


人工智慧驅動的應用程式正在不斷發展,不僅僅是執行任務的自主代理。一種涉及人機互動的新方法允許用戶提供回饋、審查結果並決定人工智慧的後續步驟。這些運行時代理程式稱為 CoAgent。
長話短說
在本教程中,您將學習如何使用 LangGraph、CopilotKit 和 Tavily 建立 Perplexity 克隆。
是時候開始建造了!
什麼是特工副駕駛?
代理副駕駛是 CopilotKit 將 LangGraph 代理引入您的應用程式的方式。
CoAgents 是 CopilotKit 建立代理體驗的方法!
簡而言之,它將透過執行多個搜尋查詢來處理使用者請求,並將搜尋狀態和結果即時傳回給客戶端。
查看 CopilotKit ⭐️
先決條件
要完全理解本教程,您需要對 React 或 Next.js 有基本的了解。
我們也會利用以下內容:
- Python - 一種流行的程式語言,用於使用 LangGraph 建立 AI 代理程式;確保您的電腦上已安裝它。
- LangGraph - 用於建立和部署人工智慧代理的框架。它還有助於定義代理要執行的控制流程和操作。
- OpenAI API 金鑰 - 使我們能夠使用 GPT 模型執行各種任務;對於本教程,請確保您有權存取 GPT-4 模型。
- Tavily AI - 一個搜尋引擎,使人工智慧代理能夠在應用程式中進行研究並存取即時知識。
- CopilotKit - 一個開源副駕駛框架,用於建立自訂 AI 聊天機器人、應用程式內 AI 代理程式和文字區域。
- Shad Cn UI - 提供應用程式內可重複使用 UI 元件的集合。
如何使用 LangGraph 和 CopilotKit 建立 AI 代理
在本節中,您將學習如何使用 LangGraph 和 CopilotKit 建立 AI 代理程式。
首先,複製 CopilotKit CoAgents 入門儲存庫。 ui 目錄包含 Next.js 應用程式的前端,agent 目錄包含應用程式的 CoAgent。
在 agent 目錄中,使用 Poetry 安裝專案相依性。
cd agent
poetry install
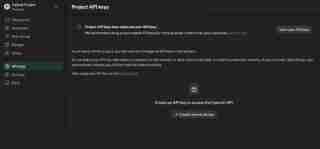
在代理資料夾中建立 .env 文件,並將 OpenAI 和 Tavily AI API 金鑰複製到該文件中:
OPENAI_API_KEY=
TAVILY_API_KEY=
將下面的程式碼片段複製到agent.py檔案中:
"""
This is the main entry point for the AI.
It defines the workflow graph and the entry point for the agent.
"""
# pylint: disable=line-too-long, unused-import
from langgraph.graph import StateGraph, END
from langgraph.checkpoint.memory import MemorySaver

from ai_researcher.state import AgentState
from ai_researcher.steps import steps_node
from ai_researcher.search import search_node
from ai_researcher.summarize import summarize_node
from ai_researcher.extract import extract_node

def route(state):
    """Route to research nodes."""
    if not state.get("steps", None):
        return END

    current_step = next((step for step in state["steps"] if step["status"] == "pending"), None)

    if not current_step:
        return "summarize_node"

    if current_step["type"] == "search":
        return "search_node"

    raise ValueError(f"Unknown step type: {current_step['type']}")

# Define a new graph
workflow = StateGraph(AgentState)
workflow.add_node("steps_node", steps_node)
workflow.add_node("search_node", search_node)
workflow.add_node("summarize_node", summarize_node)
workflow.add_node("extract_node", extract_node)
# Chatbot
workflow.set_entry_point("steps_node")

workflow.add_conditional_edges(
    "steps_node",
    route,
    ["summarize_node", "search_node", END]
)

workflow.add_edge("search_node", "extract_node")

workflow.add_conditional_edges(
    "extract_node",
    route,
    ["summarize_node", "search_node"]
)

workflow.add_edge("summarize_node", END)

memory = MemorySaver()
graph = workflow.compile(checkpointer=memory)
上面的程式碼片段定義了 LangGraph 代理程式工作流程。它從steps_node開始,搜尋結果,總結結果,提取關鍵點。
接下來建立一個 demo.py 文件,其中包含以下程式碼片段:
cd agent
poetry install
上面的程式碼建立了一個 FastAPI 端點,用於託管 LangGraph 代理並將其連接到 CopilotKit SDK。
您可以從 GitHub 儲存庫複製用於建立 CoAgent 的剩餘程式碼。在以下部分中,您將學習如何為 Perplexity 克隆建立使用者介面並使用 CopilotKit 處理搜尋請求。
使用 Next.js 建立應用程式介面
在本節中,我將引導您完成建立應用程式使用者介面的過程。
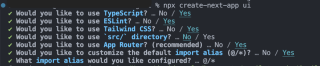
首先,透過執行以下程式碼片段來建立一個 Next.js Typescript 專案:
OPENAI_API_KEY=
TAVILY_API_KEY=
透過執行以下程式碼片段將 ShadCn UI 庫安裝到新建立的專案中:
"""
This is the main entry point for the AI.
It defines the workflow graph and the entry point for the agent.
"""
# pylint: disable=line-too-long, unused-import
from langgraph.graph import StateGraph, END
from langgraph.checkpoint.memory import MemorySaver

from ai_researcher.state import AgentState
from ai_researcher.steps import steps_node
from ai_researcher.search import search_node
from ai_researcher.summarize import summarize_node
from ai_researcher.extract import extract_node

def route(state):
    """Route to research nodes."""
    if not state.get("steps", None):
        return END

    current_step = next((step for step in state["steps"] if step["status"] == "pending"), None)

    if not current_step:
        return "summarize_node"

    if current_step["type"] == "search":
        return "search_node"

    raise ValueError(f"Unknown step type: {current_step['type']}")

# Define a new graph
workflow = StateGraph(AgentState)
workflow.add_node("steps_node", steps_node)
workflow.add_node("search_node", search_node)
workflow.add_node("summarize_node", summarize_node)
workflow.add_node("extract_node", extract_node)
# Chatbot
workflow.set_entry_point("steps_node")

workflow.add_conditional_edges(
    "steps_node",
    route,
    ["summarize_node", "search_node", END]
)

workflow.add_edge("search_node", "extract_node")

workflow.add_conditional_edges(
    "extract_node",
    route,
    ["summarize_node", "search_node"]
)

workflow.add_edge("summarize_node", END)

memory = MemorySaver()
graph = workflow.compile(checkpointer=memory)
接下來,在Next.js 專案的根目錄下建立一個components 資料夾,然後將ui 資料夾從此GitHub 儲存庫複製到該資料夾中。 Shadcn 可讓您透過命令列安裝各種元件,輕鬆地將它們新增至您的應用程式。
除了 Shadcn 元件之外,您還需要建立一些代表應用程式介面不同部分的元件。在 components 資料夾中執行以下程式碼片段,將這些元件加入 Next.js 專案:
"""Demo"""

import os
from dotenv import load_dotenv
load_dotenv()

from fastapi import FastAPI
import uvicorn
from copilotkit.integrations.fastapi import add_fastapi_endpoint
from copilotkit import CopilotKitSDK, LangGraphAgent
from ai_researcher.agent import graph

app = FastAPI()
sdk = CopilotKitSDK(
    agents=[
        LangGraphAgent(
            name="ai_researcher",
            description="Search agent.",
            graph=graph,
        )
    ],
)

add_fastapi_endpoint(app, sdk, "/copilotkit")

# add new route for health check
@app.get("/health")
def health():
    """Health check."""
    return {"status": "ok"}

def main():
    """Run the uvicorn server."""
    port = int(os.getenv("PORT", "8000"))
    uvicorn.run("ai_researcher.demo:app", host="0.0.0.0", port=port, reload=True)
將下面的程式碼片段複製到 app/page.tsx 檔案中:
# ?? Navigate into the ui folder
npx create-next-app ./
在上面的程式碼片段中,ResearchProvider 是一個自訂的 React 上下文提供程序,它共享用戶的搜尋查詢和結果,使應用程式中的所有元件都可以存取它們。 ResearchWrapper 元件包含核心應用程式元素並管理 UI。
在Next.js 專案的根目錄下建立一個lib 資料夾,其中包含research-provider.tsx 文件,並將以下程式碼複製到該文件中:
npx shadcn@latest init
狀態被聲明並保存到ResearchContext以確保它們在應用程式內的多個元件之間得到正確的管理。
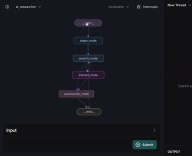
建立一個ResearchWrapper元件,如下圖所示:
cd agent
poetry install
ResearchWrapper 元件將 HomeView 元件呈現為預設視圖,並在提供搜尋查詢時顯示 ResultView。 useResearchContext 鉤子使我們能夠存取 researchQuery 狀態並相應地更新視圖。
最後,建立HomeView元件來渲染應用程式首頁介面。
OPENAI_API_KEY=
TAVILY_API_KEY=

如何將 CoAgent 連接到 Next.js 應用程式
在本部分中,您將了解如何將 CopilotKit CoAgent 連接到 Next.js 應用程序,以使用戶能夠在應用程式中執行搜尋操作。
安裝以下 CopilotKit 軟體包和 OpenAI Node.js SDK。 CopilotKit 套件允許協同代理與 React 狀態值互動並在應用程式內做出決策。
"""
This is the main entry point for the AI.
It defines the workflow graph and the entry point for the agent.
"""
# pylint: disable=line-too-long, unused-import
from langgraph.graph import StateGraph, END
from langgraph.checkpoint.memory import MemorySaver

from ai_researcher.state import AgentState
from ai_researcher.steps import steps_node
from ai_researcher.search import search_node
from ai_researcher.summarize import summarize_node
from ai_researcher.extract import extract_node

def route(state):
    """Route to research nodes."""
    if not state.get("steps", None):
        return END

    current_step = next((step for step in state["steps"] if step["status"] == "pending"), None)

    if not current_step:
        return "summarize_node"

    if current_step["type"] == "search":
        return "search_node"

    raise ValueError(f"Unknown step type: {current_step['type']}")

# Define a new graph
workflow = StateGraph(AgentState)
workflow.add_node("steps_node", steps_node)
workflow.add_node("search_node", search_node)
workflow.add_node("summarize_node", summarize_node)
workflow.add_node("extract_node", extract_node)
# Chatbot
workflow.set_entry_point("steps_node")

workflow.add_conditional_edges(
    "steps_node",
    route,
    ["summarize_node", "search_node", END]
)

workflow.add_edge("search_node", "extract_node")

workflow.add_conditional_edges(
    "extract_node",
    route,
    ["summarize_node", "search_node"]
)

workflow.add_edge("summarize_node", END)

memory = MemorySaver()
graph = workflow.compile(checkpointer=memory)
在 Next.js app 資料夾中建立 api 資料夾。在 api 資料夾中,建立一個 copilotkit 目錄,其中包含 route.ts 檔案。這將建立一個 API 端點 (/api/copilotkit),將前端應用程式連接到 CopilotKit CoAgent。
"""Demo"""

import os
from dotenv import load_dotenv
load_dotenv()

from fastapi import FastAPI
import uvicorn
from copilotkit.integrations.fastapi import add_fastapi_endpoint
from copilotkit import CopilotKitSDK, LangGraphAgent
from ai_researcher.agent import graph

app = FastAPI()
sdk = CopilotKitSDK(
    agents=[
        LangGraphAgent(
            name="ai_researcher",
            description="Search agent.",
            graph=graph,
        )
    ],
)

add_fastapi_endpoint(app, sdk, "/copilotkit")

# add new route for health check
@app.get("/health")
def health():
    """Health check."""
    return {"status": "ok"}

def main():
    """Run the uvicorn server."""
    port = int(os.getenv("PORT", "8000"))
    uvicorn.run("ai_researcher.demo:app", host="0.0.0.0", port=port, reload=True)
將下面的程式碼片段複製到 api/copilotkit/route.ts 檔案中:
# ?? Navigate into the ui folder
npx create-next-app ./
上面的程式碼片段在 /api/copilotkit API 端點設定 CopilotKit 執行時,允許 CopilotKit 透過 AI 協同代理處理使用者請求。
最後,透過使用 CopilotKit 元件包裝整個應用程式來更新 app/page.tsx,該元件為所有應用程式元件提供副駕駛上下文。
npx shadcn@latest init
CopilotKit 元件包裝了整個應用程式並接受兩個 props - runtimeUrl 和 agent。 runtimeUrl 是託管 AI 代理程式的後端 API 路由,agent 是執行操作的代理程式的名稱。
接受請求並將回應串流傳輸到前端
為了使 CopilotKit 能夠存取和處理使用者輸入,它提供了 useCoAgent 掛鉤,該掛鉤允許從應用程式內的任何位置存取代理程式的狀態。
例如,下面的程式碼片段示範如何使用 useCoAgent 鉤子。 state 變數允許存取代理程式的目前狀態,setState 用於修改狀態,run 函數使用代理程式執行指令。 start 和 stop 函數啟動和停止代理程式的執行。
cd agent
poetry install
更新 HomeView 元件以在提供搜尋查詢時執行代理程式。
OPENAI_API_KEY=
TAVILY_API_KEY=
接下來,您可以透過存取 useCoAgent 掛鉤中的狀態變數將搜尋結果串流傳輸到 ResultsView。將下面的程式碼片段複製到 ResultsView 元件中。
"""
This is the main entry point for the AI.
It defines the workflow graph and the entry point for the agent.
"""
# pylint: disable=line-too-long, unused-import
from langgraph.graph import StateGraph, END
from langgraph.checkpoint.memory import MemorySaver

from ai_researcher.state import AgentState
from ai_researcher.steps import steps_node
from ai_researcher.search import search_node
from ai_researcher.summarize import summarize_node
from ai_researcher.extract import extract_node

def route(state):
    """Route to research nodes."""
    if not state.get("steps", None):
        return END

    current_step = next((step for step in state["steps"] if step["status"] == "pending"), None)

    if not current_step:
        return "summarize_node"

    if current_step["type"] == "search":
        return "search_node"

    raise ValueError(f"Unknown step type: {current_step['type']}")

# Define a new graph
workflow = StateGraph(AgentState)
workflow.add_node("steps_node", steps_node)
workflow.add_node("search_node", search_node)
workflow.add_node("summarize_node", summarize_node)
workflow.add_node("extract_node", extract_node)
# Chatbot
workflow.set_entry_point("steps_node")

workflow.add_conditional_edges(
    "steps_node",
    route,
    ["summarize_node", "search_node", END]
)

workflow.add_edge("search_node", "extract_node")

workflow.add_conditional_edges(
    "extract_node",
    route,
    ["summarize_node", "search_node"]
)

workflow.add_edge("summarize_node", END)

memory = MemorySaver()
graph = workflow.compile(checkpointer=memory)
上面的程式碼片段從代理程式的狀態擷取搜尋結果,並使用 useCoAgent 掛鉤將它們串流到前端。搜尋結果以 Markdown 格式傳回,並傳遞到 AnswerMarkdown 元件,該元件在頁面上呈現內容。
最後,將下面的程式碼片段複製到 AnswerMarkdown 元件中。這將使用 React Markdown 庫將 Markdown 內容呈現為格式化文字。
"""Demo"""

import os
from dotenv import load_dotenv
load_dotenv()

from fastapi import FastAPI
import uvicorn
from copilotkit.integrations.fastapi import add_fastapi_endpoint
from copilotkit import CopilotKitSDK, LangGraphAgent
from ai_researcher.agent import graph

app = FastAPI()
sdk = CopilotKitSDK(
    agents=[
        LangGraphAgent(
            name="ai_researcher",
            description="Search agent.",
            graph=graph,
        )
    ],
)

add_fastapi_endpoint(app, sdk, "/copilotkit")

# add new route for health check
@app.get("/health")
def health():
    """Health check."""
    return {"status": "ok"}

def main():
    """Run the uvicorn server."""
    port = int(os.getenv("PORT", "8000"))
    uvicorn.run("ai_researcher.demo:app", host="0.0.0.0", port=port, reload=True)

恭喜!您已完成本教學的專案。您也可以在這裡觀看錄影:
完整的網路研討會錄音
把它包起來
LLM 智慧與人類智慧協同工作時最為有效,而 CopilotKit CoAgents 可讓您在短短幾分鐘內將 AI 代理、副駕駛和各種類型的助理整合到您的軟體應用程式中。
如果您需要建立 AI 產品或將 AI 代理整合到您的應用程式中,您應該考慮 CopilotKit。
本教學的原始碼可在 GitHub 上取得:
https://github.com/CopilotKit/CopilotKit/tree/main/examples/coagents-ai-researcher
感謝您的閱讀!
以上是使用 LangGraph、CopilotKit、Tavily 和 Next.js 建立 Perplexity 的克隆的詳細內容。更多資訊請關注PHP中文網其他相關文章!

 JavaScript數據類型:瀏覽器和nodejs之間是否有區別?May 14, 2025 am 12:15 AM
JavaScript核心數據類型在瀏覽器和Node.js中一致,但處理方式和額外類型有所不同。 1)全局對像在瀏覽器中為window,在Node.js中為global。 2)Node.js獨有Buffer對象,用於處理二進制數據。 3)性能和時間處理在兩者間也有差異,需根據環境調整代碼。
 JavaScript評論:使用//和 / * * / * / * /May 13, 2025 pm 03:49 PM
JavaScriptusestwotypesofcomments:single-line(//)andmulti-line(//).1)Use//forquicknotesorsingle-lineexplanations.2)Use//forlongerexplanationsorcommentingoutblocksofcode.Commentsshouldexplainthe'why',notthe'what',andbeplacedabovetherelevantcodeforclari
 Python vs. JavaScript:開發人員的比較分析May 09, 2025 am 12:22 AM
Python和JavaScript的主要區別在於類型系統和應用場景。 1.Python使用動態類型,適合科學計算和數據分析。 2.JavaScript採用弱類型,廣泛用於前端和全棧開發。兩者在異步編程和性能優化上各有優勢,選擇時應根據項目需求決定。
 Python vs. JavaScript:選擇合適的工具May 08, 2025 am 12:10 AM
選擇Python還是JavaScript取決於項目類型:1)數據科學和自動化任務選擇Python;2)前端和全棧開發選擇JavaScript。 Python因其在數據處理和自動化方面的強大庫而備受青睞,而JavaScript則因其在網頁交互和全棧開發中的優勢而不可或缺。
 Python和JavaScript:了解每個的優勢May 06, 2025 am 12:15 AM
Python和JavaScript各有優勢,選擇取決於項目需求和個人偏好。 1.Python易學,語法簡潔,適用於數據科學和後端開發,但執行速度較慢。 2.JavaScript在前端開發中無處不在,異步編程能力強,Node.js使其適用於全棧開發,但語法可能複雜且易出錯。
 JavaScript的核心:它是在C還是C上構建的?May 05, 2025 am 12:07 AM
javascriptisnotbuiltoncorc; sanInterpretedlanguagethatrunsonenginesoftenwritteninc.1)JavascriptwasdesignedAsignedAsalightWeight,drackendedlanguageforwebbrowsers.2)Enginesevolvedfromsimpleterterpretpretpretpretpreterterpretpretpretpretpretpretpretpretpretcompilerers,典型地,替代品。
 JavaScript應用程序:從前端到後端May 04, 2025 am 12:12 AM
JavaScript可用於前端和後端開發。前端通過DOM操作增強用戶體驗,後端通過Node.js處理服務器任務。 1.前端示例:改變網頁文本內容。 2.後端示例:創建Node.js服務器。
 Python vs. JavaScript:您應該學到哪種語言?May 03, 2025 am 12:10 AM
選擇Python還是JavaScript應基於職業發展、學習曲線和生態系統:1)職業發展:Python適合數據科學和後端開發,JavaScript適合前端和全棧開發。 2)學習曲線:Python語法簡潔,適合初學者;JavaScript語法靈活。 3)生態系統:Python有豐富的科學計算庫,JavaScript有強大的前端框架。


熱AI工具

Undresser.AI Undress
人工智慧驅動的應用程序,用於創建逼真的裸體照片

AI Clothes Remover
用於從照片中去除衣服的線上人工智慧工具。

Undress AI Tool
免費脫衣圖片

Clothoff.io
AI脫衣器

Video Face Swap
使用我們完全免費的人工智慧換臉工具,輕鬆在任何影片中換臉!

熱門文章
熱工具

MantisBT
Mantis是一個易於部署的基於Web的缺陷追蹤工具,用於幫助產品缺陷追蹤。它需要PHP、MySQL和一個Web伺服器。請查看我們的演示和託管服務。

EditPlus 中文破解版
體積小,語法高亮,不支援程式碼提示功能

Dreamweaver Mac版
視覺化網頁開發工具

Atom編輯器mac版下載
最受歡迎的的開源編輯器

WebStorm Mac版
好用的JavaScript開發工具

