使用下一個 JS 建立網站並使用 Vercel 進行部署。
- Mary-Kate Olsen原創
- 2024-11-15 08:02:02429瀏覽
Building and deploying a website with Next.js is easier than you might think, and the best part? It's platform-agnostic, so the steps remain the same whether using macOS, Windows, or Linux. In this guide, I'll walk you through creating a Next.js app, setting it up locally, and deploying it to Vercel with just a few simple commands.
- 1. Set Up Your Next.js Project Start by creating a new Next.js app. Open your terminal, and run the following command:
npx create-next-app@latest my-website
-- Click yes for all dependencies
This will create a new Next.js project in a folder called my-website. When prompted, click "Yes" to install all necessary dependencies.
Next, navigate to your project folder:
cd my-website
- 2. Ensure Node is Installed If you encounter any issues while setting up your project, it's likely due to an outdated version of Node.js. To fix this, you can install the latest version of Node:
nvm install node --latest-npm
Ensure you have the correct Node.js version installed by checking the Next.js installation guide for the latest version requirements.
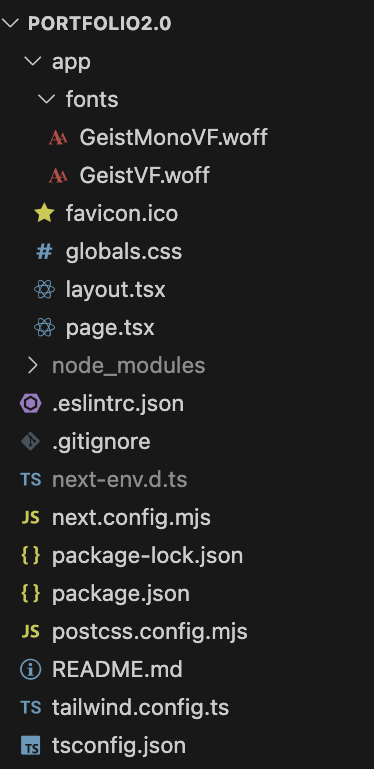
- 3. Open the Project Files Once the project is set up, open your project folder in your preferred code editor. You should see a file structure similar to the one below:

Note that the app name I've used here is portfolio2.0, but feel free to name your project whatever you like. If you want more details on these files, check out the Next.js Project Structure documentation.
- 4. Install Dependencies Next, install the necessary dependencies:
npm install
After installation, you can run your app locally to see it in action. Head to http://localhost:3000 in your browser, and you should see the Next.js default page!
 .
.
- 5.Push Code to GitHub
Now that your app is set up locally push the code to your GitHub repository. You'll need this to deploy it to Vercel.
6.Deploy to Vercel
Sign up for Vercel:
If you don't have a Vercel account, sign up at vercel.com. You can use your GitHub account for easy integration.Connect Vercel to GitHub:
Once signed in to Vercel, link your GitHub account to your Vercel dashboard.Import Your GitHub Repository:
Click "New Project" in your Vercel dashboard.
Select "Import Git Repository" and choose the repository containing your Next.js project.プロジェクトを構成します:
Vercel は、プロジェクトが Next.js でビルドされていることを自動的に検出します。
ビルド コマンドを次のビルドに設定します。
出力ディレクトリを .next に設定します (これは通常、自動構成されます)。
必要な環境変数を追加します (オプション)。プロジェクトをデプロイします:
[展開] をクリックすると、Vercel が展開プロセスを開始します。
Vercel はリポジトリのクローンを作成し、依存関係をインストールし、アプリをビルドしてデプロイします。デプロイメントが完了するまで待ちます:
Vercel はリアルタイムの導入ログを提供するので、プロセスを追跡できます。ライブサイトにアクセス:
デプロイが完了すると、your-project-name.vercel.app のようなサイトへのリンクが表示されます。それでおしまい! Next.js アプリが公開されました。

簡単な要約: Next.js プロジェクトの手順
Next.js プロジェクトを準備します:
プロジェクトが、必要なスクリプト (次の開発、次のビルド、次の開始) を含む package.json ファイルとともに GitHub リポジトリにあることを確認します。
Vercel にサインアップ:
Vercel の Web サイトにアクセスし、GitHub アカウントを使用してサインアップします。
Vercel を GitHub に接続します:
Vercel ダッシュボードで GitHub アカウントをリンクします。
GitHub リポジトリをインポートします:
Vercel ダッシュボードで、[新しいプロジェクト] をクリックし、GitHub リポジトリを選択します。
プロジェクトを構成します:
Vercel は Next.js プロジェクトを自動的に検出し、ほとんどの設定を構成します。必要に応じて設定を微調整できます。
デプロイ:
「デプロイ」をクリックして、残りの処理は Vercel に任せます。アプリのビルドとデプロイが自動的に行われます。
デプロイメントを待ちます:
導入ログをリアルタイムで監視できます。
ライブサイトを確認してください:
導入が完了すると、Vercel からサイトにアクセスするための URL が提供されます。
以上是使用下一個 JS 建立網站並使用 Vercel 進行部署。的詳細內容。更多資訊請關注PHP中文網其他相關文章!

