


該專案是一個快速範例項目,演示了應用程式在推送到主分支時自動建置、測試和部署到暫存環境的過程。
為了充分示範 CI/CD 管道,我們將使用最少的程式碼建立一個簡單的 Python 項目,然後將其整合到 GitHub Actions 中。
創建一個簡單的 Python 項目
就像我之前所說的,我們將創建一個將在管道中使用的簡單項目。我選擇在 python 中執行此操作沒有特殊原因,您可以使用您選擇的任何其他程式語言,這個專案的主要目的是演示管道。
建立專案資料夾
所以繼續建立專案資料夾並導航到該資料夾:
mkdir automated-testing
cd automated-testing
撰寫申請文件
現在我們將編寫簡單的Python應用程式。在專案資料夾中建立一個新檔案app.py。
touch app.py
將以下程式碼區塊加入檔案:
def hello():
  return "Hello, World!"

if __name__ == "__main__":
  print(hello())
這是一個非常簡單的 Python「Hello world」函數,作為可以在 CI 管道中測試的基本功能的範例。
def hello() 定義了一個名為 hello 的函數,它不帶任何參數。呼叫此函數時,它會傳回字串「Hello, World!」。
if __name__ == "__main__" 是一個標準的 Python 構造,用於確保某些程式碼僅在直接執行檔案時運行(而不是作為模組導入時)。它充當腳本的入口點。
直接執行 app.py 時(例如,透過執行 python app.py),腳本將呼叫 hello() 函數並列印結果,即「Hello, World!」。
建立需求文件。
典型的專案會有依賴項,在 python 專案中,它們通常在requirements.txt 檔案中定義。
建立新檔案requirements.txt
touch requirements.txt
將其新增至檔案:
pytest
建立單元測試
現在我們將新增一個基本測試檔test_app.py來測試app.py中的功能。將以下內容新增至文件:
from app import hello

def test_hello():
  assert hello() == "Hello, World!"
現在我們已準備好建立管道。
為 CI/CD 設定 GitHub 操作
要設定 GitHub 操作,我們需要在儲存庫中建立一個 .github/workflows 資料夾,這是我們向 GitHub 通知儲存庫中的 CI/CD 管道的方式。
建立一個新檔案:
mkdir -p .github/workflows
您可以在一個儲存庫中擁有多個管道,因此請在 .github/workflows 資料夾中建立一個檔案 proj.yml。我們將在這裡定義建置、測試和部署 Python 專案的步驟。
將以下程式碼加入您的檔案:
name: Build, Test and Deploy

# Trigger the workflow on pushes to the main branch
on:
  push:
    branches:
      - main

jobs:
  build-and-test:
    runs-on: ubuntu-latest

    steps:
    # Checkout the code from the repository
    - name: Checkout repo
      uses: actions/checkout@v4

    # Set up Python environment
    - name: Setup Python
      uses: actions/setup-python@v5
      with:
        python-version: '3.x'

    # Install dependencies
    - name: Install Dependecies
      run: |
        python -m pip install --upgrade pip
        pip install -r requirements.txt

    # Build (this project deosn't require a build but we will simulate a build by creating a file)
    - name: Build Project
      run: |
        mkdir -p build
        # Simulate build output by creating a file
        touch build/output_file.txt

    # Run tests using pytest
    - name: Run tests
      run:
        pytest

    # Upload the build output as an artifact (we created a file in the build step to simulate an artifact)
    - name: Upload build artifact
      uses: actions/upload-artifact@v4
      with:
        name: build-artifact
        path: build/

  deploy:
    runs-on: ubuntu-latest
    needs: build-and-test
    if: success()

    steps:
    # Download the artifact from the build stage
    - name: Download build artifact
      uses: actions/download-artifact@v4
      with:
        name: build-artifact
        path: build/

    - name: Simulate Deployment
      run: |
        echo "Deploying to staging..."
        ls build/
Breakdown of the CI/CD Pipeline Steps
- Trigger on Push to main: The pipeline is triggered whenever there is a push to the main branch.
- Checkout Code: This step uses GitHub’s checkout action to pull our code from the repository.
- Set Up Python: The pipeline sets up a Python environment on the CI runner (GitHub's virtual machine), ensuring that the correct Python version is used.
- Install Dependencies: It installs the required dependencies for our Python project (pytest in this case). This dependency was just added as an example of when a project has dependencies as this particular sample python application does not require any.
- Build: This stage was also just added for demonstration purposes, supposing this was a JavaScript/Node.js project this is where we would run the npm run build command and this will create an artifact we can upload and use in the deploy stage. Since this is a python project and it doesn't really require a build, we will create a file and folder in this stage. The file will serve as our artifact for the deploy stage.
- Run Tests: It runs the tests using pytest to validate the code.
- Upload Build Artifact: After running the tests, the build-and-test stage creates and saves a build artifact (in this case, a simulated output_file.txt in the build folder from the build step). The action upload-artifact is used to store this artifact. You can replace this with whatever actual build output your project creates.
- Deploy Stage: Our application will only be deployed if the test was successful which is why I have added the conditionals needs and if. Using “needs” we can require that the deploy job won’t even run unless the test job is successful. The download-artifact action retrieves the build artifact and the last step "Simulate Deployment" simulates deployment by printing a message and lists the artifact. If this was a live project we would have the actual deployment commands to deploy to a real staging environment here. You can replace the echo and ls commands with actual deployment commands (e.g., deploying to a cloud platform). This approach ensures that the output from the build-and-test stage is properly passed to the deploy stage, simulating how a real deployment would work with build artifacts.
Push to GitHub
If you haven't already, you need to initialize a git repository using the commands below:
git init
git add .
git commit -m "Create project as well as CI/CD pipeline"
Now we push to GitHub. Create a GitHub repository and push your code using the below commands:
git remote add origin <your-repo-url>
git push -u origin main
</your-repo-url>
Verify the Pipeline
After pushing the code, you can visit the Actions tab in your GitHub repository. You should see the pipeline triggered, running the steps defined in your proj.yml file.
If everything is set up correctly, the pipeline will build, test, and simulate deployment. You can changes things around in your project and make new pushes to see the the pipeline works, create errors intentional so you can see how the pipeline works when the tests fail.
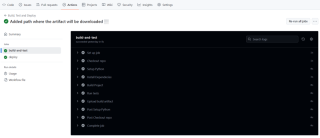
On a successful run this is how your Actions tab should look.
And that's it, this setup provides a working example of a CI/CD pipeline for a very basic Python project. If you found this helpful, please share with your connection and if you have any questions, do not hesitate to drop the question in the comments.
以上是使用 GitHub Actions 自動化建置、測試和部署流程的詳細內容。更多資訊請關注PHP中文網其他相關文章!

 您如何將元素附加到Python列表中?May 04, 2025 am 12:17 AM
toAppendElementStoApythonList,usetheappend()方法forsingleements,Extend()formultiplelements,andinsert()forspecificpositions.1)useeAppend()foraddingoneOnelementAttheend.2)useextendTheEnd.2)useextendexendExendEnd(
 您如何創建Python列表?舉一個例子。May 04, 2025 am 12:16 AM
TocreateaPythonlist,usesquarebrackets[]andseparateitemswithcommas.1)Listsaredynamicandcanholdmixeddatatypes.2)Useappend(),remove(),andslicingformanipulation.3)Listcomprehensionsareefficientforcreatinglists.4)Becautiouswithlistreferences;usecopy()orsl
 討論有效存儲和數值數據的處理至關重要的實際用例。May 04, 2025 am 12:11 AM
金融、科研、医疗和AI等领域中,高效存储和处理数值数据至关重要。1)在金融中,使用内存映射文件和NumPy库可显著提升数据处理速度。2)科研领域,HDF5文件优化数据存储和检索。3)医疗中,数据库优化技术如索引和分区提高数据查询性能。4)AI中,数据分片和分布式训练加速模型训练。通过选择适当的工具和技术,并权衡存储与处理速度之间的trade-off,可以显著提升系统性能和可扩展性。
 您如何創建Python數組?舉一個例子。May 04, 2025 am 12:10 AM
pythonarraysarecreatedusiseThearrayModule,notbuilt-Inlikelists.1)importThearrayModule.2)指定tefifythetypecode,例如,'i'forineizewithvalues.arreaysofferbettermemoremorefferbettermemoryfforhomogeNogeNogeNogeNogeNogeNogeNATATABUTESFELLESSFRESSIFERSTEMIFICETISTHANANLISTS。
 使用Shebang系列指定Python解釋器有哪些替代方法?May 04, 2025 am 12:07 AM
除了shebang線,還有多種方法可以指定Python解釋器:1.直接使用命令行中的python命令;2.使用批處理文件或shell腳本;3.使用構建工具如Make或CMake;4.使用任務運行器如Invoke。每個方法都有其優缺點,選擇適合項目需求的方法很重要。
 列表和陣列之間的選擇如何影響涉及大型數據集的Python應用程序的整體性能?May 03, 2025 am 12:11 AM
ForhandlinglargedatasetsinPython,useNumPyarraysforbetterperformance.1)NumPyarraysarememory-efficientandfasterfornumericaloperations.2)Avoidunnecessarytypeconversions.3)Leveragevectorizationforreducedtimecomplexity.4)Managememoryusagewithefficientdata
 說明如何將內存分配給Python中的列表與數組。May 03, 2025 am 12:10 AM
Inpython,ListSusedynamicMemoryAllocationWithOver-Asalose,而alenumpyArraySallaySallocateFixedMemory.1)listssallocatemoremoremoremorythanneededinentientary上,respizeTized.2)numpyarsallaysallaysallocateAllocateAllocateAlcocateExactMemoryForements,OfferingPrediCtableSageButlessemageButlesseflextlessibility。
 您如何在Python數組中指定元素的數據類型?May 03, 2025 am 12:06 AM
Inpython,YouCansspecthedatatAtatatPeyFelemereModeRernSpant.1)Usenpynernrump.1)Usenpynyp.dloatp.dloatp.ploatm64,formor professisconsiscontrolatatypes。


熱AI工具

Undresser.AI Undress
人工智慧驅動的應用程序,用於創建逼真的裸體照片

AI Clothes Remover
用於從照片中去除衣服的線上人工智慧工具。

Undress AI Tool
免費脫衣圖片

Clothoff.io
AI脫衣器

Video Face Swap
使用我們完全免費的人工智慧換臉工具,輕鬆在任何影片中換臉!

熱門文章
熱工具

EditPlus 中文破解版
體積小,語法高亮,不支援程式碼提示功能

Dreamweaver CS6
視覺化網頁開發工具

SublimeText3漢化版
中文版,非常好用

記事本++7.3.1
好用且免費的程式碼編輯器

SublimeText3 Mac版
神級程式碼編輯軟體(SublimeText3)

