在 HTML 中拖放
- WBOYWBOYWBOYWBOYWBOYWBOYWBOYWBOYWBOYWBOYWBOYWBOYWB原創
- 2024-09-04 16:38:261422瀏覽
以下文章提供了 HTML 中拖放的概述。拖放是最新的功能,因其方便的功能模式而在網頁中手動提供輸入而聞名。拖放方法可以描述為使用者從來源欄位的項目清單中選擇特定資料/選項,將其拖曳到目標欄位中的過程。它是使用文檔物件模型以及來自 HTML 網頁的多個滑鼠事件來實現的。此功能中使用的各種事件有:drag、dragstart、dragleave、dragenter、dragover、drop、dragend 和drag exit。
拖放事件
最新的拖放(dnd)功能中包含多個事件;下面我們一一看看:
| Sr. No | Events | Details Description |
| 1 | Drag | To drag entity(element or text) when the mouse is moved with the element to be dragged. |
| 2 | Dragstart | The very first step in drag and drop is dragstart. It gets executed when the user is going to start with dragging the object to the required location. |
| 3 | Dragenter | Dragenter event is used when the mouse is getting hover on the target element. |
| 4 | Dragleave | This event is used when the user releases a mouse from an element. |
| 5 | Dragover | This event occurs when a mouse is used to over an element. |
| 6 | Drop | This event is used at the end of the drag and drop process for drop element operation. |
| 7 | Dragend | This is one of the most important event in this process for releasing the mouse button from the element to complete the drag procedure. |
| 8 | Dragexit | This event status that the element is no longer in the drag process of urgent target selection of element. |
讓我們來看看一些將要進行拖放操作的資料屬性:
- dataTransfer.dropEffect [ = value ]: 此屬性用於顯示目前正在進行哪個操作。可以將其設定為替換已選擇的操作。其中包含的值例如副本、連結、無或移動。
- dataTransfer.effectAllowed [ = value ]: 任何允許的操作都會透過該屬性傳回。還可以設定更改已選擇的操作。
- dataTransfer.files:此資料屬性用於取得要拖曳的檔案的fileList。
- dataTransfer.addElement(element): 用於將已經存在的元素插入到可用於渲染拖曳回饋的其他元素清單中。
- dataTransfer.setDragImage(element, x, y): 此屬性與上面的有點相同,用於更新拖曳回饋並幫助更改已存在的回饋
- dataTransfer.clearData ( [ format ] ): 它幫助使用者從已經定義的格式中刪除資料。如果使用者省略參數,IT 將刪除所有資料。
- dataTransfer.setData(format, data): 這是用來新增指定資料的熱門屬性之一。
- data = dataTransfer.getData(format): 拖曳操作中此屬性用於擷取指定資料。如果沒有與之相同的數據,則傳回空字串。
HTML 中拖放的語法
以下是定義拖放語法的幾個步驟:
選擇要拖曳的物件:為其設定屬性 true。
<element draggable="true">
開始拖曳物件:
function dragStart(ev){}
放下物件:
function dragDrop(ev){}
HTML 中的拖放範例
以下範例將顯示拖放操作在 HTML 中的具體執行方式。
範例#1
代碼:
<html>
<head>
<title>Drag and Drop Demo</title>
<script>
function allowDrop(ev) {
ev.preventDefault();
}
function dragStart(ev) {
ev.dataTransfer.setData("text", ev.target.id);
}
function dragDrop(ev) {
ev.preventDefault();
var data = ev.dataTransfer.getData("text");
ev.target.appendChild(document.getElementById(data));
}
</script>
<style>
#box {
margin: auto;
width: 30%;
width: 21%;
height:150px;
border: 2px solid blue;
padding: 2px;
}
#square1, #square2, #square3 {
float: left;
margin: 5px;
padding: 10px;
}
#square1 {
width: 30px;
height: 30px;
background-color: #BEA7CC;
}
#square2 {
width: 60px;
height: 60px;
background-color: #B5D5F5;
}
#square3 {
width: 90px;
height: 90px;
background-color:#F5B5C5 ;
}
h2 {
font-size:20px;
font-weight:bold;
text-align:center;
}
</style>
</head>
<body>
<h2>HTML DRAG AND DROP DEMO</h2>
<div id = "box">
<div id="square1" draggable="true"ondragstart="dragStart(event)"></div>
<div id="square2" draggable="true"ondragstart="dragStart(event)"></div>
<div id="square3" ondrop="dragDrop(event)" ondragover="allowDrop(event)"></div>
</div>
</body>
</html>
輸出:
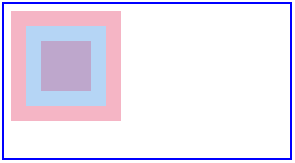
拖放之前,選項輸出將如下所示:

執行拖放操作後,輸出如下:

範例#2
這裡我們將看到另一個範例,其中我們將影像從一個位置移動到另一個指定位置,如下程式碼所示。
代碼:
<!DOCTYPE HTML>
<html>
<head>
<script>
function allowDrop(ev) {
ev.preventDefault();
}
function dragStart(ev) {
ev.dataTransfer.setData("text", ev.target.id);
}
function dragDrop(ev) {
ev.preventDefault();
var data = ev.dataTransfer.getData("text");
ev.target.appendChild(document.getElementById(data));
}
</script>
<style>
.divfirst {
width: 250px;
height: 150px;
padding: 10px;
border: 1px solid black;
background-color: #F5F5F5;
}
p {
font-size:20px;
font-weight:bold;
}
</style>
</head>
<body>
<p>Image Drag and Drop Demo</p>
<div class="divfirst" ondrop="dragDrop(event)" ondragover="allowDrop(event)">
<img id="drag1"
src="Jerry.jpeg" draggable="true"
ondragstart="dragStart(event)" width="250" height="150"></div>
<br>
<div     class= "divfirst"ondrop="dragDrop(event)"
ondragover="allowDrop(event)"></div>
</body>
</html>
輸出:
拖放操作之前,輸出為:

拖曳操作完成後,如下圖所示:

範例 #3
在此範例中,我們將了解如何將檔案拖曳到指定位置:
代碼:
<body>
<div id="filedemo" style="min-height: 150px; border: 1px solid black;"
ondragenter="document.getElementById('output').textContent = ''; event.stopPropagation(); event.preventDefault();"
ondragover="event.stopPropagation(); event.preventDefault();"
ondrop="event.stopPropagation(); event.preventDefault();
dodrop(event);">
DROP FILES HERE...
</div>
<script>
function dodrop(event)
{
var dt = event.dataTransfer;
var files = dt.files;
for (var i = 0; i < files.length; i++) {
output(" File " + i + ":\n(" + (typeof files[i]) + ") : <" + files[i] + " > " +
files[i].name + " " );
}
}
function output(text)
{
document.getElementById("filedemo").textContent += text;
}
</script>
</body>
輸出:

結論
HTML 拖放是最重要的使用者介面實體之一,可用於複製、刪除或記錄等不同目的。它適用於不同的事件和屬性,如上所述。當您拾取某個物件並將其放在指定位置時,它會執行該操作。
以上是在 HTML 中拖放的詳細內容。更多資訊請關注PHP中文網其他相關文章!
陳述:
本文內容由網友自願投稿,版權歸原作者所有。本站不承擔相應的法律責任。如發現涉嫌抄襲或侵權的內容,請聯絡admin@php.cn
上一篇:HTML 伺服器傳送的事件下一篇:HTML 伺服器傳送的事件

