
掌握 React Native 和 MERN Stack 中的 SOLID 原則

- WBOYWBOYWBOYWBOYWBOYWBOYWBOYWBOYWBOYWBOYWBOYWBOYWB原創
- 2024-09-03 15:23:01980瀏覽
Robert C. Martin(Bob 叔叔)提出的 SOLID 原則構成了良好軟體設計的基礎。這些原則指導開發人員創建可維護、可擴展且易於理解的系統。在本部落格中,我們將深入探討每個 SOLID 原則,並探索如何將它們應用到 React Native 和 MERN 堆疊(MongoDB、Express.js、React、Node.js)的上下文中。
1.單一職責原則(SRP)
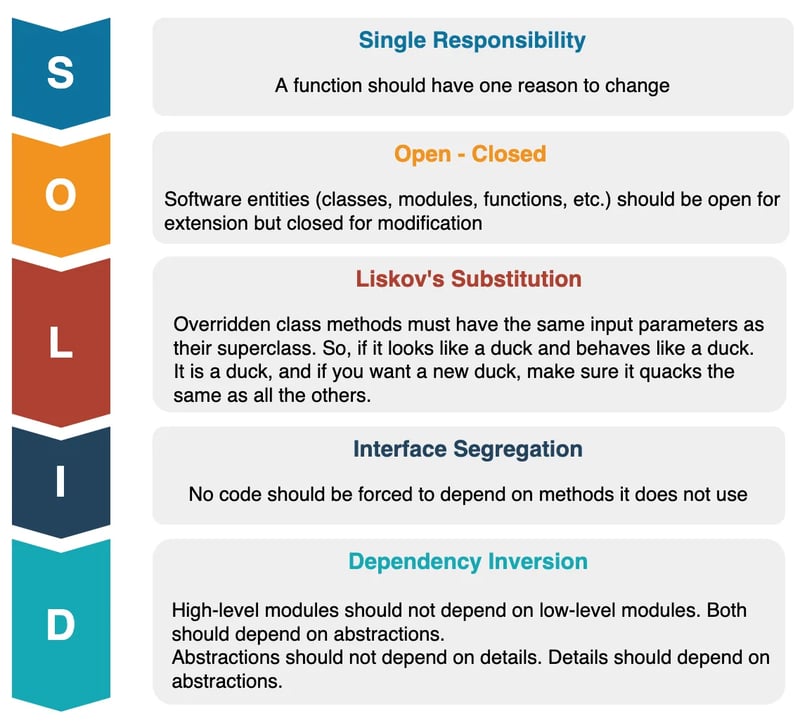
定義:一個類別應該只有一個改變的理由,這意味著它應該只有一項工作或職責。
說明:
單一職責原則 (SRP) 確保類別或模組專注於軟體功能的一個面向。當一個類別承擔多個職責時,與一個職責相關的變更可能會無意中影響另一個職責,從而導致錯誤和更高的維護成本。
React Native 範例:
考慮 React Native 應用程式中的 UserProfile 元件。最初,該元件可能負責呈現使用者介面並處理 API 請求以更新使用者資料。這違反了 SRP,因為該元件正在執行兩件不同的事情:管理 UI 和業務邏輯。
違規:
const UserProfile = ({ userId }) => {
  const [userData, setUserData] = useState(null);

  useEffect(() => {
    fetch(`/api/users/${userId}`)
      .then(response => response.json())
      .then(data => setUserData(data));
  }, [userId]);

  return (
    <View>
      <Text>{userData?.name}</Text>
      <Text>{userData?.email}</Text>
    </View>
  );
};
在此範例中,UserProfile 元件負責取得資料和渲染 UI。如果您需要更改資料的取得方式(例如,透過使用不同的 API 端點或引入快取),則必須修改元件,這可能會導致 UI 中出現意想不到的副作用。
重構:
為了遵守 SRP,請將資料擷取邏輯與 UI 渲染邏輯分開。
// Custom hook for fetching user data
const useUserData = (userId) => {
  const [userData, setUserData] = useState(null);

  useEffect(() => {
    const fetchUserData = async () => {
      const response = await fetch(`/api/users/${userId}`);
      const data = await response.json();
      setUserData(data);
    };
    fetchUserData();
  }, [userId]);

  return userData;
};

// UserProfile component focuses only on rendering the UI
const UserProfile = ({ userId }) => {
  const userData = useUserData(userId);

  return (
    <View>
      <Text>{userData?.name}</Text>
      <Text>{userData?.email}</Text>
    </View>
  );
};
在此重構中,useUserData 掛鉤處理資料獲取,允許 UserProfile 元件僅專注於渲染 UI。現在,如果您需要修改資料擷取邏輯,您可以在不影響 UI 程式碼的情況下進行操作。
Node.js 範例:
想像一下在 Node.js 應用程式中處理資料庫查詢和業務邏輯的 UserController。這違反了 SRP,因為控制者有多重職責。
違規:
class UserController {
  async getUserProfile(req, res) {
    const user = await db.query('SELECT * FROM users WHERE id = ?', [req.params.id]);
    res.json(user);
  }

  async updateUserProfile(req, res) {
    const result = await db.query('UPDATE users SET name = ? WHERE id = ?', [req.body.name, req.params.id]);
    res.json(result);
  }
}
這裡,UserController 負責與資料庫互動和處理 HTTP 請求。資料庫互動邏輯的任何變更都需要對控制器進行修改,從而增加錯誤的風險。
重構:
將資料庫互動邏輯分離到儲存庫類別中,讓控制器專注於處理 HTTP 請求。
// UserRepository class handles data access logic
class UserRepository {
  async getUserById(id) {
    return db.query('SELECT * FROM users WHERE id = ?', [id]);
  }

  async updateUser(id, name) {
    return db.query('UPDATE users SET name = ? WHERE id = ?', [name, id]);
  }
}

// UserController focuses on business logic and HTTP request handling
class UserController {
  constructor(userRepository) {
    this.userRepository = userRepository;
  }

  async getUserProfile(req, res) {
    const user = await this.userRepository.getUserById(req.params.id);
    res.json(user);
  }

  async updateUserProfile(req, res) {
    const result = await this.userRepository.updateUser(req.params.id, req.body.name);
    res.json(result);
  }
}
現在,UserController 專注於處理 HTTP 請求和業務邏輯,而 UserRepository 負責資料庫互動。這種分離使得程式碼更容易維護和擴展。
2. 開閉原理(OCP)
定義:軟體實體應該對擴充開放,但對修改關閉。
說明:
開放/封閉原則 (OCP) 強調類別、模組和函數應該能夠輕鬆擴展,而無需修改其現有程式碼。這促進了抽象和介面的使用,允許開發人員引入新功能,同時將在現有程式碼中引入錯誤的風險降至最低。
React Native 範例:
想像一個原本有固定樣式的按鈕組件。隨著應用程式的成長,您需要為不同的用例擴展不同樣式的按鈕。如果每次需要新樣式時都不斷修改現有組件,最終將違反 OCP。
違規:
const Button = ({ onPress, type, children }) => {
  let style = {};

  if (type === 'primary') {
    style = { backgroundColor: 'blue', color: 'white' };
  } else if (type === 'secondary') {
    style = { backgroundColor: 'gray', color: 'black' };
  }

  return (
    <TouchableOpacity onPress={onPress} style={style}>
      <Text>{children}</Text>
    </TouchableOpacity>
  );
};
在此範例中,每次新增按鈕類型時都必須修改 Button 元件。這是不可擴展的,並且會增加錯誤的風險。
重構:
透過允許樣式作為 props 傳入,重構 Button 元件以開放擴展。
const Button = ({ onPress, style, children }) => {
  const defaultStyle = {
    padding: 10,
    borderRadius: 5,
  };

  return (
    <TouchableOpacity onPress={onPress} style={[defaultStyle, style]}>
      <Text>{children}</Text>
    </TouchableOpacity>
  );
};

// Now, you can extend the button's style without modifying the component itself
<Button style={{ backgroundColor: 'blue', color: 'white' }} onPress={handlePress}>
  Primary Button
</Button>

<Button style={{ backgroundColor: 'gray', color: 'black' }} onPress={handlePress}>
  Secondary Button
</Button>
透過重構,Button 元件對修改關閉,對擴充開放,允許在不改變元件內部邏輯的情況下新增新的按鈕樣式。
Node.js 範例:
考慮 Node.js 應用程式中支援多種支付方式的支付處理系統。最初,您可能會想在一個類別中處理每種付款方式。
違規:
class PaymentProcessor {
  processPayment(amount, method) {
    if (method === 'paypal') {
      console.log(`Paid ${amount} using PayPal`);
    } else if (method === 'stripe') {
      console.log(`Paid ${amount} using Stripe`);
    } else if (method === 'creditcard') {
      console.log(`Paid ${amount} using Credit Card`);
    }
  }
}
在此範例中,新增新的付款方式需要修改 PaymentProcessor 類,違反了 OCP。
Refactor:
Introduce a strategy pattern to encapsulate each payment method in its own class, making the PaymentProcessor open for extension but closed for modification.
class PaymentProcessor {
  constructor(paymentMethod) {
    this.paymentMethod = paymentMethod;
  }

  processPayment(amount) {
    return this.paymentMethod.pay(amount);
  }
}

// Payment methods encapsulated in their own classes
class PayPalPayment {
  pay(amount) {
    console.log(`Paid ${amount} using PayPal`);
  }
}

class StripePayment {
  pay(amount) {
    console.log(`Paid ${amount} using Stripe`);
  }
}

class CreditCardPayment {
  pay(amount) {
    console.log(`Paid ${amount} using Credit Card`);
  }
}

// Usage
const paypalProcessor = new PaymentProcessor(new PayPalPayment());
paypalProcessor.processPayment(100);

const stripeProcessor = new PaymentProcessor(new StripePayment());
stripeProcessor.processPayment(200);
Now, to add a new payment method, you simply create a new class without modifying the existing PaymentProcessor. This adheres to OCP and makes the system more scalable and maintainable.
3. Liskov Substitution Principle (LSP)
Definition: Objects of a superclass should be replaceable with objects of a subclass without affecting the correctness of the program.
Explanation:
The Liskov Substitution Principle (LSP) ensures that subclasses can stand in for their parent classes without causing errors or altering the
expected behavior. This principle helps maintain the integrity of a system's design and ensures that inheritance is used appropriately.
React Native Example:
Imagine a base Shape class with a method draw. You might have several subclasses like Circle and Square, each with its own implementation of the draw method. These subclasses should be able to replace Shape without causing issues.
Correct Implementation:
class Shape {
  draw() {
    // Default drawing logic
  }
}

class Circle extends Shape {
  draw() {
    super.draw();
    // Circle-specific drawing logic
  }
}

class Square extends Shape {
  draw() {
    super.draw();
    // Square-specific drawing logic
  }
}

function renderShape(shape) {
  shape.draw();
}

// Both Circle and Square can replace Shape without issues
const circle = new Circle();
renderShape(circle);

const square = new Square();
renderShape(square);
In this example, both Circle and Square classes can replace the Shape class without causing any problems, adhering to LSP.
Node.js Example:
Consider a base Bird class with a method fly. You might have a subclass Sparrow that extends Bird and provides its own implementation of fly. However, if you introduce a subclass like Penguin that cannot fly, it violates LSP.
Violation:
class Bird {
  fly() {
    console.log('Flying');
  }
}

class Sparrow extends Bird {
  fly() {
    super.fly();
    console.log('Sparrow flying');
  }
}

class Penguin extends Bird {
  fly() {
    throw new Error("Penguins can't fly");
  }
}
In this example, substituting a Penguin for a Bird will cause errors, violating LSP.
Refactor:
Instead of extending Bird, you can create a different hierarchy or use composition to avoid violating LSP.
class Bird {
  layEggs() {
    console.log('Laying eggs');
  }
}

class FlyingBird extends Bird {
  fly() {
    console.log('Flying');
  }
}

class Penguin extends Bird {
  swim() {
    console.log('Swimming');
  }
}

// Now, Penguin does not extend Bird in a way that violates LSP
In this refactor, Penguin no longer extends Bird in a way that requires it to support flying, adhering to LSP.
4. Interface Segregation Principle (ISP)
Definition: A client should not be forced to implement interfaces it doesn't use.
Explanation:
The Interface Segregation Principle (ISP) suggests that instead of having large, monolithic interfaces, it's better to have smaller, more specific interfaces. This way, classes implementing the interfaces are only required to implement the methods they actually use, making the system more flexible and easier to maintain.
React Native Example:
Suppose you have a UserActions interface that includes methods for both regular users and admins. This forces regular users to implement admin-specific methods, which they don't need, violating ISP.
Violation:
interface UserActions {
  viewProfile(): void;
  deleteUser(): void;
}

class RegularUser implements UserActions {
  viewProfile() {
    console.log('Viewing profile');
  }

  deleteUser() {
    throw new Error("Regular users can't delete users");
  }
}
In this example, the RegularUser class is forced to implement a method (deleteUser) it doesn't need, violating ISP.
Refactor:
Split the UserActions interface into more specific interfaces for regular users and admins.
interface RegularUserActions {
  viewProfile(): void;
}

interface AdminUserActions extends RegularUserActions {
  deleteUser(): void;
}

class RegularUser implements RegularUserActions {
  viewProfile() {
    console.log('Viewing profile');
  }
}

class AdminUser implements AdminUserActions {
  viewProfile() {
    console.log('Viewing profile');
  }

  deleteUser() {
    console.log('User deleted');
  }
}
Now, RegularUser only implements the methods it needs, adhering to ISP. Admin users implement the AdminUserActions interface, which extends RegularUserActions, ensuring that they have access to both sets of methods.
Node.js Example:
Consider a logger interface that forces implementing methods for various log levels, even if they are not required.
Violation:
class Logger {
  logError(message) {
    console.error(message);
  }

  logInfo(message) {
    console.log(message);
  }

  logDebug(message) {
    console.debug(message);
  }
}

class ErrorLogger extends Logger {
  logError(message) {
    console.error(message);
  }

  logInfo(message) {
    // Not needed, but must be implemented
  }

  logDebug(message) {
    // Not needed, but must be implemented
  }
}
In this example, ErrorLogger is forced to implement methods (logInfo, logDebug) it doesn't need, violating ISP.
Refactor:
Create smaller, more specific interfaces to allow classes to implement only what they need.
class ErrorLogger {
  logError(message) {
    console.error(message);
  }
}

class InfoLogger {
  logInfo(message) {
    console.log(message);
  }
}

class DebugLogger {
  logDebug(message) {
    console.debug(message);
  }
}
Now, classes can implement only the logging methods they need, adhering to ISP and making the system more modular.
5. Dependency Inversion Principle (DIP)
Definition: High-level modules should not depend on low-level modules. Both should depend on abstractions.
Explanation:
The Dependency Inversion Principle (DIP) emphasizes that high-level modules (business logic) should not be directly dependent on low-level modules (e.g., database access, external services). Instead, both should depend on abstractions, such as interfaces. This makes the system more flexible and easier to modify or extend.
React Native Example:
In a React Native application, you might have a UserProfile component that directly fetches data from an API service. This creates a tight coupling between the component and the specific API implementation, violating DIP.
Violation:
const UserProfile = ({ userId }) => {
  const [userData, setUserData] = useState(null);

  useEffect(() => {
    fetch(`/api/users/${userId}`)
      .then(response => response.json())
      .then(data => setUserData(data));
  }, [userId]);

  return (
    <View>
      <Text>{userData?.name}</Text>
      <Text>{userData?.email}</Text>
    </View>
  );
};
In this example, the UserProfile component is tightly coupled with a specific API implementation. If the API changes, the component must be modified, violating DIP.
Refactor:
Introduce an abstraction layer (such as a service) that handles data fetching. The UserProfile component will depend on this abstraction, not the concrete implementation.
// Define an abstraction (interface)
const useUserData = (userId, apiService) => {
  const [userData, setUserData] = useState(null);

  useEffect(() => {
    apiService.getUserById(userId).then(setUserData);
  }, [userId]);

  return userData;
};

// UserProfile depends on an abstraction, not a specific API implementation
const UserProfile = ({ userId, apiService }) => {
  const userData = useUserData(userId, apiService);

  return (
    <View>
      <Text>{userData?.name}</Text>
      <Text>{userData?.email}</Text>
    </View>
  );
};
Now, UserProfile can work with any service that conforms to the apiService interface, adhering to DIP and making the code more flexible.
Node.js Example:
In a Node.js application, you might have a service that directly uses a specific database implementation. This creates a tight coupling between the service and the database, violating DIP.
Violation:
class UserService {
  getUserById(id) {
    return db.query('SELECT * FROM users WHERE id = ?', [id]);
  }
}
In this example, UserService is tightly coupled with the specific database implementation (db.query). If you want to switch databases, you must modify UserService, violating DIP.
Refactor:
Introduce an abstraction (interface) for database access, and have UserService depend on this abstraction instead of the concrete implementation.
// Define an abstraction (interface)
class UserRepository {
  constructor(database) {
    this.database = database;
  }

  getUserById(id) {
    return this.database.findById(id);
  }
}

// Now, UserService depends on an abstraction, not a specific database implementation
class UserService {
  constructor(userRepository) {
    this.userRepository = userRepository;
  }

  async getUserById(id) {
    return this.userRepository.getUserById(id);
  }
}

// You can easily switch database implementations without modifying UserService
const mongoDatabase = new MongoDatabase();
const userRepository = new UserRepository(mongoDatabase);
const userService = new UserService(userRepository);
By depending on an abstraction (UserRepository), UserService is no longer tied to a specific database implementation. This adheres to DIP, making the system more flexible and easier to maintain.
Conclusion
The SOLID principles are powerful guidelines that help developers create more maintainable, scalable, and robust software systems. By applying these principles in your React
Native and MERN stack projects, you can write cleaner code that's easier to understand, extend, and modify.
Understanding and implementing SOLID principles might require a bit of effort initially, but the long-term benefits—such as reduced technical debt, easier code maintenance, and more flexible systems—are well worth it. Start applying these principles in your projects today, and you'll soon see the difference they can make!
以上是掌握 React Native 和 MERN Stack 中的 SOLID 原則的詳細內容。更多資訊請關注PHP中文網其他相關文章!