
如何將自訂字體新增至 Tailwind - 對於網頁和本機下載的字體

- 王林原創
- 2024-08-19 04:33:02874瀏覽
建立 Web 應用程式時,包含您喜歡的字體就像錦上添花。字體增強文字效果,使網站更具吸引力,並提供更好的使用者體驗。設計師和開發人員對某些字體又愛又恨,使用預設字體可能會限制他們的創造力。添加自訂字體使開發人員可以自由地將外部字體添加到他們的應用程式中。
先決條件
在本教學中,我強烈建議您具備 Tailwind CSS 的基礎知識。
我假設讀者熟悉 Tailwind CSS 以及如何將 Tailwind 整合到應用程式中。如果您是 Tailwind 新手,可以查看官方文件以取得如何安裝的說明。
什麼是自訂字體?
自訂字體是預設無法使用的字體。您的系統中不存在自訂字體,並且在需要時無法隨時使用。它們包括您購買、在線獲取、自己創建的字體或您公司使用的特殊品牌字體。自訂字體的一個流行範例是 Google 字體。
將自訂字體新增至您的專案中
當您在專案上安裝 Tailwind 時,它會新增一個名為 tailwind.config 的檔案。在 tailwind.config 檔案中,我們新增自訂字體、顏色、網格佈局範本、字體大小等。若要新增自訂字體,請將自訂屬性放在擴充物件之間。請參閱下面的 tailwind.config 檔案的外觀:
/* tailwind.config file */

/** @type {import('tailwindcss').Config} */
module.exports = {
  content: ["./src/**/*.{html,js}"],
  theme: {
    extend: { },
    },
  },
  plugins: [],
};
要新增自訂字體,我將使用 Google Fonts。前往Google字體網站,點擊“選擇樣式”,然後選擇您喜歡的字體。在本教程中,我將使用這個 Rubik's 字體。請參閱下面的 google-font 網站的圖示,以帶圓圈的數字作為指導:

要將 Google 連結附加到您的 HTML 文件,請執行以下步驟:
從 Google 複製連結。
前往index.html 檔案。
找到 head 標籤並將 Google Fonts 的連結貼到裡面。
<!-- index.html file -->

<!DOCTYPE html>
<html lang="en">
  <!-- the heade tag -->
  <head>
    <meta charset="utf-8" />
    <link rel="icon" href="%PUBLIC_URL%/favicon.ico" />
    <meta name="viewport" content="width=device-width, initial-scale=1"/>
    <meta name="theme-color" content="#000000" />
    <meta name="description" content="Web site created using create-
    react-app" />
    <!-- google link -->
    <link rel="preconnect" href="https://fonts.googleapis.com">
    <link rel="preconnect" href="https://fonts.gstatic.com" crossorigin>
    <link href="https://fonts.googleapis.com/css2?    family=Abril+Fatface&family=Mulish:wght@200;300;400;500;600;700;800;900;1    000&family=Rubik:wght@400;500&display=swap" rel="stylesheet">
    <link rel="apple-touch-icon" href="%PUBLIC_URL%/logo192.png" />
      <link rel="manifest" href="%PUBLIC_URL%/manifest.json" />
    <title>React App</title>
  </head>
  <body>
    <noscript>You need to enable JavaScript to run this app.</noscript>
    <div id="root"></div>
  </body>
</html>
使用自訂字體
在index.html檔案中貼上Rubik字體後,您的專案中應該可以使用Rubik字體,但您還不能使用它。
使用方法:
前往 tailwind.config 檔案。
在擴充物件中加入 fontFamily。
在字體系列中,我將為字體命名,在本例中,名稱為 rub。它可以有任何名稱。打開括號,加入字體名稱(“Rubik”)和備用字體。
/* tailwind.config file */

/** @type {import('tailwindcss').Config} */
module.exports = {
  content: ["./src/**/*.{html,js}"],
  theme: {
    extend: {
      fontFamily: {
        'rub': ["Rubik", "sans-serif"],
      },
    },
  },
  plugins: [],
};
Tailwind 可以辨識 Rubik 的字體,但我還沒使用它。前往要使用該字體的檔案或元件,並將 Rubik 字體新增至其 class=''/className='' 屬性中。若要將自訂字體套用到您的項目,請使用 rub,而不是 Rubik。請參閱下面的範例:
// the file/component

import React from 'react'

function CustomFonts() {
  return (
    <div className='flex justify-center'>
        <div>
            <!-- without custom font -->
            <h1>Default Font</h1>
            <p>Hello My name is Emeka and I enjoy creating things that
            live on the internet. I also write technical articles.</p>
        </div>
        <div>
            <!-- with custom font -->
            <h1 className='font-rub'>Custom Font(Rubik Font)</h1>
            <p className='font-rub'>Hello My name is Emeka and I enjoy
            creating things that live on the internet. I also write
            technical articles.</pv>
        </div>
    </div>
  )
}

export default CustomFonts
使用本地下載的字體
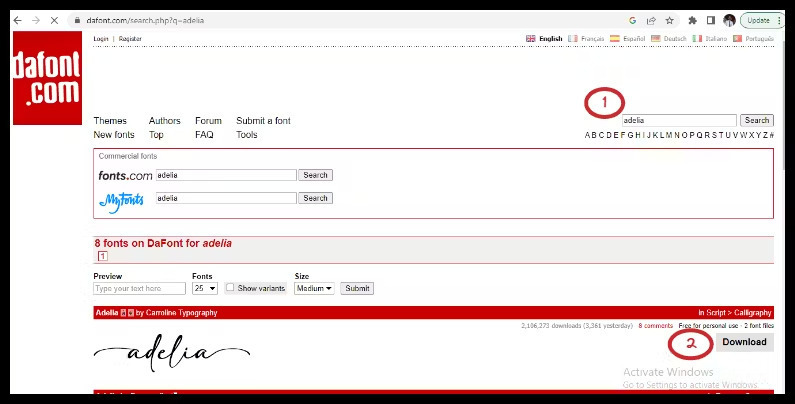
要使用本地下載的字體,我會隨機選擇一個網站。您可以嘗試您選擇的任何網站。進入dafont網站,在搜尋欄中搜尋字體,然後將其下載到本機。請參考下面 dafont 網站的圖示,以圓圈數字作為指引:
解壓縮zip檔案(我使用WinRAR解壓縮),複製解壓縮的文件,並將其貼到專案中的資料夾中。請參閱下面的範例:

下一步是導航到 /index.css 檔案並插入 @font-face 將自訂字體引入專案。我將使用 ADELIA 作為字體系列和 src: 來指定字體的可用位置。
@tailwind base;
@tailwind components;
@tailwind utilities;

@font-face {
    font-family: 'ADELIA';
    src: url('./fonts/ADELIA.ttf');
}
要整合 Rubik 字體,請導覽至 tailwind.config 檔案並執行下列步驟:
新增自訂實用程式類別名稱。
開啟括號
插入「ADELIA」和「cursive」作為備用字體。
這是一個範例:
/* tailwind.config file */

/** @type {import('tailwindcss').Config} */
module.exports = {
  content: ["./src/**/*.{html,js}"],
  theme: {
    extend: {
      fontFamily: {
        'rub': ["Rubik", "sans-serif"],
        'adelia': ['ADELIA', 'cursive']
      },
    },
  },
  plugins: [],
};
我們現在可以在我們的專案中使用該字體:
// the file/component

import React from 'react'

function CustomFonts() {
  return (
    <div className='flex justify-center'>
        <div>
            <!-- without custom font -->
            <h1>Default font</h1>
            <p>Hello My name is Emeka and I enjoy creating things that
            live on the internet. I also write technical articles.</p>
        </div>
        <div>
            <!-- with custom font -->
            <h1 className='font-adelia'>Custom Font(Rubik Font)</h1>
            <p className='font-adelia'>Hello My name is Emeka and I enjoy
            creating things that live on the internet. I also write
            technical articles.</pv>
        </div>
    </div>
  )
}

export default CustomFonts
結論
您可以在任何元件或文件中使用自訂字體。對特定文件或元件沒有限制;您可以在整個專案的多個元件或文件中使用它。此外,您可以將多種自訂字體新增至設定檔。我希望這篇文章對您有幫助。按讚、留言和分享,讓其他人可以學習。謝謝。
以上是如何將自訂字體新增至 Tailwind - 對於網頁和本機下載的字體的詳細內容。更多資訊請關注PHP中文網其他相關文章!