
HTMX + Go:使用 Golang 和 HTMX 建立 CRUD 應用程式

- PHPz原創
- 2024-07-17 07:24:391173瀏覽
我看到很多關於 HTMX 的問題,特別是在剛剛嘗試過該庫的開發人員中,「但是你能用它真正構建什麼?」
好問題,在本文中,我們將從建立一個資料庫支援的 CRUD 應用程式開始,使用 HTMX 和 Go 作為後端語言。
順便說一句,如果您確實想要一本關於使用HTMX 建立全端應用程式的基於專案的實用指南,請查看我的**HTMX + Go:使用Golang 和HTMX 建立全端應用程式[含折扣] 課程。 **
我們開始吧。
我們到底在建構什麼?
我想將其稱為任務管理應用程序,但我知道您已經認為這只是另一個 Todo 應用程式的奇特名稱。別擔心,Todo 應用程式非常適合學習語言、程式庫和框架的基本操作,因此我們將使用相同的經過測試和可信賴的策略。
我們的應用程式將能夠執行以下操作:
- 顯示任務
- 新增任務
- 更新現有任務並......
- 刪除任務
資料庫設定
首先,我們需要一個資料庫,對於這個示範項目,我將使用 MySQL。請隨意使用您選擇的任何資料庫,並根據本文進行必要的程式碼變更以引用您的資料庫。
我們會讓事情變得簡單,沒有複雜的模式設計。首先,我們建立一個名為 testdb 的資料庫,並在該資料庫中建立一個 todos 表(可以隨意為您的資料庫和表指定您喜歡的任何名稱,但請確保在 SQL 語句中使用相同的名稱)
在 todos 表內,實作以下架構:
- id: PK,自動遞增
- task : VARCHAR(200) - 包含任務項目
- 完成:INT(1),預設 = 0(布林欄位)
您可以選擇為資料庫表添加一些任務,以便我們可以在第一次載入應用程式時開始看到一些任務。
建立超媒體 API
要開始設定我們的小應用程序,請在開發電腦中任何方便的位置為該專案建立一個資料夾。
mkdir task-management
在專案資料夾的根目錄中執行以下命令,將其初始化為 Golang 專案:
go mod init task-management
接下來,我們需要安裝一些依賴項。我們已經知道我們使用 MySQL 作為資料庫,因此,我們需要安裝 Golang 的 MySQL 驅動程式。
我們還需要安裝 Gorilla Mux Router,它將作為我們專案的路由庫。在專案的根目錄中執行以下兩個命令,將這些庫安裝到您的專案中
MySQL:
go get -u github.com/go-sql-driver/mysql
大猩猩混合器:
go get -u github.com/gorilla/mux
這些函式庫就位後,在專案的根目錄中建立 main.go 檔案並加入以下程式碼:
package main

import (
    "database/sql"
    "fmt"
    "html/template"
    "log"
    "net/http"
    "strconv"
    "strings"

    _ "github.com/go-sql-driver/mysql"
    "github.com/gorilla/mux"
)

var tmpl *template.Template
var db *sql.DB

type Task struct {
    Id   int
    Task string
    Done bool
}

func init() {
    tmpl, _ = template.ParseGlob("templates/*.html")

}

func initDB() {
    var err error
    // Initialize the db variable
    db, err = sql.Open("mysql", "root:root@(127.0.0.1:3333)/testdb?parseTime=true")
    if err != nil {
        log.Fatal(err)
    }

    // Check the database connection
    if err = db.Ping(); err != nil {
        log.Fatal(err)
    }
}

func main() {

    gRouter := mux.NewRouter()

    //Setup MySQL
    initDB()
    defer db.Close()

    gRouter.HandleFunc("/", Homepage)

    //Get Tasks
    gRouter.HandleFunc("/tasks", fetchTasks).Methods("GET")

    //Fetch Add Task Form
    gRouter.HandleFunc("/newtaskform", getTaskForm)

    //Add Task
    gRouter.HandleFunc("/tasks", addTask).Methods("POST")

    //Fetch Update Form
    gRouter.HandleFunc("/gettaskupdateform/{id}", getTaskUpdateForm).Methods("GET")

    //Update Task
    gRouter.HandleFunc("/tasks/{id}", updateTask).Methods("PUT", "POST")

    //Delete Task
    gRouter.HandleFunc("/tasks/{id}", deleteTask).Methods("DELETE")

    http.ListenAndServe(":4000", gRouter)

}

func Homepage(w http.ResponseWriter, r *http.Request) {

    tmpl.ExecuteTemplate(w, "home.html", nil)

}

func fetchTasks(w http.ResponseWriter, r *http.Request) {
    todos, _ := getTasks(db)
    //fmt.Println(todos)

    //If you used "define" to define the template, use the name you gave it here, not the filename
    tmpl.ExecuteTemplate(w, "todoList", todos)
}

func getTaskForm(w http.ResponseWriter, r *http.Request) {

    tmpl.ExecuteTemplate(w, "addTaskForm", nil)
}

func addTask(w http.ResponseWriter, r *http.Request) {

    task := r.FormValue("task")

    fmt.Println(task)

    query := "INSERT INTO tasks (task, done) VALUES (?, ?)"

    stmt, err := db.Prepare(query)

    if err != nil {
        log.Fatal(err)
    }
    defer stmt.Close()

    _, executeErr := stmt.Exec(task, 0)

    if executeErr != nil {
        log.Fatal(executeErr)
    }

    // Return a new list of Todos
    todos, _ := getTasks(db)

    //You can also just send back the single task and append it
    //I like returning the whole list just to get everything fresh, but this might not be the best strategy
    tmpl.ExecuteTemplate(w, "todoList", todos)

}

func getTaskUpdateForm(w http.ResponseWriter, r *http.Request) {

    vars := mux.Vars(r)

    //Convert string id from URL to integer
    taskId, _ := strconv.Atoi(vars["id"])

    task, err := getTaskByID(db, taskId)

    if err != nil {
        http.Error(w, err.Error(), http.StatusInternalServerError)
    }

    tmpl.ExecuteTemplate(w, "updateTaskForm", task)

}

func updateTask(w http.ResponseWriter, r *http.Request) {

    vars := mux.Vars(r)

    taskItem := r.FormValue("task")
    //taskStatus, _ := strconv.ParseBool(r.FormValue("done"))
    var taskStatus bool

    fmt.Println(r.FormValue("done"))

    //Check the string value of the checkbox
    switch strings.ToLower(r.FormValue("done")) {
    case "yes", "on":
        taskStatus = true
    case "no", "off":
        taskStatus = false
    default:
        taskStatus = false
    }

    taskId, _ := strconv.Atoi(vars["id"])

    task := Task{
        taskId, taskItem, taskStatus,
    }

    updateErr := updateTaskById(db, task)

    if updateErr != nil {
        log.Fatal(updateErr)
    }

    //Refresh all Tasks
    todos, _ := getTasks(db)

    tmpl.ExecuteTemplate(w, "todoList", todos)
}

func deleteTask(w http.ResponseWriter, r *http.Request) {

    vars := mux.Vars(r)

    taskId, _ := strconv.Atoi(vars["id"])

    err := deleTaskWithID(db, taskId)

    if err != nil {
        http.Error(w, err.Error(), http.StatusInternalServerError)
    }

    //Return list
    todos, _ := getTasks(db)

    tmpl.ExecuteTemplate(w, "todoList", todos)
}

func getTasks(dbPointer *sql.DB) ([]Task, error) {

    query := "SELECT id, task, done FROM tasks"

    rows, err := dbPointer.Query(query)

    if err != nil {
        return nil, err
    }

    defer rows.Close()
    var tasks []Task

    for rows.Next() {
        var todo Task

        rowErr := rows.Scan(&todo.Id, &todo.Task, &todo.Done)

        if rowErr != nil {
            return nil, err
        }

        tasks = append(tasks, todo)
    }

    if err = rows.Err(); err != nil {
        return nil, err
    }

    return tasks, nil

}

func getTaskByID(dbPointer *sql.DB, id int) (*Task, error) {

    query := "SELECT id, task, done FROM tasks WHERE id = ?"

    var task Task

    row := dbPointer.QueryRow(query, id)
    err := row.Scan(&task.Id, &task.Task, &task.Done)

    if err != nil {
        if err == sql.ErrNoRows {
            return nil, fmt.Errorf("No task was found with task %d", id)
        }
        return nil, err
    }

    return &task, nil

}

func updateTaskById(dbPointer *sql.DB, task Task) error {

    query := "UPDATE tasks SET task = ?, done = ? WHERE id = ?"

    result, err := dbPointer.Exec(query, task.Task, task.Done, task.Id)

    if err != nil {
        return err
    }

    rowsAffected, err := result.RowsAffected()

    if err != nil {
        return err
    }

    if rowsAffected == 0 {
        fmt.Println("No rows updated")
    } else {
        fmt.Printf("%d row(s) updated\n", rowsAffected)
    }

    return nil

}

func deleTaskWithID(dbPointer *sql.DB, id int) error {

    query := "DELETE FROM tasks WHERE id = ?"

    stmt, err := dbPointer.Prepare(query)

    if err != nil {
        return err
    }
    defer stmt.Close()

    result, err := stmt.Exec(id)
    if err != nil {
        return err
    }

    rowsAffected, err := result.RowsAffected()
    if err != nil {
        return err
    }
    if rowsAffected == 0 {
        return fmt.Errorf("no task found with id %d", id)
    }

    fmt.Printf("Deleted %d task(s)\n", rowsAffected)
    return nil

}
是的,那是很多程式碼。別擔心,我們會從最頂層走下來
所以首先我們導入所有必要的套件。我們安裝了 MySQL 驅動程式和 Gorilla Mux 路由器,以及 Go 標準庫中的一堆軟體包,它們將在我們的程式碼操作中有用。
import (
    "database/sql"
    "fmt"
    "html/template"
    "log"
    "net/http"
    "strconv"
    "strings"
    _ "github.com/go-sql-driver/mysql"
    "github.com/gorilla/mux"
)
接下來,我們建立一個 tmpl 變量,用於保存載入的模板和一個 db 變量,該變量將是指向執行資料庫任務的資料庫連接的指標。然後,我們建立一個定義任務類型的自訂任務結構。
在 init() 函數中,我們從模板資料夾載入所有模板。我們所有的模板都應該有 .html 副檔名,因為 HTMX 希望我們回傳 HTML,這很有意義。
繼續在專案的根目錄中建立 templates 資料夾,以便我們可以從那裡開始載入所有範本。
我們還有一個 initDB() 函數,它負責設定與資料庫的連接並傳回對資料庫的指標參考。確保更改連接字串以符合您的資料庫(憑證、主機、連接埠、資料庫名稱等)
在主函數中,我們初始化路由器並呼叫 initDB() 資料庫函數來初始化資料庫。然後是我們所有的路由和路由處理程序,最後,我們監聽連接埠 4000,這是我們為應用程式提供服務的地方。
路線和處理程序
現在讓我們開始分解我們的路線及其各自的處理程序。
- The GET / Base Route: This is our base route and loads the home page of the application. The handler, Hompage returns the home.html file to the client.
- The GET /tasks Route: This route uses the fetchTasks handler to get all our tasks from our database and return them in an HTML list to the client using a todoList template.
- The GET /newtaskform Route: This route will load a new task form from the server each time a user wants to create a new task or clicks a Add New Task button. It uses a addTaskForm template to display a new HTML form for adding a new task
- The POST /tasks Route: This route calls the addTask handler to add a new task to the database and return an updated list of all tasks.
- The GET /gettaskupdateform/{id} Route: Uses the Id of a task to load the task into an update form with the updateTaskForm template and returns this form to the client when the user clicks the Edit button.
- The PUT/POST /tasks/{id} Route: Takes the Id of a task to be updated and updates it using the updateTask handler. After the update operation, the most recent version of the list is returned as HTML.
- The DELETE /tasks/{id} Route: Uses the deleteTask handler and a task Id to delete a specific task. Once the task is deleted, an updated list of tasks is returned back to the client.
And that’s all the routes and handlers used in this application.
You may have noticed some other functions asides the route handlers also defined in our main.go file. These are functions for performing database operations for fetching tasks (getTasks), getting a single task using its Id (getTaskByID), updating a task using its Id (updateTaskById), and deleting a task using the tasks’ Id (deleTaskWithID).
These helper functions are used within our route handlers to facilitate database operations and keep the handlers lean.
Creating Our Templates
Now that we are familiar with our Hypermedia API, let’s begin creating the HTML templates that will be retuned in the response to our API calls.
First, we create home.html file in the templates folder. This will load the home page of our task management application. Add the following code to the file after creating it.
    <meta charset="UTF-8">
    <meta http-equiv="X-UA-Compatible" content="IE=edge">
    <meta name="viewport" content="width=device-width, initial-scale=1.0">
    <link href="https://cdn.jsdelivr.net/npm/bootstrap@5.3.3/dist/css/bootstrap.min.css" rel="stylesheet" integrity="sha384-QWTKZyjpPEjISv5WaRU9OFeRpok6YctnYmDr5pNlyT2bRjXh0JMhjY6hW+ALEwIH" crossorigin="anonymous">
    <script src="https://unpkg.com/htmx.org@1.9.12"></script>
    <title>To Do App</title>


    <div class="row">

        <div class="col">
            <h2>Tasks</h2>

            <div>
                <a href="#" hx-get="/newtaskform" hx-target="#addTaskForm">Add New Item</a>
            </div>

            <div id="taskList" hx-get="/tasks" hx-trigger="load" hx-swap="innerHTML">

            </div>

        </div>
        <!-- <div class="col">

        </div> -->
        <div class="col">
            <h2>Add New Task</h2>

            <div id="addTaskForm">
                {{template "addTaskForm"}}
            </div>

        </div>

    </div>
This templates forms the shell and layout of the entire application. We have the boilerplate HTML structure and I have also added the Bootstrap CSS library for some basic styling. The HTMX library has also been included through a CDN link.
The application layout contains two sections. One section for displaying tasks and the other for showing the new task and task update forms.
The first section contains a button for requesting a new task form from the hypermedia API. Once the form is returned, we then use hx-target to load the form into the div with an id of addTaskForm in the forms section of the page.
<a href="#" hx-get="/newtaskform" hx-target="#addTaskForm">Add New Item</a>
The next component in the first section is the div where our tasks will be loaded into. This div uses hx-trigger to initiate a GET request to the /tasks route once the page loads, thus immediately loading the tasks into the page.
<div id="taskList" hx-get="/tasks" hx-trigger="load" hx-swap="innerHTML">

</div>
In the second section, as mentioned earlier, we have a div with an id of addTaskForm for loading both our new task and update forms. We have also preloaded the form for adding a new task into this div using Go template import syntax so as to have a default form in place.
Now let’s create the form for adding a new task next. Inside the templates folder, create the file addTaskForm.html and add the following code inside it:
{{define "addTaskForm"}}
{{end}}
This templates loads a fresh form in the UI for adding a new task. When the submit button is clicked, it uses HTMX to send a POST request to the /tasks route to add a new task. When the operation is done, it uses HTMX once again to load the response, an updated list of tasks, into the div with an id of taskList.
Next is our update form template. Inside the templates folder, create the file updateTaskForm.html and add the following code:
{{define "updateTaskForm"}}
{{end}}
This template takes in a task to be updated and uses it to pre-populate the update form so that the user can see the previous state of the task to be updated.
When the Update Task button is clicked, it will send the updated values to the hypermedia API for the task to be updated. Once updated, it loads the updated list into the page.
Finally, we create the template the returns our list of task items. Inside the templates folder, create the file todoList.html and add the following code:
{{define "todoList"}}
{{end}}
Yeah, a lot is going on in this template, so let’s break it down.
First, the template takes in a Go slice of Task types and loops over it using the range function to create an HTML list of unordered items.
The task it displayed in each list item and the Done property is used to check if the task is completed. If so, we use CSS to strike the task as being completed.
Just after the task text, we have an Edit button. This button calls the /gettaskupdateform endpoint to load an update form using the id of the specific task that was clicked. The user can then update the task and get an updated list of task items.
After the Edit button, we have a Delete button that uses hx-delete to call the DELETE /tasks/{id} endpoint so that we can delete the task. But before we can send the delete request, we use hx-confirm to display a confirmation dialog to the user so that they can confirm if they really want to delete this task item. Once deleted, a new updated list is returned and the task will be gone.
And with that we wrap up our application, so let’s move on to the fun part, checking it out.
Running the Application
With all the code in place, now let’s test our application.
Ensure that all files are saved and run the following command at the root of your project:
go run main.go
Now go to your browser and load the application page at http://localhost:4000. If you have used a different port, ensure that you’re using that port to load the app.
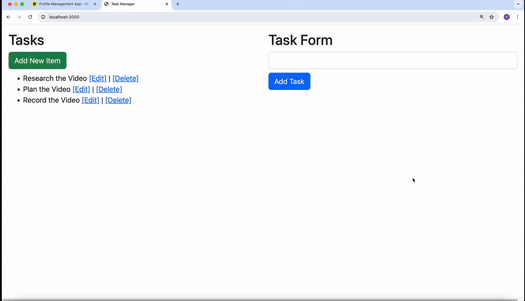
Now you should see your application as displayed below. See below as we add a new task, update an existing task and delete a task from our task list
Conclusion
If you have enjoyed this article, and will like to learn more about building projects with HTMX, I’ll like you to check out HTMX + Go: Build Fullstack Applications with Golang and HTMX, and The Complete HTMX Course: Zero to Pro with HTMX to further expand your knowledge on building hypermedia-driven applications with HTMX.
Happy Coding :)
以上是HTMX + Go:使用 Golang 和 HTMX 建立 CRUD 應用程式的詳細內容。更多資訊請關注PHP中文網其他相關文章!