A brief analysis of Handler message passing mechanism
Introduction to this section
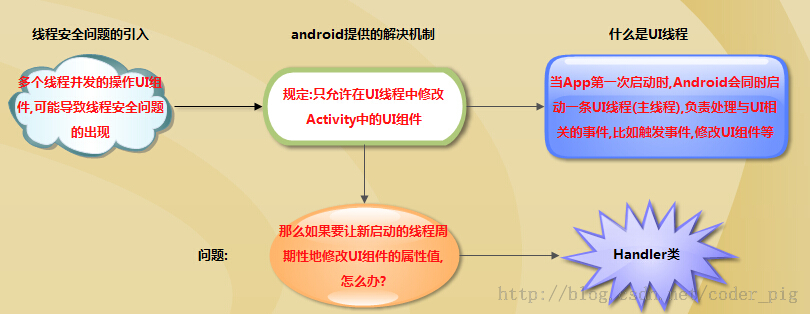
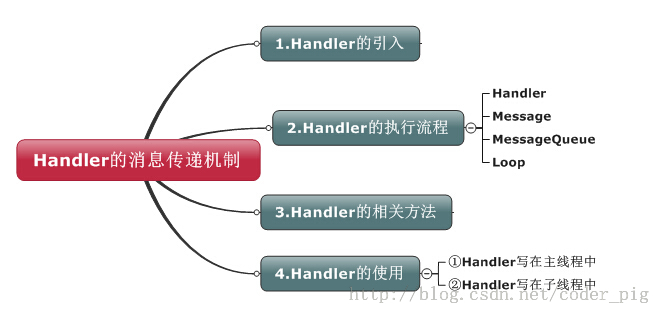
In the first two sections, we have studied the two event processing mechanisms in Android. There are only these two types of event responses; this section will explain to you It is the information transfer Handler in the UI component in the Activity. I believe many friends know that for the sake of thread safety, Android does not allow us to operate the UI outside the UI thread; many times when we refresh the interface, we need to notify the UI component update through the Handler! In addition to using Handler to complete interface updates, you can also use runOnUiThread() to update, or even more advanced transaction buses. Of course, here we only explain Handler, what is Handler, execution process, related methods, and use in sub-threads and main threads. The difference between Handler and more!
Learning roadmap:
2. Introduction of Handler class:

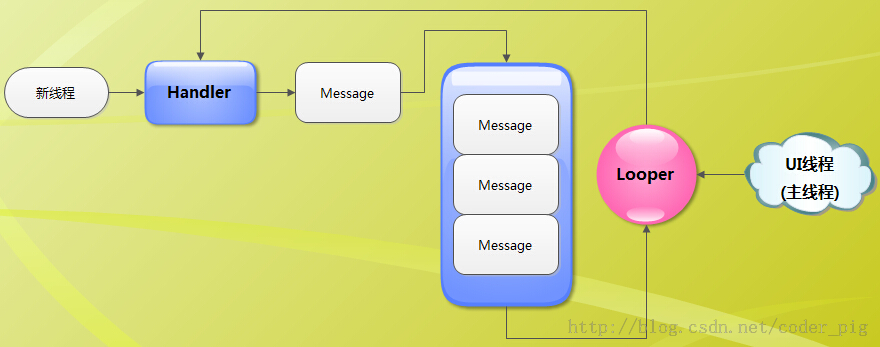
3. Handler’s execution flow chart:

Flow chart analysis: Related nouns
- UI thread: It is our main thread. When the system creates the UI thread, it will initialize a Looper object and also create a MessageQueue associated with it;
- Handler: The function is to send and process information. If you want the Handler to work normally, there must be a Looper object in the current thread
- Message: Message object received and processed by Handler
- MessageQueue: Message queue, first-in-first-out management Message, when initializing the Looper object, a MessageQueue associated with it will be created;
- Looper: Each thread can only have one Looper, which manages the MessageQueue and continuously extracts Messages from it and distributes them to the corresponding Handler for processing!
To put it simply:
When our child thread wants to modify the UI components in the Activity, we can create a new Handler Object, send information to the main thread through this object; and the information we send will first wait in the MessageQueue of the main thread, be taken out by Looper in first-in, first-out order, and then distributed to the corresponding Handler for processing according to the what attribute of the message object!
4. Related methods of Handler:
- void handleMessage(Message msg): Method for processing messages, usually used Rewritten!
- sendEmptyMessage(int what): Send an empty message
- sendEmptyMessageDelayed(int what, long delayMillis): Specify the delay Send an empty message after milliseconds
- sendMessage(Message msg): Send the message immediately
- sendMessageDelayed(Message msg): Specify the delay after how many milliseconds Send message
- final boolean hasMessage(int what): Check whether the message queue contains a message with the what attribute as the specified value If the parameter is (int what, Object object): In addition to judging the what attribute, you also need to judge whether the Object attribute is the message of the specified object
5. Handler usage example:
1) Handler is written in the main thread
In the main thread, because the system has initialized a Looper object, we directly create the Handler object to send information. And deal with it!
Code example: A simple program to switch images regularly, through the Timer timer, regularly modify the content displayed by the ImageView to form a frame animation
Running renderings:

Implementation code:
xmlns:tools="http://schemas.android.com/tools"
android:id=" @+id/RelativeLayout1"
android:layout_width="match_parent"
android:layout_height="match_parent"
android:gravity="center"
tools:context="com.jay.example. handlerdemo1.MainActivity" >
<ImageView
android:id="@+id/imgchange"
android:layout_width="wrap_content"
android: layout_height="wrap_content"
android: layout_alignparentLeft = "True"
android: layout_alignparenttop = "true"/& gt;
# & lt & GT & GT ##
MainActivity.java:
//Define the array id of the switched picture
int imgids[] = new int[]{
R.drawable.s_1, R .drawable.s_2,R.drawable.s_3,
R.drawable.s_4,R.drawable.s_5,R.drawable.s_6,
R.drawable.s_7,R.drawable.s_8
} ;
int imgstart = 0;
final Handler myHandler = new Handler()
{
@Override
//Rewrite the handleMessage method and determine whether it is based on the value of what in msg Perform subsequent operations
public void handleMessage(Message msg) {
if(msg.what == 0x123)
{
imgchange.setImageResource(imgids[imgstart++ % 8]);
.layout.activity_main ; .schedule(new TimerTask() { myHandler.sendEmptyMessage(0x123);
In the sub-thread
If the Handler is written in the sub-thread, we need to create a Looper object ourselves! The creation process is as follows:
##1 )
Create a Handler object and override the handleMessage() method. Processing information from other threads!
3)
Call Looper.loop() method to start LooperUsage example: Input a number, and after calculation, all prime numbers in this range will be output through Toastandroid:layout_height="match_parent"Implementation code: main.xml:##<LinearLayout xmlns:android="http://schemas.android.com/apk/res/android"
android:layout_width="match_parent"
android:orientation="vertical ">
<EditTextandroid:id="@+id/etNum" android:inputType="number" android:layout_width="match_parent"
android:layout_height= "wrap_content"android:layout_width="match_parent"
android:layout_height="wrap_content"
android:onClick ="cal"
android:text="Calculation"/>
</LinearLayout>
MainActivity.java:
{
static final String UPPER_NUM = "upper";
EditText etNum;
CalThread calThread;
// Define a thread class
class CalThread extends Thread
{
public Handler mHandler;
public void run()
Looper.prepare();
mHandler = new Handler()
{ #Int UPPER = msg.getdata (). Getint (upper_num);
List & LT; Integer & GT; Nums = New ArrayList & LT; Integer & GT; All quality number
outer:
for (int i = 2; i <= upper; i++)
for (int j = 2; j < ;= Math.sqrt(i) ; j++)
If(i != 2 && i % j == 0)
Continue Outr;
}
}
nums.add (i);
}
//Use Toast to display all the counted prime numbers
toast. ; savedInstanceState);
setContentView(R.layout.main);
etNum = (EditText)findViewById(R.id.etNum);
calThread = new CalThread();
// Start a new thread
calTh read. start();
start Message();
msg.what = 0x123;
Bundle bundle = new Bundle();
bundle.putInt(UPPER_NUM,
Integer.parseInt(etNum.getT ext().toString()) );
msg.setData(bundle);
//Send a message to the Handler in the new thread
calThread.mHandler.sendMessage(msg);
}
}
PS: This example comes from "Android Crazy Handout" ~
Summary of this section
This section conducts a simple analysis of Handler event delivery in Android. It is necessary to distinguish Handler, Message, MessageQueue, The concept of Loop, and the difference between Handler written in the main thread and sub-thread!


