BroadcastReceiver master test
Introduction to this section
In this section we will study the third of the four major components of Android: BroadcastReceiver (broadcast receiver), hehe, I have been thinking about it just now How to write an opening sentence, so I flipped through the two Android basic books I had and found that neither of them had an introduction to BroadcastReceiver. I don’t know if it’s a coincidence or the author feels that this thing is not used much and there is no need to talk about it! However, they don't talk about it, but Xiaozhu can talk about it, and he has to talk about it in detail! Okay, let’s start this section~ PS: By the way, on the Android official website, I clicked on API Guides -> App Components and found no trace of BroadcastReceiver. Well, then just search for BroadcastReceiver directly. The corresponding document address is: BroadcastReceiver
1. What is BroadcastReceiver?
Answer: Broadcast is a literal translation of broadcast. Let’s give an vivid example to help me understand BroadcastReceiver. I remember reading before. At that time, each class would have a large speaker hanging on the wall to broadcast some announcements, such as when school started to move books, broadcast: "Find a few classmates in each class to pick up books from the Academic Affairs Office." After this broadcast is sent, all students will receive this broadcast notification at the same time. Received, but not every student will move books. Generally, those who move books are the "strong men" in the class. This group of "strong men" received this After the broadcast, he will set off to move the books back but!
——Okay, the above is a very vivid example of broadcast delivery:
Big speaker--> Send broadcast--> All students can receive the broadcast--> Hercules processing Broadcast
Back to our concept, in fact, BroadcastReceiver is the global loudspeaker between applications, that is, a means of communication. The system itself will send broadcasts at many times, such as when the battery is low or sufficient, just after starting, plugging in headphones, changing the input method, etc. When these times occur, the system will send a broadcast. This is called a system broadcast. Every APP will receive it. If you want your application to receive Do some operations during this broadcast, such as: after the system is turned on, secretly run services in the background ~ Haha, at this time you only need to Register a BroadcastReceiver for monitoring startup. When receiving the startup broadcast, do some sneaky things~ Of course, we can also send broadcasts ourselves. For example, after receiving push information from the server, the user logs in elsewhere, and then the user should be forced to log off and return to Login interface, and prompts to log in elsewhere ~ Of course, I will write a simple example later to help everyone understand the benefits that broadcast brings to us ~
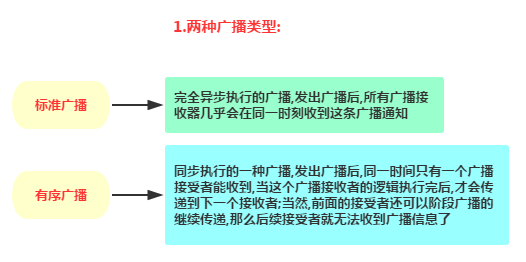
2. Two types of broadcast:

3. Receive system broadcasts
1) Two ways to register broadcasts
As mentioned before, the system will send corresponding system broadcasts at certain times , let’s let our APP receive the system broadcast, Before receiving, we need to register a broadcast receiver for our APP! The registration methods are divided into the following two types: dynamic and static!


Below we demonstrate the usage and differences between the two through code:
2 )Dynamic registration instance (monitoring network status changes)
Code example:
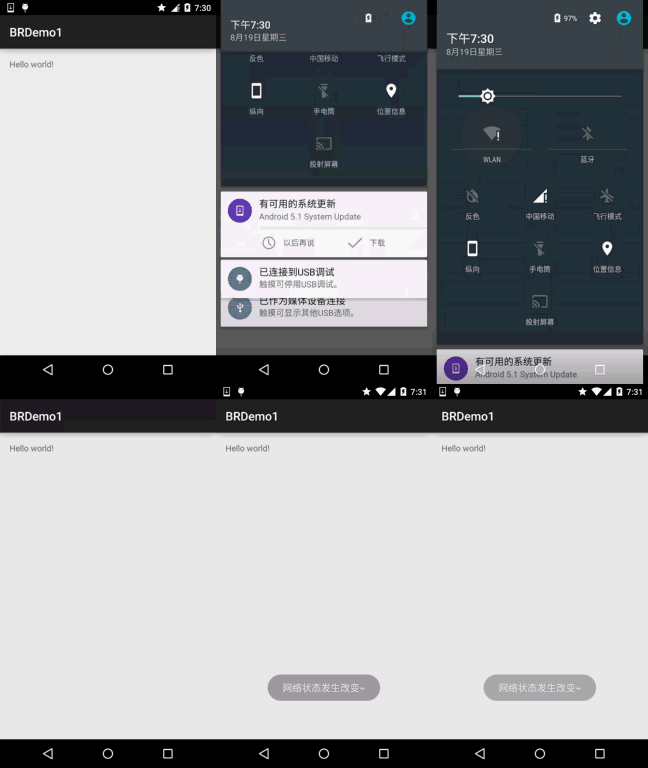
Rendering:

Okay, there is no Internet connection at the beginning, that is, the wifi is not turned on. Click to turn on the wifi and a Toast prompt will appear after a while~ It’s also easy to implement!
Code implementation:
Customize a BroadcastReceiver and complete the transactions to be broadcast in the onReceive() method, such as the prompt Toast information here: MyBRReceiver.java
@Override
public void onReceive(Context context, Intent intent) {
Toast.makeText(context,"Network status occurred Change~",Toast.LENGTH_SHORT).show();
}
}
MainActivity.java Dynamic registration broadcast:
MyBRReceiver myReceiver;
@Override
protected void onCreate(Bundle savedInstanceState) {
super.onCreate(savedInstanceState);
setContentView(R.layout.activity_main);
//Core code:
myReceiver = new MyBRReceiver () ;
IntentFilter itFilter = new IntentFilter();
itFilter.addAction("android.net.conn.CONNECTIVITY_CHANGE");
registerReceiver(myReceiver, itFilter);
}
//Don’t forget to cancel the broadcast~
@Override
protected void onDestroy() {
super.onDestroy();
unregisterReceiver(myReceiver);
}
}
Dynamic registration is simple~ But one disadvantage of dynamic registration is that the program needs to be started before we can receive the broadcast. If we need a program If it is not started, but you can still receive broadcasts, then you need to register static broadcasts!
3) Static registration instance (receiving boot broadcast)
Code example:
There is no schematic diagram here~, Let’s look directly at the code implementation~
Code implementation:
1. Customize a BroadcastReceiver and rewrite onReceive to complete transaction processing
private final String ACTION_BOOT = "android.intent.action.BOOT_COMPLETED";
@Override
public void onReceive(Context context, Intent intent) {
if (ACTION_BOOT.equals(intent.getAction()))
Toast.makeText(context, "Boot completed~", Toast.LENGTH_LONG).show();
}
}
2. Register the BroadcastReceiver in AndroidManifest.xml and add the intent-filter for the boot broadcast!
By the way, don’t forget to add android.permission .RECEIVE_BOOT_COMPLETED permission!
<intent-filter>
.BOOT_COMPLETED">
</intent-filter>
</receiver>
<!-- Permissions -->
<uses-permission android:name ="android.permission.RECEIVE_BOOT_COMPLETED"/>
Okay, then when you restart your phone, you will find that after a while, the startup completion toast will pop up~ In addition, Android versions 4.3 and above allow programs to be installed on SD cards. If your program is installed on SD , you will not receive the boot broadcast. The specific reasons and solutions will be explained in detail in the next section!
4) Precautions for using broadcast:
Hey, broadcasting is easy to use and simple, but you should pay attention to using broadcasting:
Don’t Add too much logic or perform any time-consuming operations in broadcasting, because threads are not allowed to be opened in broadcasting. When the onReceiver() method runs for a long time (more than 10 seconds) and has not ended, the program will report an error (ANR). Broadcasting more often plays the role of opening other components, such as starting a Service, Notification prompts, Activity and so on!
4. Sending broadcasts
Well, above we are all receiving broadcasts from the system. The system sends and we receive them. We can’t always be so passive, we have to be proactive. right! In addition, tomorrow is the Chinese Valentine's Day, programmers, take advantage of it and try to get out of singles, haha! Okay, back to broadcasting, we will take the initiative to broadcast it ourselves! Let’s take a look at how to achieve it!
How to send: Before sending a broadcast, you must first define a receiver, determine the target first, and then confess! ~(●'◡'●)~

Code Example: (Standard Broadcast)
MyBroadcastReceiver.java
private final String ACTION_BOOT = "com.example.broadcasttest.MY_BROADCAST";
@Override
public void onReceive(Context context, Intent intent) {
if(ACTION_BOOT.equals(intent.getAction()))
Toast.makeText(context, "I received the confession~",Toast.LENGTH_SHORT).show();
}
}
Then register in AndroidManifest.xml and write Intent-filter:
" " <action android:name="com.example.broadcasttest.MY_BROADCAST"/>
" ;/receiver>
Okay, next we run the above program project, then close it, and then we create a new project, Complete the broadcast sending in this project ~ Create a new Demo2, the layout is a simple button, and then complete the broadcast sending in MainActivity:
MainActivity.java:
@Override
protected void onCreate(Bundle savedInstanceState) {
super.onCreate(savedInstanceState);
setContentView(R.layout.activity_main);
Button btn_send = (Button) findViewById(R.id.btn_send);
btn_send.setOnClickListener(new View.OnClickListener() {
@Override
public void onClick(View v) {
sendBroadcast(new Intent( "com.example.broadcasttest.MY_BROADCAST"));
}
});
}
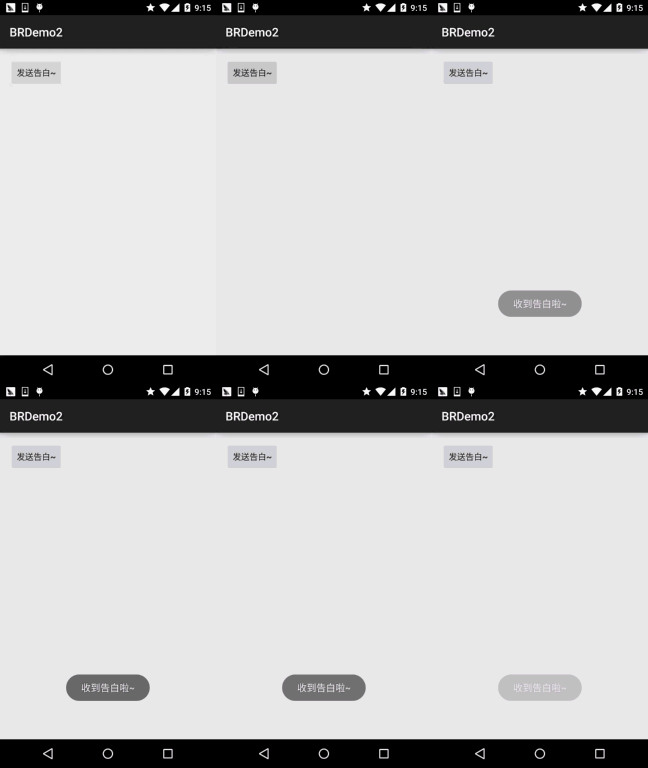
Hey, look at the running screenshot:

##Summary of this section:
Okay, the simple use of BroadcastReceiver is that simple, However, what we use here are global broadcasts, that is, other The application can also receive our broadcast, which may cause some security issues, but it’s okay. We’ll teach you how to use it in the next section. Local broadcast, and how to install the application on the SD card after Android 4.3, how to monitor the startup~Okay, that’s it for this section, thank you~


