Activity for beginners
Introduction to this section:
This section begins to explain Activity (activity), one of the four major components of Android. Let’s first look at the official introduction to Activity: PS: Official website document: Activity
is introduced as follows: About meaning:
Activity is an application A component that provides an area on the screen that allows users to perform some interactive operations on it. Like making a phone call, taking a photo, sending an email, or showing a map! Activity can be understood as a window that draws the user interface. And this window can fill the entire screen, or it can be smaller than the screen or float above other windows!
From the above paragraph, we can get the following information:
1. Activity is used to display the user interface, and the user interacts through Activity Related operations2. An App allows multiple Activities
Okay, that’s it for the general introduction. If you want to learn more, you can continue to read the API and start this section~
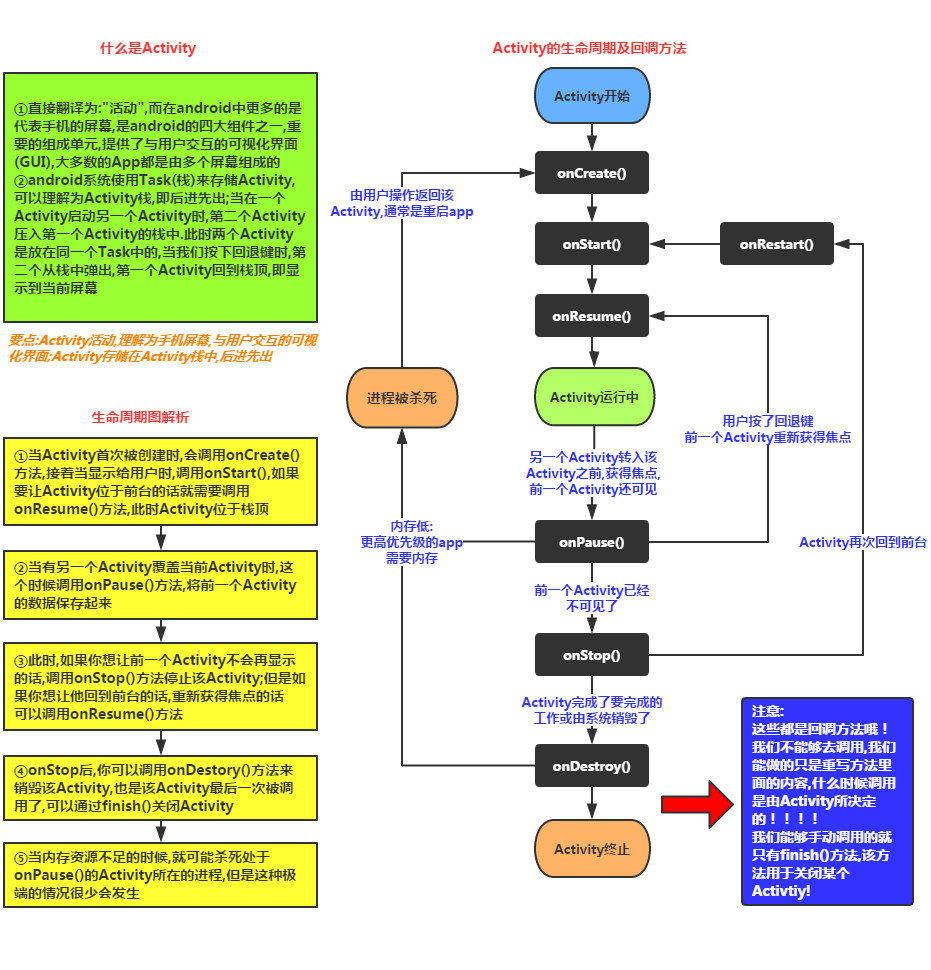
The concept of Activity and the life cycle diagram of Activity

Notes:
1. The premise that onPause() and onStop() are called is : A new Activity was opened! The former is when the old Activity is still visible; the latter is when the old Activity is no longer visible!
2. In addition, personal test: AlertDialog and PopWindow will not trigger the above two callback methods~
2. The difference between Activity/ActionBarActivity/AppCompatActivity:
Before I start explaining how to create an Activity, let’s talk about the difference between these three: Needless to say, Activity. The latter two are proposed for compatibility with lower versions. They are all under the v7 package. ActionBarActivity has been abandoned. As you can tell from the name, ActionBar~, and after 5.0, it was abandoned by Google. Now it is used ToolBar... And when we create an Activity in Android Studio, the default inheritance will be: AppCompatActivity! Of course, you can also just write Activity, but AppCompatActivity provides us with something new! Choose one of the two, Just you like~
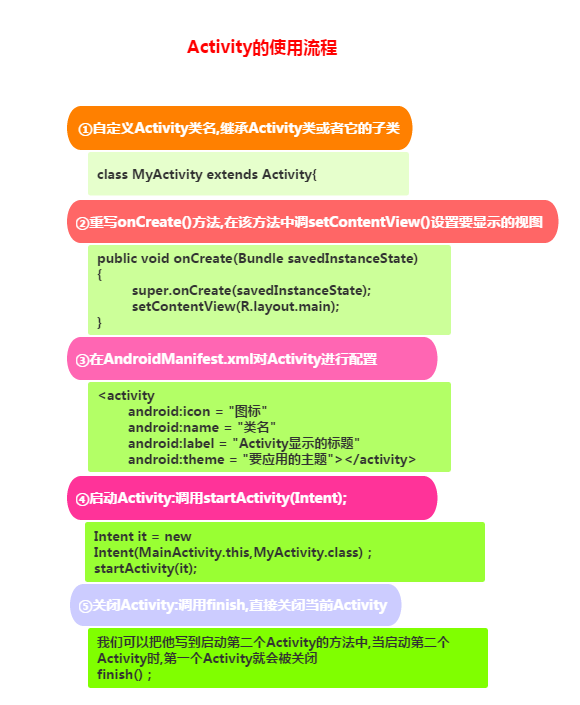
3.Activity creation process

PS:
Okay, as mentioned above, you can inherit Activity and AppCompatActivity, but the latter only provides some new things! In addition, remember that as long as you define the four major components in Android, no matter whether you use them or not, you must compare them in AndroidManifest.xml This component must be declared, otherwise the program will exit directly during runtime and report ClassNotFindException...
4. The difference between one parameter and two parameters of onCreate():
I believe friends who use as will find that when they rewrite the onCreate() method of Act, this thing has Two parameters:

But normally there is only one parameter:

Well, this is what 5.0 gives To use the new method we provide, you must first set an attribute for our Activity in the configuration file:
Then our Activity has the ability to persist. Generally, we will use it with the other two methods:
public void onRestoreInstanceState( Bundle savedInstanceState, PersistableBundle persistentState)
I believe some friends are familiar with the names of these two methods. The former method will be called in the following situations:
- Click the home button to return to the homepage or press and hold to select Run other programs
- Press the power button to turn off the screen
- Start a new Activity
- When switching between horizontal and vertical screens, it will definitely be executed, because the Act will be destroyed first when switching between horizontal and vertical screens. , and then recreate Important principle: When the system destroys your activity "without your permission", onSaveInstanceState will be called by the system. This is the responsibility of the system, as it must provide you with an opportunity to save your data (which you may or may not save).
The latter method can also retrieve the data saved by the former like onCreate: Generally executed between onStart() and onResume()! The reason why there are two ways to obtain and save data is to avoid Act jumping without closing. Then don't use the onCreate() method, and you want to take out the saved data~
Back to: Back to this Activity has the ability to persist, the added PersistableBundle parameter makes these methods It has the ability to recover data after the system is shut down and then restarted! ! And it doesn’t affect our other serialization operations, damn, I don’t know how it is implemented specifically yet, maybe I saved it in another file~! If I know the principle later, I will let you know! In addition, the API version needs to be >= 21, which means that it must be version 5.0 or above to be valid~
4. Several ways to start an Activity
In Android we You can start a new Activity in the following two ways. Pay attention to how it is started here, not Start mode! ! Divided into explicit startup and implicit startup!
1. Explicit startup: Start through the package name, written as follows:
①The most common:
②Pass Intent’s ComponentName:startActivity(new Intent(current Act.this, Act.class to be started));③Specify the package name when initializing the Intent:ComponentName cn = new ComponentName("Fully qualified class name of the current Act", "Fully qualified class name of the starting Act") ;
Intent intent = new Intent() ;
intent .setComponent(cn) ;
startActivity(intent) ;Intent intent = new Intent(" android.intent.action.MAIN");
intent.setClassName("The fully qualified class name of the current Act", "The fully qualified class name of the starting Act");
startActivity(intent);
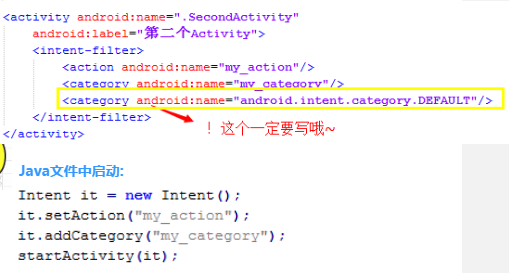
2. Implicit startup: implemented through Action, Category or data of Intent-filter This is achieved through Intent's intent-filter**. This Intent chapter will explain it in detail! That’s all you need to know here!

3. There is also another way to start the apk directly through the package name:
("Fully qualified class name of the first Activity started by apk") ;
if(intent != null) startActivity(intent) ;
5. The problem of switching between horizontal and vertical screens and saving the state
As mentioned earlier, when the App switches between horizontal and vertical screens, the current Activity will be destroyed and a new one will be created. You can do this by yourself. life cycle Add a statement to print Log in each method to make judgments, or set a button and a TextView to modify the TextView after clicking the button. Text, and then switch between horizontal and vertical screens, you will magically find that the TextView text changes back to its previous content! When switching between horizontal and vertical screens, the Act goes through the following life cycle:
onPause-> onStop-> onDestory-> onCreate->onStart->onResume
Regarding possible problems when switching between horizontal and vertical screens Go to the following question:
1. Let’s first talk about how to disable automatic switching between horizontal and vertical screens. It’s very simple. Add an attribute to Act in AndroidManifest.xml :android:screenOrientation, The following optional values are available:
- unspecified: The default value is determined by the system. The determined strategy is related to the device, so different devices will have different Show direction.
- landscape: Horizontal screen display (width is longer than height)
- portrait: Vertical screen display (height is longer than width)
- user: The user’s current preferred direction
- behind: Same as the direction of the Activity below this Activity (in the Activity stack)
- sensor: It is determined by the physical sensor. If the user rotates the device, the screen will switch between portrait and landscape.
- nosensor: Ignore the physical sensor so it does not change as the user rotates the device (except for the "unspecified" setting).
2.Want to load different layouts for horizontal and vertical screens:
1) Prepare two different sets of layouts. Android will automatically adjust the layout according to the horizontal and vertical screens. Load different layouts: Create two layout folders: layout-landhorizontal screen,layout-portvertical screen Then throw these two sets of layout files into these two folders. The file names are the same, and Android will judge by itself, and then load the corresponding layout!
2) Make your own judgment in the code and load whatever you want:
We usually load the layout file in the onCreate() method. We can adjust the horizontal and vertical screens here. To judge the status, the key code is as follows:
setContentView(R.layout.horizontal screen );
}
else if (this.getResources().getConfiguration().orientation ==Configuration.ORIENTATION_PORTRAIT) {
setContentView(R.layout.vertical screen);
}
3. How to switch the simulator between horizontal and vertical screens
If your simulator is GM. Just press the switch button on the simulator. For the native simulator, press ctrl + f11/f12 to switch!
4. State saving problem:
As mentioned above, it can be completed through a Bundle savedInstanceState parameter! Three core methods:
onSaveInstanceState(Bundle outState);
onRestoreInstanceState(Bundle savedInstanceState);
You only override the onSaveInstanceState() method and write data to this bundle, for example:
outState.putInt("num",1);
In this way, you can then take out the data stored inside in onCreate or onRestoreInstanceState, but you must check whether it is null before taking it!
savedInstanceState.getInt("num");
Then do whatever you want~
6. The system provides us with Common Activities
Okay, finally, I will attach some common Activities provided by the system!
// Call mobile customer service 10086
Uri uri = Uri.parse("tel:10086");
Intent intent = new Intent(Intent .ACTION_DIAL, uri);
startActivity(intent);
//2. Send a text message
// Send a text message with the content "Hello" to 10086
Uri uri = Uri.parse ("smsto:10086");
Intent intent = new Intent(Intent.ACTION_SENDTO, uri);
intent.putExtra("sms_body", "Hello");
startActivity(intent);
//3. Send MMS (equivalent to sending text messages with attachments)
Intent intent = new Intent(Intent.ACTION_SEND);
intent.putExtra("sms_body", "Hello");
Uri uri = Uri.parse("content://media/external/images/media/23");
intent.putExtra(Intent.EXTRA_STREAM, uri);
intent.setType("image/ png");
startActivity(intent);
//4. Open the browser:
// Open the Google homepage
Uri uri = Uri.parse("http://www .baidu.com");
Intent intent = new Intent(Intent.ACTION_VIEW, uri);
startActivity(intent);
//5. Send email: (castrated Google service No way!!!!)
// Send an email to someone@domain.com
Uri uri = Uri.parse("mailto:someone@domain.com");
Intent intent = new Intent( Intent.ACTION_SENDTO, uri);
startActivity(intent);
// Send an email to someone@domain.com with the content "Hello"
Intent intent = new Intent(Intent.ACTION_SEND);
intent.putExtra(Intent.EXTRA_EMAIL, "someone@domain.com");
intent.putExtra(Intent.EXTRA_SUBJECT, "Subject");
intent.putExtra(Intent.EXTRA_TEXT, "Hello" );
intent.setType("text/plain");
startActivity(intent);
// Send emails to multiple people
Intent intent=new Intent(Intent.ACTION_SEND);
String[] tos = {"1@abc.com", "2@abc.com"}; // Recipient
String[] ccs = {"3@abc.com", "4@abc .com"}; // CC
String[] bccs = {"5@abc.com", "6@abc.com"}; // Bcc
intent.putExtra(Intent.EXTRA_EMAIL, tos);
intent.putExtra(Intent.EXTRA_CC, ccs);
intent.putExtra(Intent.EXTRA_BCC, bccs);
intent.putExtra(Intent.EXTRA_SUBJECT, "Subject");
intent.putExtra(Intent.EXTRA_TEXT, "Hello");
intent.setType("message/rfc822");
startActivity(intent);
//6. Display map:
//Open Google Maps location of Beijing, China (39.9 north latitude, 116.3 east longitude)
Uri uri = Uri.parse("geo:39.9,116.3");
Intent intent = new Intent(Intent.ACTION_VIEW, uri);
startActivity(intent);
//7. Path planning
// Path planning: From somewhere in Beijing (39.9 north latitude, east longitude 116.3) To a place in Shanghai (31.2 north latitude, 121.4 east longitude)
Uri uri = Uri.parse("http://maps.google.com/maps?f=d&saddr=39.9 116.3&daddr=31.2 121.4");
Intent intent = new Intent(Intent.ACTION_VIEW, uri);
startActivity(intent);
//8. Multimedia playback:
Intent intent = new Intent(Intent.ACTION_VIEW);
Uri uri = Uri.parse("file:///sdcard/foo.mp3");
intent.setDataAndType(uri, "audio/mp3");
startActivity(intent);
//Get all the audio files in the SD card, and then play the first one =-=
Uri uri = Uri.withAppendedPath(MediaStore.Audio.Media.INTERNAL_CONTENT_URI, "1");
Intent intent = new Intent(Intent.ACTION_VIEW, uri);
startActivity(intent);
//9. Open the camera to take pictures:
//Open the camera program
Intent intent = new Intent( MediaStore.ACTION_IMAGE_CAPTURE);
startActivityForResult(intent, 0);
// Get photo data
Bundle extras = intent.getExtras();
Bitmap bitmap = (Bitmap) extras.get("data ");
//Another:
//Calling the system camera application and storing the photos taken
Intent intent = new Intent(MediaStore.ACTION_IMAGE_CAPTURE);
time = Calendar.getInstance().getTimeInMillis();
intent.putExtra(MediaStore.EXTRA_OUTPUT, Uri.fromFile(new File(Environment
.getExternalStorageDirectory().getAbsolutePath()+"/tucue", time + " .jpg")));
startActivityForResult(intent, ACTIVITY_GET_CAMERA_IMAGE);
//10. Get and cut the picture
// Get and cut the picture
Intent intent = new Intent (Intent.ACTION_GET_CONTENT);
intent.setType("image/*");
intent.putExtra("crop", "true"); // Turn on cropping
intent.putExtra("aspectX ", 1); // The aspect ratio of the cut is 1:2
intent.putExtra("aspectY", 2);
intent.putExtra("outputX", 20); // Save the image Width and height
intent.putExtra("outputY", 40);
intent.putExtra("output", Uri.fromFile(new File("/mnt/sdcard/temp"))); // Save Path
intent.putExtra("outputFormat", "JPEG");//Return format
startActivityForResult(intent, 0);
//Cut specific picture
Intent intent = new Intent(" com.android.camera.action.CROP");
intent.setClassName("com.android.camera", "com.android.camera.CropImage");
intent.setData(Uri.fromFile(new File("/mnt/sdcard/temp")));
intent.putExtra("outputX", 1); // The aspect ratio of the clipping is 1:2
intent.putExtra("outputY", 2);
intent.putExtra("aspectX", 20); //Save the width and height of the image
intent.putExtra("aspectY", 40);
intent.putExtra("scale", true);
intent.putExtra("noFaceDetection", true);
intent.putExtra("output", Uri.parse("file:///mnt/sdcard/temp"));
startActivityForResult(intent, 0);
/ /11. Open Google Market
// Open Google Market and directly enter the detailed page of the program
Uri uri = Uri.parse("market://details?id=" + "com.demo.app") ;
Intent intent = new Intent(Intent.ACTION_VIEW, uri);
startActivity(intent);
//12. Enter the mobile phone setting interface:
// Enter the wireless network setting interface (Others can draw inferences from one example)
Intent intent = new Intent(android.provider.Settings.ACTION_WIRELESS_SETTINGS);
startActivityForResult(intent, 0);
//13. Install apk:
Uri installUri = Uri.fromParts("package", "xxx", null);
returnIt = new Intent(Intent.ACTION_PACKAGE_ADDED, installUri);
//14. Uninstall apk:
Uri uri = Uri.fromParts("package", strPackageName, null);
Intent it = new Intent(Intent.ACTION_DELETE, uri);
startActivity(it);
//15.Send attachments :
Intent it = new Intent(Intent.ACTION_SEND);
it.putExtra(Intent.EXTRA_SUBJECT, "The email subject text");
it.putExtra(Intent.EXTRA_STREAM, "file:// /sdcard/eoe.mp3");
sendIntent.setType("audio/mp3");
startActivity(Intent.createChooser(it, "Choose Email Client"));
// 16. Enter the contact page:
Intent intent = new Intent();
intent.setAction(Intent.ACTION_VIEW);
intent.setData(People.CONTENT_URI);
startActivity(intent);
//17. View the specified contact:
Uri personUri = ContentUris.withAppendedId(People.CONTENT_URI, info.id);//info.id Contact ID
Intent intent = new Intent ();
intent.setAction(Intent.ACTION_VIEW);
intent.setData(personUri);
startActivity(intent);
Summary of this section:
Okay, it doesn’t look like an introductory tutorial after just writing it down, haha, but it’s okay to learn more. This is the first glimpse of this section. Let's go~ We will continue to study this Activity in the next section, such as data transfer, startup mode, etc.~ Stay tuned~


