Activity comes in
1. The relationship between Activity, Window and View
Okay, I originally wanted to understand the relationship between them, and then I started to look at their calls. Here comes the process... In the end, I spent two hours and only understood a very small part. Sure enough, those who went to the bottom to learn the source code are all great masters, such as Lao Luo, who has not yet reached that level. The following is to check the information by yourself. After reading the summary of the next bit of source code, please point out if there is anything wrong! A summary diagram is posted below:
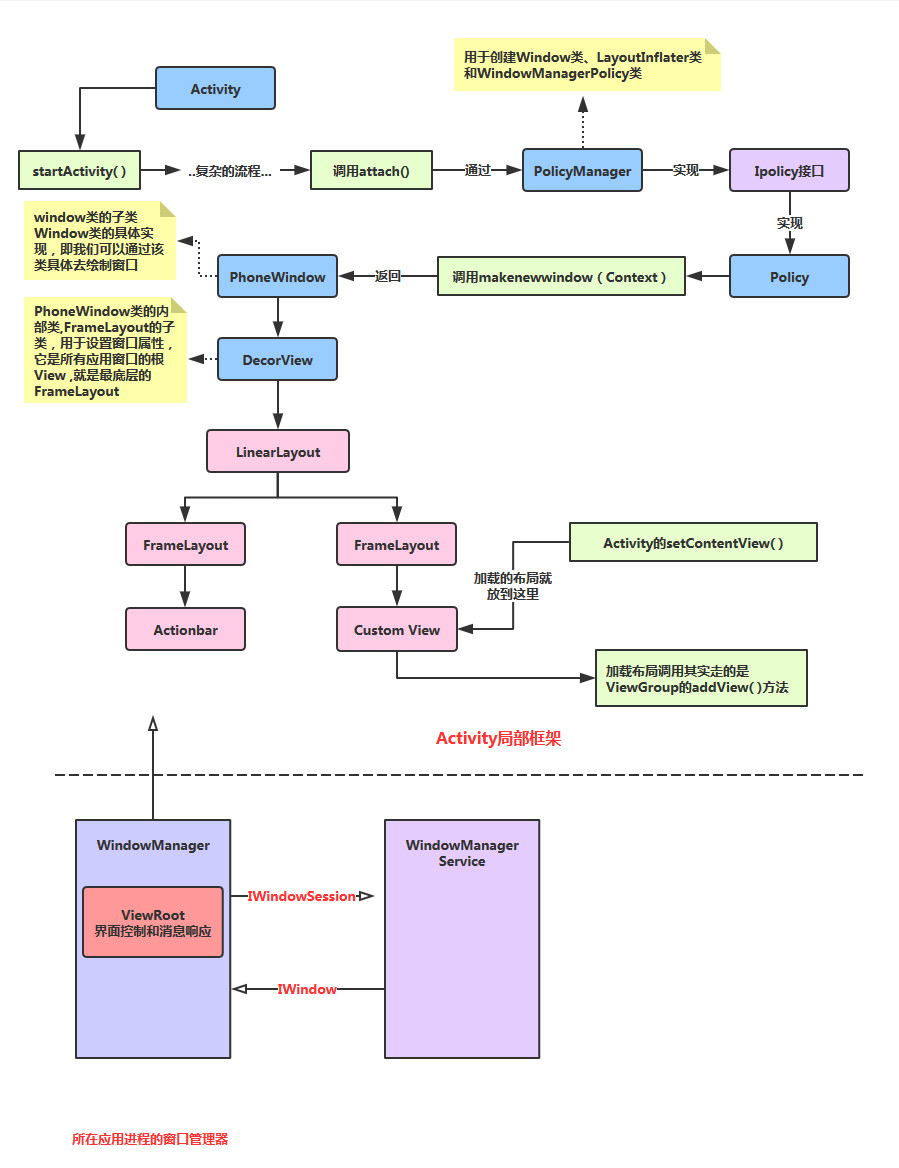
Process analysis: After Activity calls startActivity, it will finally call the attach method, and then Implement an Ipolicy interface in PolicyManager, then implement a Policy object, and then call the makenewwindow(Context) method, which will return a PhoneWindow object, and PhoneWindow It is a subclass of Window. In this PhoneWindow, there is an internal class of DecorView, which is the root View of all application windows, that is, the boss of View. Directly control whether the Activity is displayed (quote the old driver's original words...), okay, then there is a LinearLayout inside, and there are two FrameLayouts inside. They are used to install ActionBar and CustomView respectively, and the layout loaded by our setContentView() is placed in This CustomView!
Summarize the relationship between these three: Let’s make a far-fetched metaphor: We can call these three categories respectively: painters, canvases, and things drawn with brushes; The painter draws the pattern with the brush (LayoutInflater.infalte) and then draws it on the canvas (addView)! Finally it is displayed (setContentView)
2. Some concepts of Activity, Task and Back Stack
Then let’s understand the management mechanism of Activity in Android. This It involves two nouns: Task and Back Stack!
Concept analysis:
Our APP is generally composed of multiple activities, and Android provides us with a Task (task) the concept of, It is to collect multiple related activities, and then jump and return the activities! Of course, this Task is just a The concept of the frameworker layer, and the data structure of Task implemented in Android is Back Stack (Back Stack) ! I believe everyone is familiar with the data structure of stack. There is also a collection class of Stack in Java! The stack has the following characteristics:
First in, first out (LIFO), commonly used operations are push and pop. The top is called the top of the stack, and the bottom is called the stack. Bottom
The Stack Stack in Android also has the above characteristics. This is how it manages Activity:
When switching to a new Activity, then the Activity will be pushed onto the stack and become the top of the stack! When the user clicks the Back button, the Activity on the top of the stack pops out, and the Activity immediately following it comes to the top of the stack!
Let’s take a look at a flow chart given in the official document:

Process analysis:
There are three activities A1, A2, and A3 in the application. When the user clicks the application on the Launcher or Home Screen icon, Start the main A1, then A1 starts A2, and A2 starts A3. At this time, there are three activities in the stack, and these three activities are in In the same task (Task), when the user presses the return key, A3 pops up, and only A1 and A2 are left in the stack. If the user presses the return key again, Pop up A2, and only A1 remains in the stack. Continue to press the return key, pop up A1, the task is removed, that is, the program exits!
Then I saw two other pictures in the official document. Out of curiosity, I read the explanation again, and then discussed it with people in the group:
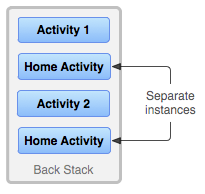
Then there is this explanation:
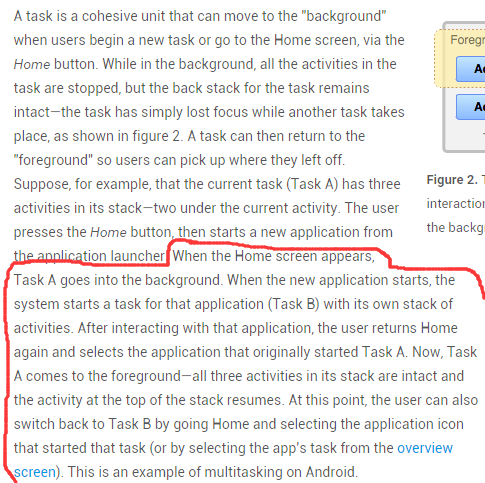
Then the conclusion is drawn:
Task is Activity The collection is a concept. The Back Stack is actually used to store the Activity. There can be multiple Tasks, but Only one stack is at the front at the same time, and the others are in the background! How did the stack come about?
Answer: When we click the icon to open a new App through the home screen, a new Task will be created! For example:
We open the APP by clicking the icon of the Address Book APP. At this time, a new stack 1 will be created, and then the newly generated Activity will be added. Maybe we have opened the SMS APP page in the Address Book APP. , but a new stack will not be created at this time, but will continue to be added to stack 1. This is Android promotes a user experience method, that is, switching between different applications can make users feel like they are the same application. A very coherent user experience, officially called seamless! ——————If we click the Home button at this time to return to the home screen, and stack 1 enters the background, we may have the following two operations:
1) Click the menu button (the square button), click Open the program just now, and then stack 1 returns to the foreground! Or we click on the address book icon on the home screen to open the APP. At this time, a new stack will not be created, and stack 1 will return to the foreground!
2) If we click on another icon to open a new APP at this time, then a new stack 2 will be created at this time, and stack 2 will come to the foreground. And stack 1 continues to stay in the background;
3) The same is true later...and so on!
3.Task Management
1) Document Translation:
Okay, continue walking through the document, starting from ManagingTasks in the document, roughly The translation is as follows:
1) Document translation
Continue walking through the document, starting from ManagingTasks in the document, the translation is as follows:
As mentioned above, Android will add the newly successfully launched Activity to the same Task and manage multiple Tasks in a "first in, first out" manner. With Back Stack, users don’t have to worry about how Activites interact with Tasks or how they exist in Back Stack! Maybe you want to change this normal management style. For example, you want one of your activities to be managed in a new Task; Or you only want to instantiate a certain Activity, or you want to clean up all Activities in the Task except the root Activity when the user leaves the task. You can do these things and more just by modifying AndroidManifest.xml < activity > can be easily implemented by passing a specially identified Intent to startActivity() in the code. Management of Actvitiy. The attributes we can use in
< activity > are as follows:
- taskAffinity
- launchMode
- allowTaskReparenting
- clearTaskOnLaunch
- alwaysRetainTaskState
- finishOnTaskLaunch
The main Intent flags you can use are:
Okay, Next, we will introduce how to use these one by one:
- FLAG_ACTIVITY_NEW_TASK
- FLAG_ACTIVITY_CLEAR_TOP
- ##FLAG_ACTIVITY_SINGLE_TOP
2) taskAffinity and allowTaskReparentingBy default,
all activities in an application have an Affinity, This makes them belong to the same Task. You can understand it as a sign of whether it is in the same Task. However, each Activity can pass The taskAffinity property in < activity> sets a separate Affinity. Activities in different applications can share the same Affinity, and different Activities in the same application It can also be set to different Affinity. The Affinity attribute works in 2 situations:
1) When the Intent object that starts the activity contains theFLAG_ACTIVITY_NEW_TASK tag: When the Intent object passed to startActivity() contains the FLAG_ACTIVITY_NEW_TASK tag, the system will look for a task different from the current Activity for the Activity that needs to be started. If the Affinity attribute of the Activity to be started is different from the Affinity attribute of all current Tasks, the system will create a new Task with that Affinity attribute and push the Activity to be started into the newly created Task stack; otherwise, the Activity will be pushed into that Affinity attribute. Affinity property in the same stack.
2)allowTaskReparenting attribute is set to true If an activity's allowTaskReparenting property is true, then it can be moved from one Task (Task1) to another Task (Task2) with the same Affinity (when Task2 is brought to the foreground). If an .apk file contains multiple "applications" from the user's perspective, you may need to assign different Affinity values to those activities.
3) launchMode:
Four optional values, the core of our research on launch mode, we will talk about it in detail below! They are: standard (default), singleTop, singleTask, singleInstance
4) Clear Stack
When the user leaves the Task for a long time (the current task is transferred to the background), the system will clear all activities in the task except the activity at the bottom of the stack. . In this way, when the user returns to the Task, only the original Activity of that task is left. We can modify the following properties to Change this behavior!
alwaysRetainTaskState: If this property of the activity at the bottom of the stack is set to true, the above situation will not happen. All activities in the Task will be saved for a long time.
clearTaskOnLaunchIf this property of the activity at the bottom of the stack is set to true, once the user leaves the Task, Then the activities in the Task stack will be cleared until only the activity at the bottom of the stack remains. This situation coincides with The opposite of alwaysRetainTaskState. Even if the user leaves only briefly, the task will return to its initial state (Only the activity at the bottom of the stack remains).
finishOnTaskLaunchSimilar to clearTaskOnLaunch, but it only operates on a single activity operation, rather than the entire Task. It can end any Activity, including the Activity at the bottom of the stack. When it is set to true, the current Activity only exists as part of the Task during the current session. When the user exits the Activity and returns, it will not exist.
4. Detailed explanation of the four loading modes of Activity:
Next, let’s explain the four loading modes in detail: They are: standard (default), singleTop, singleTask, singleInstance I saw an article with pictures and texts when I was spending time online. The explanation of startup mode is very good. It may be easier to understand. Let’s learn from it here:
Original link: Detailed graphic and text explanation of Activity startup mode: standard, singleTop, singleTask and singleInstance
English original text:Understand Android Activity's launchMode: standard, singleTop, singleTask and singleInstanceThere is also a detailed explanation of the loading mode:Detailed explanation of the four launch modes and taskAffinity attributes of Activity in Android
Let’s take a look at the summary picture first:
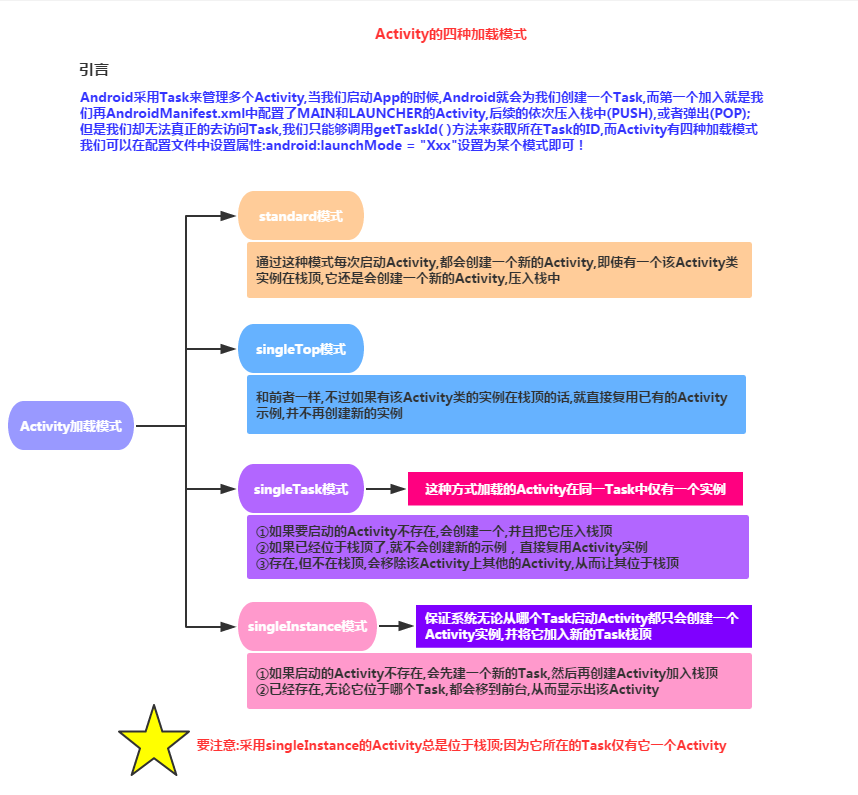
##Mode details:
standard mode:
Standard startup mode is also the default startup mode of activity. An activity started in this mode can be instantiated multiple times, that is, multiple instances of the activity can exist in the same task, and each instance will handle an Intent object. If the startup mode of Activity A is standard, and A has already been started, starting Activity A again in A, that is, calling startActivity(new Intent(this, A.class)), will start an instance of A again on top of A, that is, The current status of the stack is A-->A.
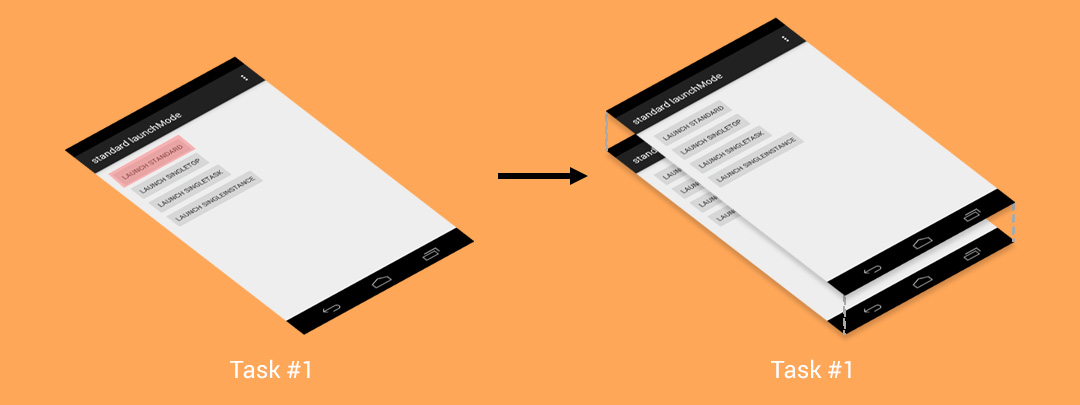
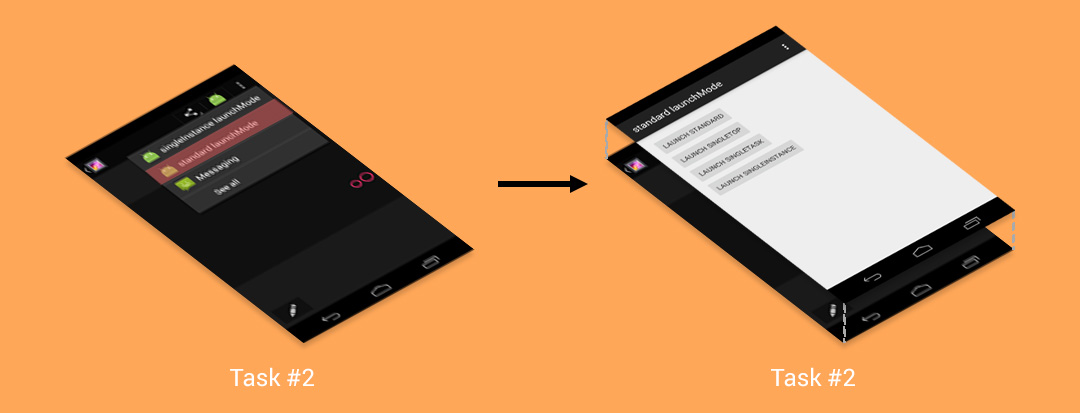
singleTop mode:
If an instance of an Activity started in singleTop mode already exists in the task the top of the stack, Then when this Activity is started again, a new instance will not be created, but the instance at the top of the stack will be reused. And the onNewIntent() method of the instance will be called to pass the Intent object to this instance. For example, if the startup mode of A is singleTop, and an instance of A already exists on the top of the stack, Then when calling startActivity(new Intent(this, A.class)) to start A, The instance of A will not be created again, but the original instance will be reused and the onNewIntent() method of the original instance will be called. At this time, there is still an instance of A in the task stack. If an instance of an activity started in singleTop mode If it already exists in the task stack but is not at the top of the stack, its behavior is the same as in standard mode and multiple instances will be created.
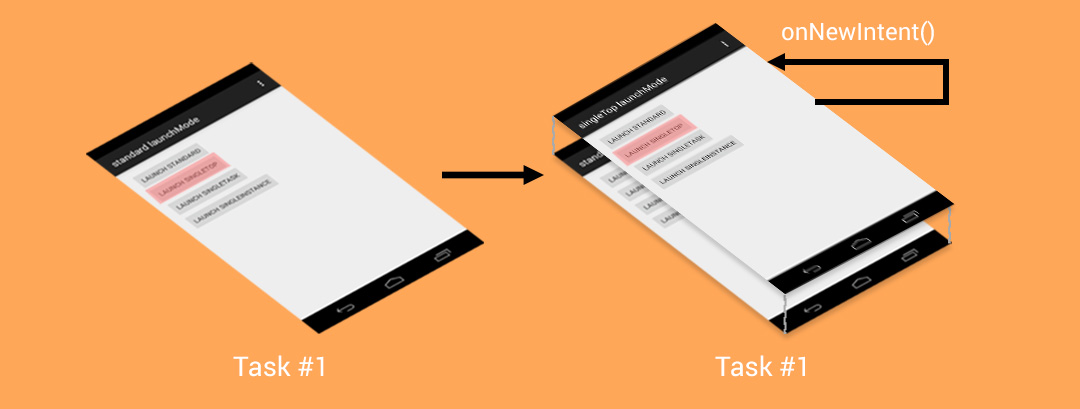
singleTask mode:
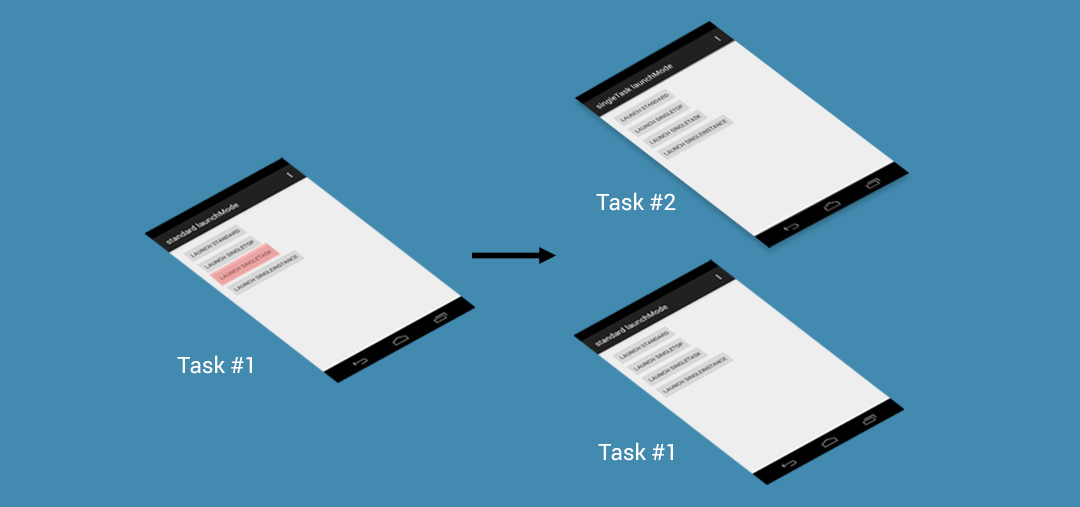
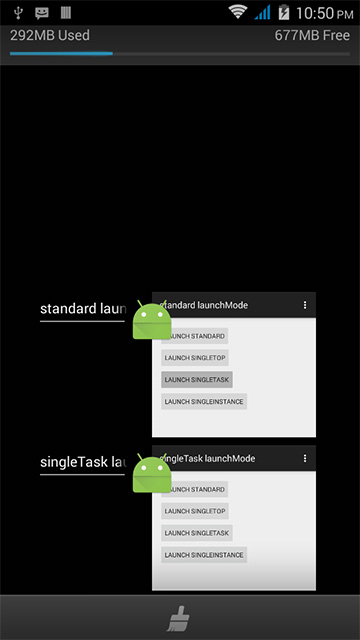
Only one Activity instance is allowed in the system. If there is already an instance in the system, The task holding this instance will be moved to the top and the intent will be sent via onNewIntent(). If not, a new Activity will be created and placed in the appropriate task
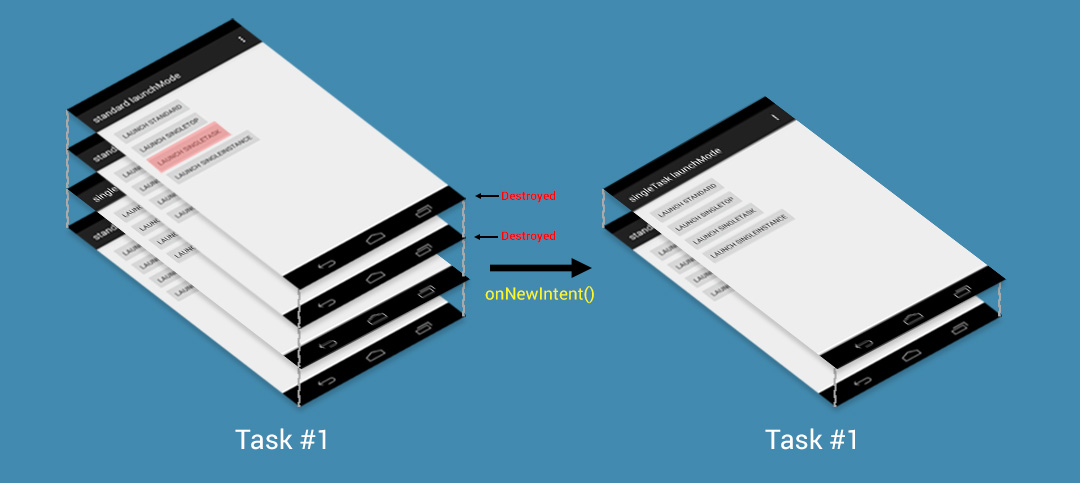
An issue mentioned in the official documentation:
The system will create a new task and instantiate this Activity as the root of the new task This requires us to set taskAffinity. Dismissal after using taskAffinity:
singleInstance mode
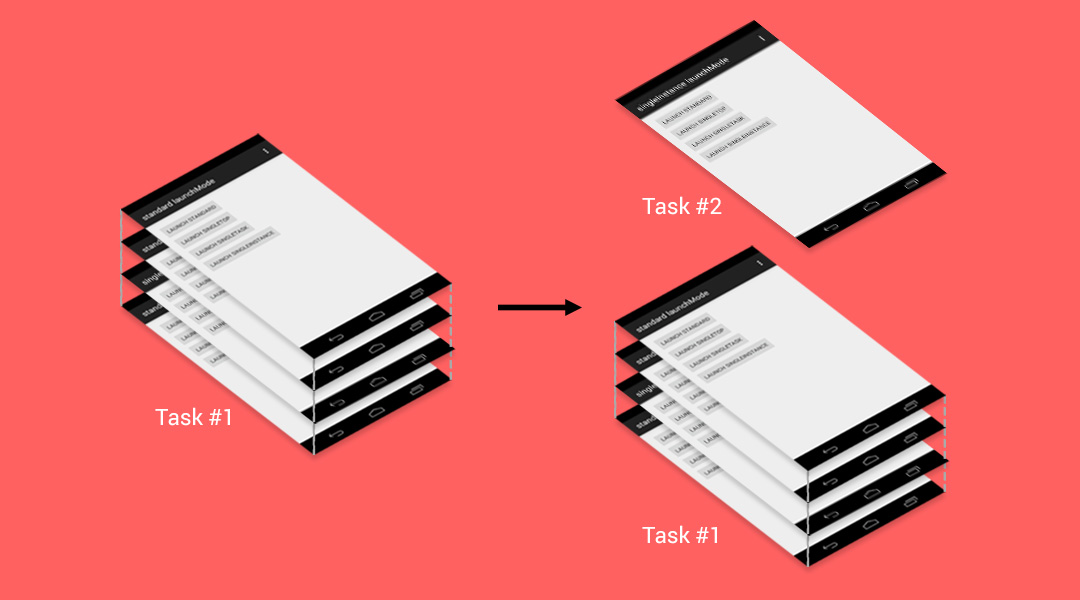
Ensures that no matter which Task the system starts the Activity from, it will only create one Activity instance and add it to the top of the new Task stack That is to say, other activities started by this instance will automatically run in another Task. When an instance of the activity is started again, the existing tasks and instances will be reused. and this instance will be called The onNewIntent() method passes the Intent instance to the instance. Same as singleTask, There will only be one such Activity instance in the system at the same time.
5. Activity Supplements
There may be some things about Activity that haven’t been mentioned yet, so I’ll reserve a place here, and everything I’ve missed will be here. Fill! First of all, it is the suggestion of group friend Zhuhai Kun to post the Activity management class of open source China. Well, here it is, everyone can use it directly. In project~
1)开源中国客户端Activity管理类:
import java.util.Stack;
import android.app.Activity;
import android.app.ActivityManager;
import android.content.Context;
public class AppManager {
private static Stack<Activity> activityStack;
private static AppManager instance;
private AppManager(){}
/**
* Single instance
*/
public static AppManager getAppManager(){
if(instance==null){
instance=new AppManager();
}
return instance;
}
/**
* Add Activity to the stack
*/
public void addActivity(Activity activity){
if(activityStack==null){
activityStack=new Stack<Activity>();
}
activityStack.add(activity);
}
/**
* Get the current Activity (the last one pushed on the stack)
*/
public Activity currentActivity(){
Activity activity=activityStack.lastElement();
return activity;
}
/**
* End the current Activity (the last one pushed on the stack)
*/
public void finishActivity(){
Activity activity=activityStack.lastElement();
finishActivity(activity);
}
/**
* End the specified Activity
*/
public void finishActivity(Activity activity){
if(activity!=null){
activityStack.remove(activity);
activity.finish();
activity=null;
}
}
/**
* End the Activity of the specified class name
*/
public void finishActivity(Class<?> cls){
for (Activity activity : activityStack) {
if(activity.getClass().equals(cls) ){
finishActivity(activity);
}
}
}
/**
* End all activities
*/
public void finishAllActivity(){
for (int i = 0, size = activityStack.size(); i < size; i++){
if (null != activityStack.get(i)){
activityStack.get(i).finish();
}
}
activityStack.clear();
}
/**
* Exit the application
*/
public void AppExit(Context context) {
try {
finishAllActivity();
ActivityManager activityMgr= (ActivityManager) context.getSystemService(Context.ACTIVITY_SERVICE);
activityMgr.restartPackage(context.getPackageName());
System.exit(0);
} catch (Exception e) { }
}
}
Summary of this section:
Okay, that’s it for this section. Things are a bit bitter and difficult to understand. Just know it for now. Let’s summarize the overall scheduling of Tasks. Related operations:
- Press the Home button to switch the previous Task to the background
- Long press the Home button to display the list of recently executed Tasks
- Click the app icon in Launcher or HomeScreen to start a new Task, or schedule an existing Task to the foreground
- When starting an Activity in singleTask mode, it will search in the system to see if a suitable one already exists Task, if it exists, will schedule this Task to the foreground to reuse this Task. If there is already an instance of the Activity to be started in this Task, clear all Activities above this instance and display this instance to the user. If there is no instance of the Activity to be started in this existing Task, an instance is started at the top of this Task. If this Task does not exist, a new Task will be started, and an instance of this SingleTask mode Activity will be started in this new Task.
- When starting a singleInstance Activity, it will search the system to see if there is already an instance of this Activity. If it exists, the Task where this instance is located will be scheduled to the foreground and the instance of this Activity will be reused (there are only This Activity), if it does not exist, will start a new task and start an instance of this singleInstance mode Activity in this new Task.
Okay, that’s it for this section. Things about Task and Activity loading modes are still quite complicated. I’ll post the steps for writing this article. You can take a look at some of the references at that time~
References:
- 1.Tasks and Back Stack
- 2.Understand the relationship between Activity and Task in android
- 3.Detailed graphic and text explanation of Activity startup mode: standard, singleTop, singleTask and singleInstance
- 4.Understand Android Activity's launchMode: standard, singleTop, singleTask and singleInstance
- 5.Detailed explanation of the four launch modes and taskAffinity attributes of Activity in Android
- 6.Detailed explanation of Android’s Activity and Tasks
- 7.Activity’s four startup modes and onNewIntent() ##8.
- Translation: Complete analysis of Android tasks and return stacks, detailing the details you don’t know


