How to use AppML
This chapter will demonstrate how to create an <AppML> application in the following 4 simple steps.
The next chapter will explain how to download <AppML> and start developing web applications on your own computer.
1. Create a model (Model)
Create a file with the following content
<datasource>
<database>
<connection>Demo</connection>
<sql>SELECT CustomerName,ContactName,City,Country FROM Customers</sql>
<orderby>CustomerName</orderby>
</database>
</datasource>
<filters>
<query>
<field>CustomerName</field>
</query>
</filters>
</appml>
In the subdirectory Models (we recommend) save the file as Customers.xml .
Model parsing
<appml> tag defines the model.
<datasource> tag defines the data source of the model.
<database> tag defines the database.
The<connection> tag defines the link to the database.
<sql>Tag definition data query
<orderby>Tag definition default sorting.
The<query> tag defines legal query filters.
2. Create a WEB page
In the first <AppML> app, create an HTML page:
Example
<!DOCTYPE html>
<html>
<body>

<h1>My First Web Application</h1>

<table>
<tr>
  <th>Customer</th>
  <th>City</th>
  <th>Country</th>
</tr>
<tr>
  <td>Alfreds Futterkiste</td>
  <td>Berlin</td>
  <td>Germany</td>
</tr>
</table>

</body>
</html>
Run instance»
Click the "Run instance" button to view the online instance
3. Add style
Add cascading styles to your web page before executing <AppML> app:
Instance
<!DOCTYPE html>
<html>

<head>
<link rel="stylesheet" href="appml.css">
</head>

<body>
<h1>My First Web Application</h1>

<table class="appmltable">
<tr>
  <th>Customer</th>
  <th>City</th>
  <th>Country</th>
</tr>
<tr>
  <td>Alfreds Futterkiste</td>
  <td>Berlin</td>
  <td>Germany</td>
</tr>
</table>

</body>
</html>
Run Example»
Click the "Run Example" button to view the online example
4. Add the script, and then execute the application
on your web Add a script to the page to run <AppML> app:
Instance
<!DOCTYPE html>
<html>

<head>
<link rel="stylesheet" href="appml.css">
</head>

<body>
<h1>My First Web Application</h1>

<div id="Place01">

<table id="Template01" class="appmltable">
<tr>
  <th>Customer</th>
  <th>City</th>
  <th>Country</th>
</tr>
<trid="appml_row">
  <td>#CustomerName#</td>
  <td>#City#</td>
  <td>#Country#</td>
</tr>
</table>
</div>

<script src="appml.js"></script>
<script>
app=new AppML("appml.htmlx","Models/Customers.xml");
app.run("Place01","Template01");
</script>

</body>
</html>
Run instance»
Click "Run" Instance" button to view online examples
Example analysis
<AppML> The library contains a large number of functions. These functions can be called from your web page.
<script src="appml.js"> Loaded <AppML> library.
JavaScript statement: app=new AppML("appml.htmlx","Models/Customers.xml"); Create AppML application object, Then execute the web server script "appml.htmlx" to load the data of the "Customers.xml" file.
JavaScript statement app.run("Place01","Template01"); Insert data into the HTML element with id="Place01", Use the id="Template01" attribute element as the template.
Attribute id="appml_row" defines each piece of data inserted into the HTML element.
# The data in the tag will be replaced with the model's data.
All of the above, can you imagine a faster prototype?
How does it work?
When the web page loads, you can load the <AppML> controller into the page.
Using the <AppML> controller, you can create <AppML> objects on the page.
When you run the <AppML> object in the page, it will request the server-side data controller.
<AppML> object receives data from the server (using the data model).
<AppML> object (or your code) displays data on the page.
(Optional) Web users can change the data.
(Optional) <AppML> can send data in the server background.
(Optional) The server controller can store data on the server side.
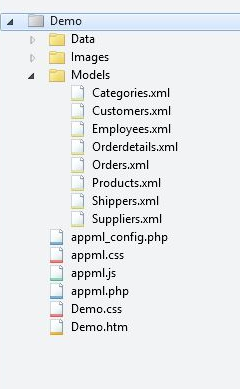
Typical Web files and folders:
| ##web folder: Data Image folder:Images Model folder:Models Application:Demo.htm Style:Demo.css <AppML> Configuration file:appml_config.php (or .htmlx) <AppML> Style file:appml.css <AppML> Browser controller:appml.js < ;AppML> Server Controller:appml.php (or .htmlx) |


