
Rumah >Tutorial sistem >LINUX >Android hot fix analisis kod sumber Tinker
Android hot fix analisis kod sumber Tinker

- 王林ke hadapan
- 2024-03-25 09:20:241061semak imbas
Sorotan utama Tinker ialah ia telah membangunkan sendiri set dex diff dan algoritma berkaitan tampalan. Tujuan utama artikel ini adalah untuk menganalisis algoritma ini. Sudah tentu, perlu diperhatikan bahawa prasyarat untuk analisis ialah anda perlu mempunyai pemahaman tertentu tentang format fail dex, jika tidak, anda mungkin keliru.
Jadi, artikel ini mula-mula akan melakukan analisis ringkas format fail dex, dan juga melakukan beberapa eksperimen mudah, dan akhirnya memasukkan bahagian algoritma dex diff dan tampalan.
Pertama sekali, mari kita fahami secara ringkas fail Dex Apabila menyahkompilasi, semua orang tahu bahawa apk akan mengandungi satu atau lebih fail *.dex ini menyimpan kod yang kami tulis dalam keadaan biasa, kami juga akan menggunakan alat untuk menukarnya ke dalam balang, dan kemudian gunakan beberapa alat untuk menyahhimpun dan melihatnya.
Semua orang harus tahu bahawa fail jar adalah serupa dengan pakej fail kelas yang dimampatkan Dalam keadaan biasa, kita boleh terus menyahmampat dan melihat fail kelas satu demi satu. Bagi fail dex, kami tidak boleh mendapatkan fail kelas dalaman dengan menyahmampatnya, yang bermaksud bahawa fail dex mempunyai format khususnya sendiri:
dex menyusun semula fail kelas Java, menguraikan kumpulan malar dalam semua fail kelas JAVA, menghapuskan maklumat berlebihan, dan menggabungkannya semula untuk membentuk kumpulan malar Semua fail kelas berkongsi kumpulan malar yang sama, menjadikan rentetan dan pemalar yang sama Muncul sekali sahaja dalam DEX fail, sekali gus mengurangkan saiz fail.
Seterusnya, mari kita lihat rupa struktur dalaman fail dex.
Untuk menganalisis komposisi fail, sebaiknya tulis fail dex yang paling mudah untuk analisis.
Mula-mula kami menulis kelas Hello.java:
public class Hello{
    public static void main(String[] args){
        System.out.println("hello dex!");
    }
}
Kemudian susun:
javac -source 1.7 -target 1.7 Hello.java
Akhirnya tukarkannya kepada fail dex melalui kerja dx:
dx --dex --output=Hello.dex Hello.class
Laluan dx berada di bawah Android-sdk/build-tools/nombor versi/dx Jika arahan dx tidak dapat dikenali, ingat untuk meletakkan laluan di bawah laluan, atau gunakan laluan mutlak.
Dengan cara ini kita mendapat fail dex yang sangat mudah.
Mula-mula tunjukkan gambar rajah struktur dalaman kasar fail dex:
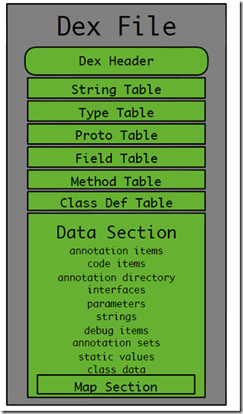
Sudah tentu, hanya menerangkannya daripada gambar pastinya tidak mencukupi, kerana kita akan mengkaji diff dan algoritma tampalan kemudiannya, secara teori, kita harus mengetahui lebih terperinci, malah hingga ke: setiap perkataan fail dex Apakah yang diwakili oleh bahagian itu?
Untuk fail seperti binari, cara terbaik pastinya tidak bergantung pada ingatan Nasib baik, ada perisian sedemikian yang boleh membantu kami menganalisis:
- Nama perisian: 010 Editor
Selepas memuat turun dan memasang, buka fail dex kami dan anda akan dibimbing untuk memasang templat penghuraian fail dex.
Rendering akhir adalah seperti berikut:
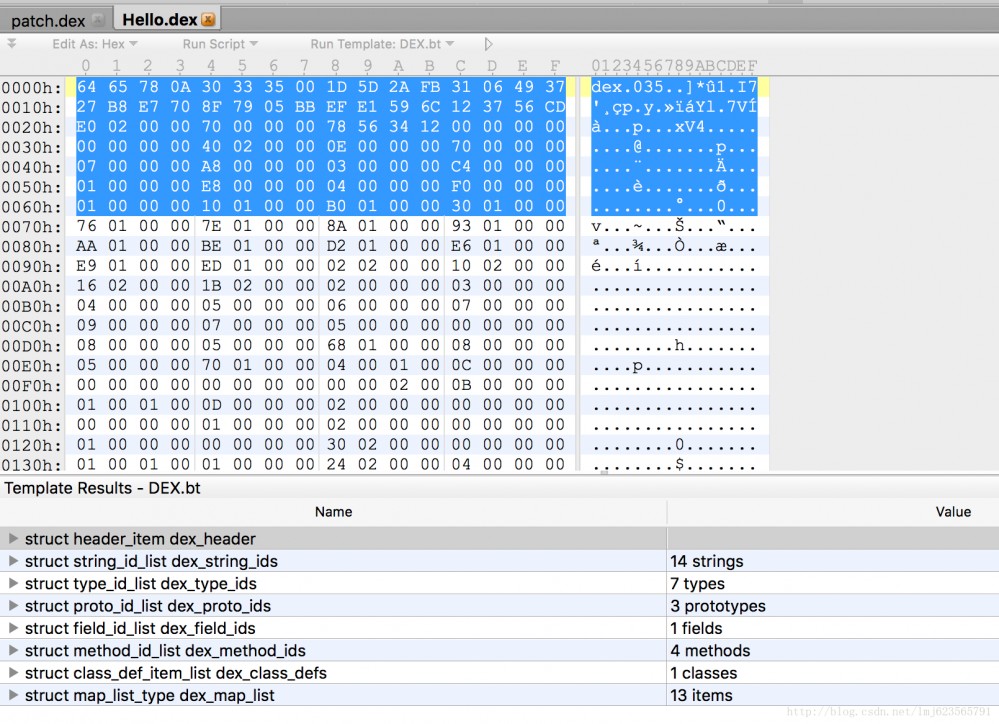
Bahagian atas mewakili kandungan fail dex (dipaparkan dalam format heksadesimal), dan bahagian bawah menunjukkan setiap kawasan fail dex Anda boleh mengklik pada bahagian bawah untuk melihat kawasan kandungan dan kandungannya.
Sudah tentu, ia juga sangat disyorkan di sini untuk membaca beberapa artikel khas untuk mendalami pemahaman anda tentang fail dex:
- Analisis format fail DEX
- Perjalanan kejuruteraan terbalik Android—menghuraikan format fail Dex yang disusun
Artikel ini hanya akan melakukan analisis format mudah bagi fail dex.
dex_header
Mula-mula, mari kita lakukan analisis kasar dex_header Pengepala mengandungi medan berikut:
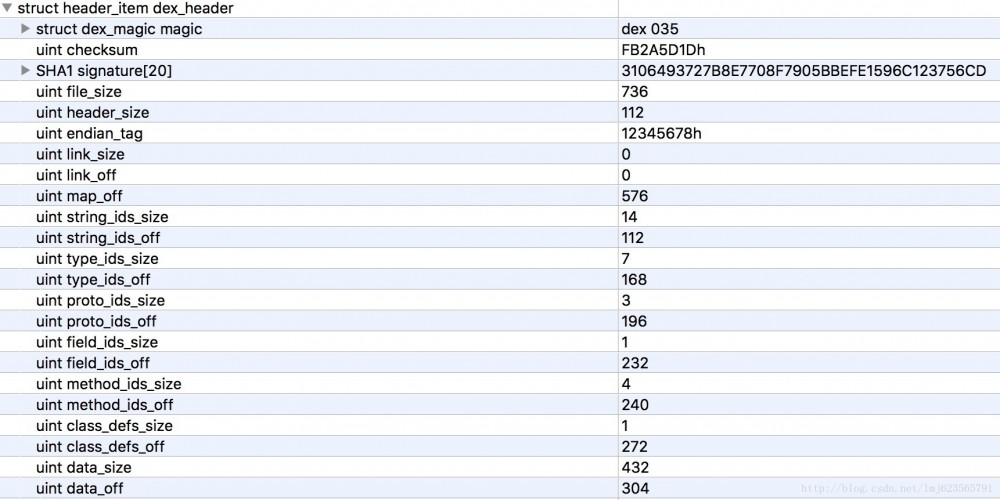
Pertama sekali, kami meneka peranan pengepala Kami dapat melihat bahawa ia mengandungi beberapa medan berkaitan pengesahan dan anggaran pengedaran blok dalam keseluruhan fail dex (off adalah offset).
Kelebihan ini ialah apabila mesin maya membaca fail dex, ia hanya perlu membaca bahagian pengepala untuk mengetahui anggaran pengedaran blok fail dex dan ia boleh menyemak sama ada format fail itu betul, sama ada fail itu ada telah diusik, dsb.
- Dapat membuktikan bahawa fail tersebut adalah fail dex
- checksum dan tandatangan digunakan terutamanya untuk mengesahkan integriti fail
- saiz_fail ialah saiz fail dex
- head_size ialah saiz fail header
- Nilai lalai endian_tag ialah 12345678, dan logo menggunakan Little-Endian secara lalai (carian sendiri).
Selebihnya adalah hampir semua saiz dan luar yang muncul secara berpasangan, kebanyakannya mewakili bilangan dan mengimbangi struktur data tertentu yang terkandung dalam setiap blok. Contohnya: string_ids_off ialah 112, yang bermaksud kawasan string_ids bermula pada offset 112; string_ids_size ialah 14, yang bermaksud bilangan string_id_items ialah 14; Selebihnya adalah serupa jadi saya tidak akan memperkenalkan mereka.
Digabungkan dengan 010Editor, anda boleh melihat struktur data yang terkandung dalam setiap kawasan dan nilai yang sepadan Hanya luangkan masa anda dan bacanya.
Selain header, ada satu lagi bahagian penting iaitu dex_map_list. Jom tengok gambar dulu:
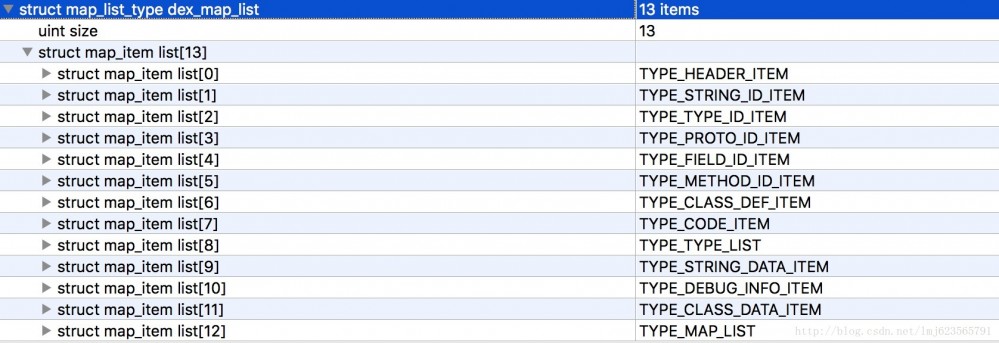
Yang pertama ialah bilangan map_item_list, diikuti dengan penerangan setiap map_item_list.
Apakah kegunaan map_item_list?

Anda boleh melihat bahawa setiap map_list_item mengandungi jenis penghitungan, ahli 2-bait yang tidak digunakan, saiz yang menunjukkan bilangan jenis semasa dan ofset yang menunjukkan ofset jenis semasa.
Ambil contoh ini:
- Yang pertama ialah jenis TYPE_HEADER_ITEM, yang mengandungi 1 pengepala (saiz=1) dan offset ialah 0.
- Seterusnya ialah TYPE_STRING_ID_ITEM, yang mengandungi 14 string_id_item (saiz=14), dan offset ialah 112 (jika anda ingat, panjang pengepala ialah 112, diikuti dengan pengepala).
Selebihnya boleh disimpulkan mengikut urutan~~
Dalam kes ini, dapat dilihat bahawa melalui map_list, fail dex yang lengkap boleh dibahagikan kepada kawasan tetap (13 dalam contoh ini), dan permulaan setiap kawasan dan bilangan format data yang sepadan dengan kawasan itu diketahui.
Cari permulaan setiap kawasan melalui map_list Setiap kawasan akan sepadan dengan struktur data tertentu. Lihat sahaja melalui 010 Editor.
现在我们了解了dex的基本格式,接下来我们考虑下如何做dex diff 和 patch。
先要考虑的是我们有什么:
- old dex
- new dex
我们想要生成一个patch文件,该文件和old dex 通过patch算法还能生成new dex。
- 那么我们该如何做呢?
根据上文的分析,我们知道dex文件大致有3个部分(这里3个部分主要用于分析,勿较真):
- header
- 各个区域
- map list
header实际上是可以根据后面的数据确定其内容的,并且是定长112的;各个区域后面说;map list实际上可以做到定位到各个区域开始位置;
我们最终patch + old dex -> new dex;针对上述的3个部分,
- header我们可以不做处理,因为可以根据其他数据生成;
- map list这个东西,其实我们主要要的是各个区域的开始(offset)
- 知道了各个区域的offset后,在我们生成new dex的时候,我们就可以定位各个区域的开始和结束位置,那么只需要往各个区域写数据即可。
那么我们看看针对一个区域的diff,假设有个string区域,主要用于存储字符串:
old dex该区域的字符串有: Hello、World、zhy
new dex该区域的字符串有: Android、World、zhy
可以看出,针对该区域,我们删除了Hello,增加了Android。
那么patch中针对该区域可以如下记录:
“del Hello , add Android”(实际情况需要转化为二进制)。
想想应用中可以直接读取出old dex,即知道:
- 原来该区域包含:Hello、World、zhy
- patch中该区域包含:”del Hello , add Android”
那么,可以非常容易的计算出new dex中包含:
Android、World、zhy。
这样我们就完成了一个区域大致的diff和patch算法,其他各个区域的diff和patch和上述类似。
这样来看,是不是觉得这个diff和patch算法也没有那么的复杂,实际上tinker的做法与上述类似,实际情况可能要比上述描述要复杂一些,但是大体上是差不多的。
有了一个大致的算法概念之后,我们就可以去看源码了。
这里看代码实际上也是有技巧的,tinker的代码实际上蛮多的,往往你可以会陷在一堆的代码中。我们可以这么考虑,比如diff算法,输入参数为old dex 、new dex,输出为patch file。
那么肯定存在某个类,或者某个方法接受和输出上述参数。实际上该类为DexPatchGenerator:
diff的API使用代码为:
@Test
public void testDiff() throws IOException {
    File oldFile = new File("Hello.dex");
    File newFile = new File("Hello-World.dex");

    File patchFile = new File("patch.dex");
    DexPatchGenerator dexPatchGenerator
            = new DexPatchGenerator(oldFile, newFile);
    dexPatchGenerator.executeAndSaveTo(patchFile);
}
代码在tinker-build的tinker-patch-lib下。
写一个单元测试或者main方法,上述几行代码就是diff算法。
所以查看代码时要有针对性,比如看diff算法,就找到diff算法的入口,不要在gradle plugin中去纠结。
public DexPatchGenerator(File oldDexFile, File newDexFile) throws IOException {
    this(new Dex(oldDexFile), new Dex(newDexFile));
}
将我们传入的dex文件转化为了Dex对象。
public Dex(File file) throws IOException {
    // 删除了一堆代码
    InputStream  in = new BufferedInputStream(new FileInputStream(file));
    loadFrom(in, (int) file.length());
}

private void loadFrom(InputStream in, int initSize) throws IOException {
    byte[] rawData = FileUtils.readStream(in, initSize);
    this.data = ByteBuffer.wrap(rawData);
    this.data.order(ByteOrder.LITTLE_ENDIAN);
    this.tableOfContents.readFrom(this);
}
首先将我们的文件读取为byte[]数组(这里还是蛮耗费内存的),然后由ByteBuffer进行包装,并设置字节顺序为小端(这里说明ByteBuffer还是蛮方便的。然后通过readFrom方法为Dex对象的tableOfContents赋值。
#TableOfContents
public void readFrom(Dex dex) throws IOException {
    readHeader(dex.openSection(header));
    // special case, since mapList.byteCount is available only after
    // computeSizesFromOffsets() was invoked, so here we can't use
    // dex.openSection(mapList) to get dex section. Or
    // an {@code java.nio.BufferUnderflowException} will be thrown.
    readMap(dex.openSection(mapList.off));
    computeSizesFromOffsets();
}
在其内部执行了readHeader和readMap,上文我们大致分析了header和map list相关,实际上就是将这两个区域转化为一定的数据结构,读取然后存储到内存中。
首先看readHeader:
private void readHeader(Dex.Section headerIn) throws UnsupportedEncodingException {
    byte[] magic = headerIn.readByteArray(8);
    int apiTarget = DexFormat.magicToApi(magic);

    if (apiTarget != DexFormat.API_NO_EXTENDED_OPCODES) {
        throw new DexException("Unexpected magic: " + Arrays.toString(magic));
    }

    checksum = headerIn.readInt();
    signature = headerIn.readByteArray(20);
    fileSize = headerIn.readInt();
    int headerSize = headerIn.readInt();
    if (headerSize != SizeOf.HEADER_ITEM) {
        throw new DexException("Unexpected header: 0x" + Integer.toHexString(headerSize));
    }
    int endianTag = headerIn.readInt();
    if (endianTag != DexFormat.ENDIAN_TAG) {
        throw new DexException("Unexpected endian tag: 0x" + Integer.toHexString(endianTag));
    }
    linkSize = headerIn.readInt();
    linkOff = headerIn.readInt();
    mapList.off = headerIn.readInt();
    if (mapList.off == 0) {
        throw new DexException("Cannot merge dex files that do not contain a map");
    }
    stringIds.size = headerIn.readInt();
    stringIds.off = headerIn.readInt();
    typeIds.size = headerIn.readInt();
    typeIds.off = headerIn.readInt();
    protoIds.size = headerIn.readInt();
    protoIds.off = headerIn.readInt();
    fieldIds.size = headerIn.readInt();
    fieldIds.off = headerIn.readInt();
    methodIds.size = headerIn.readInt();
    methodIds.off = headerIn.readInt();
    classDefs.size = headerIn.readInt();
    classDefs.off = headerIn.readInt();
    dataSize = headerIn.readInt();
    dataOff = headerIn.readInt();
}
如果你现在打开着010 Editor,或者看一眼最前面的图,实际上就是将header中所有的字段定义出来,读取响应的字节并赋值。
接下来看readMap:
private void readMap(Dex.Section in) throws IOException {
    int mapSize = in.readInt();
    Section previous = null;
    for (int i = 0; i < mapSize; i++) {
        short type = in.readShort();
        in.readShort(); // unused
        Section section = getSection(type);
        int size = in.readInt();
        int offset = in.readInt();

        section.size = size;
        section.off = offset;

        previous = section;
    }

    header.off = 0;

    Arrays.sort(sections);

    // Skip header section, since its offset must be zero.
    for (int i = 1; i < sections.length; ++i) {
        if (sections[i].off == Section.UNDEF_OFFSET) {
            sections[i].off = sections[i - 1].off;
        }
    }
}
这里注意,在读取header的时候,实际上已经读取除了map list区域的offset,并存储在mapList.off中。所以map list中实际上是从这个位置开始的。首先读取的就是map_list_item的个数,接下来读取的就是每个map_list_item对应的实际数据。
可以看到依次读取:type,unused,size,offset,如果你还有印象前面我们描述了map_list_item是与此对应的,对应的数据结构为TableContents.Section对象。
computeSizesFromOffsets()主要为section的byteCount(占据了多个字节)参数赋值。
到这里就完成了dex file 到 Dex对象的初始化。
有了两个Dex对象之后,就需要去做diff操作了。
继续回到源码:
public DexPatchGenerator(File oldDexFile, InputStream newDexStream) throws IOException {
    this(new Dex(oldDexFile), new Dex(newDexStream));
}
直接到两个Dex对象的构造函数:
public DexPatchGenerator(Dex oldDex, Dex newDex) {
    this.oldDex = oldDex;
    this.newDex = newDex;

    SparseIndexMap oldToNewIndexMap = new SparseIndexMap();
    SparseIndexMap oldToPatchedIndexMap = new SparseIndexMap();
    SparseIndexMap newToPatchedIndexMap = new SparseIndexMap();
    SparseIndexMap selfIndexMapForSkip = new SparseIndexMap();

    additionalRemovingClassPatternSet = new HashSet<>();

    this.stringDataSectionDiffAlg = new StringDataSectionDiffAlgorithm(
            oldDex, newDex,
            oldToNewIndexMap,
            oldToPatchedIndexMap,
            newToPatchedIndexMap,
            selfIndexMapForSkip
    );
    this.typeIdSectionDiffAlg = ...
    this.protoIdSectionDiffAlg = ...
    this.fieldIdSectionDiffAlg = ...
    this.methodIdSectionDiffAlg = ...
    this.classDefSectionDiffAlg = ...
    this.typeListSectionDiffAlg = ...
    this.annotationSetRefListSectionDiffAlg = ...
    this.annotationSetSectionDiffAlg = ...
    this.classDataSectionDiffAlg = ...
    this.codeSectionDiffAlg = ...
    this.debugInfoSectionDiffAlg = ...
    this.annotationSectionDiffAlg = ...
    this.encodedArraySectionDiffAlg = ...
    this.annotationsDirectorySectionDiffAlg = ...
}
看到其首先为oldDex,newDex赋值,然后依次初始化了15个算法,每个算法代表每个区域,算法的目的就像我们之前描述的那样,要知道“删除了哪些,新增了哪些”;
我们继续看代码:
dexPatchGenerator.executeAndSaveTo(patchFile);
有了dexPatchGenerator对象后,直接指向了executeAndSaveTo方法。
public void executeAndSaveTo(File file) throws IOException {
    OutputStream os = null;
    try {
        os = new BufferedOutputStream(new FileOutputStream(file));
        executeAndSaveTo(os);
    } finally {
        if (os != null) {
            try {
                os.close();
            } catch (Exception e) {
                // ignored.
            }
        }
    }
}
到executeAndSaveTo方法:
public void executeAndSaveTo(OutputStream out) throws IOException {
    int patchedheaderSize = SizeOf.HEADER_ITEM;
    int patchedStringIdsSize = newDex.getTableOfContents().stringIds.size * SizeOf.STRING_ID_ITEM;
    int patchedTypeIdsSize = newDex.getTableOfContents().typeIds.size * SizeOf.TYPE_ID_ITEM;

    int patchedProtoIdsSize = newDex.getTableOfContents().protoIds.size * SizeOf.PROTO_ID_ITEM;

    int patchedFieldIdsSize = newDex.getTableOfContents().fieldIds.size * SizeOf.MEMBER_ID_ITEM;
    int patchedMethodIdsSize = newDex.getTableOfContents().methodIds.size * SizeOf.MEMBER_ID_ITEM;
    int patchedClassDefsSize = newDex.getTableOfContents().classDefs.size * SizeOf.CLASS_DEF_ITEM;

    int patchedIdSectionSize =
            patchedStringIdsSize
                    + patchedTypeIdsSize
                    + patchedProtoIdsSize
                    + patchedFieldIdsSize
                    + patchedMethodIdsSize
                    + patchedClassDefsSize;

    this.patchedHeaderOffset = 0;

    this.patchedStringIdsOffset = patchedHeaderOffset + patchedheaderSize;

    this.stringDataSectionDiffAlg.execute();
    this.patchedStringDataItemsOffset = patchedheaderSize + patchedIdSectionSize;

    this.stringDataSectionDiffAlg.simulatePatchOperation(this.patchedStringDataItemsOffset);

    // 省略了其余14个算法的一堆代码
    this.patchedDexSize
            = this.patchedMapListOffset
            + patchedMapListSize;
    writeResultToStream(out);
}
因为涉及到15个算法,所以这里的代码非常长,我们这里只拿其中一个算法来说明。
每个算法都会执行execute和simulatePatchOperation方法:
首先看execute:
public void execute() {
    this.patchOperationList.clear();

    // 1. 拿到oldDex和newDex的itemList
    this.adjustedOldIndexedItemsWithOrigOrder = collectSectionItems(this.oldDex, true);
    this.oldItemCount = this.adjustedOldIndexedItemsWithOrigOrder.length;

    AbstractMap.SimpleEntry<Integer, T>[] adjustedOldIndexedItems = new AbstractMap.SimpleEntry[this.oldItemCount];
    System.arraycopy(this.adjustedOldIndexedItemsWithOrigOrder, 0, adjustedOldIndexedItems, 0, this.oldItemCount);
    Arrays.sort(adjustedOldIndexedItems, this.comparatorForItemDiff);

    AbstractMap.SimpleEntry<Integer, T>[] adjustedNewIndexedItems = collectSectionItems(this.newDex, false);
    this.newItemCount = adjustedNewIndexedItems.length;
    Arrays.sort(adjustedNewIndexedItems, this.comparatorForItemDiff);

    int oldCursor = 0;
    int newCursor = 0;
    // 2.遍历,对比,收集patch操作
    while (oldCursor < this.oldItemCount || newCursor < this.newItemCount) {
        if (oldCursor >= this.oldItemCount) {
            // rest item are all newItem.
            while (newCursor < this.newItemCount) {
                // 对剩下的newItem做ADD操作
            }
        } else if (newCursor >= newItemCount) {
            // rest item are all oldItem.
            while (oldCursor < oldItemCount) {
                // 对剩下的oldItem做DEL操作
            }
        } else {
            AbstractMap.SimpleEntry<Integer, T> oldIndexedItem = adjustedOldIndexedItems[oldCursor];
            AbstractMap.SimpleEntry<Integer, T> newIndexedItem = adjustedNewIndexedItems[newCursor];
            int cmpRes = oldIndexedItem.getValue().compareTo(newIndexedItem.getValue());
            if (cmpRes < 0) {
                int deletedIndex = oldIndexedItem.getKey();
                int deletedOffset = getItemOffsetOrIndex(deletedIndex, oldIndexedItem.getValue());
                this.patchOperationList.add(new PatchOperation<T>(PatchOperation.OP_DEL, deletedIndex));
                markDeletedIndexOrOffset(this.oldToPatchedIndexMap, deletedIndex, deletedOffset);
                ++oldCursor;
            } else if (cmpRes > 0) {
                this.patchOperationList.add(new PatchOperation<>(PatchOperation.OP_ADD,
                        newIndexedItem.getKey(), newIndexedItem.getValue()));
                ++newCursor;
            } else {
                int oldIndex = oldIndexedItem.getKey();
                int newIndex = newIndexedItem.getKey();
                int oldOffset = getItemOffsetOrIndex(oldIndexedItem.getKey(), oldIndexedItem.getValue());
                int newOffset = getItemOffsetOrIndex(newIndexedItem.getKey(), newIndexedItem.getValue());

                if (oldIndex != newIndex) {
                    this.oldIndexToNewIndexMap.put(oldIndex, newIndex);
                }

                if (oldOffset != newOffset) {
                    this.oldOffsetToNewOffsetMap.put(oldOffset, newOffset);
                }

                ++oldCursor;
                ++newCursor;
            }
        }
    }

    // 未完
}
可以看到首先读取oldDex和newDex对应区域的数据并排序,分别adjustedOldIndexedItems和adjustedNewIndexedItems。
接下来就开始遍历了,直接看else部分:
分别根据当前的cursor,获取oldItem和newItem,对其value对对比:
- 如果<0 ,则认为该old Item被删除了,记录为PatchOperation.OP_DEL,并记录该oldItem index到PatchOperation对象,加入到patchOperationList中。
- 如果>0,则认为该newItem是新增的,记录为PatchOperation.OP_ADD,并记录该newItem index和value到PatchOperation对象,加入到patchOperationList中。
- 如果=0,不会生成PatchOperation。
经过上述,我们得到了一个patchOperationList对象。
继续下半部分代码:
public void execute() {
    // 接上...

    // 根据index排序,如果index一样,则先DEL后ADD
    Collections.sort(this.patchOperationList, comparatorForPatchOperationOpt);

    Iterator<PatchOperation<T>> patchOperationIt = this.patchOperationList.iterator();
    PatchOperation<T> prevPatchOperation = null;
    while (patchOperationIt.hasNext()) {
        PatchOperation<T> patchOperation = patchOperationIt.next();
        if (prevPatchOperation != null
                && prevPatchOperation.op == PatchOperation.OP_DEL
                && patchOperation.op == PatchOperation.OP_ADD
                ) {
            if (prevPatchOperation.index == patchOperation.index) {
                prevPatchOperation.op = PatchOperation.OP_REPLACE;
                prevPatchOperation.newItem = patchOperation.newItem;
                patchOperationIt.remove();
                prevPatchOperation = null;
            } else {
                prevPatchOperation = patchOperation;
            }
        } else {
            prevPatchOperation = patchOperation;
        }
    }

    // Finally we record some information for the final calculations.
    patchOperationIt = this.patchOperationList.iterator();
    while (patchOperationIt.hasNext()) {
        PatchOperation<T> patchOperation = patchOperationIt.next();
        switch (patchOperation.op) {
            case PatchOperation.OP_DEL: {
                indexToDelOperationMap.put(patchOperation.index, patchOperation);
                break;
            }
            case PatchOperation.OP_ADD: {
                indexToAddOperationMap.put(patchOperation.index, patchOperation);
                break;
            }
            case PatchOperation.OP_REPLACE: {
                indexToReplaceOperationMap.put(patchOperation.index, patchOperation);
                break;
            }
        }
    }
}
- 首先对patchOperationList按照index排序,如果index一致则先DEL、后ADD。
- 接下来一个对所有的operation的迭代,主要将index一致的,且连续的DEL、ADD转化为REPLACE操作。
- 最后将patchOperationList转化为3个Map,分别为:indexToDelOperationMap,indexToAddOperationMap,indexToReplaceOperationMap。
ok,经历完成execute之后,我们主要的产物就是3个Map,分别记录了:oldDex中哪些index需要删除;newDex中新增了哪些item;哪些item需要替换为新item。
刚才说了每个算法除了execute()还有个simulatePatchOperation()
this.stringDataSectionDiffAlg
    .simulatePatchOperation(this.patchedStringDataItemsOffset);
传入的偏移量为data区域的偏移量。
public void simulatePatchOperation(int baseOffset) {
    int oldIndex = 0;
    int patchedIndex = 0;
    int patchedOffset = baseOffset;
    while (oldIndex < this.oldItemCount || patchedIndex < this.newItemCount) {
        if (this.indexToAddOperationMap.containsKey(patchedIndex)) {
            //省略了一些代码
            T newItem = patchOperation.newItem;
            int itemSize = getItemSize(newItem);
            ++patchedIndex;
            patchedOffset += itemSize;
        } else if (this.indexToReplaceOperationMap.containsKey(patchedIndex)) {
            //省略了一些代码
            T newItem = patchOperation.newItem;
            int itemSize = getItemSize(newItem);
            ++patchedIndex;
            patchedOffset += itemSize;
        } else if (this.indexToDelOperationMap.containsKey(oldIndex)) {
            ++oldIndex;
        } else if (this.indexToReplaceOperationMap.containsKey(oldIndex)) {
            ++oldIndex;
        } else if (oldIndex < this.oldItemCount) {
            ++oldIndex;
            ++patchedIndex;
            patchedOffset += itemSize;
        }
    }

    this.patchedSectionSize = SizeOf.roundToTimesOfFour(patchedOffset - baseOffset);
}
遍历oldIndex与newIndex,分别在indexToAddOperationMap,indexToReplaceOperationMap,indexToDelOperationMap中查找。
这里关注一点最终的一个产物是this.patchedSectionSize,由patchedOffset-baseOffset所得。
这里有几种情况会造成patchedOffset+=itemSize:
- indexToAddOperationMap中包含patchIndex
- indexToReplaceOperationMap包含patchIndex
- 不在indexToDelOperationMap与indexToReplaceOperationMap中的oldDex.
其实很好理解,这个patchedSectionSize其实对应newDex的这个区域的size。所以,包含需要ADD的Item,会被替代的Item,以及OLD ITEMS中没有被删除和替代的Item。这三者相加即为newDex的itemList。
到这里,一个算法就执行完毕了。
经过这样的一个算法,我们得到了PatchOperationList和对应区域sectionSize。那么执行完成所有的算法,应该会得到针对每个算法的PatchOperationList,和每个区域的sectionSize;每个区域的sectionSize实际上换算得到每个区域的offset。
每个区域的算法,execute和simulatePatchOperation代码都是复用的,所以其他的都只有细微的变化,可以自己看了。
接下来看执行完成所有的算法后的writeResultToStream方法。
private void writeResultToStream(OutputStream os) throws IOException {
    DexDataBuffer buffer = new DexDataBuffer();
    buffer.write(DexPatchFile.MAGIC); // DEXDIFF
    buffer.writeShort(DexPatchFile.CURRENT_VERSION); /0x0002
    buffer.writeInt(this.patchedDexSize);
    // we will return here to write firstChunkOffset later.
    int posOfFirstChunkOffsetField = buffer.position();
    buffer.writeInt(0);
    buffer.writeInt(this.patchedStringIdsOffset);
    buffer.writeInt(this.patchedTypeIdsOffset);
    buffer.writeInt(this.patchedProtoIdsOffset);
    buffer.writeInt(this.patchedFieldIdsOffset);
    buffer.writeInt(this.patchedMethodIdsOffset);
    buffer.writeInt(this.patchedClassDefsOffset);
    buffer.writeInt(this.patchedMapListOffset);
    buffer.writeInt(this.patchedTypeListsOffset);
    buffer.writeInt(this.patchedAnnotationSetRefListItemsOffset);
    buffer.writeInt(this.patchedAnnotationSetItemsOffset);
    buffer.writeInt(this.patchedClassDataItemsOffset);
    buffer.writeInt(this.patchedCodeItemsOffset);
    buffer.writeInt(this.patchedStringDataItemsOffset);
    buffer.writeInt(this.patchedDebugInfoItemsOffset);
    buffer.writeInt(this.patchedAnnotationItemsOffset);
    buffer.writeInt(this.patchedEncodedArrayItemsOffset);
    buffer.writeInt(this.patchedAnnotationsDirectoryItemsOffset);
    buffer.write(this.oldDex.computeSignature(false));
    int firstChunkOffset = buffer.position();
    buffer.position(posOfFirstChunkOffsetField);
    buffer.writeInt(firstChunkOffset);
    buffer.position(firstChunkOffset);

    writePatchOperations(buffer, this.stringDataSectionDiffAlg.getPatchOperationList());
    // 省略其他14个writePatch...

    byte[] bufferData = buffer.array();
    os.write(bufferData);
    os.flush();
}
- 首先写了MAGIC,CURRENT_VERSION主要用于检查该文件为合法的tinker patch 文件。
- 然后写入patchedDexSize
- 第四位写入的是数据区的offset,可以看到先使用0站位,等所有的map list相关的offset书写结束,写入当前的位置。
- 接下来写入所有的跟maplist各个区域相关的offset(这里各个区域的排序不重要,读写一致即可)
- 然后执行每个算法写入对应区域的信息
- 最后生成patch文件
我们依旧只看stringDataSectionDiffAlg这个算法。
private <T extends Comparable<T>> void writePatchOperations(
        DexDataBuffer buffer, List<PatchOperation<T>> patchOperationList
) {
    List<Integer> delOpIndexList = new ArrayList<>(patchOperationList.size());
    List<Integer> addOpIndexList = new ArrayList<>(patchOperationList.size());
    List<Integer> replaceOpIndexList = new ArrayList<>(patchOperationList.size());

    List<T> newItemList = new ArrayList<>(patchOperationList.size());

    for (PatchOperation<T> patchOperation : patchOperationList) {
        switch (patchOperation.op) {
            case PatchOperation.OP_DEL: {
                delOpIndexList.add(patchOperation.index);
                break;
            }
            case PatchOperation.OP_ADD: {
                addOpIndexList.add(patchOperation.index);
                newItemList.add(patchOperation.newItem);
                break;
            }
            case PatchOperation.OP_REPLACE: {
                replaceOpIndexList.add(patchOperation.index);
                newItemList.add(patchOperation.newItem);
                break;
            }
        }
    }

    buffer.writeUleb128(delOpIndexList.size());
    int lastIndex = 0;
    for (Integer index : delOpIndexList) {
        buffer.writeSleb128(index - lastIndex);
        lastIndex = index;
    }

    buffer.writeUleb128(addOpIndexList.size());
    lastIndex = 0;
    for (Integer index : addOpIndexList) {
        buffer.writeSleb128(index - lastIndex);
        lastIndex = index;
    }

    buffer.writeUleb128(replaceOpIndexList.size());
    lastIndex = 0;
    for (Integer index : replaceOpIndexList) {
        buffer.writeSleb128(index - lastIndex);
        lastIndex = index;
    }

    for (T newItem : newItemList) {
        if (newItem instanceof StringData) {
            buffer.writeStringData((StringData) newItem);
        }
        // else 其他类型,write其他类型Data

    }
}
首先将我们的patchOperationList转化为3个OpIndexList,分别对应DEL,ADD,REPLACE,以及将所有的item存入newItemList。
然后依次写入:
- del操作的个数,每个del的index
- add操作的个数,每个add的index
- replace操作的个数,每个需要replace的index
- 最后依次写入newItemList.
这里index都做了(这里做了个index – lastIndex操作)
其他的算法也是执行了类似的操作。
最好来看看我们生成的patch是什么样子的:
- 首先包含几个字段,证明自己是tinker patch
- 包含生成newDex各个区域的offset,即可以将newDex划分了多个区域,定位到起点
- 包含newDex各个区域的Item的删除的索引(oldDex),新增的索引和值,替换的索引和值
那么这么看,我们猜测Patch的逻辑时这样的:
- 首先根据各个区域的offset,确定各个区域的起点
- 读取oldDex各个区域的items,然后根据patch中去除掉oldDex中需要删除的和需要替换的item,再加上新增的item和替换的item即可组成newOld该区域的items。
即,newDex的某个区域的包含:
oldItems - del - replace + addItems + replaceItems
这么看挺清晰的,下面看代码咯~
与diff一样,肯定有那么一个类或者方法,接受old dex File 和 patch File,最后生成new Dex。不要陷在一堆安全校验,apk解压的代码中。
这个类叫做DexPatchApplier,在tinker-commons中。
patch的相关代码如下:
@Test
public void testPatch() throws IOException {
    File oldFile = new File("Hello.dex");
    File patchFile = new File("patch.dex");

    File newFile = new File("new.dex");

    DexPatchApplier dexPatchGenerator
            = new DexPatchApplier(oldFile, patchFile);
    dexPatchGenerator.executeAndSaveTo(newFile);
}
可以看到和diff代码类似,下面看代码去。
public DexPatchApplier(File oldDexIn, File patchFileIn) throws IOException {
    this(new Dex(oldDexIn), new DexPatchFile(patchFileIn));
}
oldDex会转化为Dex对象,这个上面分析过,主要就是readHeader和readMap.注意我们的patchFile是转为一个DexPatchFile对象。
public DexPatchFile(File file) throws IOException {
    this.buffer = new DexDataBuffer(ByteBuffer.wrap(FileUtils.readFile(file)));
    init();
}
首先将patch file读取为byte[],然后调用init
private void init() {
    byte[] magic = this.buffer.readByteArray(MAGIC.length);
    if (CompareUtils.uArrCompare(magic, MAGIC) != 0) {
        throw new IllegalStateException("bad dex patch file magic: " + Arrays.toString(magic));
    }

    this.version = this.buffer.readShort();
    if (CompareUtils.uCompare(this.version, CURRENT_VERSION) != 0) {
        throw new IllegalStateException("bad dex patch file version: " + this.version + ", expected: " + CURRENT_VERSION);
    }

    this.patchedDexSize = this.buffer.readInt();
    this.firstChunkOffset = this.buffer.readInt();
    this.patchedStringIdSectionOffset = this.buffer.readInt();
    this.patchedTypeIdSectionOffset = this.buffer.readInt();
    this.patchedProtoIdSectionOffset = this.buffer.readInt();
    this.patchedFieldIdSectionOffset = this.buffer.readInt();
    this.patchedMethodIdSectionOffset = this.buffer.readInt();
    this.patchedClassDefSectionOffset = this.buffer.readInt();
    this.patchedMapListSectionOffset = this.buffer.readInt();
    this.patchedTypeListSectionOffset = this.buffer.readInt();
    this.patchedAnnotationSetRefListSectionOffset = this.buffer.readInt();
    this.patchedAnnotationSetSectionOffset = this.buffer.readInt();
    this.patchedClassDataSectionOffset = this.buffer.readInt();
    this.patchedCodeSectionOffset = this.buffer.readInt();
    this.patchedStringDataSectionOffset = this.buffer.readInt();
    this.patchedDebugInfoSectionOffset = this.buffer.readInt();
    this.patchedAnnotationSectionOffset = this.buffer.readInt();
    this.patchedEncodedArraySectionOffset = this.buffer.readInt();
    this.patchedAnnotationsDirectorySectionOffset = this.buffer.readInt();
    this.oldDexSignature = this.buffer.readByteArray(SizeOf.SIGNATURE);

    this.buffer.position(firstChunkOffset);
}
还记得我们写patch的操作么,先写了MAGIC和Version用于校验该文件是一个patch file;接下来为patchedDexSize和各种offset进行赋值;最后定位到数据区(firstChunkOffset),还记得写的时候,该字段在第四个位置。
定位到该位置后,后面读取的就是数据了,数据存的时候按照如下格式存储的:
- del操作的个数,每个del的index
- add操作的个数,每个add的index
- replace操作的个数,每个需要replace的index
- 最后依次写入newItemList.
简单回忆下,我们继续源码分析。
public DexPatchApplier(File oldDexIn, File patchFileIn) throws IOException {
    this(new Dex(oldDexIn), new DexPatchFile(patchFileIn));
}

public DexPatchApplier(
        Dex oldDexIn,
        DexPatchFile patchFileIn) {
    this.oldDex = oldDexIn;
    this.patchFile = patchFileIn;
    this.patchedDex = new Dex(patchFileIn.getPatchedDexSize());
    this.oldToPatchedIndexMap = new SparseIndexMap();
}
除了oldDex,patchFile,还初始化了一个patchedDex作为我们最终输出Dex对象。
构造完成后,直接执行了executeAndSaveTo方法。
public void executeAndSaveTo(File file) throws IOException {
    OutputStream os = null;
    try {
        os = new BufferedOutputStream(new FileOutputStream(file));
        executeAndSaveTo(os);
    } finally {
        if (os != null) {
            try {
                os.close();
            } catch (Exception e) {
                // ignored.
            }
        }
    }
}
直接到executeAndSaveTo(os),该方法代码比较长,我们分3段讲解:
public void executeAndSaveTo(OutputStream out) throws IOException {

    TableOfContents patchedToc = this.patchedDex.getTableOfContents();

    patchedToc.header.off = 0;
    patchedToc.header.size = 1;
    patchedToc.mapList.size = 1;

    patchedToc.stringIds.off
            = this.patchFile.getPatchedStringIdSectionOffset();
    patchedToc.typeIds.off
            = this.patchFile.getPatchedTypeIdSectionOffset();
    patchedToc.typeLists.off
            = this.patchFile.getPatchedTypeListSectionOffset();
    patchedToc.protoIds.off
            = this.patchFile.getPatchedProtoIdSectionOffset();
    patchedToc.fieldIds.off
            = this.patchFile.getPatchedFieldIdSectionOffset();
    patchedToc.methodIds.off
            = this.patchFile.getPatchedMethodIdSectionOffset();
    patchedToc.classDefs.off
            = this.patchFile.getPatchedClassDefSectionOffset();
    patchedToc.mapList.off
            = this.patchFile.getPatchedMapListSectionOffset();
    patchedToc.stringDatas.off
            = this.patchFile.getPatchedStringDataSectionOffset();
    patchedToc.annotations.off
            = this.patchFile.getPatchedAnnotationSectionOffset();
    patchedToc.annotationSets.off
            = this.patchFile.getPatchedAnnotationSetSectionOffset();
    patchedToc.annotationSetRefLists.off
            = this.patchFile.getPatchedAnnotationSetRefListSectionOffset();
    patchedToc.annotationsDirectories.off
            = this.patchFile.getPatchedAnnotationsDirectorySectionOffset();
    patchedToc.encodedArrays.off
            = this.patchFile.getPatchedEncodedArraySectionOffset();
    patchedToc.debugInfos.off
            = this.patchFile.getPatchedDebugInfoSectionOffset();
    patchedToc.codes.off
            = this.patchFile.getPatchedCodeSectionOffset();
    patchedToc.classDatas.off
            = this.patchFile.getPatchedClassDataSectionOffset();
    patchedToc.fileSize
            = this.patchFile.getPatchedDexSize();

    Arrays.sort(patchedToc.sections);

    patchedToc.computeSizesFromOffsets();

    // 未完待续...

}
这里实际上,就是读取patchFile中记录的值给patchedDex的TableOfContent中各种Section(大致对应map list中各个map_list_item)赋值。
接下来排序呢,设置byteCount等字段信息。
继续:
public void executeAndSaveTo(OutputStream out) throws IOException {

    // 省略第一部分代码

    // Secondly, run patch algorithms according to sections' dependencies.
    this.stringDataSectionPatchAlg = new StringDataSectionPatchAlgorithm(
            patchFile, oldDex, patchedDex, oldToPatchedIndexMap
    );
    this.typeIdSectionPatchAlg = new TypeIdSectionPatchAlgorithm(
            patchFile, oldDex, patchedDex, oldToPatchedIndexMap
    );
    this.protoIdSectionPatchAlg = new ProtoIdSectionPatchAlgorithm(
            patchFile, oldDex, patchedDex, oldToPatchedIndexMap
    );
    this.fieldIdSectionPatchAlg = new FieldIdSectionPatchAlgorithm(
            patchFile, oldDex, patchedDex, oldToPatchedIndexMap
    );
    this.methodIdSectionPatchAlg = new MethodIdSectionPatchAlgorithm(
            patchFile, oldDex, patchedDex, oldToPatchedIndexMap
    );
    this.classDefSectionPatchAlg = new ClassDefSectionPatchAlgorithm(
            patchFile, oldDex, patchedDex, oldToPatchedIndexMap
    );
    this.typeListSectionPatchAlg = new TypeListSectionPatchAlgorithm(
            patchFile, oldDex, patchedDex, oldToPatchedIndexMap
    );
    this.annotationSetRefListSectionPatchAlg = new AnnotationSetRefListSectionPatchAlgorithm(
            patchFile, oldDex, patchedDex, oldToPatchedIndexMap
    );
    this.annotationSetSectionPatchAlg = new AnnotationSetSectionPatchAlgorithm(
            patchFile, oldDex, patchedDex, oldToPatchedIndexMap
    );
    this.classDataSectionPatchAlg = new ClassDataSectionPatchAlgorithm(
            patchFile, oldDex, patchedDex, oldToPatchedIndexMap
    );
    this.codeSectionPatchAlg = new CodeSectionPatchAlgorithm(
            patchFile, oldDex, patchedDex, oldToPatchedIndexMap
    );
    this.debugInfoSectionPatchAlg = new DebugInfoItemSectionPatchAlgorithm(
            patchFile, oldDex, patchedDex, oldToPatchedIndexMap
    );
    this.annotationSectionPatchAlg = new AnnotationSectionPatchAlgorithm(
            patchFile, oldDex, patchedDex, oldToPatchedIndexMap
    );
    this.encodedArraySectionPatchAlg = new StaticValueSectionPatchAlgorithm(
            patchFile, oldDex, patchedDex, oldToPatchedIndexMap
    );
    this.annotationsDirectorySectionPatchAlg = new AnnotationsDirectorySectionPatchAlgorithm(
            patchFile, oldDex, patchedDex, oldToPatchedIndexMap
    );

    this.stringDataSectionPatchAlg.execute();
    this.typeIdSectionPatchAlg.execute();
    this.typeListSectionPatchAlg.execute();
    this.protoIdSectionPatchAlg.execute();
    this.fieldIdSectionPatchAlg.execute();
    this.methodIdSectionPatchAlg.execute();
    this.annotationSectionPatchAlg.execute();
    this.annotationSetSectionPatchAlg.execute();
    this.annotationSetRefListSectionPatchAlg.execute();
    this.annotationsDirectorySectionPatchAlg.execute();
    this.debugInfoSectionPatchAlg.execute();
    this.codeSectionPatchAlg.execute();
    this.classDataSectionPatchAlg.execute();
    this.encodedArraySectionPatchAlg.execute();
    this.classDefSectionPatchAlg.execute();

    //未完待续...

}
这一部分很明显初始化了一堆算法,然后分别去执行。我们依然是拿stringDataSectionPatchAlg来分析。
public void execute() {
    final int deletedItemCount = patchFile.getBuffer().readUleb128();
    final int[] deletedIndices = readDeltaIndiciesOrOffsets(deletedItemCount);

    final int addedItemCount = patchFile.getBuffer().readUleb128();
    final int[] addedIndices = readDeltaIndiciesOrOffsets(addedItemCount);

    final int replacedItemCount = patchFile.getBuffer().readUleb128();
    final int[] replacedIndices = readDeltaIndiciesOrOffsets(replacedItemCount);

    final TableOfContents.Section tocSec = getTocSection(this.oldDex);
    Dex.Section oldSection = null;

    int oldItemCount = 0;
    if (tocSec.exists()) {
        oldSection = this.oldDex.openSection(tocSec);
        oldItemCount = tocSec.size;
    }

    // Now rest data are added and replaced items arranged in the order of
    // added indices and replaced indices.
    doFullPatch(
            oldSection, oldItemCount, deletedIndices, addedIndices, replacedIndices
    );
}
再贴一下我们写入时的规则:
- del操作的个数,每个del的index
- add操作的个数,每个add的index
- replace操作的个数,每个需要replace的index
- 最后依次写入newItemList.
看代码,读取顺序如下:
- del的数量,del的所有的index存储在一个int[]中;
- add的数量,add的所有的index存储在一个int[]中;
- replace的数量,replace的所有的index存储在一个int[]中;
是不是和写入时一致。
继续,接下来获取了oldDex中oldItems和oldItemCount。
那么现在有了:
- del count and indices
- add count add indices
- replace count and indices
- oldItems and oldItemCount
拿着我们拥有的,继续执行doFullPatch
private void doFullPatch(
        Dex.Section oldSection,
        int oldItemCount,
        int[] deletedIndices,
        int[] addedIndices,
        int[] replacedIndices) {
    int deletedItemCount = deletedIndices.length;
    int addedItemCount = addedIndices.length;
    int replacedItemCount = replacedIndices.length;
    int newItemCount = oldItemCount + addedItemCount - deletedItemCount;

    int deletedItemCounter = 0;
    int addActionCursor = 0;
    int replaceActionCursor = 0;

    int oldIndex = 0;
    int patchedIndex = 0;

    while (oldIndex < oldItemCount || patchedIndex < newItemCount) {
        if (addActionCursor < addedItemCount && addedIndices[addActionCursor] == patchedIndex) {
            T addedItem = nextItem(patchFile.getBuffer());
            int patchedOffset = writePatchedItem(addedItem);
            ++addActionCursor;
            ++patchedIndex;
        } else
        if (replaceActionCursor < replacedItemCount && replacedIndices[replaceActionCursor] == patchedIndex) {
            T replacedItem = nextItem(patchFile.getBuffer());
            int patchedOffset = writePatchedItem(replacedItem);
            ++replaceActionCursor;
            ++patchedIndex;
        } else
        if (Arrays.binarySearch(deletedIndices, oldIndex) >= 0) {
            T skippedOldItem = nextItem(oldSection); // skip old item.

            ++oldIndex;
            ++deletedItemCounter;
        } else
        if (Arrays.binarySearch(replacedIndices, oldIndex) >= 0) {
            T skippedOldItem = nextItem(oldSection); // skip old item.

            ++oldIndex;
        } else
        if (oldIndex < oldItemCount) {
            T oldItem = adjustItem(this.oldToPatchedIndexMap, nextItem(oldSection));

            int patchedOffset = writePatchedItem(oldItem);

            ++oldIndex;
            ++patchedIndex;
        }
    }
}
先整体上看一下,这里的目的就是往patchedDex的stringData区写数据,写的数据理论上应该是:
- 新增的数据
- 替代的数据
- oldDex中出去新增和被替代的数据
当然他们需要顺序写入。
所以看代码,首先计算出newItemCount=oldItemCount + addCount - delCount,然后开始遍历,遍历条件为0~oldItemCount或0~newItemCount。
我们期望的是,在patchIndex从0~newItemCount之间都会写入对应的Item。
Item写入通过代码我们可以看到:
- 首先判断该patchIndex是否包含在addIndices中,如果包含则写入;
- 再者判断是否在repalceIndices中,如果包含则写入;
- 然后判断如果发现oldIndex被delete或者replace,直接跳过;
- 那么最后一个index指的就是,oldIndex为非delete和replace的,也就是和newDex中items相同的部分。
上述1.2.4三个部分即可组成完整的newDex的该区域。
这样的话就完成了stringData区域的patch算法。
其他剩下的14个算法的execute代码是相同的(父类),执行的操作类似,都会完成各个部分的patch算法。
当所有的区域都完成恢复后,那么剩下的就是header和mapList了,所以回到所有算法执行完成的地方:
public void executeAndSaveTo(OutputStream out) throws IOException {

    //1.省略了offset的各种赋值
    //2.省略了各个部分的patch算法

    // Thirdly, write header, mapList. Calculate and write patched dex's sign and checksum.
    Dex.Section headerOut = this.patchedDex.openSection(patchedToc.header.off);
    patchedToc.writeHeader(headerOut);

    Dex.Section mapListOut = this.patchedDex.openSection(patchedToc.mapList.off);
    patchedToc.writeMap(mapListOut);

    this.patchedDex.writeHashes();

    // Finally, write patched dex to file.
    this.patchedDex.writeTo(out);
}
定位到header区域,写header相关数据;定位到map list区域,编写map list相关数据。两者都完成的时候,需要编写header中比较特殊的两个字段:签名和checkSum,因为这两个字段是依赖map list的,所以必须在编写map list后。
这样就完成了完整的dex的恢复,最后将内存中的所有数据写到文件中。
刚才我们有个Hello.dex,我们再编写一个类:
public class World{
    public static void main(String[] args){
        System.out.println("nani World");
    }
}
然后将这个类编译以及打成dx文件。
javac -source 1.7 -target 1.7 World.java
dx --dex --output=World.dex World.class
这样我们就准备好了两个dex,Hello.dex和World.dex.
使用010 Editor分别打开两个dex,我们主要关注string_id_item;

两边分别13个字符串,按照我们上面介绍的diff算法,我们可以得到以下操作:
两边的字符串分别开始遍历对比:
- 如果<0 ,则认为该old Item被删除了,记录为PatchOperation.OP_DEL,并记录该oldItem index到PatchOperation对象,加入到patchOperationList中。
- 如果>0,则认为该newItem是新增的,记录为PatchOperation.OP_ADD,并记录该newItem index和value到PatchOperation对象,加入到patchOperationList中。
- 如果=0,不会生成PatchOperation。
del 1
add 1 LWorld;
del 2
add 8 World.java
del 10
add 11 naniWorld
然后是根据索引排序,没有变化;
接下来遍历所有的操作,将index一致且DEL和ADD相邻的操作替换为replace
replace 1 LWorld
del 2
add 8 World.java
del 10
add 11 naniWorld
最终在write时,会做一次遍历,将操作按DEL,ADD,REPLACE进行分类,并且将出现的item放置到newItemList中。
del ops:
    del 2
    del 10
add ops:
    add 8
    add 11
replace ops:
    replace 1
newItemList变为:
LWorld //replace 1
World.java //add 8
naniWorld //add 11
然后写入,那么写入的顺序应该是:
2 //del size
2
8 // index - lastIndex
2 // add size
8
3 // index - lastIndex
1 //replace size
1
LWorld
World.java
naniWorld
这里我们直接在DexPatchGenerator的writeResultToStream的相关位置打上日志:
buffer.writeUleb128(delOpIndexList.size());
System.out.println("del size = " + delOpIndexList.size());
int lastIndex = 0;
for (Integer index : delOpIndexList) {
    buffer.writeSleb128(index - lastIndex);
    System.out.println("del index = " + (index - lastIndex));
    lastIndex = index;
}
buffer.writeUleb128(addOpIndexList.size());
System.out.println("add size = " + addOpIndexList.size());
lastIndex = 0;
for (Integer index : addOpIndexList) {
    buffer.writeSleb128(index - lastIndex);
    System.out.println("add index = " + (index - lastIndex));
    lastIndex = index;
}
buffer.writeUleb128(replaceOpIndexList.size());
System.out.println("replace size = " + addOpIndexList.size());
lastIndex = 0;
for (Integer index : replaceOpIndexList) {
    buffer.writeSleb128(index - lastIndex);
    System.out.println("replace index = " + (index - lastIndex));

    lastIndex = index;
}

for (T newItem : newItemList) {
    if (newItem instanceof StringData) {
        buffer.writeStringData((StringData) newItem);
        System.out.println("stringdata  = " + ((StringData) newItem).value);
      }
}
可以看到输出为:
del size = 2
del index = 2
del index = 8
add size = 2
add index = 8
add index = 3
replace size = 2
replace index = 1
stringdata  = LWorld;
stringdata  = World.java
stringdata  = nani World
与我们上述分析结果一致 ~~
那么其他区域可以用类似的方式去验证,patch的话也差不多,就不赘述了。
Atas ialah kandungan terperinci Android hot fix analisis kod sumber Tinker. Untuk maklumat lanjut, sila ikut artikel berkaitan lain di laman web China PHP!