Rumah >hujung hadapan web >html tutorial >Tambahkan tarikh tamat tempoh pada siaran WordPress
Tambahkan tarikh tamat tempoh pada siaran WordPress
- WBOYWBOYWBOYWBOYWBOYWBOYWBOYWBOYWBOYWBOYWBOYWBOYWBasal
- 2023-09-10 12:25:061389semak imbas
Saya menjalankan beberapa tapak web yang menyertakan pemberitahuan dan maklumat penting dalam sepanduk di halaman utama mereka. Saya cenderung menggunakan jenis siaran tersuai untuk ini, menambah sepanduk dan memaparkannya di mana perlu dalam tema. (Jika anda ingin melakukan sesuatu yang serupa, ia diterangkan dalam tutorial ini.)
Tetapi sepanduk saya sentiasa mempunyai tarikh luput. Contohnya, ia mungkin mengandungi maklumat tentang acara yang akan datang atau kekosongan kerja. Sebaik sahaja acara tamat atau kekosongan diisi, saya perlu pergi ke laman web dan memadamkan siaran secara manual.
Adalah lebih mudah jika semasa membuat siaran sedemikian saya boleh memberi mereka tarikh tamat tempoh supaya ia tidak lagi kelihatan di tapak saya.
Dalam tutorial ini saya akan menunjukkan kepada anda bagaimana untuk melakukan ini. Terdapat tiga langkah:
- Buat kotak meta untuk tarikh akhir dalam skrin suntingan pos.
- Gunakan pemilih tarikh UI jQuery pada medan kotak meta untuk meningkatkan antara muka.
- Akhir sekali, gunakan cangkuk
pre_get_postsuntuk memastikan siaran dengan tarikh tamat tempoh tidak dipaparkan.pre_get_posts挂钩确保不会显示过期日期的帖子。
您需要什么
要完成本教程,您需要:
- WordPress 的开发安装
- 代码编辑器
您将使用到期日期所需的所有代码创建一个插件,并在您的网站上激活它。那么让我们开始吧!
设置插件
首先您需要创建插件。在 wp-content 目录的插件文件夹中,创建一个名为 tutsplus-post-expiry-date-php 的空文件。
在代码编辑器中打开文件并向其中添加以下内容:
<?php
/*
Plugin Name: Add an Expiry Date to Posts
Plugin URI: https://.tutsplus.com/tutorials/add-an-expiry-date-to-wordpress-posts--cms-22665
Description: Adds an expiry date to posts, using a the jQuery UI datepicker
Author: Rachel McCollin
Version: 1.0
 */
您需要编辑该文件以使用您自己的名称和插件 URL,但这就是您需要告诉 WordPress 这是一个插件及其用途的信息。
现在转到 WordPress 管理员中的插件屏幕并激活插件。
创建元框
首先,我们将为到期日期创建元框。
使用 add_meta_box() 显示元框
第一步是创建将元框添加到帖子编辑屏幕的函数。将其添加到您的插件文件中:
function tutsplus_add_expiry_date_metabox() {
    add_meta_box(
        'tutsplus_expiry_date_metabox',
        __( 'Expiry Date', 'tutsplus'),
        'tutsplus_expiry_date_metabox_callback',
        'post',
        'side',
        'high'
    );
}
add_action( 'add_meta_boxes', 'tutsplus_add_expiry_date_metabox' );
这使用 add_meta_box() 函数,该函数有六个参数:
-
'tutsplus_expiry_date_metabox':此元框的唯一ID -
__( 'Expiry Date', 'tutsplus'):这显示为元框的标题 -
'tutsplus_expiry_date_metabox_callback':将填充元框的回调函数(我们接下来将创建它) -
'post':此元框将出现在其编辑屏幕上的帖子类型 -
'side':元框将出现在屏幕的哪一部分 -
'high':元框将出现在哪个位置
然后将该函数附加到 add_meta_boxes 挂钩,使其在正确的时间触发。
创建回调函数
如果您现在保存插件并加载编辑屏幕,您会看到错误,因为回调函数尚未定义。所以我们接下来就这样做。
将其添加到您的插件文件中:
function tutsplus_expiry_date_metabox_callback( $post ) { ?>

	<form action="" method="post">

		<?php
		//retrieve metadata value if it exists
		$tutsplus_expiry_date = get_post_meta( $post->ID, 'expires', true );
		?>

		<label for "tutsplus_expiry_date"><?php __('Expiry Date', 'tutsplus' ); ?></label>

		<input type="text" class="MyDate" name="tutsplus_expiry_date" value=<?php echo esc_attr( $tutsplus_expiry_date ); ?> / >

	</form>

<?php }
让我们看看它的作用:
- 它定义了
tutsplus_expiry_date_metabox_callback()回调函数,以$post作为其对象。 - 它打开一个表单元素。
- 它会创建一个名为
$tutsplus_expiry_date的变量,并将'expires'元键的值作为其值。 - 它为元框中的字段创建一个标签。
- 它使用日期选择器工作所需的
MyDate类创建一个输入元素,名称为tutsplus_expiry_date,我们稍后在保存字段数据时将使用它,以及值$tutsplus_expiry_date。 - 它关闭表单。
现在我们有了表单,但它实际上不会执行任何操作,除非我们创建另一个函数来保存用户添加到其中的数据。
保存后保存数据
要将任何数据输入保存到表单中,我们需要创建一个函数,然后将其附加到 save_post
Apa yang anda perlukan
Untuk melengkapkan tutorial ini, anda memerlukan:
-
Pemasangan pembangunan WordPress
Editor Kod🎜
Menetapkan pemalam
🎜Mula-mula anda perlu mencipta pemalam. Dalam folder pemalam direktoriwp-content, buat fail kosong bernama dokumen tutsplus-post-expiry-date-php . 🎜
🎜Buka fail dalam editor kod dan tambah kandungan berikut padanya: 🎜
function tutsplus_save_expiry_date_meta( $post_id ) {

	// Check if the current user has permission to edit the post. */
	if ( !current_user_can( 'edit_post', $post->ID ) )
    return;

	if ( isset( $_POST['tutsplus_expiry_date'] ) ) {
		$new_expiry_date = ( $_POST['tutsplus_expiry_date'] );
		update_post_meta( $post_id, 'expires', $new_expiry_date );
	}

}
add_action( 'save_post', 'tutsplus_save_expiry_date_meta' );
🎜Anda perlu mengedit fail ini untuk menggunakan nama dan URL pemalam anda sendiri, tetapi itu sahaja yang anda perlukan untuk memberitahu WordPress bahawa ini adalah pemalam dan fungsinya. 🎜
🎜Sekarang pergi ke skrin Pemalam dalam pentadbir WordPress dan aktifkan pemalam. 🎜
Buat kotak meta
🎜Mula-mula kita akan buat kotak meta untuk tarikh luput. 🎜Gunakan add_meta_box() untuk memaparkan kotak meta
🎜Langkah pertama ialah mencipta fungsi yang menambah kotak meta pada skrin suntingan siaran. Tambahkan ini pada fail pemalam anda: 🎜🎜🎜wp_nonce_field( 'tutsplus_expiry_date_metabox_nonce', 'tutsplus_nonce' );🎜Ini menggunakan fungsi
add_meta_box(), yang mempunyai enam parameter: 🎜
-
🎜
'tutsplus_expiry_date_metabox': ID unik metabox ini🎜
🎜
__( 'Tarikh Luput', 'tutsplus'): Ini dipaparkan sebagai tajuk kotak meta 🎜🎜
🎜
🎜
'tutsplus_expiry_date_metabox_callback': Fungsi panggil balik yang akan mengisi metabox (kami akan menciptanya seterusnya) 🎜🎜
🎜
🎜
'post': Jenis siaran kotak meta ini akan muncul pada skrin edit 🎜🎜
🎜
🎜
'side': Bahagian skrin mana kotak meta akan dipaparkan🎜🎜
🎜
🎜
'high': Tempat kotak meta akan muncul🎜🎜
🎜
add_meta_boxes supaya ia menyala pada masa yang betul. 🎜
Buat fungsi panggil balik
🎜Jika anda menyimpan pemalam sekarang dan memuatkan skrin edit, anda akan melihat ralat kerana fungsi panggil balik belum ditentukan lagi. Jadi itulah yang akan kita lakukan seterusnya. 🎜 🎜Tambah ini pada fail pemalam anda: 🎜if( !isset( $_POST['tutsplus_nonce'] ) ||
!wp_verify_nonce( $_POST['tutsplus_nonce'],
'tutsplus_expiry_date_metabox_nonce'
) )
return;
🎜Jom lihat fungsinya: 🎜
-
🎜Ia mentakrifkan fungsi panggil balik
tutsplus_expiry_date_metabox_callback(), dengan $post sebagai objeknya. 🎜
🎜Ia membuka elemen bentuk. 🎜
🎜Ia akan mencipta pembolehubah bernama $tutsplus_expiry_date dengan nilai kekunci meta 'expires' sebagai nilainya. 🎜
🎜Ia mencipta label untuk medan dalam kotak meta. 🎜
🎜Ia mencipta elemen input dengan nama tutsplus_expiry_date menggunakan kelas MyDate yang diperlukan untuk pemilih tarikh berfungsi, yang akan kami simpan kemudian Ia akan digunakan apabila memasukkan data medan, bersama-sama dengan nilai $tutsplus_expiry_date. 🎜
🎜Ia menutup borang. 🎜
Simpan data selepas menyimpan
🎜Untuk menyimpan sebarang input data pada borang, kita perlu mencipta fungsi dan kemudian melampirkannya pada cangkuksave_post. 🎜
🎜Dalam fail pemalam anda, tambahkan yang berikut: 🎜
function tutsplus_load_jquery_datepicker() {
wp_enqueue_script( 'jquery-ui-datepicker' );
wp_enqueue_style( 'jquery-style', 'http://ajax.googleapis.com/ajax/libs/jqueryui/1.8.2/themes/smoothness/jquery-ui.css' );
}
add_action( 'admin_enqueue_scripts', 'tutsplus_load_jquery_datepicker' );
🎜Ini melakukan perkara berikut: 🎜
- 它检查当前用户是否具有当前帖子的
edit_post能力。 - 如果是,它会使用
isset检查数据是否已添加到元框字段。 - 如果是这种情况,它会创建一个名为
$new_expiry_date的变量,并将其定义为输入的值。 - 最后,它会使用该值更新帖子的元数据。
所以我们现在有一个元框,它可以让用户添加文本并将其保存到帖子元数据中。让我们让它更安全。
添加随机数以确保安全
为了确保帖子元数据仅通过此表单进行编辑,我们将添加一个随机数。
在回调函数中,在函数的其余内容之前,添加以下代码:
wp_nonce_field( 'tutsplus_expiry_date_metabox_nonce', 'tutsplus_nonce' );
接下来,在用于保存数据的 tutsplus_save_expiry_date_meta() 函数中,在函数开头添加以下内容:
if( !isset( $_POST['tutsplus_nonce'] ) ||
    !wp_verify_nonce( $_POST['tutsplus_nonce'],
	'tutsplus_expiry_date_metabox_nonce'
	) )
return;
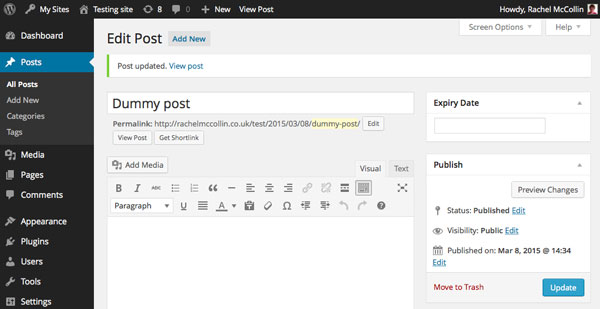
现在保存您的插件并查看您的帖子编辑屏幕。您将看到您的元框:

这是一个好的开始,但问题是目前这是一个普通的文本字段,所以没有办法确保您的用户仅以正确的格式输入日期。我们将通过添加 jQuery UI 日期选择器来纠正这个问题。
添加 JQuery UI 日期选择器
好消息是 jQuery UI 日期选择器预装了 WordPress,因此您无需注册或安装它:只需将其放入函数中即可。
在插件文件的顶部添加以下内容:
function tutsplus_load_jquery_datepicker() {
	wp_enqueue_script( 'jquery-ui-datepicker' );
	wp_enqueue_style( 'jquery-style', 'http://ajax.googleapis.com/ajax/libs/jqueryui/1.8.2/themes/smoothness/jquery-ui.css' );
}
add_action( 'admin_enqueue_scripts', 'tutsplus_load_jquery_datepicker' );
这会将脚本本身和存储在 Google API 上的脚本样式表排入队列。请注意,您必须将其挂钩到 admin_enqueue_scripts 操作挂钩,而不是像在前端使用脚本时那样挂钩到 wp_enqueue_scripts 。
接下来,您需要将脚本添加到输出表单的回调函数中。在 input 元素之后和结束 标记之前,添加以下内容:
<script type="text/javascript">
    jQuery(document).ready(function() {
		jQuery('.MyDate').datepicker({
			dateFormat : 'dd-mm-yy'
		});
	});
</script>
这引用了您已添加到输入元素的 MyDate 类,并向其中添加了日期选择器脚本。
您的回调函数现在将如下所示:
function tutsplus_expiry_date_metabox_callback( $post ) { ?>

	<form action="" method="post">

		<?php
		// add nonce for security
		wp_nonce_field( 'tutsplus_expiry_date_metabox_nonce', 'tutsplus_nonce' );

		//retrieve metadata value if it exists
		$tutsplus_expiry_date = get_post_meta( $post->ID, 'expires', true );
		?>

		<label for "tutsplus_expiry_date"><?php __('Expiry Date', 'tutsplus' ); ?></label>

		<input type="text" class="MyDate" name="tutsplus_expiry_date" value=<?php echo esc_attr( $tutsplus_expiry_date ); ?> / >

		<script type="text/javascript">
			jQuery(document).ready(function() {
				jQuery('.MyDate').datepicker({
					dateFormat : 'dd-mm-yy'
				});
			});
		</script>

	</form>

<?php }
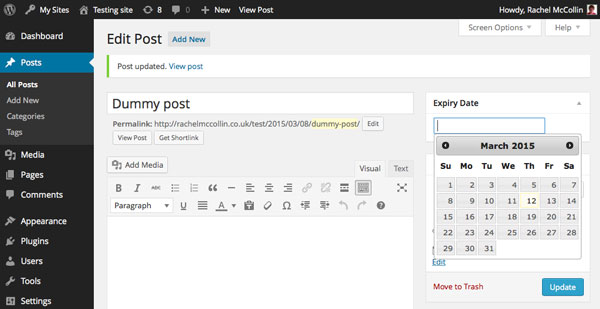
现在让我们看看保存插件文件后元框的样子:

那好多了!但是,尽管您现在可以为帖子添加到期日期,但这对于它们是否显示在您的网站上没有任何影响。现在让我们改变这一点。
修改查询以排除过期帖子
最后一步是使用 pre_get_posts 挂钩修改主查询。
仍在您的插件文件中工作,添加以下代码:
function tutsplus_filter_expired_posts( $query ) {

    // doesn't affect admin screens
    if ( is_admin() )
        return;
    // check for main query
	if ( $query->is_main_query() ) {

    	//filter out expired posts
        $today = date('d-m-Y');
        $metaquery = array(
            array(
                 'key' => 'expires',
                 'value' => $today,
                 'compare' => '<',
                 'type' => 'DATE',
			)
        );
        $query->set( 'meta_query', $metaquery );
	}
}
add_action( 'pre_get_posts', 'tutsplus_filter_expired_posts' );
这做了六件事:
- 首先,它定义
tutsplus_filter_expired_posts()函数,并以$query作为其对象。 - 它会检查我们是否位于管理屏幕中,因为我们不想排除其中过期的帖子。
- 接下来,它检查主查询是否正在运行。
- 如果是这样,它将变量
$today定义为今天的日期,并使用与日期选择器相同的日期格式。 - 然后,它使用
compare运算符定义$metaquery来排除过期日期早于今天的帖子。 - 最后,它使用
$metaquery变量重置查询。
该函数与 pre_get_posts 挂钩,这将使其在查询获取帖子时运行。
现在保存您的插件文件并尝试一下。创建一个发布日期为几天前的帖子,然后为其指定昨天的到期日期。保存并切换到您的博客主页。您会发现您刚刚创建的帖子不在那里!
摘要
能够让您的帖子在给定日期自动过期非常有用。如果帖子的内容不再相关,或者您不希望人们在给定日期之后看到它,则添加到期日期可以让您不必记住在不再需要该帖子时编辑或删除该帖子。
通过使用 jQuery 日期选择器,您创建了一个用户友好的元框,您可以使用它来节省时间并避免访问者的困惑。
Atas ialah kandungan terperinci Tambahkan tarikh tamat tempoh pada siaran WordPress. Untuk maklumat lanjut, sila ikut artikel berkaitan lain di laman web China PHP!

