Rumah >hujung hadapan web >tutorial js >Cipta apl cuaca menggunakan TypeScript dan NativeScript
Cipta apl cuaca menggunakan TypeScript dan NativeScript
- 王林asal
- 2023-08-27 22:17:11830semak imbas
Dalam tutorial ini, saya akan menunjukkan kepada anda cara membina apl cuaca dalam NativeScript menggunakan bahasa TypeScript.
Dalam artikel sebelumnya dalam siri ini, kami mencipta aplikasi mengambil nota menggunakan JavaScript tulen. Kali ini kita akan menggunakan TypeScript. Mula-mula mari kita fahami mengapa TypeScript ialah pilihan yang baik untuk membina aplikasi NativeScript.
1. Mengapa memilih TypeScript?
TypeScript ialah warganegara kelas pertama dalam NativeScript. Ia digunakan oleh pasukan teras NativeScript untuk membina rangka kerja NativeScript itu sendiri. Berikut ialah beberapa sebab mengapa anda mungkin mahu menggunakan TypeScript untuk membangunkan apl NativeScript:
- TypeScript menyusun ke JavaScript. Apabila pengkompil berjalan, ia menangkap sebarang ralat yang mungkin wujud dalam kod anda supaya anda boleh mengambil tindakan dengan segera tanpa menunggu pengkompil NativeScript selesai. Ini bermakna anda sebagai pembangun boleh menjadi lebih produktif.
- TypeScript membolehkan anda menggunakan ciri ES6 seperti kelas, modul, fungsi anak panah, literal templat dan banyak lagi. Ini bermakna anda mempunyai lebih banyak alat yang boleh anda gunakan untuk menyusun dan menulis kod yang lebih baik.
Jika saya belum meyakinkan anda, atau anda ingin mengetahui lebih lanjut tentang sebab TypeScript sesuai untuk dibangunkan dengan NativeScript, anda boleh menyemak Membina apl NativeScript yang lebih baik dengan TypeScript.
2. Alat
Untuk memanfaatkan sepenuhnya apa yang TypeScript tawarkan, saya mengesyorkan menggunakan editor teks Kod Visual Studio. Ia mempunyai ciri IntelliSense yang menyediakan pelengkapan automatik pintar apabila anda menulis kod TypeScript, ia disepadukan dengan Git, dan ia juga mempunyai keupayaan penyahpepijatan.
Paling penting, terdapat juga pemalam NativeScript yang membolehkan anda meningkatkan kecekapan kerja anda semasa membangunkan aplikasi NativeScript. Satu ciri yang saya dapati berguna ialah penyepaduan emulator. Ini membolehkan anda menjalankan emulator terus daripada penyunting teks dan nyahpepijat aplikasi daripada penyunting teks itu sendiri. Kod Visual Studio adalah percuma dan tersedia pada semua platform utama (Windows, Linux, OS X).
Tetapi jika anda tidak mahu meninggalkan keselesaan editor teks anda, anda juga boleh memasang sambungan untuk menjadi lebih baik dalam pengekodan dengan TypeScript. Untuk Atom, terdapat pemalam atom-typescript. Untuk Teks Sublime, terdapat pemalam TypeScript Sublime.
3.Gambaran Keseluruhan Apl
Apl yang akan kami cipta ialah aplikasi cuaca. Ia akan mengandungi halaman berikut:
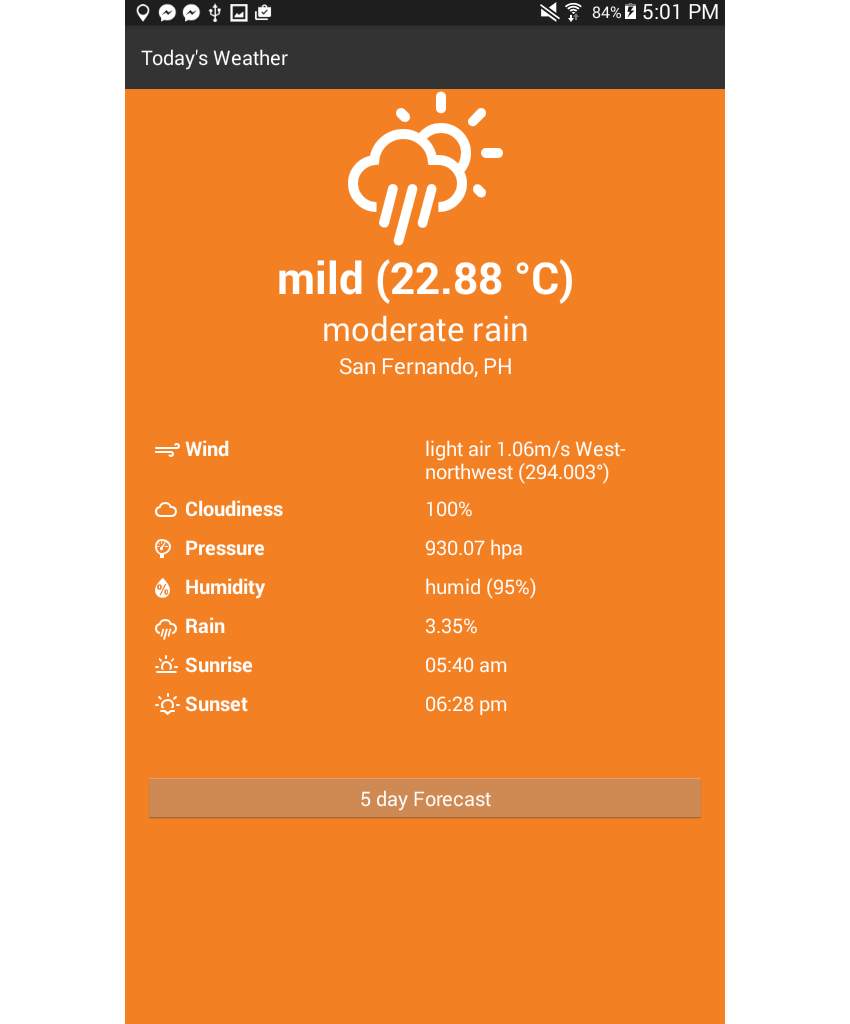
- Halaman utama memaparkan cuaca semasa dan beberapa maklumat berkaitan seperti suhu, tekanan udara dan kelembapan.
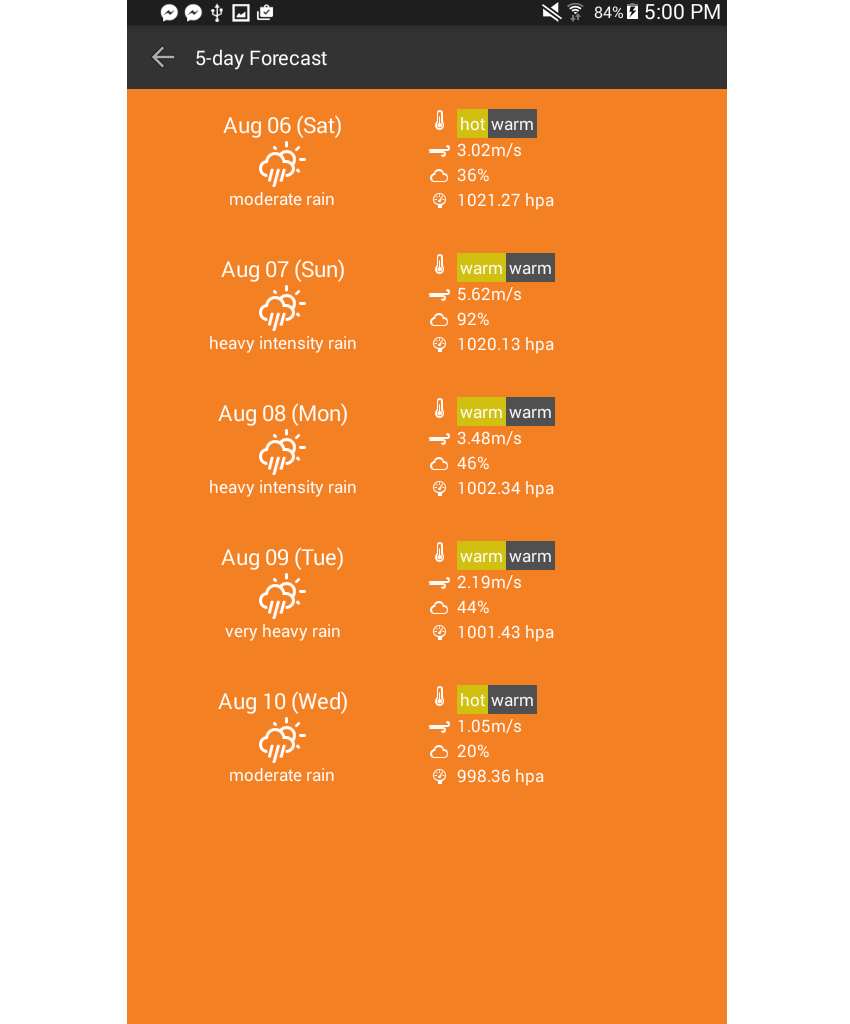
- Halaman ramalan cuaca, menunjukkan ramalan lima hari keadaan cuaca untuk lima hari akan datang.
Laman utama adalah seperti berikut:

Ini ialah halaman ramalan:

Anda boleh mencari kod sumber penuh dalam repositori GitHub apl.
4. OpenWeatherMap
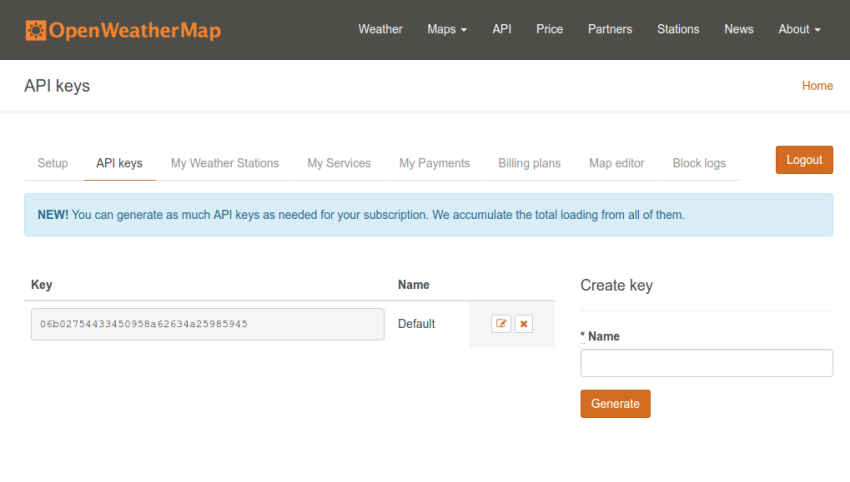
Data cuaca akan datang daripada API OpenWeatherMap dan seperti mana-mana API lain, anda perlu mendaftarkan kunci API untuk menggunakannya. Teruskan dan daftar akaun, saya akan menunggu. Setelah log masuk, pergi ke halaman API Keys, salin nilai medan Key, dan simpan di tempat yang selamat. Anda akan memerlukannya kemudian apabila anda mula membuat aplikasi anda.

5. Cipta Apl
Setelah anda tahu rupa apl anda, sudah tiba masanya untuk mula menciptanya. Mulakan dengan mencipta projek NativeScript baharu menggunakan templat TypeScript:
tns create weatherApp --template typescript
Setelah selesai, navigasi ke folder app dan buat folder dan fail berikut. Untuk kemudahan, anda juga boleh memuat turun atau mengklon repositori GitHub dan menyalin fail daripada folder app. app 文件夹并创建以下文件夹和文件。为了方便起见,您还可以下载或克隆 GitHub 存储库,然后从 app 文件夹复制文件。
- common
    + constants.ts
    + navigation.ts
    + requestor.ts
    + utilities.ts
- fonts
- pages
    + forecast
        * forecast.css
        * forecast.ts
        * forecast.xml
        * forecast-view-model.ts
    + main
        * main.css
        * main.ts
        * main.xml
        * main-view-model.ts
- stores
    + location.ts
- app.css
- app.ts
我们只会在 app 目录中工作,因此每次我引用文件路径或文件夹时,都会假设 app
tns plugin add nativescript-geolocationp>Kami hanya akan berfungsi dalam direktori
app, jadi setiap kali saya merujuk pada laluan fail atau folder, ia akan dianggap sebagai aplikasi Direktori ialah direktori akar.
Pasang kebergantungan
Apl memerlukan beberapa kebergantungan: modul geolokasi NativeScript dan Momen. Anda boleh memasang modul geolokasi menggunakan arahan berikut:
npm install momentDan pasang Momen:
export const WEATHER_URL = 'http://api.openweathermap.org/data/2.5/';
export const WEATHER_APIKEY = 'YOUR OPENWEATHERMAP API KEY';
export const CURRENT_WEATHER_PATH = 'weather/';
export const WEATHER_FORECAST_PATH = 'forecast/daily/';

export const WEATHER_ICONS = {
  day: {
    'clear': 0xf00d,
    'clouds': 0xf002,
    'drizzle': 0xf009,
    'rain': 0xf008,
    'thunderstorm': 0x010,
    'snow': 0xf00a,
    'mist': 0xf0b6
  },
  night: {
    'clear': 0xf02e,
    'clouds': 0xf086,
    'drizzle': 0xf029,
    'rain': 0xf028,
    'thunderstorm': 0xf02d,
    'snow': 0xf02a,
    'mist': 0xf04a
  },
  neutral: {
    'temperature': 0xf055,
    'wind': 0xf050,
    'cloud': 0xf041,
    'pressure': 0xf079,
    'humidity': 0xf07a,
    'rain': 0xf019,
    'sunrise': 0xf046,
    'sunset': 0xf052
  }
};

export const WIND_DIRECTIONS = [
  "North", "North-northeast", "Northeast",
  "East-northeast", "East", "East-southeast", "Southeast",
  "South-southeast", "South", "South-southwest", "Southwest",
  "West-southwest", "West", "West-northwest", "Northwest", "North-northwest"
];
Modul geolokasi digunakan untuk menentukan lokasi semasa pengguna. Moment membolehkan pemformatan mudah cap waktu Unix, yang kemudiannya akan kami perolehi melalui API.
Modul yang biasa digunakan
Sebelum melihat kod untuk setiap halaman aplikasi, mari kita lihat modul tersuai yang akan digunakan sepanjang aplikasi.
Malar🎜
常量模块 (common/constants.ts) 包含整个应用程序中使用的所有常量值:例如 OpenWeatherMap API 的基本 URL、您之前获得的 API 密钥、路径到我们将使用的端点、天气图标的字符代码和风向。
export const WEATHER_URL = 'http://api.openweathermap.org/data/2.5/';
export const WEATHER_APIKEY = 'YOUR OPENWEATHERMAP API KEY';
export const CURRENT_WEATHER_PATH = 'weather/';
export const WEATHER_FORECAST_PATH = 'forecast/daily/';

export const WEATHER_ICONS = {
  day: {
    'clear': 0xf00d,
    'clouds': 0xf002,
    'drizzle': 0xf009,
    'rain': 0xf008,
    'thunderstorm': 0x010,
    'snow': 0xf00a,
    'mist': 0xf0b6
  },
  night: {
    'clear': 0xf02e,
    'clouds': 0xf086,
    'drizzle': 0xf029,
    'rain': 0xf028,
    'thunderstorm': 0xf02d,
    'snow': 0xf02a,
    'mist': 0xf04a
  },
  neutral: {
    'temperature': 0xf055,
    'wind': 0xf050,
    'cloud': 0xf041,
    'pressure': 0xf079,
    'humidity': 0xf07a,
    'rain': 0xf019,
    'sunrise': 0xf046,
    'sunset': 0xf052
  }
};

export const WIND_DIRECTIONS = [
  "North", "North-northeast", "Northeast",
  "East-northeast", "East", "East-southeast", "Southeast",
  "South-southeast", "South", "South-southwest", "Southwest",
  "West-southwest", "West", "West-northwest", "Northwest", "North-northwest"
];
实用程序
实用程序模块包括各种实用程序功能:例如将度数转换为方向、确定风速的描述性文本、将开尔文转换为摄氏度以及将字符代码转换为字符。您将在稍后的页面中看到如何使用所有这些函数。
import constants = require('./constants');

export function degreeToDirection(num) {
  var val= Math.floor((num / 22.5) + .5);
  return constants.WIND_DIRECTIONS[(val % 16)];
}

export function describeWindSpeed(speed) {
  if(speed < 0.3) {
    return 'calm';
  } else if(speed >= 0.3 && speed < 1.6) {
    return 'light air';
  } else if (speed >= 1.6 && speed < 3.4) {
    return 'light breeze';
  } else if (speed >= 3.4 && speed < 5.5) {
    return 'gentle breeze';
  } else if (speed >= 5.5 && speed < 8) {
    return 'moderate breeze';
  } else if(speed >= 8 && speed < 10.8) {
    return 'fresh breeze';
  } else if(speed >= 10.8 && speed < 13.9) {
    return 'strong breeze';
  } else if(speed >= 13.9 && speed < 17.2) {
    return 'moderate gale';
  } else if (speed >= 17.2 && speed < 20.8) {
    return 'gale';
  } else if (speed >= 20.8 && speed < 24.5) {
    return 'strong gale';
  } else if (speed >= 24.5 && speed < 28.5) {
    return 'storm';
  } else if (speed >= 28.5 && speed < 32.7) {
    return 'violent storm';
  } else if (speed >= 32.7 && speed < 42) {
    return 'hurricane force';
  }
  return 'super typhoon';
}

export function describeHumidity(humidity) {
  if (humidity >= 0 && humidity <= 40) {
    return 'very dry';
  } else if (humidity >= 40 && humidity <= 70) {
    return 'dry';
  } else if (humidity >= 85 && humidity <= 95) {
    return 'humid';
  }
  return 'very humid';
}

export function describeTemperature(temp) {
  var celsius = convertKelvinToCelsius(temp);
  if (celsius >= 0 && celsius < 7) {
    return 'very cold';
  } else if (celsius >= 8 && celsius < 13) {
    return 'cold';
  } else if (celsius >= 13 && celsius < 18) {
    return 'cool';
  } else if (celsius >= 18 && celsius < 23) {
    return 'mild';
  } else if (celsius >= 23 && celsius < 28) {
    return 'warm';
  } else if (celsius >= 28 && celsius < 32) {
    return 'hot';
  }
  return 'very hot';
}

export function convertKelvinToCelsius(celsius) {
  return celsius - 273.15;
}

export function getTimeOfDay() {
  var hour = (new Date()).getHours();
  var time_of_day = 'night';
  if(hour >= 5 && hour <= 18){
    time_of_day = 'day';
  }
  return time_of_day;
}

export function getIcons(icon_names) {
  var icons = icon_names.map((name) => {
    return {
      'name': name,
      'icon': String.fromCharCode(constants.WEATHER_ICONS.neutral[name])
    };
  });
  return icons;
}
导航
导航模块是一个自定义帮助模块,它允许我们轻松地在应用程序的所有页面之间导航。打开 common/navigation.ts 文件并添加以下内容:
import frame = require('ui/frame');

export function getStartPage() {
  return 'pages/main/main';
}

export function goToForecastPage() {
  frame.topmost().navigate('pages/forecast/forecast');
}

export function goToMainPage() {
  frame.topmost().goBack();
}
这使用框架模块导航到应用的其他页面。 getStartPage() 方法仅返回应用程序主页面的位置。 goToForecastPage(),顾名思义,允许用户导航到预测页面。
在 NativeScript 中导航时,您需要了解当前所在位置。这就是为什么您首先需要调用 topmost() 函数来获取当前或最上面的页面,然后调用 navigate() 函数转到另一个页面。此函数接受您想要访问的页面的路径。
请求者
Requestor 模块对 OpenWeatherMap API 执行实际请求。正如 NativeScript 简介一文中提到的,NativeScript 使用 JavaScript 虚拟机来运行 JavaScript 代码。这意味着我们还可以使用浏览器中提供的功能。
其中一个函数是 fetch,它允许我们向远程服务器发出 HTTP 请求。该参数是您要发出请求的网址。它返回一个承诺,因此我们使用 then() 来等待原始响应。注意“原始”一词的使用; fetch 函数返回带有标头和其他低级信息的响应,这就是为什么我们需要调用 json() 函数来获取实际的 JSON 数据。这将返回另一个承诺,因此我们再次使用 then() 来获取实际的对象。
export function get(url){
  return fetch(
    url
  ).then(function(response){
    return response.json();
  }).then(function(json){
    return json;
  });
}
或者,您可以使用 Http 模块,这是在 NativeScript 中发出 HTTP 请求的更可靠的方式。
位置存储
位置存储用作位置信息的存储。这使我们能够从导入此模块的任何文件中更新并获取当前位置。
export var location;

export function saveLocation(loc) {
  location = loc;
}

export function getLocation() {
  return location;
}
主页
现在是时候查看应用程序每个页面的代码了。但在此之前,首先打开入口点文件 (app.ts)。这使用导航模块来获取应用程序的起始页面:
import application = require("application");
import navigation = require('./common/navigation');
application.mainModule = navigation.getStartPage();
application.start();
接下来,让我们分解 pages/main/main.xml 文件。
navigatingTo 事件用于在每次用户导航到此特定页面时执行 TypeScript 文件中类似命名的函数。 CSS 类也是从 TypeScript 文件动态确定的。
<Page xmlns="http://schemas.nativescript.org/tns.xsd" navigatingTo="navigatingTo" class="{{ background_class }}">
...
</Page>
ScrollView 组件用于包装所有内容,以便当内容超出屏幕尺寸可以显示时自动生成垂直滚动条。
由于我们要从远程服务器加载数据,因此使用 ActivityIndicator 组件来显示平台默认的加载动画。这需要您提供 busy 属性,该属性接受一个控制是否启动动画的布尔值。默认情况下,该值设置为 true,并且仅在应用程序向服务器发出请求后更新为 false。
visibility 属性还用于确保组件在不播放动画时不会占用任何空间。
<StackLayout>
  <ScrollView>
    <ActivityIndicator busy="{{ is_loading }}" visibility="{{ is_loading ? 'visible' : 'collapsed' }}" />
    <StackLayout visibility="{{ !is_loading ? 'visible' : 'collapsed' }}">
      ...
    </StackLayout>
  </ScrollView>
</StackLayout>
对于主要内容,我们在顶部显示当前天气的总体概述,在下面显示详细信息。总体概述显示代表当前天气、当前温度、天气描述和地点的图标。
<Label text="{{ icon }}" class="icon" />
<Label text="{{ temperature }}" class="temperature" />
<Label text="{{ weather }}" class="weather" textWrap="true"/>
<Label text="{{ place }}" class="place" textWrap="true"/>
有关详细信息,有大量有关当前天气的信息,您可以通过查看 text 属性来猜测。每一个还附有自己的图标。
在我之前向您展示的屏幕截图中,您看到它的两个页面都使用两列布局。这就是我们使用 GridLayout 的原因。但正如您从下面的代码中看到的,我们还在每行的第一列使用 GridLayout。
您可能会问为什么我们要这样做,而不是仅仅创建一个三列布局,其中图标位于第一列,天气属性位于第二列,值位于第三列。这是完全可以理解的,它会让代码更加简洁。
但问题是 NativeScript 版本 2.1 目前不允许其 GridLayout 使用百分比单位。这意味着我们不能使用像 10% 这样的图标作为图标,而其他两列各消耗 45%。
我们下面使用的布局通过使用 GridLayout 来包装图标和天气属性来解决该问题,图标消耗 30 像素,天气属性消耗所需的空间量包含文本。请注意 row 和 col 属性在 GridLayout 上的使用。
<GridLayout columns="*,*" rows="auto,auto,auto,auto,auto,auto,auto" cssClass="details">

  <GridLayout columns="30,auto" rows="auto" row="0" col="0">
    <Label text="{{ wind_icon }}" class="small-icon" row="0" col="0" />
    <Label text="Wind" textWrap="true" row="0" col="1" class="label" />
  </GridLayout>
  <Label text="{{ wind }}" textWrap="true" row="0" col="1" />

  <GridLayout columns="30,auto" rows="auto" row="1" col="0">
    <Label text="{{ cloud_icon }}" class="small-icon" row="0" col="0" />
    <Label text="Cloudiness" textWrap="true" row="1" col="1" class="label" />
  </GridLayout>
  <Label text="{{ clouds }}" textWrap="true" row="1" col="1" />

  <GridLayout columns="30,auto" rows="auto" row="2" col="0">
    <Label text="{{ pressure_icon }}" class="small-icon" row="0" col="0" />
    <Label text="Pressure" textWrap="true" row="2" col="1" class="label" />
  </GridLayout>
  <Label text="{{ pressure }}" textWrap="true" row="2" col="1" />

  <GridLayout columns="30,auto" rows="auto" row="3" col="0">
    <Label text="{{ humidity_icon }}" class="small-icon" row="0" col="0" />
    <Label text="Humidity" textWrap="true" row="3" col="1" class="label" />
  </GridLayout>
  <Label text="{{ humidity }}" textWrap="true" row="3" col="1" />

  <GridLayout columns="30,auto" rows="auto" row="4" col="0">
    <Label text="{{ rain_icon }}" class="small-icon" row="0" col="0" />
    <Label text="Rain" textWrap="true" row="4" col="1" class="label" />
  </GridLayout>
  <Label text="{{ rain }}" textWrap="true" row="4" col="1" />

  <GridLayout columns="30,auto" rows="auto" row="5" col="0">
    <Label text="{{ sunrise_icon }}" class="small-icon" row="0" col="0" />
    <Label text="Sunrise" textWrap="true" row="5" col="1" class="label" />
  </GridLayout>
  <Label text="{{ sunrise }}" textWrap="true" row="5" col="1" />

  <GridLayout columns="30,auto" rows="auto" row="6" col="0">
    <Label text="{{ sunset_icon }}" class="small-icon" row="0" col="0" />
    <Label text="Sunset" textWrap="true" row="6" col="1" class="label" />
  </GridLayout>
  <Label text="{{ sunset }}" textWrap="true" row="6" col="1" />

</GridLayout>
主页的最后一个标记是通往预测页面的按钮:
<Button text="5 day Forecast" tap="goToForecastPage" />
主页 JavaScript
打开 pages/main/main.ts 文件并添加以下代码:
import { EventData } from "data/observable";
import { Page } from "ui/page";
import { MainViewModel } from "./main-view-model";
import navigation = require('../../common/navigation');

export function navigatingTo(args: EventData) {
  var page = <Page>args.object;
  page.bindingContext = new MainViewModel();
}

export function goToForecastPage () {
  navigation.goToForecastPage();
}
在上面的代码中,我们导入了几个内置的 NativeScript 模块、主视图模型和导航。
EventData 对象是使用对象解构来提取的,这是 TypeScript 提供的 ES6 功能。 EventData 是我们作为参数传递给 navigatingTo 函数的内容,以便它可以访问导航到此页面的任何页面传入的任何数据。
它有一个 object 属性,基本上是触发事件的任何组件。在本例中,我们知道它是在 Page 组件上触发的,这就是我们使用 <page></page> 作为类型断言的原因。之后,我们将主视图模型绑定到页面。这将允许我们在类中添加或更新属性,并且它将立即反映在页面上。
在主视图模型(pages/main/main-view-model.ts)中,首先导入我们将使用的所有模块:
import observable = require("data/observable");
import requestor = require("../../common/requestor");
import constants = require("../../common/constants");
import geolocation = require("nativescript-geolocation");
import moment = require('moment');
import utilities = require('../../common/utilities');
import locationStore = require('../../stores/locationStore');
通过扩展Observable模块来创建视图模型,这使得该类中的所有属性都是可观察的。这意味着每次此类中发生更改时,UI 中每个属性的所有引用都会更新。
export class MainViewModel extends observable.Observable {

  constructor() {
    ...
  }

}
在构造函数内,检查是否启用了地理定位。如果未启用,请尝试通过调用 enableLocationRequest() 函数来启用它。这会触发应用要求用户启用地理定位。
super(); //call the constructor method of the parent class
//check if geolocation is not enabled
if (!geolocation.isEnabled()) {
  geolocation.enableLocationRequest(); //try to enable geolocation
}
接下来判断是白天还是晚上,并根据结果设置页面背景。然后在页面中设置图标。
var time_of_day = utilities.getTimeOfDay();
this.set('background_class', time_of_day);
this.setIcons();
之后,尝试确定当前位置。请注意,如果用户不允许地理定位,则该应用根本无法运行,因为天气取决于用户的位置。该应用程序将尝试在 10 秒内确定用户的位置。如果失败,则会向用户显示一条错误消息。
var location = geolocation.getCurrentLocation({timeout: 10000}).
  then(
    (loc) => {
      if (loc) {
        ...
      }
    },
    (e) => {
      //failed to get location
      alert(e.message);
    }
);
如果位置请求成功,我们使用 locationStore 保存它。这允许我们稍后访问其他页面上的位置,而无需再次请求。
locationStore.saveLocation(loc);
下面是您在 NativeScript 中请求位置时可能收到的示例响应,供您参考。您可以查看 NativeScript 的位置文档,详细了解以下每个属性。
{
   "latitude":51.50853,
   "longitude":-0.12574,
   "altitude":0,
   "horizontalAccuracy":37.5,
   "verticalAccuracy":37.5,
   "speed":0,
   "direction":0,
   "timestamp":"2016-08-08T02:25:45.252Z",
   "android":{

   }
}
我们可以使用模板文字构建完整的 API 请求 URL,并使用请求者模块发出请求。
this.set('is_loading', true); //show the loader animation
var url = `${constants.WEATHER_URL}${constants.CURRENT_WEATHER_PATH}?lat=${loc.latitude}&lon=${loc.longitude}&apikey=${constants.WEATHER_APIKEY}`;
requestor.get(url).then((res) => {
  ...
});
响应返回后,将其提取并格式化,然后将结果值设置为类的属性。由于该类是可观察的,因此这将自动更新应用程序的 UI。
this.set('is_loading', false); //stop loader animation
var weather = res.weather[0].main.toLowerCase();
var weather_description = res.weather[0].description;

var temperature = res.main.temp;
var icon = constants.WEATHER_ICONS[time_of_day][weather];

var rain = '0';
if(res.rain){
  rain = res.rain['3h'];
}

this.set('icon', String.fromCharCode(icon));
this.set('temperature', `${utilities.describeTemperature(Math.floor(temperature))} (${utilities.convertKelvinToCelsius(temperature).toFixed(2)} °C)`);
this.set('weather', weather_description);
this.set('place', `${res.name}, ${res.sys.country}`);
this.set('wind', `${utilities.describeWindSpeed(res.wind.speed)} ${res.wind.speed}m/s ${utilities.degreeToDirection(res.wind.deg)} (${res.wind.deg}°)`);
this.set('clouds', `${res.clouds.all}%`);
this.set('pressure', `${res.main.pressure} hpa`);
this.set('humidity', `${utilities.describeHumidity(res.main.humidity)} (${res.main.humidity}%)`);
this.set('rain', `${rain}%`);
this.set('sunrise', moment.unix(res.sys.sunrise).format('hh:mm a'));
this.set('sunset', moment.unix(res.sys.sunset).format('hh:mm a'));
下面是 API 可能返回的示例响应,供您参考:
{
   "coord":{
      "lon":-0.13,
      "lat":51.51
   },
   "weather":[
      {
         "id":803,
         "main":"Clouds",
         "description":"broken clouds",
         "icon":"04d"
      }
   ],
   "base":"cmc stations",
   "main":{
      "temp":291.44,
      "pressure":1031.7,
      "humidity":82,
      "temp_min":290.37,
      "temp_max":292.25
   },
   "wind":{
      "speed":0.3,
      "deg":45,
      "gust":1
   },
   "rain":{
      "3h":0.075
   },
   "clouds":{
      "all":68
   },
   "dt":1470545747,
   "sys":{
      "type":3,
      "id":1462694692,
      "message":0.0043,
      "country":"GB",
      "sunrise":1470544455,
      "sunset":1470598626
   },
   "id":2643743,
   "name":"London",
   "cod":200
}
您可以在当前天气数据的文档中找到有关每个属性的详细信息。
最后。有setIcons() 函数,它设置页面中使用的所有图标:
setIcons() {
  var icons = utilities.getIcons([
    'temperature', 'wind', 'cloud',
    'pressure', 'humidity', 'rain',
    'sunrise', 'sunset'
  ]);
  icons.forEach((item) => {
    this.set(`${item.name}_icon`, item.icon);
  });
}
主页样式和图标
以下是主页的样式:
.temperature {
  font-size: 40px;
  font-weight: bold;
  text-align: center;
}

.weather {
  font-size: 30px;
  text-align: center;
}

.place {
  font-size: 20px;
  text-align: center;
}

.icon {
  font-family: 'weathericons';
  font-size: 100px;
  text-align: center;
}

.small-icon {
  font-family: 'weathericons';
  font-size: 18px;
  margin-right: 5px;
}

.details {
  margin-top: 20px;
  padding: 30px;
  font-size: 18px;
}

.label {
  font-weight: bold;
}

.details Label {
  padding: 5px 0;
}

Button {
  margin: 20px;
}
请注意,使用 weathericons 作为 font-family 用于 icon 和 small-icon 类。这就是我们在 NativeScript 中使用图标字体的方式。如果您喜欢网页上的 Font Awesome 等图标字体,则可以在 NativeScript 应用中以相同的方式使用它们。
首先,下载您要使用的图标字体。此应用程序使用天气图标字体。解压 zip 存档并在解压的文件夹中转到 font 目录。将 .ttf 文件复制到应用中的 fonts 目录,并将其重命名为 weathericons.ttf。文件名是您每次想要使用特定字体图标时用作 font-family 的值的文件名。除此之外,您还必须添加 font-size 来控制图标的大小。
预测页面
现在让我们看一下预测页面的标记(pages/forecast/forecast.xml)。在标题中,有一个后退按钮,允许用户返回主页。请注意,我们使用的是 Button 组件,而不是通用的 NavigationButton,它是 iOS 后退按钮和 Android 导航按钮的 NativeScript 等效项。
<Page xmlns="http://schemas.nativescript.org/tns.xsd" navigatingTo="navigatingTo" class="{{ background_class }}">
  <Page.actionBar>
    <ActionBar title="5-day Forecast" class="header">
      <NavigationButton text="Back" android.systemIcon="ic_menu_back" tap="goToMainPage" />
    </ActionBar>
  </Page.actionBar>
  ...
</Page>
对于主要内容,使用 Repeater 组件,而不是通常的 ListView。这两个组件都可以用来生成列表,但 ListView 带有更多功能。例如,当列表超出屏幕尺寸时,它会自动生成垂直滚动条。还内置无限滚动功能。
本例中使用 Repeater 组件,因为实际上并不需要我刚才提到的功能。我们所需要的只是一个简单的列表。
<StackLayout>
  <ScrollView>
    <ActivityIndicator busy="{{ is_loading }}" visibility="{{ is_loading ? 'visible' : 'collapsed' }}" />
    <Repeater items="{{ forecast }}">
      <Repeater.itemTemplate>
       ...
      </Repeater.itemTemplate>
    </Repeater>
  </ScrollView>
</StackLayout>
每个 Repeater.itemTemplate 内部都是一个 GridLayout ,其中包含两列,一列用于一般天气信息,一列用于详细信息。
第一列是 StackLayout 包含日期、天气图标和天气描述。第二列也是一个 StackLayout,包含四个 GridLayouts,其中包含四个天气属性(温度、风速、云量和气压)。
第一个 GridLayout 有三列,用于包含图标、白天温度和夜间温度。其他三行只有两列 - 用于图标和天气属性的值。
<GridLayout class="item" columns="*,*" rows="auto">
  <StackLayout class="day-weather" row="0" col="0">
    <Label text="{{ day }}" class="date" />
    <Label text="{{ icon }}" class="icon" />
    <Label text="{{ description }}" textWrap="true" />
  </StackLayout>

  <StackLayout class="details" row="0" col="1">
    <GridLayout columns="30,auto,auto" rows="auto" row="0" col="0">
      <Label text="{{ $parents['Page'].temperature_icon }}" class="small-icon" row="0" col="0" />
      <Label text="{{ temperature.day }}" class="temp day-temp" row="0" col="1" />
      <Label text="{{ temperature.night }}" class="temp night-temp" row="0" col="2" />
    </GridLayout>

    <GridLayout columns="30,auto" rows="auto" row="1" col="0">
      <Label text="{{ $parents['Page'].wind_icon }}" class="small-icon" row="0" col="0" />
      <Label text="{{ wind }}" row="0" col="1" />
    </GridLayout>

    <GridLayout columns="30,auto" rows="auto" row="2" col="0">
      <Label text="{{ $parents['Page'].cloud_icon }}" class="small-icon" row="0" col="0" />
      <Label text="{{ clouds }}" row="0" col="1" />
    </GridLayout>

    <GridLayout columns="30,auto" rows="auto" row="3" col="0">
      <Label text="{{ $parents['Page'].pressure_icon }}" class="small-icon" row="0" col="0" />
      <Label text="{{ pressure }}" row="0" col="1" />
    </GridLayout>

  </StackLayout>
</GridLayout>
注意 $parents['Page'] 的使用。使用 Repeater 或 ListView 组件时,您无法访问为要使用的列表指定的数组之外的数据 — 除非您显式指定父组件数据可用的地方。这就是 $parents['Page'] 的用武之地。 $parents 是 NativeScript 中的一个特殊变量,允许您访问特定组件上的可用数据。在本例中,我们指定 Page 来访问每个天气属性的图标。
<GridLayout columns="30,auto" rows="auto" row="1" col="0">
  <Label text="{{ $parents['Page'].wind_icon }}" class="small-icon" row="0" col="0" />
  <Label text="{{ wind }}" row="0" col="1" />
</GridLayout>
预测页面 JavaScript
预测页面的代码与主页的代码几乎相同。唯一的区别是导航功能用于返回主页,而我们使用 ForecastViewModel 作为视图模型。
import { EventData } from "data/observable";
import { Page } from "ui/page";
import { ForecastViewModel } from "./forecast-view-model";
import navigation = require('../../common/navigation');

export function navigatingTo(args: EventData) {
  var page = <Page>args.object;
  page.bindingContext = new ForecastViewModel();
}

export function goToMainPage() {
  navigation.goToMainPage();
}
这是视图模型的代码(pages/forecast/forecast-view-model.ts):
import observable = require("data/observable");
import requestor = require("../../common/requestor");
import constants = require("../../common/constants");
import moment = require('moment');
import utilities = require('../../common/utilities');
import locationStore = require('../../stores/locationStore');

export class ForecastViewModel extends observable.Observable {

  constructor() {
    super();
    var location = locationStore.getLocation();
    var url = `${constants.WEATHER_URL}${constants.WEATHER_FORECAST_PATH}?cnt=6&lat=${location.latitude}&lon=${location.longitude}&apikey=${constants.WEATHER_APIKEY}`;

    var time_of_day = utilities.getTimeOfDay();
    this.set('is_loading', true);
    this.set('background_class', time_of_day);
    this.setIcons();

    requestor.get(url).then((response) => {
      this.set('is_loading', false);
      var forecast = this.getForecast(response);
      this.set('forecast', forecast);
    });
  }

  private getForecast(response) {
    var forecast = [];
    var list = response.list.splice(1); //remove first item from array of forecasts
    //format and push all the necessary data into a new array
    list.forEach((item) => {
      forecast.push({
        day: moment.unix(item.dt).format('MMM DD (ddd)'),
        icon: String.fromCharCode(constants.WEATHER_ICONS['day'][item.weather[0].main.toLowerCase()]),
        temperature: {
          day: `${utilities.describeTemperature(item.temp.day)}`,
          night: `${utilities.describeTemperature(item.temp.night)}`
        },
        wind: `${item.speed}m/s`,
        clouds: `${item.clouds}%`,
        pressure: `${item.pressure} hpa`,
        description: item.weather[0].description
      })
    });

    return forecast;
  }

  private setIcons() {
    var icons = utilities.getIcons(['temperature', 'wind', 'cloud', 'pressure']);
    icons.forEach((item) => {
      this.set(`${item.name}_icon`, item.icon);
    });
  }

}
在构造函数内,我们从位置存储中获取当前位置,并构造 16 天天气预报的 URL 端点。但我们只需要 5 天,而不是 16 天,因此我们指定 6 作为计数 (cnt)。我们使用 6 是因为时区取决于服务器而不是指定的位置。这意味着 API 有可能返回前一天或当天的天气。这就是为什么有额外的 1 天作为填充。
var location = locationStore.getLocation();
var url = `${constants.WEATHER_URL}${constants.WEATHER_FORECAST_PATH}?cnt=6&lat=${location.latitude}&lon=${location.longitude}&apikey=${constants.WEATHER_APIKEY}`;
接下来,通过调用 getForecast() 函数发出请求并使用 API 响应更新 UI:
requestor.get(url).then((response) => {
  this.set('is_loading', false);
  var forecast = this.getForecast(response);
  this.set('forecast', forecast);
});
以下是 16 天预测端点返回的示例响应。请注意,为了使示例更加简洁,我将计数设置为 1,这就是 list 属性仅包含一个对象的原因。
{
   "city":{
      "id":2643743,
      "name":"London",
      "coord":{
         "lon":-0.12574,
         "lat":51.50853
      },
      "country":"GB",
      "population":0
   },
   "cod":"200",
   "message":0.0347,
   "cnt":1,
   "list":[
      {
         "dt":1470571200,
         "temp":{
            "day":24.69,
            "min":17.37,
            "max":24.69,
            "night":17.37,
            "eve":23.29,
            "morn":19.02
         },
         "pressure":1029.77,
         "humidity":0,
         "weather":[
            {
               "id":500,
               "main":"Rain",
               "description":"light rain",
               "icon":"10d"
            }
         ],
         "speed":8.27,
         "deg":253,
         "clouds":0
      }
   ]
}
预测页面样式
以下是预测页面的样式(pages/forecast/forecast.css):
Page {
  font-size: 15px;
}

.item {
  padding: 20px 10px;
}

.day-weather {
  text-align: center;
}

.details {
  horizontal-align: left;
}

.date {
  font-size: 20px;
}

.icon {
  font-family: 'weathericons';
  font-size: 30px;
}

.temp {
  padding: 3px;
  text-align: center;
  font-size: 15px;
}

.day-temp {
  background-color: #d0c110;
}

.night-temp {
  background-color: #505050;
}

.small-icon {
  font-family: 'weathericons';
  margin-right: 5px;
  text-align: center;
}
全局应用样式
打开 app.css 文件并添加以下样式:
.header {
  background-color: #333;
  color: #fff;
}

.day {
  background-color: #f48024;
  color: #fff;
}

.night {
  background-color: #924da3;
  color: #fff;
}
6.更改默认应用程序图标
您可以通过转到 App_Resources 文件夹来更改默认应用程序图标。在那里您可以看到 Android 和 iOS 文件夹。对于Android,您可以替换以下每个文件夹中的图像文件来更改图标:
drawable-hdpidrawable-ldpidrawable-mdpi
对于 iOS,您要替换的是 Assets.xcassets/AppIcon.appiconset 文件夹内的图像。
如果您想轻松创建适用于 Android 和 iOS 的图标,请查看 MakeAppIcon。只需选择一个图像文件用作图标,它就会自动为 Android 和 iOS 生成不同的尺寸。然后您可以将它们移动到上面提到的文件夹中。只需确保您获得正确的尺寸,并且名称与它们替换的图像相同。
7.运行应用程序
您可以通过执行以下 tns 命令照常在设备或模拟器上运行该应用:
tns run {platform}
tns livesync {platform} --watch
现在我们使用 TypeScript 的唯一区别是,在每个任务开始时都有一个额外的步骤,即将 TypeScript 文件编译为 JavaScript。 TypeScript 强大的类型检查充当了安全网,可以在 NativeScript 编译应用之前捕获一些错误。
结论
在本教程中,您学习了如何使用 TypeScript 语言通过 NativeScript 构建应用程序。具体来说,您学习了以下概念:
- 通过将相关文件放入各自的文件夹中来构建您的应用。
- 使用模块重用代码。
- 使用视图模型为应用页面提供数据和功能。
- 使用地理定位插件确定位置。
- 发出 HTTP 请求。
- 使用字体图标。
- 在页面之间导航。
我将为您提供一些资源,以继续您使用 NativeScript 开发出色应用程序的旅程:
- 阅读有关如何在 Google Play 或 App Store 上发布 NativeScript 应用的指南。
- 订阅 NativeScript 简讯并了解 NativeScript 社区的最新动态。
- 查看 Awesome NativeScript,这是一系列出色的 NativeScript 库、工具、资源和应用程序。
- 观看我们的 Envato Tuts+ TypeScript 入门课程。
Atas ialah kandungan terperinci Cipta apl cuaca menggunakan TypeScript dan NativeScript. Untuk maklumat lanjut, sila ikut artikel berkaitan lain di laman web China PHP!

