Rumah >pangkalan data >Redis >Bagaimana untuk melaksanakan kegigihan data EMQ X Redis
Bagaimana untuk melaksanakan kegigihan data EMQ X Redis
- WBOYWBOYWBOYWBOYWBOYWBOYWBOYWBOYWBOYWBOYWBOYWBOYWBke hadapan
- 2023-06-02 11:43:371911semak imbas
Pengenalan kepada EMQ , PostgreSQL, MongoDB, Cassandra, AWS DynamoDB dan pelbagai pangkalan data lain untuk pertanyaan pantas oleh perkhidmatan luaran atau untuk mengekalkan keadaan berjalan semasa apabila perkhidmatan tidak berfungsi atau pelanggan berada di luar talian secara luar biasa dan keadaan sebelumnya dipulihkan apabila sambungan dipulihkan; kegigihan juga boleh digunakan pada langganan Ejen klien: apabila klien peranti pergi dalam talian, modul kegigihan secara langsung memuatkan topik pratetap daripada pangkalan data dan melengkapkan langganan ejen, mengurangkan kerumitan reka bentuk sistem dan overhed komunikasi langganan pelanggan.
Pengguna juga boleh mencapai fungsi yang serupa dengan melanggan topik yang berkaitan, tetapi sokongan kegigihan yang terbina dalam versi perusahaan adalah lebih cekap dan boleh dipercayai, dengan banyaknya mengurangkan kerja pembangun dan meningkatkan kestabilan sistem.
Kegigihan data ialah ciri penting EMQ X dan hanya disokong dalam versi perusahaan.Reka bentuk kegigihan
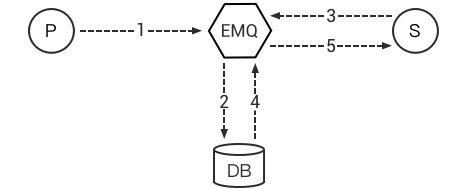
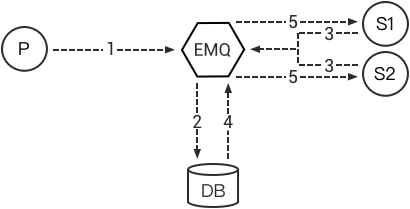
Prinsip kegigihan ialah memanggil fungsi pemprosesan (tindakan) apabila cangkuk peristiwa yang dikonfigurasikan dicetuskan Fungsi pemprosesan memperoleh data yang sepadan dan memprosesnya mengikut arahan yang dikonfigurasikan. Tambah, padam, ubah suai dan semak data. Parameter yang tersedia untuk cangkuk peristiwa yang sama dalam pangkalan data berbeza adalah sama, tetapi fungsi pemprosesan (tindakan) berbeza disebabkan ciri pangkalan data yang berbeza. Keseluruhan model dan proses kerja kegigihan adalah seperti berikut:
Storan mesej satu sama satu

- Terbitan sisi menerbitkan mesej ;
- Backend merekodkan mesej dalam pangkalan data; >Backend mendapatkannya daripada pangkalan data Mesej topik
- Hantar mesej ke bahagian Langgan; Bahagian belakang mengalih keluar mesej daripada pangkalan data; mesej;
- Backend merekodkan mesej dalam pangkalan data; 🎜>
- Backend mendapat topik daripada pangkalan data Mesej;
- Hantar mesej ke SUB1 dan SUB2; kedudukan SUB1 dan SUB2, dan mendapat mesej daripada kedudukan ini pada kali seterusnya bermula.
- Kegigihan data RedisArtikel ini menggunakan contoh praktikal untuk menggambarkan cara menyimpan maklumat yang berkaitan melalui Redis.

- Redis mempunyai prestasi yang sangat tinggi, dan satu mesin menyokong kelajuan baca dan tulis sebanyak 100,000 tahap.
- Redis menyokong kegigihan data ia boleh menyimpan data dalam memori ke cakera dan memuatkannya semula untuk digunakan semasa memulakan semula.
- Redis bukan sahaja menyokong data jenis nilai kunci mudah, tetapi juga menyediakan storan struktur data seperti senarai, set, zset dan cincang.
- Redis menyokong sandaran data, iaitu sandaran data dalam mod tuan-hamba.
- Pembaca boleh merujuk kepada Mula Pantas Redis rasmi untuk memasang Redis (semasa menulis artikel ini, versi Redis ialah 5.0), dan mulakan pelayan Redis melalui arahan
- . Konfigurasikan pelayan EMQ X
- Untuk EMQ . Satu-satunya perkara yang perlu ditukar mungkin alamat pelayan Redis: jika Redis yang dipasang oleh pembaca tidak berada pada pelayan yang sama dengan EMQ X, sila nyatakan alamat dan port pelayan Redis yang betul. Seperti yang ditunjukkan di bawah:
## Redis Server 127.0.0.1:6379, Redis Sentinel: 127.0.0.1:26379
backend.redis.pool1.server = 127.0.0.1:6379
Pastikan baki fail konfigurasi tidak berubah, dan kemudian mulakan pemalam:
emqx_ctl plugins load emqx_backend_redis
## 上线
backend.redis.hook.client.connected.1    =  { "action": { "function": "on_client_connected" }, "pool": "pool1"}

## 下线
backend.redis.hook.client.disconnected.1 = {"action": {"function": "on_client_disconnected"}, "pool": "pool1"}
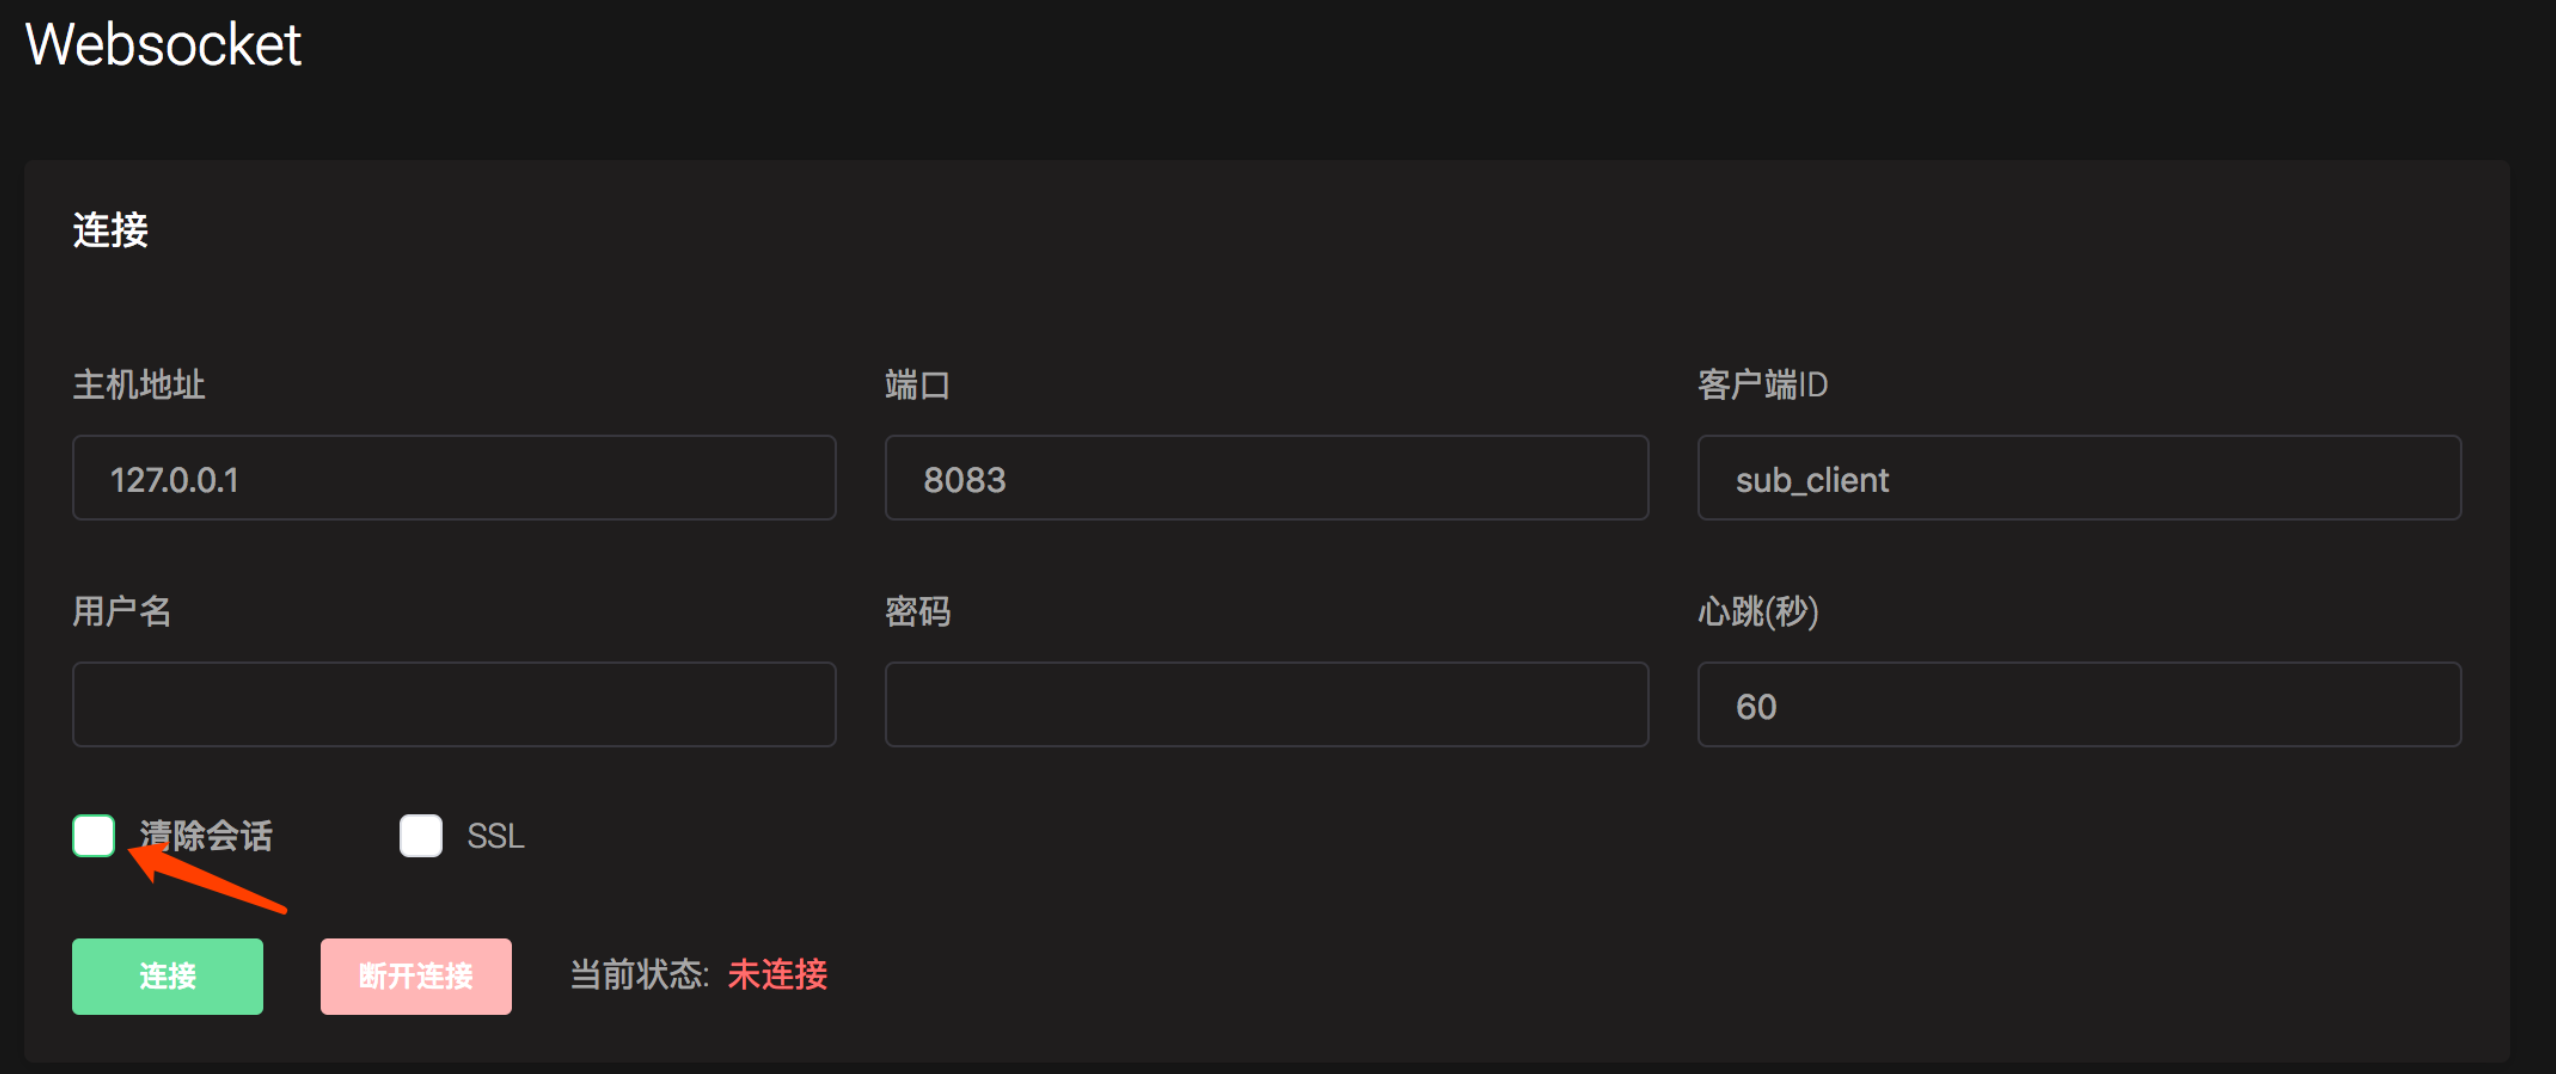
-> Cipta sambungan pelanggan baharu dalam
Soket Webtetingkap baris arahan, laksanakan arahan
, hasilnya adalah seperti berikut, pembaca dapat melihat bahawa dua kekunci disimpan dalam Redis:127.0.0.1:6379> keys * 1) "mqtt:node:emqx@127.0.0.1" 2) "mqtt:client:sub_client"
连接列表
插件以 mqtt:node:{node_name} 格式的 key 记录节点下客户端列表及连接时间戳信息,等效操作:
## redis key 为 mqtt:node:{node_name}
HMSET mqtt:node:emqx@127.0.0.1 sub_client 1542272836
字段说明:
## 节点下在线设备信息
127.0.0.1:6379> HGETALL mqtt:node:emqx@127.0.0.1
1) "sub_client1" # clientid
2) "1542272836" # 上线时间时间戳
3) "sub_client"
4) "1542272836"
连接详细信息
插件以 mqtt:client:{client_id} 格式的 key 记录客户端在线状态、上线时间,等效操作:
## redis key 为 mqtt:client:{client_id}
HMSET mqtt:client:sub_client state 1 online_at 1542272854
字段说明:
## 客户端在线状态
127.0.0.1:6379> HGETALL mqtt:client:sub_client
1) "state"
2) "0" # 0 离线 1 在线
3) "online_at"
4) "1542272854" # 上线时间戳
5) "offline_at"
6) "undefined" # 离线时间戳
客户端代理订阅
当客户端上线时,代理会加载订阅主题,而存储模块会直接从数据库中读取预设待订阅列表。应用程序可以通过数据层的设定或更改来控制代理订阅列表,以便在需要预定主题进行通信和接收消息的情况下与客户端进行通信。
配置项
打开配置文件,配置 Backend 规则:
## hook: client.connected
## action/function: on_subscribe_lookup
backend.redis.hook.client.connected.2    = {"action": {"function": "on_subscribe_lookup"}, "pool": "pool1"}
使用示例
当 sub_client 设备上线时,需要为其订阅 sub_client/upstream 与 sub_client/downlink 两个 QoS 1 的主题:
插件以
mqtt:sub:{client_id}格式 key 在 Redis 中初始化代理订阅 Hash:
## redis key 为 mqtt:sub:{client_id}
## HSET key {topic} {qos}
127.0.0.1:6379> HSET mqtt:sub:sub_client sub_client/upstream 1
(integer) 0

127.0.0.1:6379> HSET mqtt:sub:sub_client sub_client/downlink 1
(integer) 0
EMQ X 管理控制台 WebSocket 页面,以 clientid
sub_client新建一个客户端连接,切换至订阅页面,可见当前客户端自动订阅了sub_client/upstream与sub_client/downlink两个 QoS 1 的主题:

切换回管理控制台 WebSocket 页面,向
sub_client/downlink主题发布消息,可在消息订阅列表收到发布的消息。
持久化发布消息
配置项
打开配置文件,配置 Backend 规则,支持使用 topic 参数进行消息过滤,此处使用 # 通配符存储任意主题消息:
## hook: message.publish
## action/function: on_message_publish

backend.redis.hook.message.publish.1 = {"topic": "#", "action": {"function": "on_message_publish"}, "pool": "pool1"}
使用示例
在 EMQ X 管理控制台 WebSocket 页面中,使用 clientid sub_client 建立连接,向主题 upstream_topic 发布多条消息。针对每条消息, EMQ X 将持久化消息列表、消息详情两条记录。
消息列表
EMQ X 将消息列表以 message id 持久化至 mqtt:msg:{topic} Redis 集合中:
## 获取 upstream_topic 主题集合中所有 message id
127.0.0.1:6379> ZRANGE mqtt:msg:upstream_topic 0 -1
1) "2VFsyhDm0cPIQvnY9osj"
2) "2VFszTClyjpVtLDLrn1u"
3) "2VFszozkwkYOcbEy8QN9"
4) "2VFszpEc7DfbEqC97I3g"
5) "2VFszpSzRviADmcOeuXd"
6) "2VFszpm3kvvLkJTcdmGU"
7) "2VFt0kuNrOktefX6m4nP"
127.0.0.1:6379>
消息详情
每条消息详情将以 mqtt:msg:{message_id} 格式的 key 存储在 Redis Hash 中:
## 获取 message id 为 2VFt0kuNrOktefX6m4nP 的消息详情
127.0.0.1:6379> HGETALL mqtt:msg:2VFt0kuNrOktefX6m4nP
 1) "id"
 2) "2VFt0kuNrOktefX6m4nP" ## message id
 3) "from"
 4) "sub_client" ## client id
 5) "qos"
 6) "2"
 7) "topic"
 8) "up/upstream_topic"
 9) "payload"
10) "{ "cmd": "reboot" }"
11) "ts"
12) "1542338754" ## pub 时间戳
13) "retain"
14) "false"
获取离线消息
配置项
打开配置文件,配置 Backend 规则:
## hook: session.subscribed
## action/function: on_message_fetch_for_queue、on_message_fetch_for_pubsub

## 一对一离线消息
backend.redis.hook.session.subscribed.1  = {"topic": "queue/#", "action": {"function": "on_message_fetch_for_queue"}, "pool": "pool1"}

## 一对多离线消息
backend.redis.hook.session.subscribed.2  = {"topic": "pubsub/#", "action": {"function": "on_message_fetch_for_pubsub"}, "pool": "pool1"}
使用示例
MQTT 离线消息需满足以下条件:
以 clean_session = false 连接
订阅 QoS > 0
发布 QoS > 0
在 EMQ X 管理控制台中以如下配置建立连接,

持久化 Retain 消息
配置项
打开配置文件,配置 Backend 规则:
## hook: message.publish
## action/function: on_client_connected、on_message_retain

backend.redis.hook.message.publish.2     = {"topic": "#", "action": {"function": "on_message_retain"}, "pool": "pool1"}

backend.redis.hook.message.publish.3     = {"topic": "#", "action": {"function": "on_retain_delete"}, "pool": "pool1"}
消息列表
EMQ X 将消息列表以 message id 持久化至 mqtt:retain:{topic} Redis Hash 中:
## 获取 upstream_topic 主题集合中所有 message id
127.0.0.1:6379> ZRANGE mqtt:retain:upstream_topic 0 -1
1) "2VFsyhDm0cPIQvnY9osj"
127.0.0.1:6379>
消息详情
每条消息详情将以 mqtt:msg:{message_id} 格式的 key 存储在 Redis Hash 中:
## 获取 message id 为 2VFt0kuNrOktefX6m4nP 的消息详情
127.0.0.1:6379> HGETALL mqtt:msg:2VFt0kuNrOktefX6m4nP
 1) "id"
 2) "2VFt0kuNrOktefX6m4nP" ## message id
 3) "from"
 4) "sub_client" ## client id
 5) "qos"
 6) "2"
 7) "topic"
 8) "up/upstream_topic"
 9) "payload"
10) "{ "cmd": "reboot" }"
11) "ts"
12) "1542338754" ## pub 时间戳
13) "retain"
14) "false"
Atas ialah kandungan terperinci Bagaimana untuk melaksanakan kegigihan data EMQ X Redis. Untuk maklumat lanjut, sila ikut artikel berkaitan lain di laman web China PHP!

