
Rumah >Java >javaTutorial >Cara menggunakan bekas Tomcat untuk mencapai permulaan kendiri dalam springboot
Cara menggunakan bekas Tomcat untuk mencapai permulaan kendiri dalam springboot

- WBOYWBOYWBOYWBOYWBOYWBOYWBOYWBOYWBOYWBOYWBOYWBOYWBke hadapan
- 2023-05-12 10:25:141121semak imbas
1. Spring mengimport kacang melalui anotasi, yang secara kasarnya boleh dibahagikan kepada empat cara Kami bercakap tentang dua kaedah pelaksanaan Import berikut:
1 Laksanakan pemuatan Kacang dengan melaksanakan antara muka ImportSerlector:
public class TestServiceImpl {
 public void testImpl() {
 System.out.println("我是通过importSelector导入进来的service");
 }
}
public class TestService implements ImportSelector {
 @Override
 public String[] selectImports(AnnotationMetadata annotationMetadata) {
 return new String[]{"com.ycdhz.service.TestServiceImpl"};
 }
}
@Configuration
@Import(value = {TestService.class})
public class TestConfig {
}
public class TestController {
 @Autowired
 private TestServiceImpl testServiceImpl;

 @RequestMapping("testImpl")
 public String testTuling() {
 testServiceImpl.testImpl();
 return "Ok";
 }
}
2. Laksanakan pemuatan Bean dengan melaksanakan antara muka ImportSerlector:
public class TestService {
 public TestService() {
 System.out.println("我是通过ImportBeanDefinitionRegistrar导入进来的组件");
 }
}
public class TestImportBeanDefinitionRegistrar implements ImportBeanDefinitionRegistrar {
 @Override
 public void registerBeanDefinitions(AnnotationMetadata importingClassMetadata, BeanDefinitionRegistry registry) {
 //定义一个BeanDefinition
 RootBeanDefinition beanDefinition = new RootBeanDefinition(TestService.class);
 //把自定义的bean定义导入到容器中
 registry.registerBeanDefinition("testService",beanDefinition);
 }
}
@Configuration
@Import(TestImportBeanDefinitionRegistrar.class)
public class TestConfig {
}
2 Springboot akan dipasang secara automatik semasa permulaan
Kami bermula dari spring-boot-autoconfigure-2.0. 6. RELEASE Saya mencari konfigurasi Tomcat yang berkaitan di bawah .jar dan menemui dua kelas pemasangan automatik, setiap satu mengandungi tiga penyesuai (prinsip tanggungjawab tunggal berorientasikan objek) dan kelas kilang.

2.1. TomcatWebServerFactoryCustomizer: Sesuaikan fungsi khusus Tomcat yang biasa digunakan pada pelayan Servlet dan Reaktif.
public class TomcatWebServerFactoryCustomizer implements
 WebServerFactoryCustomizer<configurabletomcatwebserverfactory>, Ordered {
 @Override
 public void customize(ConfigurableTomcatWebServerFactory factory) {
 ServerProperties properties = this.serverProperties;
 ServerProperties.Tomcat tomcatProperties = properties.getTomcat();
 PropertyMapper propertyMapper = PropertyMapper.get();
 propertyMapper.from(tomcatProperties::getBasedir).whenNonNull()
 .to(factory::setBaseDirectory);
 propertyMapper.from(tomcatProperties::getBackgroundProcessorDelay).whenNonNull()
 .as(Duration::getSeconds).as(Long::intValue)
 .to(factory::setBackgroundProcessorDelay);
 customizeRemoteIpValve(factory);
 propertyMapper.from(tomcatProperties::getMaxThreads).when(this::isPositive)
 .to((maxThreads) -> customizeMaxThreads(factory,
  tomcatProperties.getMaxThreads()));
 propertyMapper.from(tomcatProperties::getMinSpareThreads).when(this::isPositive)
 .to((minSpareThreads) -> customizeMinThreads(factory, minSpareThreads));
 propertyMapper.from(() -> determineMaxHttpHeaderSize()).when(this::isPositive)
 .to((maxHttpHeaderSize) -> customizeMaxHttpHeaderSize(factory,
  maxHttpHeaderSize));
 propertyMapper.from(tomcatProperties::getMaxHttpPostSize)
 .when((maxHttpPostSize) -> maxHttpPostSize != 0)
 .to((maxHttpPostSize) -> customizeMaxHttpPostSize(factory,
  maxHttpPostSize));
 propertyMapper.from(tomcatProperties::getAccesslog)
 .when(ServerProperties.Tomcat.Accesslog::isEnabled)
 .to((enabled) -> customizeAccessLog(factory));
 propertyMapper.from(tomcatProperties::getUriEncoding).whenNonNull()
 .to(factory::setUriEncoding);
 propertyMapper.from(properties::getConnectionTimeout).whenNonNull()
 .to((connectionTimeout) -> customizeConnectionTimeout(factory,
  connectionTimeout));
 propertyMapper.from(tomcatProperties::getMaxConnections).when(this::isPositive)
 .to((maxConnections) -> customizeMaxConnections(factory, maxConnections));
 propertyMapper.from(tomcatProperties::getAcceptCount).when(this::isPositive)
 .to((acceptCount) -> customizeAcceptCount(factory, acceptCount));
 customizeStaticResources(factory);
 customizeErrorReportValve(properties.getError(), factory);
 }
}</configurabletomcatwebserverfactory>
2.2. ServletWebServerFactoryCustomizer: WebServerFactoryCustomizer menggunakan sifat ServerProperties pada pelayan web Tomcat.
public class ServletWebServerFactoryCustomizer implements
 WebServerFactoryCustomizer<configurableservletwebserverfactory>, Ordered {
 private final ServerProperties serverProperties;
 public ServletWebServerFactoryCustomizer(ServerProperties serverProperties) {
 this.serverProperties = serverProperties;
 }
 @Override
 public int getOrder() {
 return 0;
 }
 @Override
 public void customize(ConfigurableServletWebServerFactory factory) {
 PropertyMapper map = PropertyMapper.get().alwaysApplyingWhenNonNull();
 map.from(this.serverProperties::getPort).to(factory::setPort);
 map.from(this.serverProperties::getAddress).to(factory::setAddress);
 map.from(this.serverProperties.getServlet()::getContextPath)
 .to(factory::setContextPath);
 map.from(this.serverProperties.getServlet()::getApplicationDisplayName)
 .to(factory::setDisplayName);
 map.from(this.serverProperties.getServlet()::getSession).to(factory::setSession);
 map.from(this.serverProperties::getSsl).to(factory::setSsl);
 map.from(this.serverProperties.getServlet()::getJsp).to(factory::setJsp);
 map.from(this.serverProperties::getCompression).to(factory::setCompression);
 map.from(this.serverProperties::getHttp2).to(factory::setHttp2);
 map.from(this.serverProperties::getServerHeader).to(factory::setServerHeader);
 map.from(this.serverProperties.getServlet()::getContextParameters)
 .to(factory::setInitParameters);
 }
}</configurableservletwebserverfactory>
2.3. ServletWebServerFactoryCustomizer: WebServerFactoryCustomizer menggunakan sifat ServerProperties pada pelayan web Tomcat.
public class TomcatServletWebServerFactoryCustomizer
 implements WebServerFactoryCustomizer<tomcatservletwebserverfactory>, Ordered {
 private final ServerProperties serverProperties;
 public TomcatServletWebServerFactoryCustomizer(ServerProperties serverProperties) {
 this.serverProperties = serverProperties;
 }
 @Override
 public void customize(TomcatServletWebServerFactory factory) {
 ServerProperties.Tomcat tomcatProperties = this.serverProperties.getTomcat();
 if (!ObjectUtils.isEmpty(tomcatProperties.getAdditionalTldSkipPatterns())) {
 factory.getTldSkipPatterns()
  .addAll(tomcatProperties.getAdditionalTldSkipPatterns());
 }
 if (tomcatProperties.getRedirectContextRoot() != null) {
 customizeRedirectContextRoot(factory,
  tomcatProperties.getRedirectContextRoot());
 }
 if (tomcatProperties.getUseRelativeRedirects() != null) {
 customizeUseRelativeRedirects(factory,
  tomcatProperties.getUseRelativeRedirects());
 }
 }
}</tomcatservletwebserverfactory>
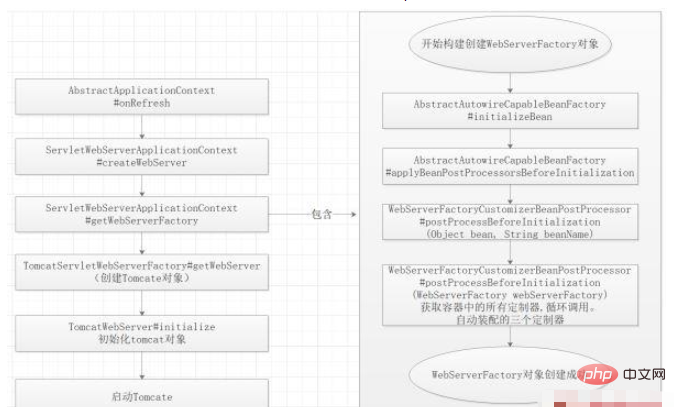
3. Dengan TomcatServletWebServerFactory, ia sama dengan mempunyai pintu masuk untuk memuatkan Spring
Gunakan AbstractApplicationContext#onReFresh() untuk memacu tomcat untuk bermula dalam bekas IOC, dan kemudian laksanakan bahagian lain dari langkah bekas ioc.
Kami boleh memerhatikan keseluruhan kitaran hayat pemuatan Tomcat melalui titik putus, serta proses pemuatan tiga penyesuai.
@Override
public WebServer getWebServer(ServletContextInitializer... initializers) {
 Tomcat tomcat = new Tomcat();
 File baseDir = (this.baseDirectory != null) ? this.baseDirectory
 : createTempDir("tomcat");
 tomcat.setBaseDir(baseDir.getAbsolutePath());
 Connector connector = new Connector(this.protocol);
 tomcat.getService().addConnector(connector);
 customizeConnector(connector);
 tomcat.setConnector(connector);
 //设置是否自动启动
 tomcat.getHost().setAutoDeploy(false);
 //创建Tomcat引擎
 configureEngine(tomcat.getEngine());
 for (Connector additionalConnector : this.additionalTomcatConnectors) {
 tomcat.getService().addConnector(additionalConnector);
 }
 //刷新上下文
 prepareContext(tomcat.getHost(), initializers);
 //准备启动
 return getTomcatWebServer(tomcat);
}
private void initialize() throws WebServerException {
 TomcatWebServer.logger
 .info("Tomcat initialized with port(s): " + getPortsDescription(false));
 synchronized (this.monitor) {
 try {
 addInstanceIdToEngineName();
 Context context = findContext();
 context.addLifecycleListener((event) -> {
 if (context.equals(event.getSource())
  && Lifecycle.START_EVENT.equals(event.getType())) {
  // Remove service connectors so that protocol binding doesn't
  // happen when the service is started.
  removeServiceConnectors();
 }
 });
 // Start the server to trigger initialization listeners
 this.tomcat.start();
 // We can re-throw failure exception directly in the main thread
 rethrowDeferredStartupExceptions();
 try {
 ContextBindings.bindClassLoader(context, context.getNamingToken(),
  getClass().getClassLoader());
 }
 catch (NamingException ex) {
 // Naming is not enabled. Continue
 }
 // Unlike Jetty, all Tomcat threads are daemon threads. We create a
 // blocking non-daemon to stop immediate shutdown
 startDaemonAwaitThread();
 }
 catch (Exception ex) {
 stopSilently();
 throw new WebServerException("Unable to start embedded Tomcat", ex);
 }
 }
}
Nota: Dalam proses ini, kita perlu memahami kitaran hayat tiga penyesuai Tomcat semuanya dimuatkan dalam proses BeanPostProcessorsRegistrar (Bean post-processor);
Kaedah pembina-->Bean post-processorSebelum-->InitializingBean-->init-method-->Bean post-processorAfter
org.springframework.beans.factory.support.AbstractAutowireCapableBeanFactory#doCreateBean
  org.springframework.beans.factory.support.AbstractAutowireCapableBeanFactory#initializeBean
protected Object doCreateBean(final String beanName, final RootBeanDefinition mbd, final @Nullable Object[] args)
 throws BeanCreationException {
 // Instantiate the bean.
 BeanWrapper instanceWrapper = null;
 if (mbd.isSingleton()) {
 instanceWrapper = this.factoryBeanInstanceCache.remove(beanName);
 }
 if (instanceWrapper == null) {
 //构造方法
 instanceWrapper = createBeanInstance(beanName, mbd, args);
 }
 final Object bean = instanceWrapper.getWrappedInstance();
 Class> beanType = instanceWrapper.getWrappedClass();
 if (beanType != NullBean.class) {
 mbd.resolvedTargetType = beanType;
 }
 // Initialize the bean instance.
 ......
 return exposedObject;
}
protected Object initializeBean(final String beanName, final Object bean, @Nullable RootBeanDefinition mbd) {
 if (System.getSecurityManager() != null) {
 AccessController.doPrivileged((PrivilegedAction<object>) () -> {
 invokeAwareMethods(beanName, bean);
 return null;
 }, getAccessControlContext());
 }
 else {
 invokeAwareMethods(beanName, bean);
 }
 Object wrappedBean = bean;
 if (mbd == null || !mbd.isSynthetic()) {
 //Bean后置处理器Before
 wrappedBean = applyBeanPostProcessorsBeforeInitialization(wrappedBean, beanName);
 }
 try {
 invokeInitMethods(beanName, wrappedBean, mbd);
 }
 catch (Throwable ex) {
 throw new BeanCreationException(
 (mbd != null ? mbd.getResourceDescription() : null),
 beanName, "Invocation of init method failed", ex);
 }
 if (mbd == null || !mbd.isSynthetic()) {
 //Bean后置处理器After
 wrappedBean = applyBeanPostProcessorsAfterInitialization(wrappedBean, beanName);
 }
 return wrappedBean;
}</object>
Atas ialah kandungan terperinci Cara menggunakan bekas Tomcat untuk mencapai permulaan kendiri dalam springboot. Untuk maklumat lanjut, sila ikut artikel berkaitan lain di laman web China PHP!