Rumah >hujung hadapan web >tutorial js >Ajar anda cara menjana hamparan Excel daripada pelayan dengan Node.js SpreadJS
Ajar anda cara menjana hamparan Excel daripada pelayan dengan Node.js SpreadJS
- 青灯夜游ke hadapan
- 2022-09-02 20:41:203306semak imbas

Node是一个基于Chrome V8引擎的JavaScript运行环境,通常用于创建网络应用程序。它可以同时处理多个连接,并且不像其他大多数模型那样依赖线程。
对于 Web 开发者来说,从数据库或Web服务器获取数据,然后输出到Excel文件以进行进一步分析的场景时有发生。我们的技术团队在跟国内外各行各业用户交流的过程中,就曾发现有很多的用户尝试在Node.js的环境下运行SpreadJS 纯前端表格控件,借助该控件,可以在服务器不预装任何Excel依赖项的情况下,收集用户输入的信息,并将其自动导出到Excel文件中。
为了满足广大技术爱好者的需要,同时减少大家在未来技术选型方面所走的弯路,本文将就SpreadJS 与 Node.js之间的技术性方案进行探讨!
一、安装 SpreadJS 和 Node .js
首先,我们需要安装Node.js以及Mock-Browser,BufferJS和FileReader,大家可以前往以下链接进行下载,同步操作:
我们将使用Visual Studio创建应用程序。打开Visual Studio后,使用JavaScript> Node.js>Blank Node.js控制台应用程序模板创建一个新应用程序。这将自动创建所需的文件并打开" app.js"文件,也是我们将要更改的唯一文件。
对于BufferJS库,您需要下载该软件包,然后通过导航到项目文件夹(一旦创建)并运行以下命令,将其手动安装到项目中:
npm install
安装完成后,您可能需要打开项目的package.json文件并将其添加到" dependencies"部分。文件内容应如下所示:
{
"name": "spread-sheets-node-jsapp",
"version": "0.0.0",
"description": "SpreadSheetsNodeJSApp",
"main": "app.js",
"author": {
   "name": "admin"
},
"dependencies": {
   "FileReader": "^0.10.2",
   "bufferjs": "1.0.0",
   "mock-browser": "^0.92.14"
  }
}
在此示例中,我们将使用Node.js的文件系统模块。我们可以将其加载到:
var fs = require('fs')
为了将SpreadJS与Node.js结合使用,我们还需要加载已安装的Mock-Browser:
var mockBrowser =require('mock-browser').mocks.MockBrowser
在加载SpreadJS脚本之前,我们需要初始化模拟浏览器。初始化我们稍后在应用程序中可能需要使用的变量,尤其是" window"变量:
global.window =mockBrowser.createWindow()
global.document = window.document
global.navigator = window.navigator
global.HTMLCollection =window.HTMLCollection
global.getComputedStyle =window.getComputedStyle
初始化FileReader库:
var fileReader = require('filereader');
global.FileReader = fileReader;
二、使用SpreadJS npm 包
将SpreadJS安装文件中的SpreadJS Sheets和ExcelIO包添加到项目中。
您可以通过右键单击解决方案资源管理器的" npm"部分并将它们添加到您的项目中,然后选择"安装新的NPM软件包"。您应该能够搜索" GrapeCity"并安装以下2个软件包:
@grapecity/spread-sheets
@grapectiy/spread-excelio
将SpreadJS npm软件包添加到项目后,正确的依赖关系将被写入package.json:
	{
	"name": "spread-sheets-node-jsapp",
	"version": "0.0.0",
	"description": "SpreadSheetsNodeJSApp",
	"main": "app.js",
	"author": {
	   "name": "admin"
	},
	  "dependencies":{
	   "@grapecity/spread-excelio": "^11.2.1",
	   "@grapecity/spread-sheets": "^11.2.1",
	   "FileReader": "^0.10.2",
	   "bufferjs": "1.0.0",
	   "mock-browser": "^0.92.14"
	  }
	}
现在我们需要在app.js文件中引入它:
var GC =require('@grapecity/spread-sheets')
var GCExcel =require('@grapecity/spread-excelio');
使用npm软件包时,还需要设置许可证密钥(点击此处,免费申请许可证密钥):
GC.Spread.Sheets.LicenseKey ="<YOUR KEY HERE>"
在这个特定的应用程序中,我们将向用户显示他们正在使用哪个版本的SpreadJS。为此,我们可以引入package.json文件,然后引用依赖项以获取版本号:
var packageJson =require('./package.json')
console.log('\n** Using Spreadjs Version"' + packageJson.dependencies["@grapecity/spread-sheets"] +'" **')
三、将 Excel 文件加载到您的 Node.js 应用程序中
点击此处,下载现成的Excel模板文件,该文件包含了从用户那里获取数据。接下来,将数据放入文件中并导出。在这种情况下,文件是用户可以编辑的状态。
初始化工作簿和ExcelIO变量:
var wb = new GC.Spread.Sheets.Workbook();
var excelIO = new GCExcel.IO();
我们在读取文件时将代码包装在try / catch块中。然后,初始化变量" readline",让您读取用户输入到控制台的数据。接下来,我们将其存储到一个JavaScript数组中,以便轻松填写Excel文件:
// Instantiate the spreadsheet and modifyit
console.log('\nManipulatingSpreadsheet\n---');
try {
   var file = fs.readFileSync('./content/billingInvoiceTemplate.xlsx');
   excelIO.open(file.buffer, (data) => {
       wb.fromJSON(data);
       const readline = require('readline');
       var invoice = {
            generalInfo: [],
            invoiceItems: [],
            companyDetails: []
       };
   });
} catch (e) {
   console.error("** Error manipulating spreadsheet **");
   console.error(e);
}
四、收集用户输入信息

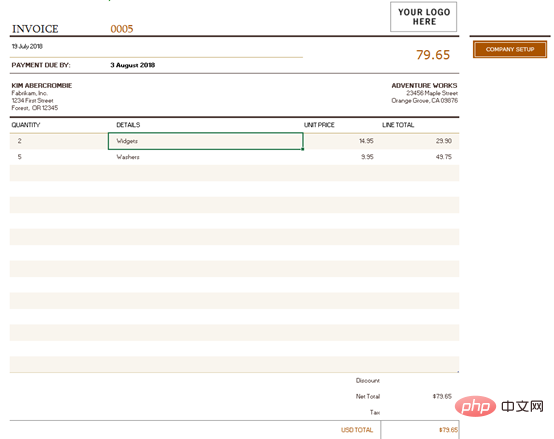
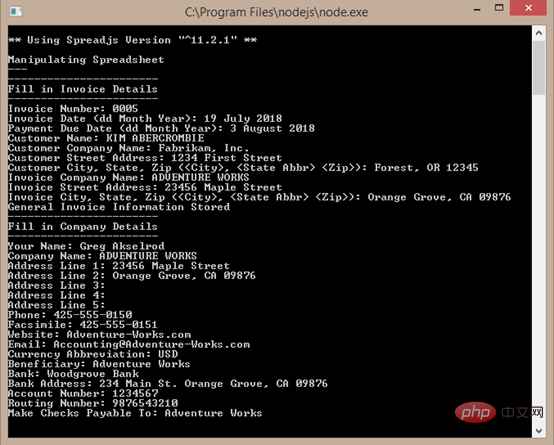
上图显示了我们正在使用的Excel文件。我们可以在excelio.open调用中创建一个单独的函数,以在控制台中提示用户需要的每一项内容。我们也可以创建一个单独的数组,将数据保存到每个输入后,然后将其推送到我们创建的invoice.generalInfo数组中:
fillGeneralInformation();
function fillGeneralInformation() {
   console.log("-----------------------\nFill in InvoiceDetails\n-----------------------")
   const rl = readline.createInterface({
       input: process.stdin,
       output: process.stdout
   });
   var generalInfoArray = [];
   rl.question('Invoice Number: ', (answer) => {
       generalInfoArray.push(answer);
       rl.question('Invoice Date (dd Month Year): ', (answer) => {
           generalInfoArray.push(answer);
            rl.question('Payment Due Date (ddMonth Year): ', (answer) => {
                generalInfoArray.push(answer);
                rl.question('Customer Name: ',(answer) => {
                   generalInfoArray.push(answer);
                    rl.question('CustomerCompany Name: ', (answer) => {
                       generalInfoArray.push(answer);
                        rl.question('Customer Street Address:', (answer) => {
                           generalInfoArray.push(answer);
                           rl.question('Customer City, State, Zip (<City>, <State Abbr><Zip>): ', (answer) => {
                                generalInfoArray.push(answer);
                               rl.question('Invoice Company Name: ', (answer) => {
                                   generalInfoArray.push(answer);
                                   rl.question('Invoice Street Address: ', (answer) => {
                                       generalInfoArray.push(answer);
                                       rl.question('Invoice City, State, Zip (<City>, <State Abbr><Zip>): ', (answer) => {
                                            generalInfoArray.push(answer);
                                           rl.close();
                                           invoice.generalInfo.push({
                                               "invoiceNumber": generalInfoArray[0],
                                               "invoiceDate": generalInfoArray[1],
                                               "paymentDueDate": generalInfoArray[2],
                                               "customerName": generalInfoArray[3],
                                               "customerCompanyName": generalInfoArray[4],
                                               "customerStreetAddress": generalInfoArray[5],
                                               "customerCityStateZip": generalInfoArray[6],
                                               "invoiceCompanyName": generalInfoArray[7],
                                               "invoiceStreetAddress": generalInfoArray[8],
                                               "invoiceCityStateZip": generalInfoArray[9],
                                            });
                                           console.log("General Invoice Information Stored");
                                           fillCompanyDetails();
                                        });
                                    });
                               });
                            });
                        });
                    });
                });
            });
       });
   });
}
该函数被称为" fillCompanyDetails",目的是收集有关公司的信息以填充到工作簿的第二张表中:
function fillCompanyDetails() {
   console.log("-----------------------\nFill in CompanyDetails\n-----------------------")
   const rl = readline.createInterface({
       input: process.stdin,
       output: process.stdout
   });
   var companyDetailsArray = []
   rl.question('Your Name: ', (answer) => {
       companyDetailsArray.push(answer);
       rl.question('Company Name: ', (answer) => {
            companyDetailsArray.push(answer);
            rl.question('Address Line 1: ',(answer) => {
               companyDetailsArray.push(answer);
                rl.question('Address Line 2: ',(answer) => {
                   companyDetailsArray.push(answer);
                    rl.question('Address Line3: ', (answer) => {
                       companyDetailsArray.push(answer);
                        rl.question('AddressLine 4: ', (answer) => {
                           companyDetailsArray.push(answer);
                           rl.question('Address Line 5: ', (answer) => {
                               companyDetailsArray.push(answer);
                               rl.question('Phone: ', (answer) => {
                                   companyDetailsArray.push(answer);
                                   rl.question('Facsimile: ', (answer) => {
                                       companyDetailsArray.push(answer);
                                        rl.question('Website: ', (answer)=> {
                                           companyDetailsArray.push(answer);
                                           rl.question('Email: ', (answer) => {
                                                companyDetailsArray.push(answer);
                                               rl.question('Currency Abbreviation: ', (answer) => {
                                                   companyDetailsArray.push(answer);
                                                    rl.question('Beneficiary: ',(answer) => {
                                                       companyDetailsArray.push(answer);
                                                       rl.question('Bank: ', (answer) => {
                                                            companyDetailsArray.push(answer);
                                                           rl.question('Bank Address: ', (answer) => {
                                                               companyDetailsArray.push(answer);
                                                               rl.question('Account Number: ', (answer) => {
                                                                   companyDetailsArray.push(answer);
                                                                    rl.question('RoutingNumber: ', (answer) => {
                                                                       companyDetailsArray.push(answer);
                                                                       rl.question('Make Checks Payable To: ', (answer) => {
                                                                           companyDetailsArray.push(answer);
                                                                            rl.close();
                                                                           invoice.companyDetails.push({
                                                                               "yourName": companyDetailsArray[0],
                                                                               "companyName": companyDetailsArray[1],
                                                                               "addressLine1": companyDetailsArray[2],
                                                                               "addressLine2": companyDetailsArray[3],
                                                                               "addressLine3": companyDetailsArray[4],
                                                                               "addressLine4": companyDetailsArray[5],
                                                                               "addressLine5": companyDetailsArray[6],
                                                                                "phone":companyDetailsArray[7],
                                                                               "facsimile": companyDetailsArray[8],
                                                                                "website":companyDetailsArray[9],
                                                                               "email": companyDetailsArray[10],
                                                                               "currencyAbbreviation":companyDetailsArray[11],
                                                                               "beneficiary": companyDetailsArray[12],
                                                                               "bank":companyDetailsArray[13],
                                                                               "bankAddress": companyDetailsArray[14],
                                                                               "accountNumber": companyDetailsArray[15],
                                                                               "routingNumber": companyDetailsArray[16],
                                                                               "payableTo": companyDetailsArray[17]
                                                                           });
                                                                           console.log("Invoice Company Information Stored");
                                                                            console.log("-----------------------\nFillin Invoice Items\n-----------------------")
                                                                           fillInvoiceItemsInformation();
                                                                        });
                                                                   });
                                                               });
                                                           });
                                                       });
                                                   });
                                               });
                                            });
                                        });
                                    });
                                });
                            });
                        });
                    });
                });
            });
       });
   });
}

现在我们已经有了用户的基本信息,我们可以集中精力收集单个项目,并另命名为" fillInvoiceItemsInformation"函数。在每个项目执行之前,我们会询问用户是否要添加一个项目。如果他们继续输入" y",那么我们将收集该项目的信息,然后再次询问直到他们键入" n":
function fillInvoiceItemsInformation() {
   const rl = readline.createInterface({
       input: process.stdin,
       output: process.stdout
   });
   var invoiceItemArray = [];
   rl.question('Add item?(y/n): ', (answer) => {
       switch (answer) {
            case "y":
               console.log("-----------------------\nEnter ItemInformation\n-----------------------");
                rl.question('Quantity: ',(answer) => {
                   invoiceItemArray.push(answer);
                    rl.question('Details: ',(answer) => {
                       invoiceItemArray.push(answer);
                        rl.question('UnitPrice: ', (answer) => {
                           invoiceItemArray.push(answer);
                           invoice.invoiceItems.push({
                               "quantity":invoiceItemArray[0],
                               "details": invoiceItemArray[1],
                               "unitPrice": invoiceItemArray[2]
                            });
                            console.log("ItemInformation Added");
                            rl.close();
                           fillInvoiceItemsInformation();
                        });
                    });
                });
                break;
            case "n":
               rl.close();
                return fillExcelFile();
                break;
            default:
                console.log("Incorrectoption, Please enter 'y' or 'n'.");
       }
   });
}
五、填入您的Excel 文件
在收集所有必需的用户信息后,我们可以将其填入到Excel文件中:
function fillExcelFile() {
   console.log("-----------------------\nFilling in Excelfile\n-----------------------");
   fillBillingInfo();
   fillCompanySetup();
}
function fillBillingInfo() {
   var sheet = wb.getSheet(0);
   sheet.getCell(0, 2).value(invoice.generalInfo[0].invoiceNumber);
   sheet.getCell(1, 1).value(invoice.generalInfo[0].invoiceDate);
   sheet.getCell(2, 2).value(invoice.generalInfo[0].paymentDueDate);
   sheet.getCell(3, 1).value(invoice.generalInfo[0].customerName);
   sheet.getCell(4, 1).value(invoice.generalInfo[0].customerCompanyName);
   sheet.getCell(5, 1).value(invoice.generalInfo[0].customerStreetAddress);
   sheet.getCell(6, 1).value(invoice.generalInfo[0].customerCityStateZip);
   sheet.getCell(3, 3).value(invoice.generalInfo[0].invoiceCompanyName);
   sheet.getCell(4, 3).value(invoice.generalInfo[0].invoiceStreetAddress);
   sheet.getCell(5, 3).value(invoice.generalInfo[0].invoiceCityStateZip);
}
function fillCompanySetup() {
   var sheet = wb.getSheet(1);
   sheet.getCell(2, 2).value(invoice.companyDetails[0].yourName);
   sheet.getCell(3, 2).value(invoice.companyDetails[0].companyName);
   sheet.getCell(4, 2).value(invoice.companyDetails[0].addressLine1);
   sheet.getCell(5, 2).value(invoice.companyDetails[0].addressLine2);
   sheet.getCell(6, 2).value(invoice.companyDetails[0].addressLine3);
   sheet.getCell(7, 2).value(invoice.companyDetails[0].addressLine4);
   sheet.getCell(8, 2).value(invoice.companyDetails[0].addressLine5);
   sheet.getCell(9, 2).value(invoice.companyDetails[0].phone);
   sheet.getCell(10, 2).value(invoice.companyDetails[0].facsimile);
   sheet.getCell(11, 2).value(invoice.companyDetails[0].website);
   sheet.getCell(12, 2).value(invoice.companyDetails[0].email);
   sheet.getCell(13, 2).value(invoice.companyDetails[0].currencyAbbreviation);
   sheet.getCell(14, 2).value(invoice.companyDetails[0].beneficiary);
   sheet.getCell(15, 2).value(invoice.companyDetails[0].bank);
   sheet.getCell(16, 2).value(invoice.companyDetails[0].bankAddress);
   sheet.getCell(17, 2).value(invoice.companyDetails[0].accountNumber);
   sheet.getCell(18, 2).value(invoice.companyDetails[0].routingNumber);
   sheet.getCell(19, 2).value(invoice.companyDetails[0].payableTo);
}
为了防止用户添加的数量超过工作表最大行数,我们可以在工作表中自动添加更多行。在设置数组中表单中的项目之前,默认添加行:
function fillInvoiceItems() {
   var sheet = wb.getSheet(0);
   var rowsToAdd = 0;
   if (invoice.invoiceItems.length > 15) {
       rowsToAdd = invoice.invoiceItems.length - 15;
       sheet.addRows(22, rowsToAdd);
   }
   var rowIndex = 8;
   if (invoice.invoiceItems.length >= 1) {
       for (var i = 0; i < invoice.invoiceItems.length; i++) {
            sheet.getCell(rowIndex,1).value(invoice.invoiceItems.quantity);
            sheet.getCell(rowIndex,2).value(invoice.invoiceItems.details);
            sheet.getCell(rowIndex,3).value(invoice.invoiceItems.unitPrice);
            rowIndex++;
       }
   }
}
六、将文档内容从 Node.js 导出到 Excel 文件
在工作簿中填写完信息后,我们可以将工作簿导出到Excel文件中。为此,我们将使用excelio打开功能。在这种情况下,只需将日期输入文件名即可:
function exportExcelFile() {
   excelIO.save(wb.toJSON(), (data) => {
       fs.appendFileSync('Invoice' + new Date().valueOf() + '.xlsx', newBuffer(data), function (err) {
            console.log(err);
       });
       console.log("Export success");
   }, (err) => {
       console.log(err);
   }, { useArrayBuffer: true });
}
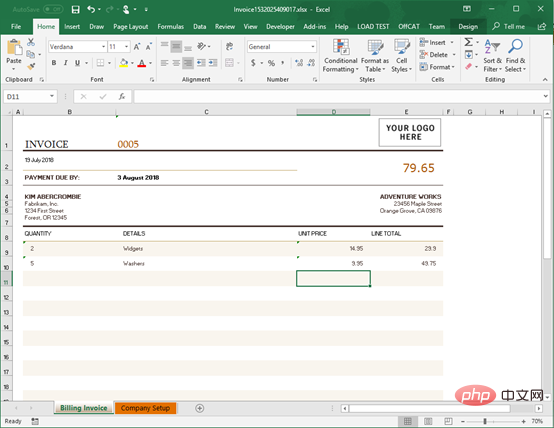
完成的文件将如下所示:

更多node相关知识,请访问:nodejs 教程!
Atas ialah kandungan terperinci Ajar anda cara menjana hamparan Excel daripada pelayan dengan Node.js SpreadJS. Untuk maklumat lanjut, sila ikut artikel berkaitan lain di laman web China PHP!
Artikel berkaitan
Lihat lagi- Mari kita bincangkan tentang cara menggunakan Node.js untuk membina pelayan web statik
- Mari kita bincangkan tentang cara Node melaksanakan penyulitan dan penyahsulitan penghantaran data bahagian hadapan dan belakang.
- [Kompilasi dan Perkongsian] Beberapa rangka kerja ujian yang boleh digunakan dalam Node.js
- Ketahui tentang dua pengurus pakej Node yang berkuasa: npm dan yarn
- Contoh data rangkak nod: ambil buku ilustrasi Pokémon dan jana fail Excel
- Bagaimana untuk membangunkan sambungan Node.js? Perkongsian pra-pengetahuan

