Rumah >hujung hadapan web >tutorial js >Contoh terperinci tentang cara menambah animasi pada satu elemen DOM
Contoh terperinci tentang cara menambah animasi pada satu elemen DOM
- WBOYWBOYWBOYWBOYWBOYWBOYWBOYWBOYWBOYWBOYWBOYWBOYWBke hadapan
- 2022-08-05 14:40:022672semak imbas
Artikel ini membawakan anda pengetahuan yang berkaitan tentang javascript, yang terutamanya memperkenalkan isu berkaitan tentang pengendalian elemen dom untuk menambah kesan animasi. Saya harap ia dapat membantu semua orang.

[Cadangan berkaitan: tutorial video javascript, bahagian hadapan web]
Kesan animasi DOM
- Biarkan elemen bergerak dari kiri ke kanan
<div id="box"></div>
    var box = document.getElementById("box");
    var t = null;
    t = setInterval(function(){

    })
Syarat penamatan pergerakan
t = setInterval(function(){终止条件})
    // 元素的属性值 === 目标点
    if(dom.attr === target){
        clearInterval(t);
    }
Tiga elemen pergerakan
Titik permulaan
Titik permulaan sesuatu pergerakan sebenarnya adalah kedudukan arus elemen. Kami menggunakan API Dapatkan kedudukan elemen semasa dan gunakan kedudukan ini sebagai permulaan pergerakan.
Matlamat
Kelajuan
Prinsip asas pergerakan
- Biarkan elemen menukar nilai atribut CSS dalam selang masa yang singkat melalui pemasa
- Pergerakan berterusan sedemikian kelihatan kepada pengguna sebagai kesan animasi
Pengenkapsulan kesan animasi DOM
Fungsi utama enkapsulasi adalah untuk membenarkan elemen menukar atribut secara berterusan dalam selang masa yang singkat untuk mencapai kesan animasi
Bingkai gerakan atribut tunggal:
<button id="btn">开始运动</button>
<div id="box"></div>
<div id="line"></div>
<script>
    var  box = document.getElementById("box");
    var  btn = document.getElementById("btn");
    var  target = 500;
    // 速度可以根据 起始点和目标点进行判断,从而决定正负;
    var speed  = 17;
    // - 方向;
    btn.onclick = function(){
        // 1. 获取元素初始位置;
        var _left = box.offsetLeft;
        speed  = target - _left >= 0 ? speed : -speed ;
        var interval = setInterval( function(){
            // 4. 判定运动的终止条件;
            if(Math.abs(target - _left) <= Math.abs(speed) ){
                // 因为终止时有可能没有到达目标点,因此我们把元素赋值到目标点位置;
                box.style.left = target + "px";
                clearInterval( interval );
            }else{
                // 2. 元素根据初始位置进行改变;
                _left += speed;
                // 3. DOM操作,根据已有数据让元素属性发生改变;
                box.style.left = _left + "px";
            }
        } , 30)
    }
    </script>
- Pakej gerakan seragam
<script>// - 提取属性名作为参数; btn.onclick = function(){
    animate( "left", 500 )}function animate( attr , target , speed = 10 ){
    // 1. 获取元素初始样式
    var _style = getComputedStyle( box );
    // 2. 根据属性要求取出当前的属性的属性值;
    var _css_style = parseInt(_style[attr]);
    speed  = target - _css_style >= 0 ? speed : -speed ;
    var interval = setInterval( function(){
        // 4. 判定运动的终止条件;
        if(Math.abs(target - _css_style) <= Math.abs(speed) ){
            // 因为终止时有可能没有到达目标点,因此我们把元素赋值到目标点位置;
            box.style[attr] = target + "px";
            clearInterval( interval );
        }else{
            // 2. 元素根据初始位置进行改变;
            _css_style += speed;
            // 3. DOM操作,根据已有数据让元素属性发生改变;
            box.style[attr] = _css_style + "px";
        }
    } , 30)}</script>
- Serasi dengan ketelusan
<script>function animate( dom , attr , target , speed = 10 ){
    // 1. 获取元素初始样式
    var _style = getComputedStyle( dom );
    // 2. 根据属性要求取出当前的属性的属性值;
    if( attr === "opacity"){
        var _css_style = parseInt(_style[attr] * 100 );
        target *= 100;
    }else{
        var _css_style = parseInt(_style[attr]);
    }
    speed  = target - _css_style >= 0 ? speed : -speed ;
    var interval = setInterval( function(){
        // 4. 判定运动的终止条件;
        if(Math.abs(target - _css_style) <= Math.abs(speed) ){
            // 因为终止时有可能没有到达目标点,因此我们把元素赋值到目标点位置;
            if( attr === "opacity"){
                dom.style[attr] = target / 100;
            }else{
                dom.style[attr] = target + "px";
            }
            clearInterval( interval );
        }else{
            // 2. 元素根据初始位置进行改变;
            _css_style += speed;
            // 3. DOM操作,根据已有数据让元素属性发生改变;
            if( attr === "opacity"){
                dom.style[attr] = _css_style / 100 ;
            }else{
                dom.style[attr] = _css_style + "px";
            }
        }
    } , 30)}</script>
- Tertimpan gerakan
- Gerakan menampan ialah mod gerakan
- Mod gerakan ini ialah gerakan di mana kelajuan berubah semasa gerakan
- Semakin kecil jarak, semakin kecil kelajuan
<button id="btn">开始运动</button>
<div id="box"></div>
<script>
var  box = document.getElementById("box");
var  btn = document.getElementById("btn");
btn.onclick = function(){
    animate( box , "left" , 500 )
}
function animate( dom , attr , target , transition = "buffer", speed = 10 ){
    var _style = getComputedStyle( dom );
    if( attr === "opacity"){
        var _css_style = parseInt(_style[attr] * 100 );
        target *= 100;
    }else{
        var _css_style = parseInt(_style[attr]);
    }

    if( transition === "liner"){
        speed  = target - _css_style >= 0 ? speed : -speed ;
    }

    var interval = setInterval( function(){
        if( transition === "buffer"){
            // 计算速度;
            speed = (target - _css_style) / 10;
            //速度不取整在小数部分会做很多无意义的计算;
            speed = speed > 0 ? Math.ceil(speed) :Math.floor( speed )
        }

        if(Math.abs(target - _css_style) <= Math.abs(speed) ){
            // 因为终止时有可能没有到达目标点,因此我们把元素赋值到目标点位置;
            if( attr === "opacity"){
                dom.style[attr] = target / 100;
            }else{
                dom.style[attr] = target + "px";
            }
                clearInterval( interval );
        }else{
            // 2. 元素根据初始位置进行改变;
            _css_style += speed;
            // 3. DOM操作,根据已有数据让元素属性发生改变;
            if( attr === "opacity"){
                dom.style[attr] = _css_style / 100 ;
            }else{
                dom.style[attr] = _css_style + "px";
            }
        }
    } , 30)
}
</script>
//只需要改变里面transition的值就可以调整运动模式
//buffer为缓冲运动
//liner为匀速运动
Rangka kerja gerakan berbilang atribut (pengembangan)
- Bingkai gerakan berbilang atribut
- Apabila kita memanggil animasi berkali-kali, kami akan membuka berbilang Pemasa
- Oleh kerana data dalam pemasa adalah sama, kami tidak dapat melihat perbezaan kesan
- Tetapi menghidupkan pemasa beberapa kali akan sangat memakan komputer prestasi
- Tutup pemasa sebelumnya sebelum memulakan pemasa semasa
<script>// 在一个定时器之中,用for循环同时执行多次dom样式操作; // 1. 需要优化的部分:参数,要把样式部分的参数优化成一个对象; function animate( dom , attrs , transition = "buffer", speed = 10 ){
    var _style = getComputedStyle( dom );
    // 获取元素当前的属性 :
    for(var attr in attrs ){
        // attr ? 要过渡的css属性名;
        // attrs[attr] ? 要过渡的当前属性;
        attrs[attr] = {
            target : attrs[attr],
            // 元素当前的属性放入到这个对象之中;
            now  : parseInt(_style[attr])
        }
    }
    // 因为直接关闭interval是没有作用的,此时的inteval是一个局部变量,每次animate被调用的时候都会直接重置;
    // 我们应该吧定时器的id放在当前正在执行过渡效果的dom对象上;
    clearInterval(dom.interval);
    dom.interval = setInterval( function(){
        for(var attr in attrs){
        // 取出 attrs 之中的目标点和当前值;
            speed = (attrs[attr].target -  attrs[attr].now) / 10 ;
            // 根据速度正负,进行速度取整;
            speed = speed > 0 ? Math.ceil( speed ) : Math.floor( speed );
            // 判定终止条件;
            if( attrs[attr].target ===  attrs[attr].now){
                // 删除已经到达目标点的属性;
                delete attrs[attr]
                // 判定attrs里面已经没有属性了;
                for(var a in attrs){
                    return false;
                }
                clearInterval(dom.interval);
            }else{
                attrs[attr].now += speed;
                dom.style[ attr ] = attrs[attr].now + "px";
            }
        }
    } , 30)}// 优化参数之后,key值是等待运动的css属性,value值是元素的目标; btn.onclick = function(){
    animate( box , { width : 500 , height : 400 } )}</script>
Pelaksanaan fungsi carta karusel
 <style>
            *{
                  margin: 0;
                  padding: 0;
            }
            .container{
                  width: 1130px;
                  height: 286px;
                  margin: 0 auto;
                  position: relative;
                  overflow: hidden;
            }
            .wrapper{
                  width: 6780px;
                  position: absolute;
                  left: 0;
            }
            .slide{
                  float: left;
            }

            .slide , .slide img{
                  width: 1130px;
                  height: 286px;
            }
            .button-prev{
                  left: 0;
                  background-position: 30px center;
                  background-image: url(https://static.zcool.cn/git_z/z/widget/slider/images/svg/left_arrow.svg?v=2);
                  top: 0;
                  width: 13px;
                  height: 100%;
                  padding: 0 80px;
                  border-radius: 2px;
                  position: absolute;
                  background-repeat: no-repeat;
            }
            .button-prev:hover{
                  background-image: url(https://static.zcool.cn/git_z/z/widget/slider/images/svg/left_arrowhover.svg?v=2);
            }
            .button-next{
                  right: 0;
                  background-position: 91px center;
                  background-image: url(https://static.zcool.cn/git_z/z/widget/slider/images/svg/right_arrow.svg?v=2);
                  top: 0;
                  width: 13px;
                  height: 100%;
                  padding: 0 80px;
                  border-radius: 2px;
                  position: absolute;
                  background-repeat: no-repeat;
            }
            .button-next:hover{
                  background-image: url(https://static.zcool.cn/git_z/z/widget/slider/images/svg/right_arrowhover.svg?v=2);
            }
            .pagination{
                  position: absolute;
                  bottom: 10%;
                  width: 100%;
                  height: 10px;
                  left: 30px;
            }
            .pagination span{
                  display: inline-block;
                  width: 10px;
                  height: 10px;
                  margin-left: 10px;
                  border-radius: 50%;
                  background-color: cornflowerblue;
                  border: 2px solid transparent;
                  background-clip: content-box;
            }
            .pagination span.active{
                  border: 2px solid skyblue;
                  box-shadow: 0 0 5px skyblue;
                  background-color: #fff;
            }
      </style>
<!-- 类名请使用和我一样的类名 -->
<div class="container">
    <div class="wrapper">
          <!-- 第0张图片 -->
          <div class="slide">
                <img src="https://img.zcool.cn/ad_manager/location/f35d611484931101c43350bbdbd5.jpg" alt="">
          </div>
          <div class="slide">
                <img src="https://img.zcool.cn/ad_manager/location/3dcb6113a3471101c433505bbd72.jpg" alt="">
          </div>
          <div class="slide">
                <img src="https://img.zcool.cn/ad_manager/location/65f36113a3341101c4335014b174.jpg" alt="">
          </div>
          <div class="slide">
                <img src="https://img.zcool.cn/ad_manager/location/7f97611481181101c43350225b33.jpg" alt="">
          </div>
          <div class="slide">
                <img src="https://img.zcool.cn/ad_manager/location/afcf6114801e1101c433507f9e28.jpg" alt="">
          </div>
          <!-- 最后一张图片 -->
          <!-- 把第0张图片放在整个图片结构的最后 -->
          <div class="slide">
                <img src="https://img.zcool.cn/ad_manager/location/f35d611484931101c43350bbdbd5.jpg" alt="">
          </div>
    </div>
    <div class="button-next"></div>
    <div class="button-prev"></div>
    <div class="pagination">
          <span class="active"></span>
          <span></span>
          <span></span>
          <span></span>
          <span></span>
    </div>
</div>

<script src="./utils.js"></script>
<script>
    // 轮播图的核心就是左右切换按钮,实现显示元素下标的改变;
    var index = 0 ;
    var prev = 0;

    var next_btn = document.querySelector(".button-next");
    var prev_btn = document.querySelector(".button-prev");
    var slides   = document.querySelectorAll(".slide");
    var wrapper  = document.querySelector(".wrapper");
    // 自动播放的阻止功能是在鼠标移入container容器之中就触发的;
    var container   = document.querySelector(".container");

    var bullets = document.querySelectorAll(".pagination span");

    // 绑定事件
    // - 轮播图改变下标功能必须设置边界;
    function bindEvent(){
          next_btn.onclick = function(){
                add();
                bannerAnimate();
          }
          prev_btn.onclick = function(){
                reduce()
                bannerAnimate();
          }
          container.onmouseover = function(){
                stop();
          }
          container.onmouseout = function(){
                autoPlay();
          }

          bullets.forEach( function( ele , i ){

                ele.onmouseover = function(){
                      prev = index;
                      // 防止穿帮逻辑;
                      // - 如果在假的第0张图片上(在最后一张图片上)
                      // - 我们先让真假图片呼喊然后在进行元素的动画效果;
                      if( index === 5 ){
                            wrapper.style.left = 0;
                      }
                      index = i;
                      bannerAnimate();
                }
          })
    }
    // 下标增加;
    function add(){

          prev = index;

          if( index === slides.length - 1 ){
                // 这个逻辑会在最后一张图片进行切换时进入;
                // 我们让wrapper直接位移到开头,改变元素位置的同时让用户无法感知;
                wrapper.style.left = 0;
                // 我们需要从第0个图片切换到第一个图片;
                // -因为我们最后一张图片的显示和开头图片的显示是一样的
                index = 1;
          }else{
                index ++;
          }
    }
    // 下标减少;
    function reduce(){
          prev = index;

          if( index === 0 ){
                wrapper.style.left = -(slides.length - 1) * 1130 + "px";
                index = slides.length - 2;
          }else{
                index --;
          }
    }
    // 根据我们的算法去实现动画效果;
    function bannerAnimate(){
          animate( wrapper , { left : - index * 1130 });

          // 给对应的分页器按钮添加active;

          // 先去清空所有的类名;

          bullets.forEach( function( ele ){
                ele.classList.remove("active")
          })

          // 下标需要进行特殊处理,在显示最后一张图片的时候,给第0个按钮添加active;

          bullets[ index === 5 ? 0 : index ].classList.add("active");
    }
    bindEvent();

    var interval = null;
    function autoPlay(){
          // 间隔3s,让js点击一下下一页按钮;
          interval = setInterval( function(){
                // 虚拟点击 :
                next_btn.dispatchEvent( new Event("click"));
          } , 3000 )
    }

    function stop(){
          clearInterval( interval )
    }

    autoPlay();

</script>
Contohnya adalah seperti berikut
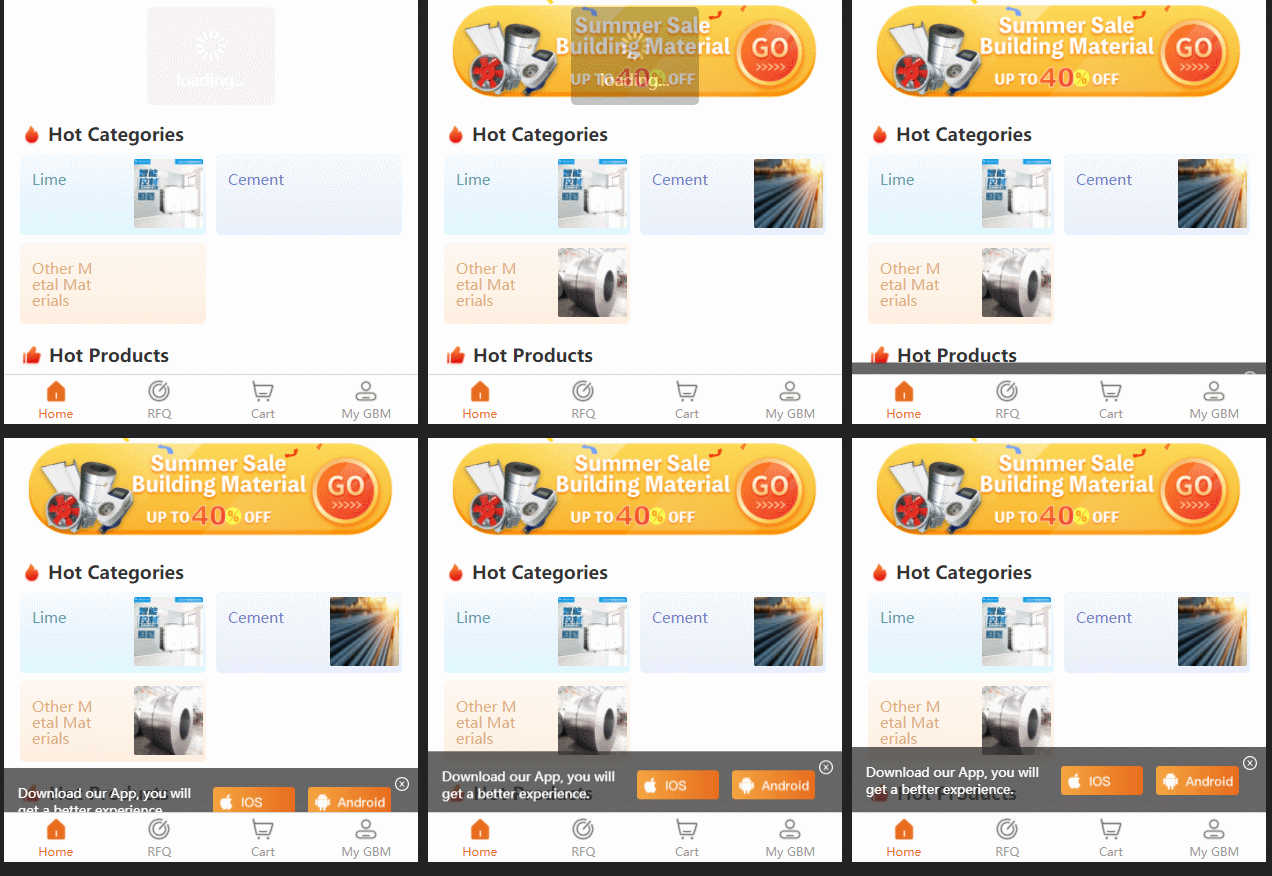
Latar belakang projek: aplikasi uniapp h5, untuk menggesa pengguna memuat turun, terdapat gesaan dom untuk dimuat turun tambahkannya pada setiap tab bar (sejumlah empat ); tetapi saya ingin mencuba cara bermain yang berbeza seperti berikut: Kesannya adalah seperti berikut:

Terus masukkan kod:
function showDownloadTisp() {
  console.log('--------------------------->showDownloadTisp')
  // #ifdef H5
  const parent = document.querySelector('.uni-tabbar')
  console.log('parent:', parent)
  const tips = document.createElement('p')
  tips.id = 'downloadTisp'


  tips.setAttribute('style',
    'background: rgba(51,51,51,0.75);'
  )

  tips.setAttribute('style',
    `background: rgba(51,51,51,0.75); position: fixed;width: 100%;height: ${uni.upx2px(120)}px; bottom:${uni.upx2px(-140)}px;  display: flex;flex-direction: row;justify-content: space-between;align-items:center;transition:0.5s;`
  )

  const desParent = document.createElement('p')
  const des = document.createTextNode('Download our App, you will get a better experience.')
  desParent.appendChild(des)
  desParent.setAttribute('style',
    `padding: 0;color: #FFFFFF;font-size:${uni.upx2px(24)}px;margin-left: ${uni.upx2px(27)}px;padding-right: ${uni.upx2px(25)}px;`
  )

  const iosImage = document.createElement('img')
  iosImage.src = '../static/guide/download ios.png'
  iosImage.setAttribute('style',
    `width: ${uni.upx2px(154)}px;height: ${uni.upx2px(54)}px;margin-right: ${uni.upx2px(25)}px;`)

  const anroidImage = document.createElement('img')
  anroidImage.src = '../static/guide/download android.png'
  anroidImage.setAttribute('style',
    `width: ${uni.upx2px(154)}px;height: ${uni.upx2px(54)}px;margin-right: ${uni.upx2px(50)}px;`)

  const closedImage = document.createElement('img')
  closedImage.src = '../static/guide/download closd.png'
  closedImage.setAttribute('style',
    `width: ${uni.upx2px(30)}px;height: ${uni.upx2px(30)}px;position: absolute;right:${uni.upx2px(15)}px;top: ${uni.upx2px(15)}px;padding: ${uni.upx2px(5)};`
  )

  tips.appendChild(desParent)
  tips.appendChild(iosImage)
  tips.appendChild(anroidImage)
  tips.appendChild(closedImage)


  iosImage.onclick = () => {
    //console.log("iosImage.onclick")
    window.location.href = 'https://apps.apple.com/cn/app/gbm001/id1574324240'
    // window.open('https://www.baidu.com/')
  }

  anroidImage.onclick = () => {
    //console.log("anroidImage.onclick")
    window.location.href = 'https://play.google.com/store/apps/details?id=com.vandream.gbmpro'
    // window.open('https://www.sina.com.cn/')
  }

  closedImage.onclick = () => {
    console.log("closedImage.onclick")
    tips.remove()
  }


  parent.parentNode.appendChild(tips)
  //parent.appendChild(tips)


  setTimeout(() => {
    tips.style.transform = `translateY(${uni.upx2px(-140) - 50}px);`
    //console.log(" tips.style.transform done")
  }, 2500)

  // #endif
}
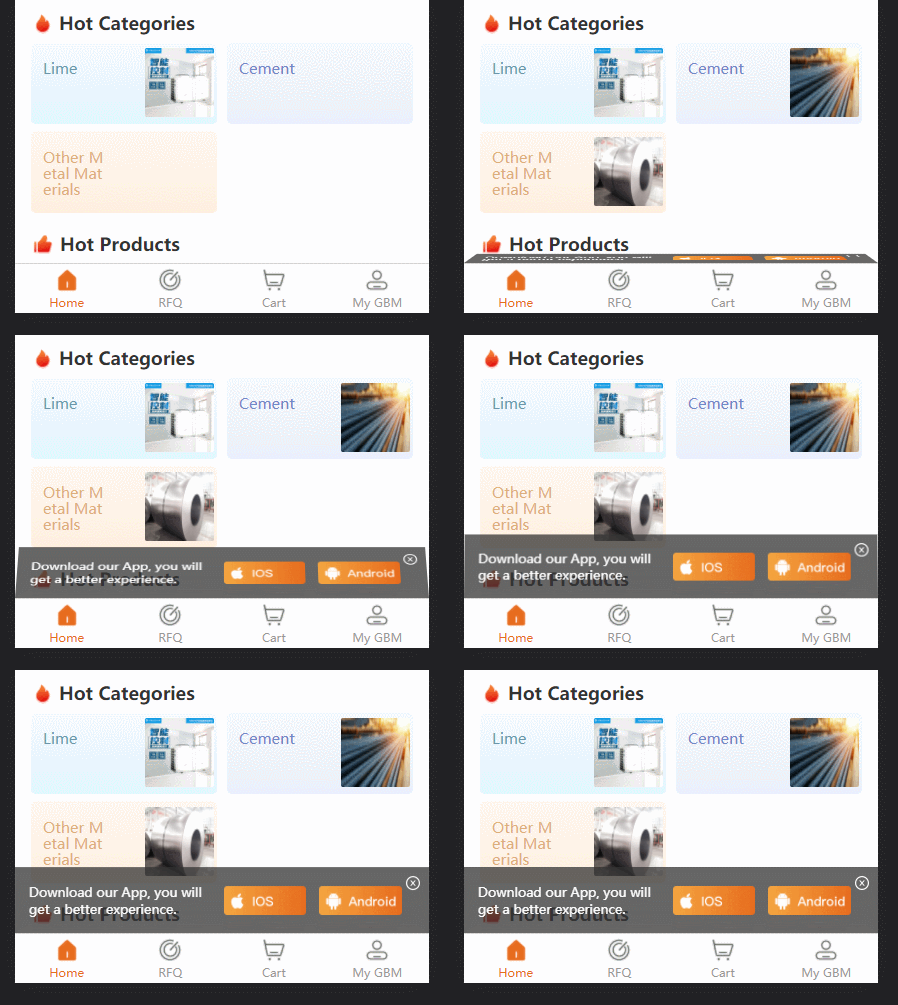
Perihal animasi transformasi tetapan js; di sini Ditukar kepada bentuk 3DCipta nod melalui kod dan kod adalah gaya dan animasi; 🎜>

function showDownloadTisp() {
  // #ifdef H5
  const parent = document.querySelector('.uni-tabbar')
  // console.log('parent:', parent)
  const tips = document.createElement('p')
  tips.id = 'downloadTisp'

  // tips.setAttribute('style',
  //   'background: rgba(51,51,51,0.75);'
  // )

  // tips.setAttribute('style',
  //   `background: rgba(51,51,51,0.75); position: fixed;width: 100%;height: ${uni.upx2px(120)}px; bottom:${uni.upx2px(-140)}px;  display: flex;flex-direction: row;justify-content: space-between;align-items:center;transition:0.5s;`
  // )
  tips.setAttribute('style',
    `background: rgba(51,51,51,0.75); position: fixed;width: 100%;height: ${uni.upx2px(120)}px; bottom:50px;  display: flex;flex-direction: row;justify-content: space-between;align-items:center;transition:0.5s; transform-origin:center bottom; transform:perspective(900px) rotateX(90deg);`
  )

  const desParent = document.createElement('p')
  const des = document.createTextNode('Download our App, you will get a better experience.')
  desParent.appendChild(des)
  desParent.setAttribute('style',
    `padding: 0;color: #FFFFFF;font-size:${uni.upx2px(24)}px;margin-left: ${uni.upx2px(27)}px;padding-right: ${uni.upx2px(10)}px;`
  )

  const iosImage = document.createElement('img')
  // iosImage.src = '../static/guide/download ios.png'
  iosImage.src = 'https://img.vandream.com/54/0330f6211506cc.png'
  iosImage.setAttribute('style',
    `width: ${uni.upx2px(154)}px;height: ${uni.upx2px(54)}px;margin-right: ${uni.upx2px(25)}px;`)

  const anroidImage = document.createElement('img')
  // anroidImage.src = '../static/guide/download android.png'
  anroidImage.src = 'https://img.vandream.com/53/0330f45097465d.png'
  anroidImage.setAttribute('style',
    `width: ${uni.upx2px(154)}px;height: ${uni.upx2px(54)}px;margin-right: ${uni.upx2px(50)}px;`)

  const closedImage = document.createElement('img')
  // closedImage.src = '../static/guide/download closd.png'
  closedImage.src = 'https://img.vandream.com/52/0330f523d7709d.png'
  closedImage.setAttribute('style',
    `width: ${uni.upx2px(30)}px;height: ${uni.upx2px(30)}px;position: absolute;right:${uni.upx2px(15)}px;top: ${uni.upx2px(15)}px;padding: ${uni.upx2px(5)};`
  )

  tips.appendChild(desParent)
  tips.appendChild(iosImage)
  tips.appendChild(anroidImage)
  tips.appendChild(closedImage)

  iosImage.onclick = () => {
    console.log('iosImage.onclick')
    window.location.href = 'https://apps.apple.com/cn/app/gbm001/id1574324240'
    // window.open('https://www.baidu.com/')
  }

  anroidImage.onclick = () => {
    console.log('anroidImage.onclick')
    window.location.href = 'https://play.google.com/store/apps/details?id=com.vandream.gbmpro'
    // window.open('https://www.sina.com.cn/')
  }

  closedImage.onclick = () => {
    console.log('closedImage.onclick')
    tips.remove()
  }

  parent.parentNode.appendChild(tips)
  // parent.appendChild(tips)

  setTimeout(() => {
    // tips.style.transform = `translateY(${uni.upx2px(-140) - 50}px);`
    tips.style.transform = 'rotateX(0deg)'
    // console.log(" tips.style.transform done"):rotateX(90deg);
  }, 2500)

  // #endif
}
tutorial video javascript Atas ialah kandungan terperinci Contoh terperinci tentang cara menambah animasi pada satu elemen DOM. Untuk maklumat lanjut, sila ikut artikel berkaitan lain di laman web China PHP!

