Rumah >hujung hadapan web >tutorial js >Angular10如何配置webpack打包?方法介绍
Angular10如何配置webpack打包?方法介绍
- 青灯夜游ke hadapan
- 2021-04-12 10:36:222579semak imbas
本篇文章给大家介绍一下Angular10 配置 webpack 打包的方法。有一定的参考价值,有需要的朋友可以参考一下,希望对大家有所帮助。

对于 Angular 项目,推荐使用 angular-cli 创建打包项目 Angular 会默认帮我们配置。
但是有特殊的需求时就显然不是很灵活,比如想分割一些较大的打包文件、分析每个打包文件组成,自定义webpack一些参数的时候就发现无从下手。
对许多项目的常见依赖项是日期库moment.js 。 这包括使用语言环境的功能,但是,它大大增加了整体捆绑软件的大小。这些都是需要我们优化的地方。
一、ngx-build-plus 建立额外配置
这里推荐一个工具库ngx-build-plus,不需要改很多东西就能在现有项目进行集成。接下来教大家如何使用,具体详情可以去github上找文档。虽然官方文档上只标注到了可用版本为9,但是Angular10也是可以使用的。
1. 使用CLI创建一个新的Angular项目
2. 添加ngx-build-plus: ng add ngx-build-plus
注意:如果要将其添加到projects文件夹中的特定子项目,请使用--project开关指向它:ng add ngx-build-plus --project getting-started
备注:这一步通过NPM安装包,在Angular >= 7 and CLI >= 7版本中,让您的项目使用自定义生成器的更新您的angular.jsonng serve和ng build。但是6版本中可能会出现安装不成功,这时候请直接yarn add ngx-build-plus --dev,然后angular.json文件中更改以下两处地方:
 "build": {
   - "builder": "@angular-devkit/build-angular:browser"
   + "builder": "ngx-build-plus:build"
   ...
 },
 "serve": {
  - "builder": "@angular-devkit/build-angular:dev-server"
   + "builder": "ngx-build-plus:dev-server"
   ...
 }
相关教程推荐:《angular教程》
3. 创建文件webpack.partial.js并添加到(子)项目的根目录:
  const webpack = require('webpack');

  module.exports = {
      plugins: [
          new webpack.DefinePlugin({
              "VERSION": JSON.stringify("4711")
          })
      ]
  }
4. 在您的 app.component.ts中使用全局变量VERSION:
  import { Component } from '@angular/core';

  declare const VERSION: string;

  @Component({
      selector: 'app-root',
      templateUrl: './app.component.html',
      styleUrls: ['./app.component.css']
  })
  export class AppComponent {
      title = 'Version: ' + VERSION;
  }
5. 使用--extra-webpack-config指向部分Webpack配置的开关启动应用程序:
ng serve --extra-webpack-config webpack.partial.js -o
如果您的项目是基于CLI的子项目,请也使用该--project开关:
ng serve --project getting-started -o --extra-webpack-config webpack.partial.js
提示:考虑为此命令创建一个npm脚本。
6. 确保显示了您的webpack配置所提供的版本。
有打印结果显示就表示你的项目已经启用了
webpack.partial.js文件中的配置,下面就是在webpack.partial.js中补充我们需要的功能了,笔者主要集中在了两大块。
- 添加BundleAnalyzerPlugin,分析打包文件
- 第三方库模块分离 - optimization + splitChunks,分割较大的文件
下面分别描述
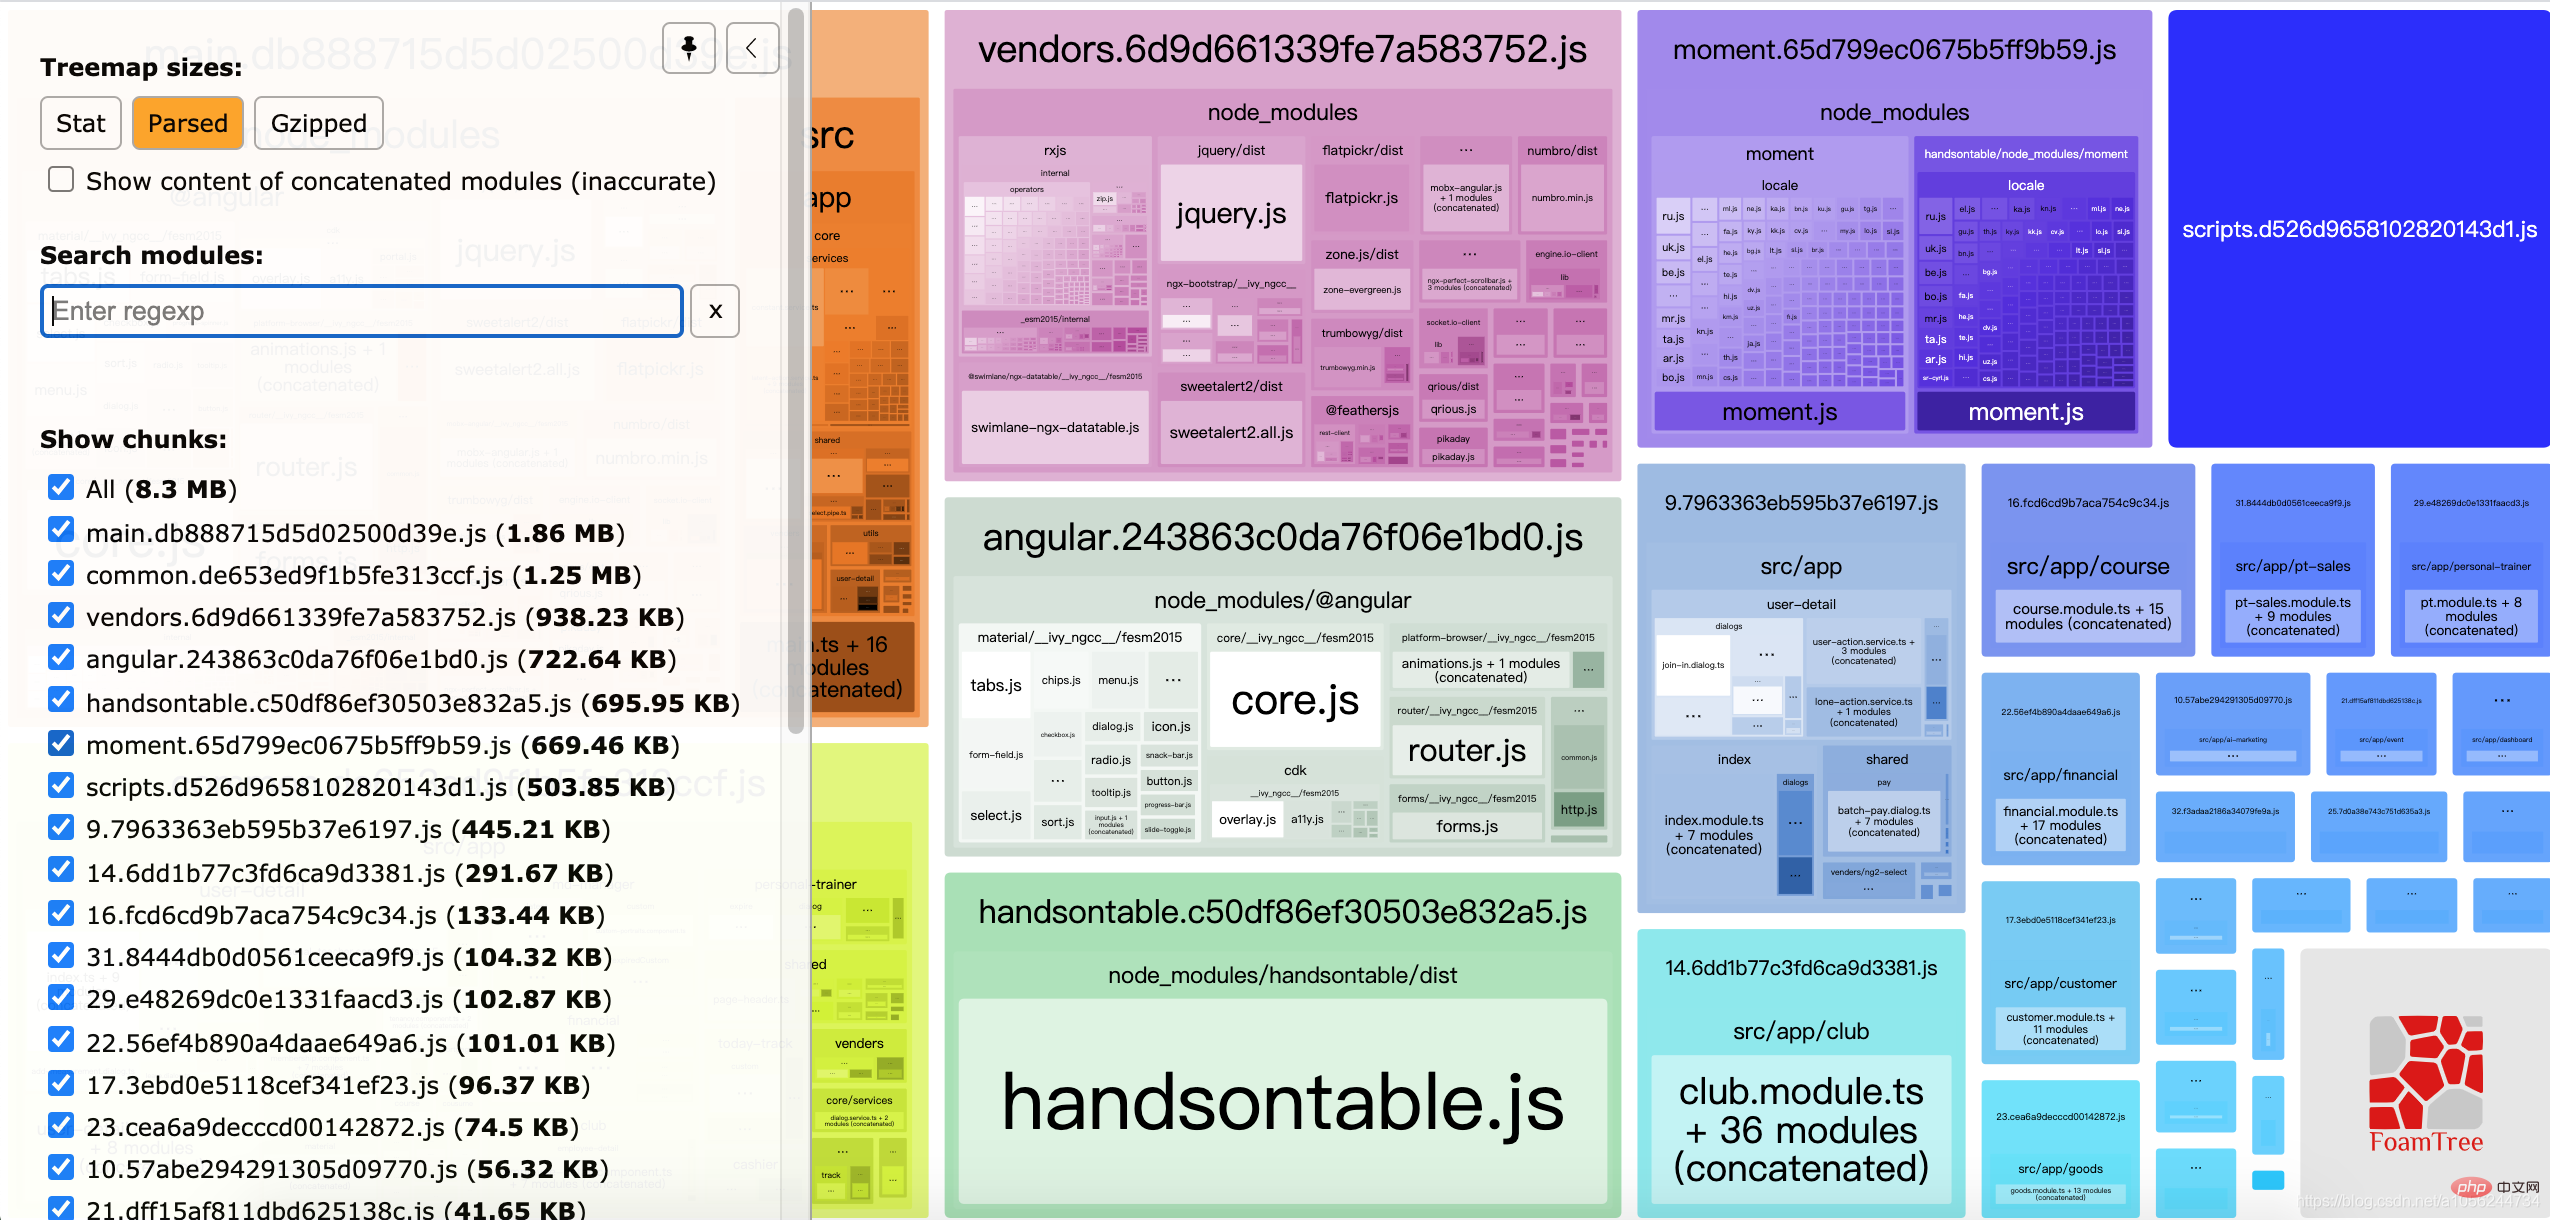
二、webpack-bundle-analyzer 打包文件分析工具
1.安装
$ yarn add webpack-bundle-analyzer --dev
2.配置
在webpack.partial.js中的module.exports = webpackConfig这句话的上面增加
const BundleAnalyzerPlugin = require('webpack-bundle-analyzer').BundleAnalyzerPlugin
module.exports = {
  plugins: [
    new BundleAnalyzerPlugin({
      analyzerMode: 'static',
    }),
    new webpack.DefinePlugin({
      "VERSION": JSON.stringify("4711")
    })
  ]
}
3.运行
启动服务:
生产环境查看:npm run build --report 或 正常build 即可启动查看器
开发环境查看:webpack -p --progress 或启动正常devServer服务即可启动查看器!
4.结果

5.该插件默认配置
new BundleAnalyzerPlugin({
      // openAnalyzer: true,
      // reportFilename: path.join(__dirname, 'report.html')
      //  可以是`server`,`static`或`disabled`。
      //  在`server`模式下,分析器将启动HTTP服务器来显示软件包报告。
      //  在“静态”模式下,会生成带有报告的单个HTML文件。
      //  在`disabled`模式下,你可以使用这个插件来将`generateStatsFile`设置为`true`来生成Webpack Stats JSON文件。
      analyzerMode: 'static',
      //  将在“服务器”模式下使用的主机启动HTTP服务器。
      // analyzerHost: '127.0.0.1',
      //  将在“服务器”模式下使用的端口启动HTTP服务器。
      // analyzerPort: 8888,
      //  路径捆绑,将在`static`模式下生成的报告文件。
      //  相对于捆绑输出目录。
      // reportFilename: 'report.html',
      //  模块大小默认显示在报告中。
      //  应该是`stat`,`parsed`或者`gzip`中的一个。
      //  有关更多信息,请参见“定义”一节。
      // defaultSizes: 'parsed',
      //  在默认浏览器中自动打开报告
      // openAnalyzer: true,
      //  如果为true,则Webpack Stats JSON文件将在bundle输出目录中生成
      // generateStatsFile: false,
      //  如果`generateStatsFile`为`true`,将会生成Webpack Stats JSON文件的名字。
      //  相对于捆绑输出目录。
      // statsFilename: 'stats.json',
      //  stats.toJson()方法的选项。
      //  例如,您可以使用`source:false`选项排除统计文件中模块的来源。
      //  在这里查看更多选项:https:  //github.com/webpack/webpack/blob/webpack-1/lib/Stats.js#L21
      // statsOptions: null,
      // logLevel: 'info' // 日志级别。可以是'信息','警告','错误'或'沉默'。
    }),
模块功能:能够查看到你的文件打包压缩后中真正的内容,找出那些模块组成最大的大小,找到错误的模块,优化它!最好的事情是它支持缩小捆绑!它解析它们以获得实际大小的捆绑模块。它也显示他们的gzipped大小!
三、使用webpack把第三方库模块分离 - optimization + splitChunks
在 webpack4.x 中,我们使用 optimization.splitChunks 来分离公用的代码块。SplitChunks插件简单的来说就是Webpack中一个提取或分离代码的插件,主要作用是提取公共代码,防止代码被重复打包,拆分过大的js文件,合并零散的js文件。
这里说的分离,当然只是针对一些第三方库(一般来自 node_modules),以及我们自己定义的工具库(或公用方法)。
不知如何下手?首先,我们来看官网给的一份
1. 默认配置:
splitChunks: {
    chunks: "async",
    minSize: 30000,
    minChunks: 1,
    maxAsyncRequests: 5,
    maxInitialRequests: 3,
    automaticNameDelimiter: '~',
    name: true,
    cacheGroups: {
        vendors: {
            test: /[\\/]node_modules[\\/]/,
            priority: -10
        },
    default: {
            minChunks: 2,
            priority: -20,
            reuseExistingChunk: true
        }
    }
}
接着,我们再来看下它们的含义:
-
chunks: 该属性值的数据类型可以是 字符串 或者 函数。如果是字符串,那它的值可能为 initial | async | all 三者之一。默认值的数据类型为 字符串,默认值为 async,但推荐用 all。它表示将哪种类型的模块分离成新文件。字符串参数值的作用分别如下:
- initial:表示对异步引入的模块不处理
- async:表示只处理异步模块
- all:无论同步还是异步,都会处理
minSize: 该属性值的数据类型为数字。它表示将引用模块分离成新代码文件的最小体积,默认为 30000,单位为字节,即 30K(指min+gzip之前的体积)。这里的 30K 应该是最佳实践,因为如果引用模块小于 30K 就分离成一个新代码文件,那页面打开时,势必会多增加一个请求。
maxSize: 把提取出来的模块打包生成的文件大小不能超过maxSize值,如果超过了,要对其进行分割并打包生成新的文件。单位为字节,默认为0,表示不限制大小。
minChunks: 该属性值的数据类型为数字。它表示将引用模块如不同文件引用了多少次,才能分离生成新代码文件。默认值为 1
maxAsyncRequests: 该属性值的数据类型为数字,默认值为 5。它表示按需加载最大的并行请求数,针对异步。
maxInitialRequests: 该属性值的数据类型为数字,默认值为 3。它表示单个入口文件最大的并行请求数,针对同步。
automaticNameDelimiter: 该属性值的数据类型为字符串,默认值为。它表示分离后生成新代码文件名称的链接符,比如说 app1.js 和 app2.js 都引用了 utils.js 这个工具库,那么,最后打包后分离生成的公用文件名可能是 xxapp1~app2.js 这样的,即以 ~ 符号连接。
name: 该属性值的数据类型可以是 布尔值 或者 函数(返回值为字符串),其中布尔值得为 true,此时,分离文件后生成的文件名将基于 cacheGroups 和 automaticNameDelimiter。如果设置为 false,则不会进行模块分离。
cacheGroups: 该属性值的数据类型为对象,它的值可以继承 splitChunks.* 中的内容。如果 cacheGroups存在与 splitChunks.* 同名的属性,则 cacheGroups 的属性值则直接覆盖 splitChunks.* 中设置的值。
test: 该属性值的数据类型可以为 字符串 或 正则表达式,它规定了哪些文件目录的模块可以被分离生成新文件。
priority: 该属性值的数据类型可以为数字,默认值为 0。它表示打包分离文件的优先
reuseExistingChunk: 该属性值的数据类型可以为布尔值。它表示针对已经分离的模块,不再重新分离。
2.分离第三方库
要将第三方库分离出来,我们需要调整配置文件,设置 chunks: 'all',即表示让所有加载类型的模块在某些条件下都能打包。
3.分离工具函数
打包中,我们发现,工具函数模块(utils)的源码被分别打包到了两个文件中,这显然是不对。之所以出现这种情况,是因为我们设置了 minSize: 30000,即分离成独立文件的最小体积为 30K,而这里的 工具函数(utils.js)只有几KB,所以,没被分离成单独的文件。
4.第三方库合并打包并重命名
有的时候,我们希望将所有来自 node_modules 的第三方库都打包到同一个文件中。显然,上面的打包配置并没有满足这个条件。并且,我们还希望可以对打包后的文件名进行重命名。
要完成,只需要在 cacheGroups 设置 name 属性即可。这里,笔者还把项目中使用到的moment、handsontable、angular库单独分离出来了。
// webpack.config.js
module.exports = {
  optimization: {
    splitChunks: {
      chunks: 'all',
      minSize: 30000,
      maxSize: 0,
      minChunks: 1,
      maxAsyncRequests: 5,
      maxInitialRequests: 3,
      automaticNameDelimiter: '~',
      name: true,
      cacheGroups: {
        moment: {
          name: 'moment',
          test: /[\\/]node_modules[\\/]moment[\\/]/,
          priority: -6						// 两个cacheGroup.priority相同时,先定义的会先命中
        },
        handsontable: {
          name: 'handsontable',
          test: /[\\/]node_modules[\\/]handsontable[\\/]/,
          priority: -7
        },
        angular: {
          name: 'angular',
          test: /[\\/]node_modules[\\/]@angular[\\/]/,
          priority: -9
        },
       vendors: {
          name: 'vendors',
          test: /[\\/]node_modules[\\/]/,
          priority: -10
        },
        default: {
          name: 'default',
          minChunks: 2,
          priority: -20,
          reuseExistingChunk: true
        }
      }
    }
  }
}
5.SplitChunks插件配置选项
-
chunks选项,决定要提取那些模块。默认是
async:只提取异步加载的模块出来打包到一个文件中。 异步加载的模块:通过import('xxx')或require(['xxx'],() =>{})加载的模块。initial:提取同步加载和异步加载模块,如果xxx在项目中异步加载了,也同步加载了,那么xxx这个模块会被提取两次,分别打包到不同的文件中。 同步加载的模块:通过import xxx或require('xxx')加载的模块。all:不管异步加载还是同步加载的模块都提取出来,打包到一个文件中。 minSize选项:规定被提取的模块在压缩前的大小最小值,单位为字节,默认为30000,只有超过了30000字节才会被提取。maxSize选项:把提取出来的模块打包生成的文件大小不能超过maxSize值,如果超过了,要对其进行分割并打包生成新的文件。单位为字节,默认为0,表示不限制大小。minChunks选项:表示要被提取的模块最小被引用次数,引用次数超过或等于minChunks值,才能被提取。maxAsyncRequests选项:最大的按需(异步)加载次数,默认为 6。maxInitialRequests选项:打包后的入口文件加载时,还能同时加载js文件的数量(包括入口文件),默认为4。-
先说一下优先级
maxInitialRequests/maxAsyncRequests<maxSize<minSize。 automaticNameDelimiter选项:打包生成的js文件名的分割符,默认为~。name选项:打包生成js文件的名称。cacheGroups选项,核心重点,配置提取模块的方案。里面每一项代表一个提取模块的方案。下面是cacheGroups每项中特有的选项,其余选项和外面一致,若cacheGroups每项中有,就按配置的,没有就使用外面配置的。test选项:用来匹配要提取的模块的资源路径或名称。值是正则或函数。priority选项:方案的优先级,值越大表示提取模块时优先采用此方案。默认值为0。reuseExistingChunk选项:true/false。为true时,如果当前要提取的模块,在已经在打包生成的js文件中存在,则将重用该模块,而不是把当前要提取的模块打包生成新的js文件。enforce选项:true/false。为true时,忽略minSize,minChunks,maxAsyncRequests和maxInitialRequests外面选项
四、HtmlWebpackPlugin
HtmlWebpackPlugin简化了HTML文件的创建,以便为你的webpack包提供服务。这对于在文件名中包含每次会随着编译而发生变化哈希的 webpack bundle 尤其有用。 你可以让插件为你生成一个HTML文件,这个插件有两个重要作用。
- 创建HTML页面文件到你的输出目录
- 将webpack打包后的chunk自动引入到这个HTML中
1.安装
npm install --save-dev html-webpack-plugin
使用yarn
yarn add --dev html-webpack-plugin
2.基本用法
该插件将为你生成一个 HTML5 文件, 其中包括使用 script 标签的 body 中的所有 webpack 包。 只需添加插件到你的 webpack 配置如下:
const HtmlWebpackPlugin = require('html-webpack-plugin')
const path = require('path')

module.exports = {
  plugins: [
    new webpack.DefinePlugin({
      "VERSION": JSON.stringify("4711")
    }),
    new HtmlWebpackPlugin({
      filename: 'index.html',												 // 根据模板文件生成的html的文件名
      template: path.join(__dirname, 'src/index.html'),
      chunksSortMode: 'manual',
      chunks: ['styles', 'runtime', 'polyfills', 'scripts', 'vendors', 'main']
    })
  ]
}
这将会产生一个包含以下内容的文件 dist/index.html:
<!doctype html>
<html>
<head>
  <meta charset="utf-8">
  <meta http-equiv="Pragma" content="no-cache"/>
  <meta http-equiv="Cache-Control" content="no-cache, no-store, must-revalidate"/>
  <meta http-equiv="Expires" content="0"/>
  <meta name="viewport" content="width=device-width,initial-scale=1">
  <meta name="renderer" content="webkit">
  <meta name="force-rendering" content="webkit">
  <meta http-equiv="X-UA-Compatible" content="IE=edge,chrome=1"/>
  <title>test</title>
  <base href="/">
  <link rel="icon" type="image/png" href="favicon.png">
  <link href="styles.bf72314ba2e0c15c73f2.css" rel="stylesheet">
</head>
<body>
<app-root></app-root>
<div id="preloader">
  <div>
    <div class="loader loader--glisteningWindow"></div>
  </div>
</div>
<script src="runtime.fe0efdd131eb00c21b3a.js"></script>
<script src="vendors.6d9d661339fe7a583752.js"></script>
<script src="polyfills.5cb77843a9758f0097e1.js"></script>
<script src="scripts.d526d9658102820143d1.js"></script>
<script src="moment.65d799ec0675b5ff9b59.js"></script>
<script src="handsontable.c50df86ef38503e832a5.js"></script>
<script src="main.db888715d5d02500d39e.js"></script>
</body>
</html></p>
<p>如果你有多个 webpack 入口点, 他们都会在生成的HTML文件中的 <code>script</code> 标签内。</p>
<p>需要注意的是,默认angular-cli打包生成的入口文件也被配置成了index.html,所以我们需要更改<code>angular.jaon</code>文件中的配置。并且,由于Angular单页面应用的入口文件为<code>main.ts</code> 所以!chunks配置中,main 一定一定要放在最后,否则运行会出错,笔者因为没有放在最后找了一晚上的bug~~</p>
<p><img src="https://img.php.cn/upload/image/998/783/134/1618194694682438.png" title="1618194694682438.png" alt="2.png"></p>
<p>改为:</p>
<p><img src="https://img.php.cn/upload/image/267/684/755/1618194704270838.png" title="1618194704270838.png" alt="3.png"></p>
<h3 data-id="heading-22"><strong>3.HtmlWebpackPlugin插件配置选项</strong></h3>
<p>您可以将配置选项的哈希值传递给<code>html-webpack-plugin</code>。允许的值如下:</p>
<table>
<thead><tr class="firstRow">
<th>名称</th>
<th>类型</th>
<th>默认</th>
<th>描述</th>
</tr></thead>
<tbody>
<tr>
<td><strong><code>title</code></strong></td>
<td><code>{String}</code></td>
<td><code>Webpack App</code></td>
<td>用于生成的HTML文档的标题</td>
</tr>
<tr>
<td><strong><code>filename</code></strong></td>
<td><code>{String}</code></td>
<td><code>'index.html'</code></td>
<td>将HTML写入的文件。默认为<code>index.html</code>。您可以在这里指定一个子目录(如:<code>assets/admin.html</code>)</td>
</tr>
<tr>
<td><strong><code>template</code></strong></td>
<td><code>{String}</code></td>
<td>``</td>
<td>
<code>webpack</code>模板的相对或绝对路径。默认情况下,它将使用(<code>src/index.ejs</code>如果存在)。请参阅<a href="https://github.com/jantimon/html-webpack-plugin/blob/master/docs/template-option.md" target="_blank" rel="nofollow noopener noreferrer">文档</a>以了解详细信息</td>
</tr>
<tr>
<td><strong><code>templateContent</code></strong></td>
<td><code>{string、Function、false}</code></td>
<td>false</td>
<td>可用于代替<code>template</code>提供内联模板-请阅读“<a href="https://github.com/jantimon/html-webpack-plugin#writing-your-own-templates" target="_blank" rel="nofollow noopener noreferrer">编写自己的模板”</a>部分</td>
</tr>
<tr>
<td><strong><code>templateParameters</code></strong></td>
<td><code>{Boolean、Object、Function}</code></td>
<td><code>false</code></td>
<td>允许覆盖模板中使用的参数-请参见<a href="https://github.com/jantimon/html-webpack-plugin/tree/master/examples/template-parameters" target="_blank" rel="nofollow noopener noreferrer">示例</a>
</td>
</tr>
<tr>
<td><strong><code>inject</code></strong></td>
<td><code>{Boolean、String}</code></td>
<td><code>true</code></td>
<td>`true</td>
</tr>
<tr>
<td><strong><code>publicPath</code></strong></td>
<td><code>{String、'auto'}</code></td>
<td><code>'auto'</code></td>
<td>用于脚本和链接标签的publicPath</td>
</tr>
<tr>
<td><strong><code>scriptLoading</code></strong></td>
<td><code>{'blocking'、'defer'}</code></td>
<td><code>'blocking'</code></td>
<td>现代浏览器支持非阻塞javascript加载(<code>'defer'</code>),以提高页面启动性能。</td>
</tr>
<tr>
<td><strong><code>favicon</code></strong></td>
<td><code>{String}</code></td>
<td>``</td>
<td>将给定的图标图标路径添加到输出HTML</td>
</tr>
<tr>
<td><strong><code>meta</code></strong></td>
<td><code>{Object}</code></td>
<td><code>{}</code></td>
<td>允许注入<code>meta</code>-tags。例如<code>meta: {viewport: 'width=device-width, initial-scale=1, shrink-to-fit=no'}</code>
</td>
</tr>
<tr>
<td><strong><code>base</code></strong></td>
<td><code>{Object、String、false}</code></td>
<td><code>false</code></td>
<td>注入<a href="https://developer.mozilla.org/en-US/docs/Web/HTML/Element/base" target="_blank" rel="nofollow noopener noreferrer"><code>base</code></a>标签。例如<code>base: "https://example.com/path/page.html</code>
</td>
</tr>
<tr>
<td><strong><code>minify</code></strong></td>
<td><code>{Boolean、Object}</code></td>
<td>
<code>true</code>如果<code>mode</code>是<code>'production'</code>,否则<code>false</code>
</td>
<td>控制是否以及以何种方式最小化输出。有关更多详细信息,请参见下面的<a href="https://github.com/jantimon/html-webpack-plugin#minification" target="_blank" rel="nofollow noopener noreferrer">缩小</a>。</td>
</tr>
<tr>
<td><strong><code>hash</code></strong></td>
<td><code>{Boolean}</code></td>
<td><code>false</code></td>
<td>如果是,<code>true</code>则将唯一的<code>webpack</code>编译哈希值附加到所有包含的脚本和CSS文件中。这对于清除缓存很有用</td>
</tr>
<tr>
<td><strong><code>cache</code></strong></td>
<td><code>{Boolean}</code></td>
<td><code>true</code></td>
<td>仅在文件被更改时发出文件</td>
</tr>
<tr>
<td><strong><code>showErrors</code></strong></td>
<td><code>{Boolean}</code></td>
<td><code>true</code></td>
<td>错误详细信息将写入HTML页面</td>
</tr>
<tr>
<td><strong><code>chunks</code></strong></td>
<td><code>{?}</code></td>
<td><code>?</code></td>
<td>仅允许您添加一些块(例如,仅单元测试块)</td>
</tr>
<tr>
<td><strong><code>chunksSortMode</code></strong></td>
<td><code>{String、Function}</code></td>
<td><code>auto</code></td>
<td>允许控制在将块包含到HTML中之前应如何对其进行排序。允许值为`'none'</td>
</tr>
<tr>
<td><strong><code>excludeChunks</code></strong></td>
<td><code>{Array.<string>}</code></td>
<td>``</td>
<td>允许您跳过一些块(例如,不添加单元测试块)</td>
</tr>
<tr>
<td><strong><code>xhtml</code></strong></td>
<td><code>{Boolean}</code></td>
<td><code>false</code></td>
<td>如果<code>true</code>将<code>link</code>标签呈现为自动关闭(符合XHTML)</td>
</tr>
</tbody>
</table>
<p>最后奉上完整的<code>webpack.partial.js</code></p>
<pre class="brush:php;toolbar:false">const webpack = require('webpack')
const BundleAnalyzerPlugin = require('webpack-bundle-analyzer').BundleAnalyzerPlugin
const HtmlWebpackPlugin = require('html-webpack-plugin')
const path = require('path')

module.exports = {
  externals: {        // 打包除外的文件
    echarts: 'echarts'
  },
  optimization: {
    splitChunks: {
      chunks: "all",
      minSize: 20000,
      minChunks: 1,
      maxAsyncRequests: 5,
      maxInitialRequests: 3,
      automaticNameDelimiter: '~',
      name: true,
      cacheGroups: {
        moment: {
          name: 'moment',
          test: /[\\/]node_modules[\\/]moment[\\/]/,
          priority: -6
        },
        handsontable: {
          name: 'handsontable',
          test: /[\\/]node_modules[\\/]handsontable[\\/]/,
          priority: -7
        },
        angular: {
          name: 'angular',
          test: /[\\/]node_modules[\\/]@angular[\\/]/,
          priority: -9
        },
        vendors: {
          name: 'vendors',
          test: /[\\/]node_modules[\\/]/,
          priority: -10
        },
        default: {
          name: 'default',
          minChunks: 2,
          priority: -20,
          reuseExistingChunk: true
        }
      }
    }
  },
  plugins: [
    new BundleAnalyzerPlugin({
      analyzerMode: 'static',
    }),
    new webpack.DefinePlugin({
      "VERSION": JSON.stringify("4711")
    }),
    new HtmlWebpackPlugin({
      filename: 'index.html',
      template: path.join(__dirname, 'src/index.html'),
      chunksSortMode: 'manual',
      chunks: ['styles', 'runtime', 'polyfills', 'scripts', 'vendors', 'main']      // 限定顺序,main.js必须在最后
    })
  ]
}
希望大家打包顺利,项目运行快快滴。
demo地址:
https://github.com/qinqing3761/webpack-build-demo
更多编程相关知识,请访问:编程入门!!
Atas ialah kandungan terperinci Angular10如何配置webpack打包?方法介绍. Untuk maklumat lanjut, sila ikut artikel berkaitan lain di laman web China PHP!

