Rumah >pembangunan bahagian belakang >masalah PHP >如何安装php5
如何安装php5
- 藏色散人asal
- 2021-03-17 10:24:192349semak imbas
安装php5的方法:首先下载PHP5源码包;然后通过“make && make install”命令进行编译安装;接着拷贝一个文件做配置文件;最后查看PHP信息即可。

本文操作环境:windows7系统、PHP5版,DELL G3电脑
PHP5安装
进到src目录下 cd /usr/local/src
下载PHP5源码包wget http://cn2.php.net/distributions/php-5.6.37.tar.gz
解压下载的文件 tar -zxvf php-5.6.37.tar.gz
进入文件目录 cd php-5.6.37
configure ./configure --prefix=/usr/local/php --with-apxs2=/usr/local/apache/bin/apxs --with-config-file-path=/usr/local/php/etc --with-mysql=/usr/local/mysql --with-pdo-mysql=/usr/local/mysql --with-mysqli=/usr/local/mysql/bin/mysql_config --with-zlib-dir --with-gd --with-jpeg-dir --with-png-dir --with-freetype-dir --with-iconv-dir --with-zlib-dir --with-bz2 --with-openssl-dir=/usr/include/openssl --with-mcrypt --enable-soap --enable-gd-native-ttf --enable-mbstring --enable-sockets --enable-exif
查看报错信息
checking for xml2-config path…
configure: error: xml2-config not found. Please check your libxml2 installation.
解决办法如下,完成后再执行configure
yum install libxml2-devel -y
yum install libxml2 -y
查看报错信息
configure:error: cannot find OpenSSL's <evp'h>
解决如下,完成后再执行configure时将--with-openssl 改为--with-openssl-dir=/usr/include/openssl。或者不更改命令,直接执行yum install -y openssl-devel 也可以。
export PHP_OPENSSL_DIR=yes
查看报错信息
configure:error:please reinstall the BZip2 distribution
解决如下,完成后继续configure
yum install bzip2-devel -y
查看报错信息
configure:error:jpeglib.h not found
解决如下,完成后继续configure
yum install libjpeg-devel -y
查看报错信息
png.h not found
解决后继续configure
yum install libpng-devel
查看报错信息
freetype-config not found
解决后继续configure
yum install freetype-devel -y
查看报错信息
mcrypt.h not found please reinstall libmcrypt
解决后继续configure
yum install libmcrypt-devel -y

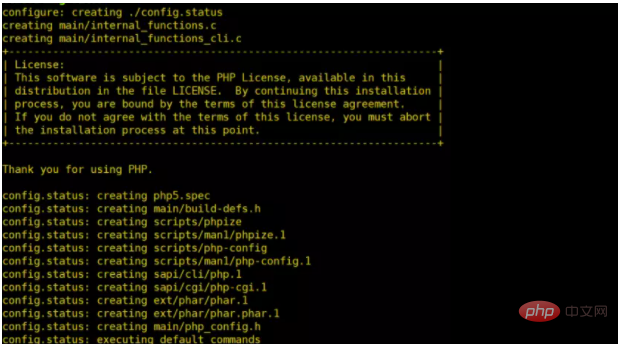
出现这个界面就可以编译安装了
make && make install
编译安装完之后需要拷贝一个文件做配置文件 ,源文件是在/usr/local/src/php-5.6.37下 ,cp php.ini-development /usr/local/php/etc/php.ini
查看是否加载配置文件,该命令可以查看PHP信息,包括编译参数,configure路径等。
/usr/local/php/bin/php -i |less
推荐学习:《PHP视频教程》
Atas ialah kandungan terperinci 如何安装php5. Untuk maklumat lanjut, sila ikut artikel berkaitan lain di laman web China PHP!

