Rumah >hujung hadapan web >uni-app >uniapp如何上传身份证
uniapp如何上传身份证
- 藏色散人asal
- 2021-01-26 12:00:506294semak imbas
uniapp实现上传身份证的方法:首先打开上传证照页面;然后安装Dcloud插件市场模板;接着集成到自己的项目中,按项目的要求进行修改并使用;最后引入插件“pathToBase64”,并将图像路径转base64即可。

本教程操作环境:windows7系统、uni-app2.5.1版本,Dell G3电脑。
推荐(免费):uni-app教程
uniapp-app端上传证件(身份证/银行卡)照片后转base64发送给后台功能实现
功能描述:
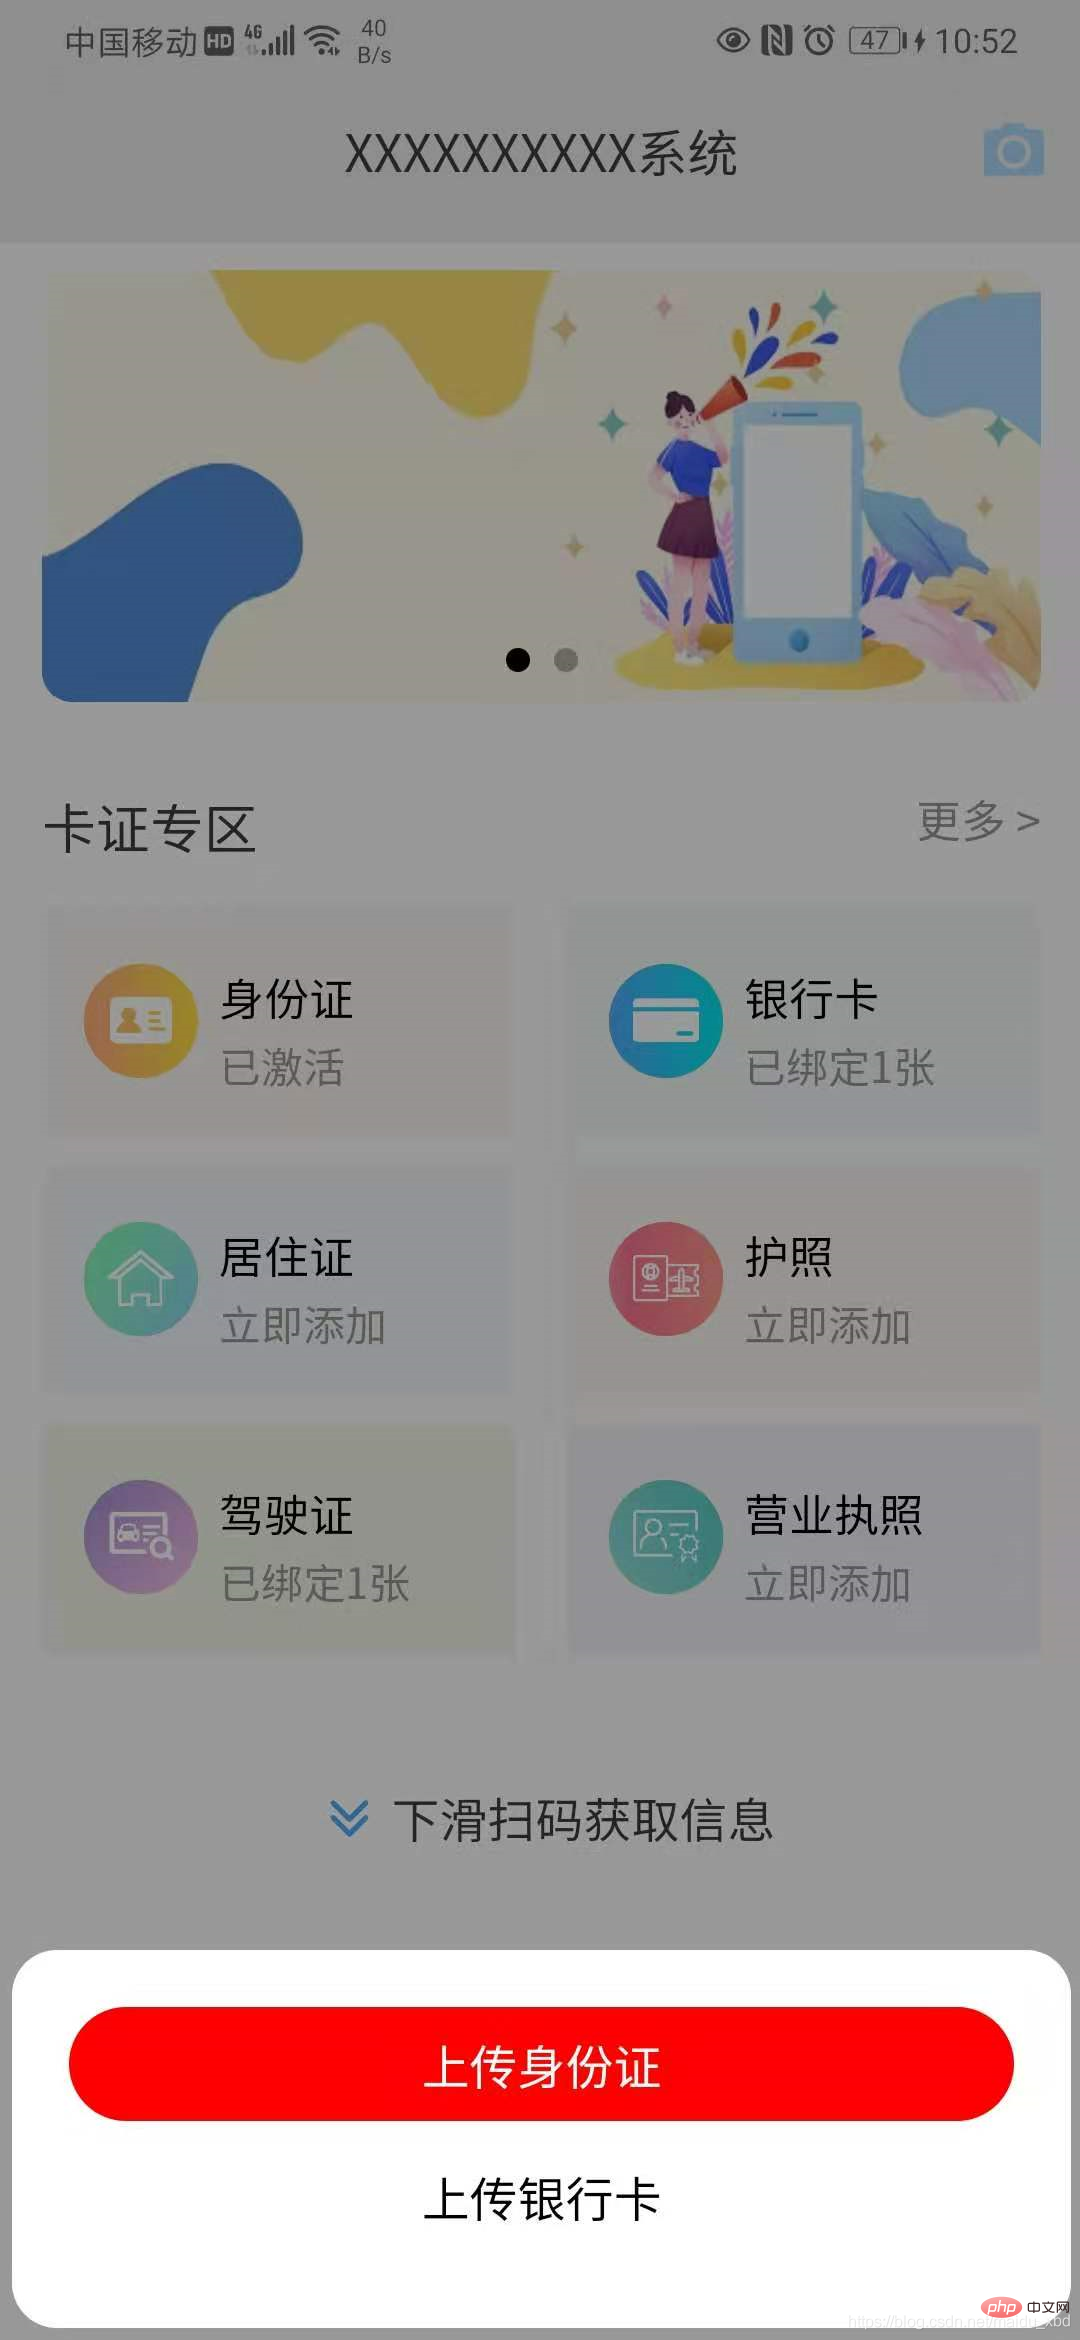
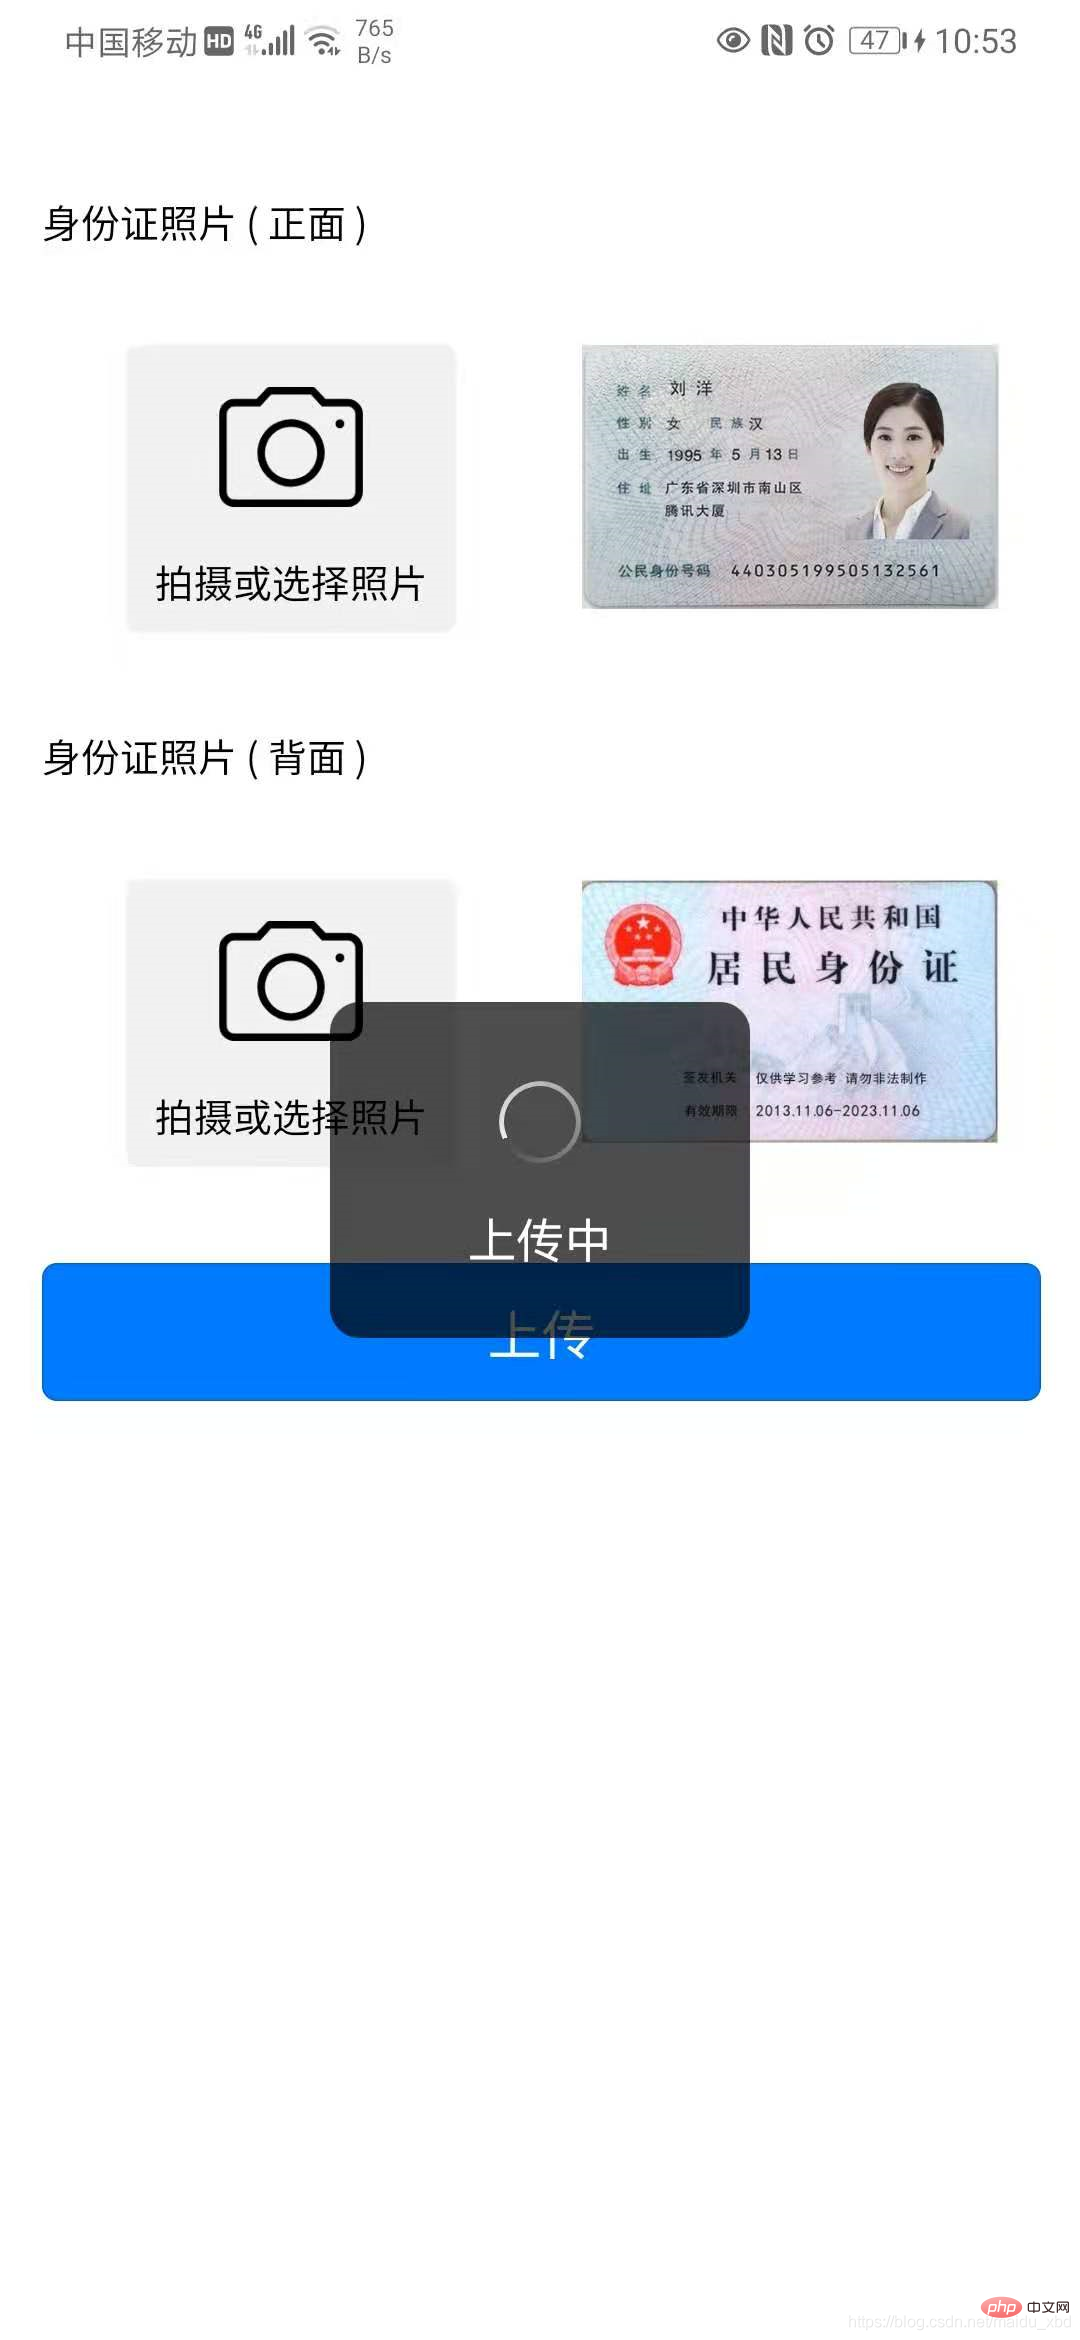
如下图,点击首页右上角图标出现弹框,点击选择“上传身份证”或“银行卡”,选择好证照后,点击上传按钮,将图片上传到后台进行OCR识别。


解决方案:
关键点 1.上传证照界面实现;2.图片url转base64处理。
具体实现步骤如下
(1)点击按钮,点击首页右上角图标出现弹框,点击选择“上传身份证”或“银行卡”,跳转上传证照页面
template:
<view @click="upload" class="iconfont icon-paizhao2"></view>
<!-- 选择证件弹窗 -->
<uni-popup ref="cardpopup" type="bottom">
<view class="dialog" >
<view @click="selectItem(index)" :class="active==index ? 'active':''" v-for="(item,index) in cardTypeList" :key="index">
{{item.name}}
</view>
</view>
</uni-popup>
data:
data(){
    return{
        cardTypeList:[{name:"上传身份证"},{name:"上传银行卡"}],
    }
}
methods:
methods:{

    upload(){
				this.$refs.cardpopup.open()
			},
        //选择上传身份证/银行卡
	selectItem(index){
		this.active=index;
		if(index==0){
			// 选择上传身份证
			uni.navigateTo({
				url:"/pages/idcard/idcard"
			})
		}else{
			// 选择上传银行卡
			uni.navigateTo({
				url:"/pages/bankcard/bankcard"
			})
		}
	},

}
style
<style lang="scss">
.dialog{
	background-color: #fff;
	padding:40rpx;
	border-radius: 15px;
	margin:10rpx;
	view{
		height: 80rpx;
		line-height: 80rpx;
		text-align: center;
		margin-bottom: 6px;
	}
	.active{
		background-color: red;
		border-radius: 80rpx;
		color:#fff;

	}
}
</style>
(2)上传证照界面实现:安装Dcloud插件市场模板 graceUI [ 免费界面 ] - 身份证选择上传模板
ps:GraceUI上,提供了丰富的组件、布局及界面库,如登录注册,个人中心、头像裁剪、商城套装等,可直接使用,极大的提高了开发效率。https://www.graceui.com/
(3)安装插件后,就是集成到自己的项目中,按项目的要求进行修改并使用。
(4)图片url转base64处理: 安装Dcloud插件市场插件 image-tools 图像转换工具,可用于图像和base64的转换
引入插件【pathToBase64】图像路径转base64
import { pathToBase64 } from '../../js_sdk/gsq-image-tools/image-tools/index.js'
使用插件,在图片上传后,将图片url转换为base64,并保存
methods: {
		// 选择身份证正面照片
		selectImg1 : function() {
			uni.chooseImage({
				count:1,
				success:(res)=>{
					this.idCard1 = res.tempFilePaths[0];
					//将图片url转换为base64
					pathToBase64(res.tempFilePaths[0]).then(base64=>{
						// console.log(base64)
						this.idCard1base64=base64
					}).catch(error=>{
						console.log(error)
					})
				}
			})
		}
}
以下附上银行卡上传页面完整代码,上传身份证代码类似(建议将上传证照功能封装为可复用的组件)
<template>
	<!-- 上传银行卡页面 -->
	<view>
		<view class="grace-idcard-main">
			<view class="grace-idcard-desc">
			</view>
			<view class="grace-idcard-text">
				银行卡照片 ( 正面 )
			</view>
			<view class="grace-idcard-items">
				<view class="grace-idcard-uper-btn" @tap="selectImg">
					<view class="img"><image src="../../static/images/camera.png" mode="widthFix" /></view>
					<view class="text">拍摄或选择照片</view>
				</view>
				<view class="grace-idcard-preview">
					<image :src="bankCard"  @tap="previewImg" mode="widthFix"></image>
				</view>
			</view>
			<view style="margin-top:38upx;">
				<button type="primary" @tap="uploadCards">上传</button>
			</view>
		</view>
	</view>
</template>
<script>
import { pathToBase64  } from '../../js_sdk/gsq-image-tools/image-tools/index.js'
var _self;
export default {
	data() {
		return {
			bankCard : '../../static/images/bankcard.jpg',
			bankCardBase64:null
		};
	},
	onLoad:function(){
		_self = this;
	},
	methods: {
		// 选择银行卡正面照片
		selectImg : function() {
			uni.chooseImage({
				count:1,
				success:(res)=>{
					this.bankCard = res.tempFilePaths[0];
					//将图片url转换为base64
					pathToBase64(res.tempFilePaths[0]).then(base64=>{
						this.bankCardBase64=base64
					}).catch(error=>{
						console.log(error)
					})
				}
			})
		},
		// 预览银行卡正面照片
		previewImg: function(){
			uni.previewImage({
				urls:[_self.bankCard]
			});
		},
		// 上传银行卡
		uploadCards : function(){
			if(this.bankCard == '../../static/images/bankcard.jpg'){
				uni.showToast({title:"请选择银行卡照片", icon:"none"});
				return;
			}
			uni.showLoading({title:"上传中"});
			var param={
				type:2,
				images:[
					{
						side:"front",
						image:this.bankCardBase64,
						orderNum:1
					}

				]
			}
			// 向后台发送请求
			this.$myRequest({
				url:"card/ocr",
				method:"POST",
				data:param
			}).then(res=>{
				console.log("上传银行卡返回结果:",res)
				if(res.data.respCode=="00000"){
					uni.hideLoading();
					uni.showToast({title:res.data.respDesc,icon:"none"})
					uni.navigateTo({
						url:"/pages/cardInfo/cardInfo?data="+JSON.stringify(res.data.result)
					})
				}else{
					uni.hideLoading();
					uni.showToast({title:res.data.respDesc,icon:"none"})
				}
			})
		}
	},
}
</script>
<style>
view{font-size:28upx;}
.grace-idcard-main{margin:20upx 30upx;}
.grace-idcard-desc{line-height:2em; background:#FFFFFF; padding:40upx; border-radius:10upx;}
.grace-idcard-text{line-height:2em; margin-top:30upx;}
.grace-idcard-items{background:#FFFFFF; padding:30upx 0; display:flex; margin:30upx 0; border-radius:10upx; align-items: flex-start;}
.grace-idcard-uper-btn{width:276upx; margin:0 60upx; background:#F1F1F1; padding-bottom:10upx; border-radius:10upx; text-align:center;}
.grace-idcard-uper-btn .img{width:100upx; height:100upx; margin:0 auto; margin-top:30upx;}
.grace-idcard-uper-btn .img image{width:100upx; height:100upx;}
.grace-idcard-uper-btn .text{width:100%; margin-top:10upx; text-align:center; line-height:2em;}
.grace-idcard-preview{width:50%; margin:0 30upx; }
.grace-idcard-preview image{width:100%; border-radius: 10rpx;}
</style>
Atas ialah kandungan terperinci uniapp如何上传身份证. Untuk maklumat lanjut, sila ikut artikel berkaitan lain di laman web China PHP!

