Rumah >hujung hadapan web >tutorial js >在WebView中使用JavaScript的方法介绍
在WebView中使用JavaScript的方法介绍
- 青灯夜游ke hadapan
- 2021-01-08 18:35:336160semak imbas

如果你想要载入的页面中用了JavaScript,你必须为你的WebView使能JavaScript。一旦使能之后,你也可以自己创建接口在你的应用和JavaScript代码间进行交互。
可以通过getSettings()获得WebSettings,然后用setJavaScriptEnabled()使能JavaScript:
WebView myWebView = (WebView) findViewById(R.id.webview);
WebSettings webSettings = myWebView.getSettings();
webSettings.setJavaScriptEnabled(true);
绑定JavaScript与Android代码
当你为你的Android应用中的WebView专门开发一个网页应用时,你可以创建你的JavaScript代码和你的客户端的Android代码之间的接口。
比如,你可以用JavaScript代码调用Android代码中的方法,来展现一个对话框之类,而不是使用alert()方法(JS中的对话框方法)。
在JS和Android代码间绑定一个新的接口,需要调用 addJavascriptInterface()方法。
方法参数传入一个Java对象实例和一个字符串,该字符串是一个名字(interface name,注意此接口不是通常所说的那个用来实现的接口,而是传入的这个对象在JS中的别名),在JS代码中用此名字调用该Java对象的方法。
注意这个方法可以让JS代码控制宿主程序,这是一个非常有力的特性,但是同时也存在一些安全问题,因为进一步JS代码可以通过反射访问到注入对象的公有域。攻击者可能会在HTML和JavaScript中包含了有威胁性的代码。
所以Android 4.1,API 17,也就是JELLY_BEAN 开始,只有被JavascriptInterface 注解标识的公有方法可以被JS代码访问。
另外,因为JS代码和Java对象在这个WebView所私有的后台线程交互,所以还需要注意线程安全性问题。
注意,与JS代码绑定的的这个Java对象运行在另一个线程中,与创建它的线程不是一个线程。
注意,这个Java对象的域是不可访问的。
绑定JavaScript与Android代码的例子
比如可以定义这么一个类:
/** * 自定义的Android代码和JavaScript代码之间的桥梁类
     *
     * @author 1
     * */ public class WebAppInterface
    {
        Context mContext;
        /** Instantiate the interface and set the context */
        WebAppInterface(Context c)
        {
            mContext = c;
        } /** Show a toast from the web page */
        // 如果target 大于等于API 17,则需要加上如下注解
        // @JavascriptInterface public void showToast(String toast)
        {
        // Toast.makeText(mContext, toast, Toast.LENGTH_SHORT).show();
        Toast.makeText(mContext, toast, Toast.LENGTH_LONG).show();
        }
    }
然后将这个类和你的WebView中的JS代码绑定:
WebView webView = (WebView) findViewById(R.id.webview);
webView.addJavascriptInterface(new WebAppInterface(this), "Android");
给这个对象起的别名叫“Android”。
这个就创立了一个接口名,叫“Android”,运行在WebView中的JS代码可以通过这个名字调用WebAppInterface类中的showToast()方法:
<input type="button" value="Say hello"
onClick="showAndroidToast('Hello Android!')" />
<script type="text/javascript"> function showAndroidToast(toast)
{
Android.showToast(toast);
} </script>特别注意:需要设置chrome handler
两个问题:
1、网页按钮按下后不出现JS对话框是因为没有设置chrome handler,需要设置如下:
// 如果不设置这个,JS代码中的按钮会显示,但是按下去却不弹出对话框
// Sets the chrome handler. This is an implementation of WebChromeClient
// for use in handling JavaScript dialogs, favicons, titles, and the
// progress. This will replace the current handler.
myWebView.setWebChromeClient(new WebChromeClient()
        {

            @Override public boolean onJsAlert(WebView view, String url,
             String message,
                    JsResult result)
            { // TODO Auto-generated method stub return super.
            onJsAlert(view, url, message, result);
            }

        });
2.调用Android代码的那个按钮也没有出现Toast是因为我把别名写错了(大小写没有注意)。
Android调用JavaScript代码
这个还比较简单,需要调用的时候只需要一行代码:
myWebView.loadUrl("javascript:myFunction()");其中myFunction()是JS函数。
这里要补充一下,如果JavaScript函数是带参数的,那么调用时要特别注意。
比如下面这个JS函数,在原来内容上加入一行:
function writeLine(string)
    {
        console.log("Write a new Line");
        //调试信息
        document.getElementById("content").innerHTML += string +
        "<br />";
        //在content标签段落加入新行
        }
注:其中content是自定义的标签,html中有一个段落是:
<p id="content"></p>
那么在Android代码中调用这个writeLine()函数时,需要传入一个字符串参数,比如,想要传入一个叫name的String:
myWebView.loadUrl("javascript:writeLine('"+name+"')");
//JS代码要是带参数
还有就是要注意双引号中的函数名一定不要写错。
程序实例
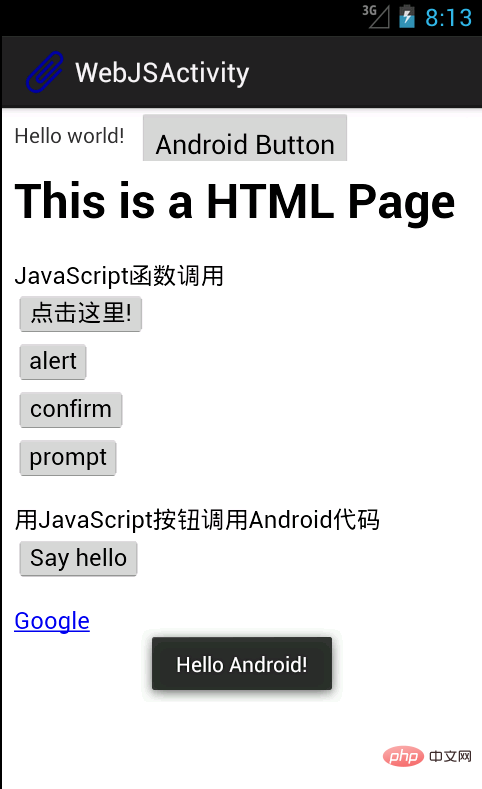
效果如下:

界面中包含一个TextView,旁边一个Button,下面整个是一个WebView。
在WebView中载入了一个本地html文件,本地文件存放在assets文件夹中。
网页中前四个按钮调用的是JavaScript函数,显示各种对话框。
SayHello按钮调用Android代码中的一个方法,显示一个Toast,如图中所示。
为了证明Android也可以调用JS代码,最上方的Android Button按下后和“点击这里”那个按钮的效果一致,都是出现JS的对话框。
Activity代码:
package com.example.hellowebjs;
import android.annotation.SuppressLint;
import android.app.Activity;
import android.content.Context;
import android.os.Bundle;
import android.view.View;
import android.webkit.JsResult;
import android.webkit.WebChromeClient;
import android.webkit.WebSettings;
import android.webkit.WebView;
import android.webkit.WebViewClient;
import android.widget.Button;
import android.widget.Toast;
public class WebJSActivity extends Activity
{ private WebView myWebView = null; private Button myButton = null;

    @SuppressLint("SetJavaScriptEnabled")
    @Override public void onCreate(Bundle savedInstanceState)
    { super.onCreate(savedInstanceState);
        setContentView(R.layout.activity_web_js);

        myWebView = (WebView) findViewById(R.id.myWebView);
        // 得到设置属性的对象
        WebSettings webSettings = myWebView.getSettings();
        // 使能JavaScript
        webSettings.setJavaScriptEnabled(true);
        // 支持中文,否则页面中中文显示乱码
         webSettings.setDefaultTextEncodingName("GBK");
         // 限制在WebView中打开网页,而不用默认浏览器
         myWebView.setWebViewClient(new WebViewClient());
         // 如果不设置这个,JS代码中的按钮会显示,但是按下去却不弹出对话框
         // Sets the chrome handler.
         //This is an implementation of WebChromeClient
         // for use in handling JavaScript dialogs, favicons,
         //titles, and the
         // progress. This will replace the current handler.
         myWebView.setWebChromeClient(new WebChromeClient()
        {

         @Override public boolean onJsAlert(WebView view, String url,
         String message,
                    JsResult result)
            { // TODO Auto-generated method stub return
            super.onJsAlert(view, url, message, result);
            }

        });
        // 用JavaScript调用Android函数:
        // 先建立桥梁类,将要调用的Android代码写入桥梁类的public函数
         // 绑定桥梁类和WebView中运行的JavaScript代码
         // 将一个对象起一个别名传入,在JS代码中用这个别名代替这个对象,
         可以调用这个对象的一些方法
         myWebView.addJavascriptInterface(new WebAppInterface(this),
         "myInterfaceName");
         // 载入页面:本地html资源文件
         myWebView.loadUrl("file:///android_asset/sample.html");
         // 这里用一个Android按钮按下后调用JS中的代码
         myButton = (Button) findViewById(R.id.button1);
        myButton.setOnClickListener(new View.OnClickListener()
        {

            @Override public void onClick(View v)
            {
            // 用Android代码调用JavaScript函数:
            myWebView.loadUrl("javascript:myFunction()");
            // 这里实现的效果和在网页中点击第一个按钮的效果一致  }
        });

    } /** * 自定义的Android代码和JavaScript代码之间的桥梁类
     *
     * @author 1
     * */ public class WebAppInterface
    {
        Context mContext;
        /** Instantiate the interface and set the context */
        WebAppInterface(Context c)
        {
            mContext = c;
        } /** Show a toast from the web page */
        // 如果target 大于等于API 17,则需要加上如下注解
        // @JavascriptInterface public void showToast(String toast)
        { // Toast.makeText(mContext, toast, Toast.LENGTH_SHORT).show();
         Toast.makeText(mContext, toast, Toast.LENGTH_LONG).show();
        }
    }

}
HTML文件:
<html> <head> <h1> This is a HTML Page </h1>
<!-- JavaScript脚本,主要包括了按钮要执行的函数,显示对话框等 -->
<script type="text/javascript">
//JavaScript方法,弹出对话框显示信息
function myFunction()
{
alert("Hello World!");
} function onAlert()
{
console.log("onAlert method");
//显示调试信息
alert("This is a alert sample from html");
} function onConfirm()
{
console.log("onConfirm method");
var b = confirm("are you sure to login?");
alert("your choice is " + b);
} function onPrompt()
{
console.log("onPrompt method");
var b = prompt("please input your password", "aaa");
alert("your input is " + b);
} //调用绑定的Java对象的方法,即调用Android代码显示对话框
function showAndroidToast(toast)
{
console.log("showAndroidToast method");
myInterfaceName.showToast(toast);
//注意此处的myInterfaceName要和外部传入的名字一致,大小写正确
}
</script>
</head>
<body>
<p>
<!-- 前四个按钮调用JS函数 -->
JavaScript函数调用
<br />
<button onclick="myFunction()">点击这里!</button>
<br />
<input type="button" value="alert" onclick="onAlert()" />
<br />
<input type="button" value="confirm" onclick="onConfirm()" />
<br />
<input type="button" value="prompt" onclick="onPrompt()" />
<br />
<!-- 上面用了两种定义按钮的方式,效果一样的 -->
</p>
<p>
<!-- 这个Say hello 按钮调用Android代码中的方法 -->
用JavaScript按钮调用Android代码
<br />
<input type="button" value="Say hello"
onClick="showAndroidToast('Hello Android!')" />
</p>
<a href="http://www.google.com" />Google </a>
</body> </html>Activity布局文件:
<RelativeLayout xmlns:android="http://schemas.android.com/apk/res/android"
xmlns:tools="http://schemas.android.com/tools"
android:id="@+id/myRelativeLayout"
android:layout_width="match_parent"
android:layout_height="match_parent" >
<TextView android:id="@+id/textView1"
android:layout_width="wrap_content"
android:layout_height="wrap_content"
android:padding="@dimen/padding_medium"
android:text="@string/hello_world" tools:context=".WebJSActivity" />
<Button android:id="@+id/button1"
android:layout_width="wrap_content"
android:layout_height="wrap_content"
android:layout_toRightOf="@id/textView1"
 android:text="@string/btn1_text" />
  <WebView android:id="@+id/myWebView"
  android:layout_width="fill_parent"
  android:layout_height="fill_parent"
  android:layout_below="@id/textView1" />
  </RelativeLayout>
更多编程相关知识,请访问:编程教学!!
Atas ialah kandungan terperinci 在WebView中使用JavaScript的方法介绍. Untuk maklumat lanjut, sila ikut artikel berkaitan lain di laman web China PHP!

