本篇文章主要讲述的是用Yii框架模拟PHP极光推送消息通知,具有一定的参考价值,感兴趣的朋友可以了解一下,希望对你有所帮助。
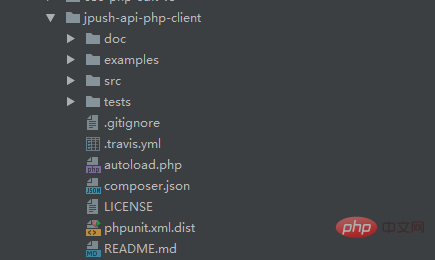
一、下载极光推送PHP SDK,解压后放在/protected/components/目录下,如下图所示:

二、完善修改下官方的demo例子,我这里复制一份demo,改为NotifyPush.php,如下代码:
<?php
require dirname(__FILE__) . '/jpush-api-php-client/autoload.php';
use JPush\Client as JPush;
class NotifyPush {
static function pushAlias($alias,$ticket='消息提醒',$alert){
$appKey=Yii::app()->params['push']['AppKey'];
$appMasterSecret=Yii::app()->params['push']['AppMasterSecret'];
$production_mode=Yii::app()->params['push']['production_mode'];
$client = new JPush($appKey, $appMasterSecret);
// 完整的推送示例
// 这只是使用样例,不应该直接用于实际生产环境中 !!
try {
$response = $client->push()
->setPlatform(array('ios', 'android'))
// 一般情况下,关于 audience 的设置只需要调用 addAlias、addTag、addTagAnd 或 addRegistrationId
// 这四个方法中的某一个即可,这里仅作为示例,当然全部调用也可以,多项 audience 调用表示其结果的交集
// 即是说一般情况下,下面三个方法和没有列出的 addTagAnd 一共四个,只适用一个便可满足大多数的场景需求
->addAlias($alias)
->setNotificationAlert($alert)
->iosNotification($ticket, array(
'sound' => 'sound.caf',
// 'badge' => '+1',
// 'content-available' => true,
// 'mutable-content' => true,
'category' => 'jiguang',
'extras' => array(
'key' => 'value',
'jiguang'
),
))
->androidNotification($ticket, array(
'title' => $alert,
// 'build_id' => 2,
'extras' => array(
'key' => 'value',
'jiguang'
),
))
->message($alert, array(
'title' => $alert,
// 'content_type' => 'text',
'extras' => array(
'key' => 'value',
'jiguang'
),
))
->options(array(
// sendno: 表示推送序号,纯粹用来作为 API 调用标识,
// API 返回时被原样返回,以方便 API 调用方匹配请求与返回
// 这里设置为 100 仅作为示例
// 'sendno' => 100,
// time_to_live: 表示离线消息保留时长(秒),
// 推送当前用户不在线时,为该用户保留多长时间的离线消息,以便其上线时再次推送。
// 默认 86400 (1 天),最长 10 天。设置为 0 表示不保留离线消息,只有推送当前在线的用户可以收到
// 这里设置为 1 仅作为示例
// 'time_to_live' => 1,
// apns_production: 表示APNs是否生产环境,
// True 表示推送生产环境,False 表示要推送开发环境;如果不指定则默认为推送生产环境
'apns_production' => $production_mode,
// big_push_duration: 表示定速推送时长(分钟),又名缓慢推送,把原本尽可能快的推送速度,降低下来,
// 给定的 n 分钟内,均匀地向这次推送的目标用户推送。最大值为1400.未设置则不是定速推送
// 这里设置为 1 仅作为示例
// 'big_push_duration' => 1
))
->send();
print_r($response);
} catch (\JPush\Exceptions\APIConnectionException $e) {
// try something here
print $e;
} catch (\JPush\Exceptions\APIRequestException $e) {
// try something here
print $e;
}
}
static function pushAll($ticket='消息提醒',$alert){
$appKey=Yii::app()->params['push']['AppKey'];
$appMasterSecret=Yii::app()->params['push']['AppMasterSecret'];
$production_mode=Yii::app()->params['push']['production_mode'];
$client = new JPush($appKey, $appMasterSecret);
// 完整的推送示例
// 这只是使用样例,不应该直接用于实际生产环境中 !!
try {
$response = $client->push()
->setPlatform(array('ios', 'android'))
->setAudience('all')
// 一般情况下,关于 audience 的设置只需要调用 addAlias、addTag、addTagAnd 或 addRegistrationId
// 这四个方法中的某一个即可,这里仅作为示例,当然全部调用也可以,多项 audience 调用表示其结果的交集
// 即是说一般情况下,下面三个方法和没有列出的 addTagAnd 一共四个,只适用一个便可满足大多数的场景需求
->setNotificationAlert($alert)
->iosNotification($ticket, array(
'sound' => 'sound.caf',
// 'badge' => '+1',
// 'content-available' => true,
// 'mutable-content' => true,
'category' => 'jiguang',
'extras' => array(
'key' => 'value',
'jiguang'
),
))
->androidNotification($ticket, array(
'title' => $alert,
// 'build_id' => 2,
'extras' => array(
'key' => 'value',
'jiguang'
),
))
->message($alert, array(
'title' => $alert,
// 'content_type' => 'text',
'extras' => array(
'key' => 'value',
'jiguang'
),
))
->options(array(
// sendno: 表示推送序号,纯粹用来作为 API 调用标识,
// API 返回时被原样返回,以方便 API 调用方匹配请求与返回
// 这里设置为 100 仅作为示例
// 'sendno' => 100,
// time_to_live: 表示离线消息保留时长(秒),
// 推送当前用户不在线时,为该用户保留多长时间的离线消息,以便其上线时再次推送。
// 默认 86400 (1 天),最长 10 天。设置为 0 表示不保留离线消息,只有推送当前在线的用户可以收到
// 这里设置为 1 仅作为示例
// 'time_to_live' => 1,
// apns_production: 表示APNs是否生产环境,
// True 表示推送生产环境,False 表示要推送开发环境;如果不指定则默认为推送生产环境
'apns_production' => $production_mode,
// big_push_duration: 表示定速推送时长(分钟),又名缓慢推送,把原本尽可能快的推送速度,降低下来,
// 给定的 n 分钟内,均匀地向这次推送的目标用户推送。最大值为1400.未设置则不是定速推送
// 这里设置为 1 仅作为示例
// 'big_push_duration' => 1
))
->send();
print_r($response);
} catch (\JPush\Exceptions\APIConnectionException $e) {
// try something here
print $e;
} catch (\JPush\Exceptions\APIRequestException $e) {
// try something here
print $e;
}
}
}三、调用NotifyPush.php里的方法,实现推送,如下代码:
class CronNotifyPushCommand extends  CConsoleCommand{
    public $keys=array();
    public function init(){
        parent::init();
    }

    public function actionIndex(){
        echo 'start CronNotifyPushCommand '.chr(10);
        if(!Yii::app()->params['push']['push_status']){
            echo 'push status disabled';die();
        }
        $rkey='message_notify_list';
        $waitTotals=Fredis::model()->redis->lsize($rkey);
        echo 'wait totals:'.$waitTotals.chr(10);
        $waitResult=true;
        $i=0;
        while($waitResult) {$i++;
            echo $i.'/'.$waitTotals.' wait to do'.chr(10);
            $waitResult=Fredis::model()->redis->rpop($rkey);
            if(!$waitResult) {
                continue;
            }
            $db_data=unserialize($waitResult);var_dump($db_data);
            $message_content=$db_data['message_content'];
            $uid=$db_data['uid'];
            $alias=$uid;
            if($uid==0){
                NotifyPush::pushAll($message_content, $message_content);
            }else {
                NotifyPush::pushAlias($alias, $message_content, $message_content);
            }
        }

        echo 'end'.chr(10);
    }
}
相关教程:PHP视频教程
Atas ialah kandungan terperinci Yii1.1框架模拟PHP极光推送消息通知. Untuk maklumat lanjut, sila ikut artikel berkaitan lain di laman web China PHP!
 Data apa yang boleh disimpan dalam sesi PHP?May 02, 2025 am 12:17 AM
Phpsessionscanstorestrings, nombor, tatasusunan, andobjects.1.strings: textdatalikeusernames.2.numbers: integersorfloatsforcounters.3.Arrays: ListsLikeshoppingCarts.4.Objects: complextructureSturesthatareserialized.
 Bagaimana anda memulakan sesi PHP?May 02, 2025 am 12:16 AM
Tostartaphpsession, usesession_start () atthescript'sbeginning.1) placeitbeforeanyoutputtosetthesessioncookie.2) usesessionsforusererdatalikeloginstatusorshoppingcarts.3)
 Apakah regenerasi sesi, dan bagaimanakah ia meningkatkan keselamatan?May 02, 2025 am 12:15 AM
Penjanaan semula sesi merujuk kepada menjana ID sesi baru dan membatalkan ID lama apabila pengguna melakukan operasi sensitif dalam kes serangan tetap sesi. Langkah-langkah pelaksanaan termasuk: 1. Mengesan Operasi Sensitif, 2. Menjana ID Sesi Baru, 3. Memusnahkan ID Sesi Lama, 4. Kemas kini maklumat sesi pengguna.
 Apakah beberapa pertimbangan prestasi semasa menggunakan sesi PHP?May 02, 2025 am 12:11 AM
Sesi PHP mempunyai kesan yang signifikan terhadap prestasi aplikasi. Kaedah pengoptimuman termasuk: 1. Gunakan pangkalan data untuk menyimpan data sesi untuk meningkatkan kelajuan tindak balas; 2. Mengurangkan penggunaan data sesi dan hanya menyimpan maklumat yang diperlukan; 3. Gunakan pemproses sesi yang tidak menyekat untuk meningkatkan keupayaan konkurensi; 4. Laraskan masa tamat tempoh sesi untuk mengimbangi pengalaman pengguna dan beban pelayan; 5. Gunakan sesi berterusan untuk mengurangkan bilangan data membaca dan menulis masa.
 Bagaimana sesi PHP berbeza dari kuki?May 02, 2025 am 12:03 AM
Phpsessionsareserver-side, whilecookiesareclient-side.1) Sessionsstoredataontheserver, aremoresecure, andhandlelargerdata.2) cookiesstoredataontheclient, arelesssecure, andlimiteShorsionsforsionsforsionsforsionsforsionsforsionsforsionsforsionsforsionsforsionsforsionsforsionsforsionsforsionsforsionsforsionsforsionsforsionsforsionsforsionsforsionsforsionsforsionsforsions
 Bagaimanakah PHP mengenal pasti sesi pengguna?May 01, 2025 am 12:23 AM
Phpidentifierauser'sSessionusingSessionCookiesandSessionIds.1) whensession_start () ISCALLED, phpGeneratesAuniquesessionIdstoredinacookienamedPhpsessidontheUserer'sBrowser.2) ThisIdallowsPhptoretRievesSessionDataFromtheserver.
 Apakah beberapa amalan terbaik untuk mendapatkan sesi PHP?May 01, 2025 am 12:22 AM
Keselamatan sesi PHP boleh dicapai melalui langkah -langkah berikut: 1. Gunakan session_regenerate_id () untuk menjana semula ID sesi apabila pengguna log masuk atau merupakan operasi penting. 2. Sulitkan ID sesi penghantaran melalui protokol HTTPS. 3. Gunakan session_save_path () untuk menentukan direktori selamat untuk menyimpan data sesi dan menetapkan kebenaran dengan betul.
 Di manakah fail sesi php disimpan secara lalai?May 01, 2025 am 12:15 AM
PhpsessionFileSarestoredIntHedirectorySpecifiedBySession.save_path, biasanya/tmponunix-likesystemsorc: \ windows \ temponwindows.tocustomethis: 1) usession_save_path ()


Alat AI Hot

Undresser.AI Undress
Apl berkuasa AI untuk mencipta foto bogel yang realistik

AI Clothes Remover
Alat AI dalam talian untuk mengeluarkan pakaian daripada foto.

Undress AI Tool
Gambar buka pakaian secara percuma

Clothoff.io
Penyingkiran pakaian AI

Video Face Swap
Tukar muka dalam mana-mana video dengan mudah menggunakan alat tukar muka AI percuma kami!

Artikel Panas

Alat panas

Versi Mac WebStorm
Alat pembangunan JavaScript yang berguna

SublimeText3 versi Inggeris
Disyorkan: Versi Win, menyokong gesaan kod!

EditPlus versi Cina retak
Saiz kecil, penyerlahan sintaks, tidak menyokong fungsi gesaan kod

ZendStudio 13.5.1 Mac
Persekitaran pembangunan bersepadu PHP yang berkuasa

Muat turun versi mac editor Atom
Editor sumber terbuka yang paling popular


