Rumah >hujung hadapan web >tutorial css >如何使用纯CSS实现大白的形象(附源码)
如何使用纯CSS实现大白的形象(附源码)
- 不言ke hadapan
- 2018-10-08 16:53:053134semak imbas
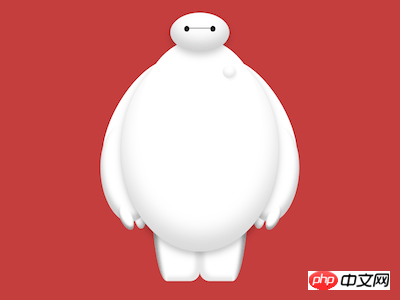
本篇文章给大家带来的内容是关于如何使用纯CSS实现大白的形象(附源码),有一定的参考价值,有需要的朋友可以参考一下,希望对你有所帮助。
效果预览

源代码下载
https://github.com/comehope/front-end-daily-challenges
代码解读
整个人物分为 3 部分:头、身体、腿,下面按照这个顺序分别画出,先画头部。
定义 dom,容器 .baymax 表示大白,head 表示头部:
<div class="baymax">
    <div class="head">
        <div class="eyes"></div>
    </div>
</div>
居中显示:
body {
    margin: 0;
    height: 100vh;
    display: flex;
    align-items: center;
    justify-content: center;
    background-color: rgba(176, 0, 0, 0.75);
}
定义容器尺寸和子元素对齐方式:
.baymax {
    width: 30em;
    height: 41em;
    font-size: 10px;
    display: flex;
    justify-content: center;
    position: relative;
}
画出头部轮廓:
.head {
    position: absolute;
    width: 9em;
    height: 6em;
    background-color: white;
    border-radius: 50%;
    box-shadow:
        inset 0 -1.5em 3em rgba(0, 0, 0, 0.2),
        0 0.5em 1.5em rgba(0, 0, 0, 0.2);
}
画出双眼中间的线条:
.head .eyes {
    position: absolute;
    width: 4.8em;
    height: 0.1em;
    background-color: #222;
    top: 2.3em;
    left: calc((9em - 4.8em) / 2);
}
画出双眼:
.head .eyes::before,
.head .eyes::after {
    content: '';
    position: absolute;
    width: 0.8em;
    height: 0.9em;
    background-color: #222;
    border-radius: 50%;
    top: -0.3em;
}

.head .eyes::after {
    right: 0;
}
接下来画身体。
html 文件中增加身体的 dom 元素:
<div class="baymax">
    <div class="head">
        <!-- 略 -->
    </div>
    <div class="body">
        <div class="chest">
            <span class="button"></span>
        </div>
        <div class="belly"></div>
        <div class="left arm">
            <div class="fingers"></div>
        </div>
        <div class="right arm">
            <div class="fingers"></div>
        </div>
    </div>
</div>
定义身体的宽度:
.body {
    position: absolute;
    width: inherit;
}
画出胸部:
.body .chest {
    position: absolute;
    width: 19em;
    height: 26em;
    background-color: white;
    top: 4em;
    left: calc((100% - 19em) / 2);
    border-radius: 50%;
    z-index: -1;
}
画出胸前的按钮:
.body .chest .button {
    position: absolute;
    width: 2em;
    height: 2em;
    background-color: white;
    border-radius: 50%;
    top: 4em;
    right: 4em;
    box-shadow:
        inset 0 -0.5em 0.8em rgba(0, 0, 0, 0.15),
        0.2em 0.3em 0.2em rgba(0, 0, 0, 0.05);
    filter: opacity(0.75);
}
画出肚皮:
.body .belly {
    position: absolute;
    width: 24em;
    height: 31em;
    background-color: white;
    top: 5.5em;
    left: calc((100% - 24em) / 2);
    border-radius: 50%;
    z-index: -2;
    box-shadow:
        inset 0 -2.5em 4em rgba(0, 0, 0, 0.15),
        0 0.5em 1.5em rgba(0, 0, 0, 0.25);
}
定义胳膊的高度起点:
.body .arm {
    position: absolute;
    top: 7.5em;
}
胳膊分为肘以上的部分和肘以下的部分。
先设计这两段的共有属性:
.body .arm::before,
.body .arm::after {
    content: '';
    position: absolute;
    background-color: white;
    border-radius: 50%;
    transform-origin: top;
    z-index: -3;
}
再用伪元素分别画出这两部分:
.body .arm::before {
    width: 9em;
    height: 20em;
    left: 7em;
    transform: rotate(30deg);
}

.body .arm::after {
    width: 8em;
    height: 15em;
    left: -0.8em;
    top: 9.5em;
    transform: rotate(-5deg);
    box-shadow: inset 0.4em -1em 1em rgba(0, 0, 0, 0.2);
}
定义两根手指的共有属性:
.body .arm .fingers::before,
.body .arm .fingers::after {
    content: '';
    position: absolute;
    width: 1.8em;
    height: 4em;
    background-color: white;
    border-radius: 50%;
    transform-origin: top;
}
用伪元素分别画出两根手指:
.body .arm .fingers::before {
    top: 22em;
    left: 2em;
    transform: rotate(-25deg);
    box-shadow: inset 0.2em -0.4em 0.4em rgba(0, 0, 0, 0.4);
}

.body .arm .fingers::after {
    top: 21.5em;
    left: 4.8em;
    transform: rotate(-5deg);
    box-shadow: inset -0.2em -0.4em 0.8em rgba(0, 0, 0, 0.3);
    z-index: -3;
}
至此,完成了右胳膊。把右胳膊复制并水平翻转,即可得到左胳膊:
.body .arm.left {
    transform: scaleX(-1);
    right: 0;
    z-index: -3;
}
接下来画腿部。
在 html 文件中增加腿的 dom 元素:
<div class="baymax">
    <div class="head">
        <!-- 略 -->
    </div>
    <div class="body">
        <!-- 略 -->
    </div>
    <div class="left leg"></div>
    <div class="right leg"></div>
</div>
画出腿的内侧:
.leg {
    position: absolute;
    width: 5em;
    height: 16em;
    bottom: 0;
    background-color: white;
    border-bottom-right-radius: 1.5em;
    left: 10em;
    box-shadow: inset -0.7em -0.6em 0.7em rgba(0, 0, 0, 0.1);
    z-index: -3;
}
画出腿的外侧:
.leg::before {
    content: '';
    position: absolute;
    width: 2.5em;
    height: inherit;
    background-color: white;
    border-bottom-left-radius: 100%;
    left: -2.5em;
    box-shadow: inset 0.7em 1.5em 0.7em rgba(0, 0, 0, 0.4);
}
至此,完成了右腿。把右腿复制并水平翻转,即可得到左腿:
.leg.left {
    transform-origin: right;
    transform: scaleX(-1);
}
大功告成!
Atas ialah kandungan terperinci 如何使用纯CSS实现大白的形象(附源码). Untuk maklumat lanjut, sila ikut artikel berkaitan lain di laman web China PHP!
Kenyataan:
Artikel ini dikembalikan pada:segmentfault.com. Jika ada pelanggaran, sila hubungi admin@php.cn Padam
Artikel sebelumnya:如何使用CSS和D3实现一个舞动的画面(附源码)Artikel seterusnya:css如何添加删除线?css text-decoration属性设置删除线(代码实例)

