Rumah >hujung hadapan web >tutorial css >如何使用CSS的Grid布局实现小鸡邮票(附代码)
如何使用CSS的Grid布局实现小鸡邮票(附代码)
- 不言asal
- 2018-09-25 17:20:461725semak imbas
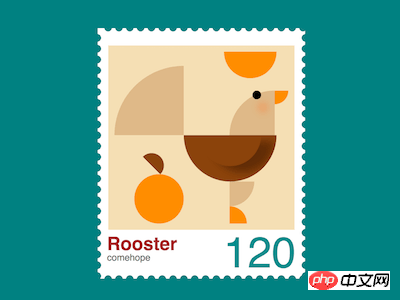
本篇文章给大家带来的内容是关于如何使用CSS的Grid布局实现小鸡邮票(附代码),有一定的参考价值,有需要的朋友可以参考一下,希望对你有所帮助。
效果预览

源代码下载
https://github.com/comehope/front-end-daily-challenges
代码解读
定义 dom,容器表示邮票:
<div class="stamp">
</div>
居中显示:
body {
    margin: 0;
    height: 100vh;
    display: flex;
    align-items: center;
    justify-content: center;
    background-color: teal;
}
设置容器尺寸:
.stamp {
    position: relative;
    width: 57em;
    height: 71em;
    font-size: 5px;
    padding: 5em;
    background-color: white;
}
用重复背景绘制出邮票的齿孔:
.stamp {
    display: flex;
    flex-direction: column;
    align-items: center;
    justify-content: center;
}

.stamp::after,
.stamp::before {
    content: '';
    width: 100%;
    height: 100%;
    position: absolute;
    background:
        radial-gradient(circle, teal 50%, transparent 50%),
        radial-gradient(circle, teal 50%, transparent 50%);
    background-size: 3.5em 3.5em;
}

.stamp::before {
    top: 1.5em;
    background-repeat: repeat-y;
    background-position: -3% 0, 103% 0;
}

.stamp::after {
    left: 1.5em;
    background-repeat: repeat-x;
    background-position: 0 -2.5%, 0 102.5%;
}
在 html 文件中增加小鸡的 dom 元素,子元素分别表示头部、喙、身体、尾巴、腿、爪子、太阳、桔子:
<div class="stamp">
    <div class="rooster">
        <span class="head"></span>
        <span class="beak"></span>
        <span class="body"></span>
        <span class="tail"></span>
        <span class="leg"></span>
        <span class="foot"></span>
        <span class="sun"></span>
        <span class="orange-stuff"></span>
    </div>
</div>
设置 grid 布局的行列尺寸:
.rooster {
    display: grid;
    grid-template-columns: 22.5em 13em 1.75em 14.5em 4.5em;
    grid-template-rows: 12.5em 14.5em 15em 8em 5.5em;
    background-color: wheat;
    padding: 2em;
    margin-top: -2em;
}
画出扇形的头部:
.head {
    grid-column: 4;
    grid-row: 2;
    background-color: burlywood;
    border-top-left-radius: 100%;
}
画出小鸡的眼睛和脸上的红晕:
.head {
    position: relative;
}

.head::after {
    content: '';
    position: absolute;
    width: 2.8em;
    height: 2.8em;
    border-radius: 50%;
    background-color: black;
    right: 30%;
    box-shadow: 2em 4em 4em rgba(255, 100, 0, 0.5);
}
画出扇形的喙:
.beak {
    grid-column: 5;
    grid-row: 2;
    height: 4.5em;
    background-color: darkorange;
    border-bottom-right-radius: 100%;
}
画出半圆形的身体:
.body {
    grid-column: 2 / 5;
    grid-row: 3;
    width: 30em;
    background-color: saddlebrown;
    border-radius: 0 0 15em 15em;
}
用伪元素,通过阴影画出翅膀:
.body {
    position: relative;
    overflow: hidden;
}

.body::after {
    content: '';
    position: absolute;
    width: 20em;
    height: 10em;
    border-radius: inherit;
    box-shadow: 4em 2em 4em rgba(0, 0, 0, 0.3);
    left: calc((30em - 20em) / 2);
}
画出扇形的尾巴:
.tail {
    grid-column: 1;
    grid-row: 1 / 3;
    height: 22.5em;
    background-color: burlywood;
    align-self: end;
    border-top-left-radius: 100%;
}
画出扇形的腿:
.leg {
    grid-column: 4;
    grid-row: 4;
    width: 8em;
    background-color: burlywood;
    border-bottom-right-radius: 100%;
}
画出扇形的小爪子:
.foot {
    grid-column: 4;
    grid-row: 5;
    width: 5.5em;
    background-color: darkorange;
    border-top-right-radius: 100%;
}
画出半圆形的太阳:
.sun {
    grid-column: 3 / 5;
    grid-row: 1;
    width: 17em;
    --h: calc(17em / 2);
    height: var(--h);
    background-color: darkorange;
    border-radius: 0 0 var(--h) var(--h);
}
画出圆形的桔子和半圆形的叶片,注意此处叶片的画法与前面画半圆形的画法不同:
.orange-stuff {
    grid-column: 1;
    grid-row: 3 / 6;
    width: 16em;
    height: 16em;
    background-color: darkorange;
    align-self: end;
    justify-self: end;
    border-radius: 50%;
    position: relative;
}

.orange-stuff::before {
    content: '';
    position: absolute;
    width: 8em;
    height: 8em;
    background: linear-gradient(45deg, transparent 50%, saddlebrown 50%);
    border-radius: 50%;
    top: -6.8em;
    left: 10%;
}
在 dom 中再增加一些文本,包括标题、作者和面值:
<div class="stamp">
    <div class="puppy">
        <!-- 略 -->
    </div>
    <p class="text">
        <span class="title">Rooster</span>
        <span class="author">comehope</span>
        <span class="face-value">120</span>
    </p>
</div>
设置标题的文字样式:
.text {
    position: relative;
    width: calc(100% + 2em * 2);
    height: 6em;
    font-family: sans-serif;
}

.text .title {
    position: absolute;
    font-size: 6em;
    font-weight: bold;
    color: brown;
}
设置作者的文字样式:
.text .author {
    position: absolute;
    font-size: 3em;
    bottom: -1.2em;
    color: dimgray;
}
设置面值的文字样式:
.text .face-value {
    position: absolute;
    font-size: 14em;
    right: 0;
    line-height: 0.9em;
    color: darkcyan;
}
大功告成!
Atas ialah kandungan terperinci 如何使用CSS的Grid布局实现小鸡邮票(附代码). Untuk maklumat lanjut, sila ikut artikel berkaitan lain di laman web China PHP!
Kenyataan:
Kandungan artikel ini disumbangkan secara sukarela oleh netizen, dan hak cipta adalah milik pengarang asal. Laman web ini tidak memikul tanggungjawab undang-undang yang sepadan. Jika anda menemui sebarang kandungan yang disyaki plagiarisme atau pelanggaran, sila hubungi admin@php.cn
Artikel sebelumnya:如何使用css3新增属性content?content属性的使用(代码实例)Artikel seterusnya:如何使用CSS的Grid布局实现小松鼠邮票的效果(附源码)

