Rumah >hujung hadapan web >tutorial js >Diff算法的分析:利用React渲染流程分析
Diff算法的分析:利用React渲染流程分析
- 不言asal
- 2018-09-08 15:53:431429semak imbas
本篇文章给大家带来的内容是关于Diff算法的分析:利用React渲染流程分析,有一定的参考价值,有需要的朋友可以参考一下,希望对你有所帮助。
1、什么是虚拟DOM
在React中,render执行的结果得到的并不是真正的DOM节点,结果仅仅是轻量级的JavaScript对象,我们称之为virtual DOM。
简单的说,其实所谓的virtual DOM就是JavaScript对象到Html DOM节点的映射;即使用JavaScript对象将Html结构表示出来,而这个对象就是virtual DOM。
Html:
<ul id='list'> <li class='item'>Item 1</li> <li class='item'>Item 2</li> </ul>
JavaScript对象表示(virtual DOM)
{
  tagName: 'ul',
  props: {
    id: 'list'
  },
  children: [
    {tagName: 'li', props: {class: 'item'}, children: ["Item 1"]},
    {tagName: 'li', props: {class: 'item'}, children: ["Item 2"]},
  ]
}
2、什么时候会生成到virtual DOM
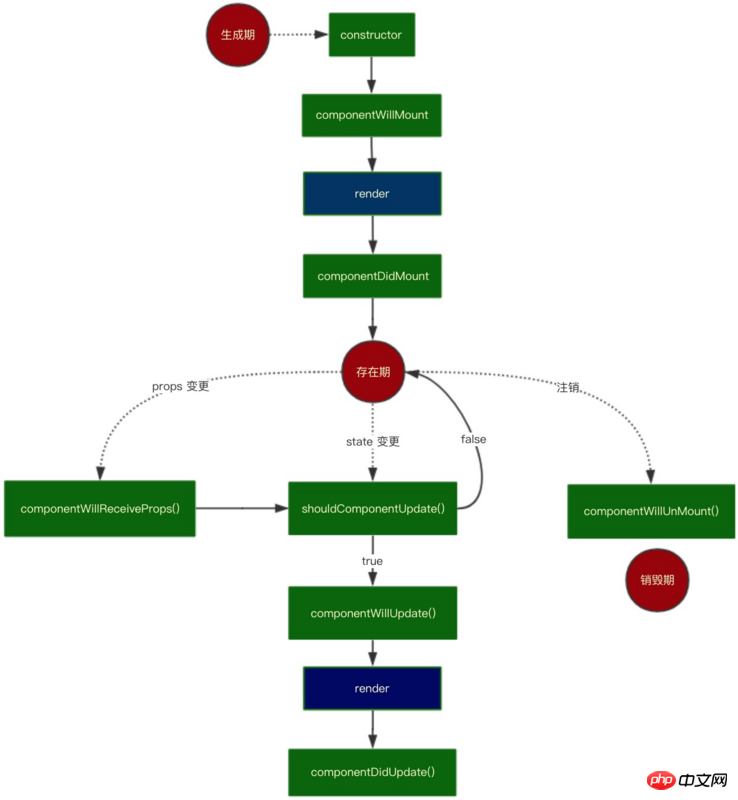
React生命周期拥有装载、更新、卸载的三个阶段;附上一张React生命周期图

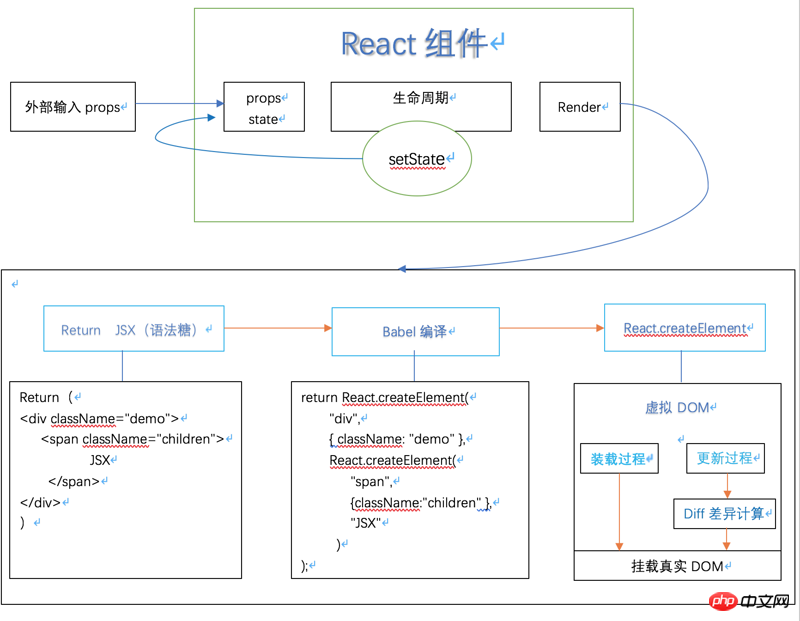
前面提到:render执行的结果得到的并不是真正的DOM节点,结果仅仅是轻量级的JavaScript对象,即在render函数调用时将会创建出虚拟DOM;
class Tab extends React.Component {
    render() {
        React.createElement(
          'p',
          { className: 'class'},
          'Hello React'
        )
    }
}

通过React.createElemen创建出虚拟DOM,而该函数只在Render函数中调用,所以在React装载和更新的过程中才会有虚拟DOM的生成;至于挂载到真实DOM自然而然是ReactDom.render函数啦。
3、virtual DOM如何实现
实现其实很简单,主要是定义一个函数并把我们传进去的参数组成一个React元素对象,而type就是我们传进去的组件类型,可以是一个类、函数或字符串(如'p')
React大致源码:
function createElement(type, config, children) {
  let propName;

  const props = {};

  let key = null;
  let ref = null;
  let self = null;
  let source = null;

  if (config != null) {
    if (hasValidRef(config)) {
      //  如果有ref,将它取出来
      ref = config.ref;
    }
    if (hasValidKey(config)) {
      //  如果有key,将它取出来
      key = '' + config.key;
    }

    self = config.__self === undefined ? null : config.__self;
    source = config.__source === undefined ? null : config.__source;

    for (propName in config) {
      if (
        hasOwnProperty.call(config, propName) &&
        !RESERVED_PROPS.hasOwnProperty(propName)
      ) {
        //  将除ref,key等这些特殊的属性放到新的props对象里
        props[propName] = config[propName];
      }
    }
  }

  //  获取子元素
  const childrenLength = arguments.length - 2;
  if (childrenLength === 1) {
    props.children = children;
  } else if (childrenLength > 1) {
    const childArray = Array(childrenLength);
    for (let i = 0; i < childrenLength; i++) {
      childArray[i] = arguments[i + 2];
    }
    props.children = childArray;
  }

  //  添加默认props
  if (type && type.defaultProps) {
    const defaultProps = type.defaultProps;
    for (propName in defaultProps) {
      if (props[propName] === undefined) {
        props[propName] = defaultProps[propName];
      }
    }
  }

  return ReactElement(
    type,
    key,
    ref,
    self,
    source,
    ReactCurrentOwner.current,
    props,
  );
}

const ReactElement = function(type, key, ref, self, source, owner, props) {
  //  最终得到的React元素
  const element = {
    // This tag allows us to uniquely identify this as a React Element
    $$typeof: REACT_ELEMENT_TYPE,

    // Built-in properties that belong on the element
    type: type,
    key: key,
    ref: ref,
    props: props,

    // Record the component responsible for creating this element.
    _owner: owner,
  };

  return element;
};
打印出组件:

4、为什么需要使用virtual DOM
DOM管理历史阶段:
JS 或者 jQuery 操作 DOM: 当应用程序越来越复杂,需要在JS里面维护的字段也越来越多,需要监听事件和在事件回调用更新页面的DOM操作也越来越多,应用程序会变得非常难维护。
后来产出 MVC、MVP 的架构模式,期望从代码组织方式来降低维护难度。但是 MVC 架构并没办法减少维护的状态,也没有降低状态更新时需要对页面的更新操作,你需要操作的DOM还是需要操作,只是换了个地方。
既然状态改变了要操作相应的DOM元素,为什么不做一个东西让视图和状态进行绑定,状态变更了视图自动变更。这就是后来人们想出了 MVVM 模式,只要在模版中声明视图组件是和什么状态进行绑定的,双向绑定引擎就会在状态更新的时候自动更新视图;
但MVVM双向数据绑定并不是唯一的办法,还有一个非常直观的方法:一旦状态发生了变化,就用模版引擎重新渲染整个视图,然后用新的视图更换掉旧的视图。
React采用的就是第四种模式;但是我们都知道对于操作DOM成本太高,而相对操作JavaScript就快速多了,而Html DOM可以很简单的用JavaScript对象表示出来(Virtual DOM就这样诞生了)
这样的做法会导致很多的问题,最大的问题就是这样做会很慢,因为即使一个小小的状态变更都要重新构造整棵 DOM,性价比太低;而React Virtual DOM在状态更新过程加了一些特别的操作来避免整棵 DOM 树变更。
相关推荐:
Atas ialah kandungan terperinci Diff算法的分析:利用React渲染流程分析. Untuk maklumat lanjut, sila ikut artikel berkaitan lain di laman web China PHP!

