目录
1. 基本思路
2. 代码结构如下:
3. index目录
4. control目录
5. 工程全局控制
主要练习了一下微信小程序的开发。这里简单记录一下主要代码片段。也是趟过了许多的坑,例如:微信小程序不支持完全全屏,微信小程序不能横屏展示。所以开发过程中也用了一些非常手段。可以说这只是一个很基本的demo,所以里面很多东西,比如摄像头监控ip、页面元素定位我都使用了写死的值。特别是界面,我只是在iPhone 6上面做的实验,所以换到其他手机上时,界面就会变型了。
1. 基本思路
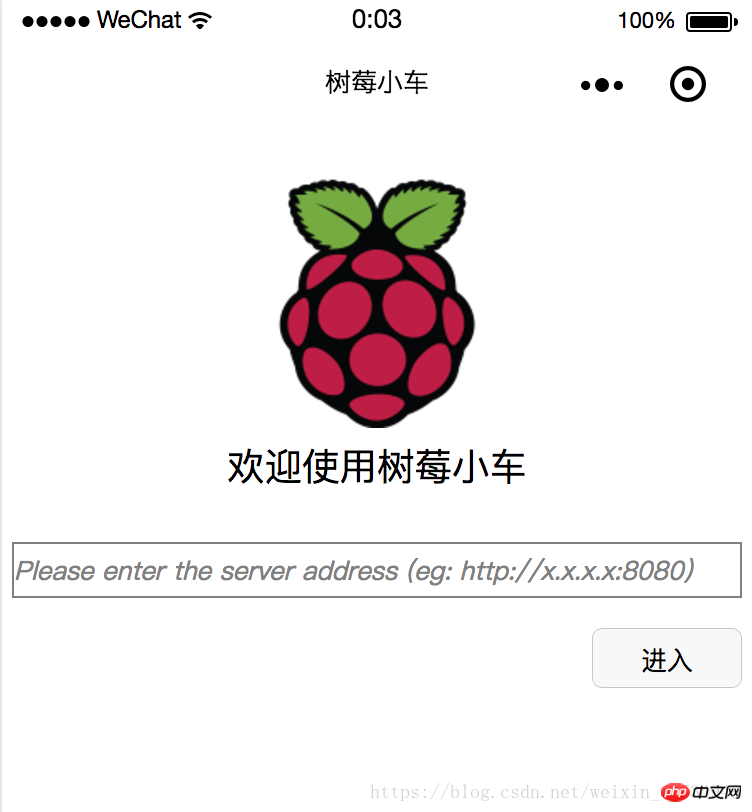
进入小程序时展示index页,可以让用户输入服务端url(模拟上一篇中在浏览器获取get请求)
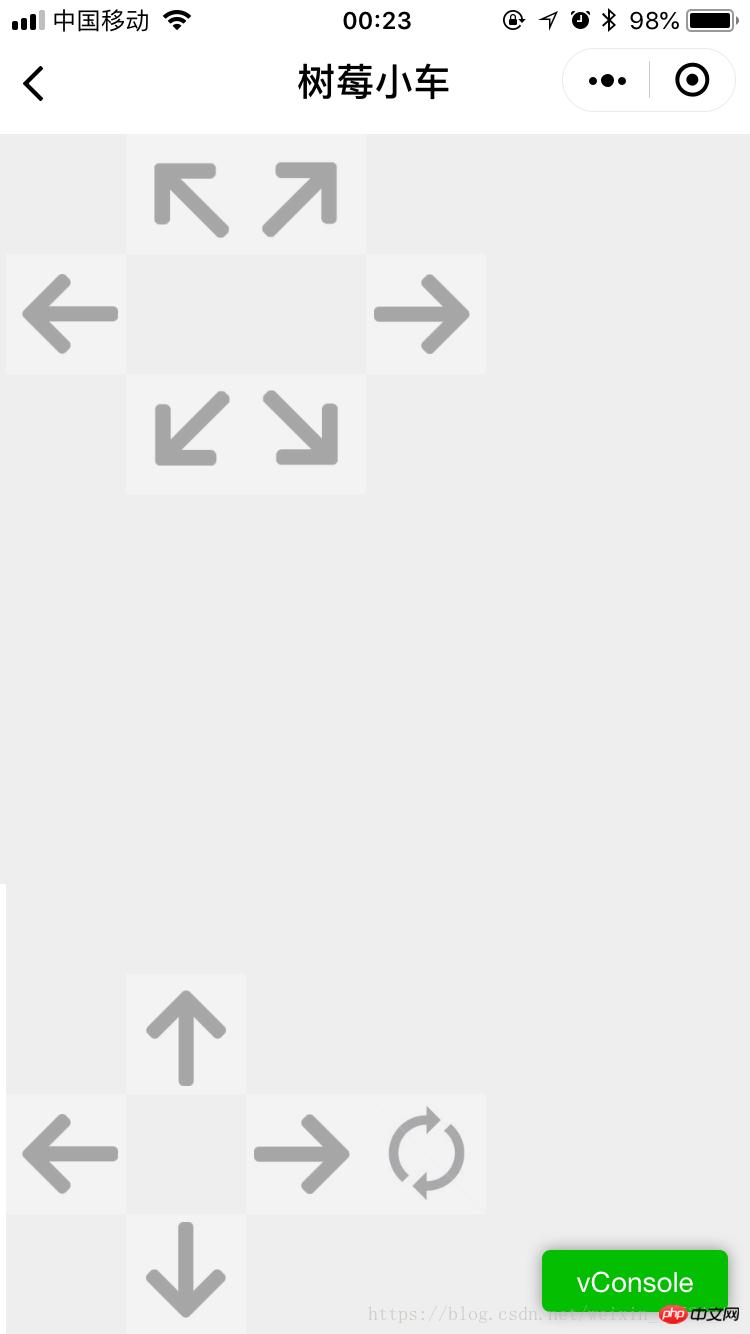
然后跳转到实际的小车控制界面,并可以通过点击按钮实现小车控制
控制小车的移动,主要是在control.js中定义了界面按钮事件的响应,在响应事件的过程中实现http请求的发送
index页面如下:

进去之后的页面如下(其中中间空白处会展示摄像头监控,不过我并没有启动,所以看不见):

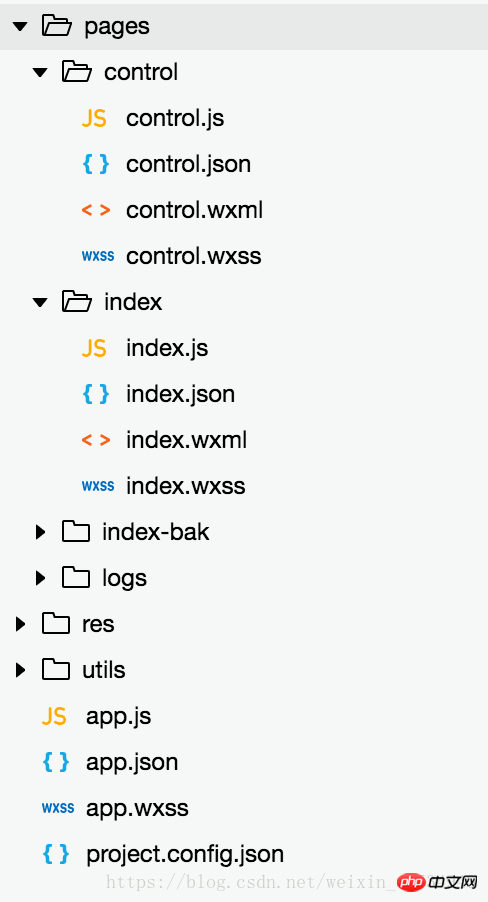
2. 代码结构如下:
其中,index下面是首页,control是控制页面,res目录下存放的是图片资源

3. index目录
index.js
//index.js
//获取应用实例
const app = getApp()

Page({
  data: {
    logo: "/res/rasp-logo.png",
    welcome: "欢迎使用树莓小车",
    enterBtn: "进入",
    PromoteMsg: "Please enter the server address (eg: http://x.x.x.x:8080)",
    reqURL: ""
  },
  // 从输入框中获取用户输入的服务器地址信息
  getURL: function (e) {
    this.setData({
      reqURL: e.detail.value
    })
  },
  enterClicked: function (e) {
    /*
     * 当按下进入按钮,需要做以下事情:
     * 1. 首先判断用户是否已经在输入框中输入完整的服务器地址
     * 2. 发起一个到服务器的GET请求,并分析服务器的响应结果
     * 3. 跳转到小车控制界面
    */
    console.log(this.data.reqURL)

    if (this.data.reqURL == '') {
      wx.showModal({
        title: '提示',
        content: '请先输入正确的服务器地址!',
      })
      return
    }

    // 发起到服务器的GET请求
    wx.request({
      url: this.data.reqURL,
      success: function (res) {
        // 在这里获取POST请求地址,以及视频流地址,然后赋值给全局变量,供control页面调用
        console.log(res.data.match(/url = \"(\S*)\"/)[1])
        console.log(res.data.match(/src=\"(\S*)\"/)[1])
        app.globalData.postURL = res.data.match(/url = \"(\S*)\"/)[1]
        app.globalData.cameraURL = res.data.match(/src=\"(\S*)\"/)[1]

        // 跳转到control页面
        wx.navigateTo({
          url: '/pages/control/control',
        })
      },
      fail: function(res) {
        wx.showModal({
          title: '提示',
          content: '请检查输入的服务器地址!',
        })
      }
    })
  }
})
index.json:无数据,只有一对打括号
index.wxml
<!--index.wxml-->
<view>
<view class="welcome">
<view class="logo">
<image style="width: 250rpx; height: 250rpx" src="{{logo}}"></image>
</view>
<view>
<text class="words">{{welcome}}</text>
</view>
</view>
<input class="requestURL" type="text" placeholder="{{PromoteMsg}}" focus='1' cursor='10' confirm-type="done" bindinput='getURL'></input>
<button class='enter' bindtap='enterClicked'>{{enterBtn}}</button>
</view>index.wxss
/**index.wxss**/
.welcome{
  display: flex;
  margin-top: 50rpx;
  flex-direction: column;
  align-items: center;
  justify-content: space-between;
}

.requestURL{
  margin: 50rpx 10rpx 30rpx 10rpx;
  border: 1px solid gray;
  font-style: italic;
  font-size: small
}

.enter{
  margin-right: 10rpx;
  width: 150rpx;
  height: 60rpx;
  font-size: small
}
4. control目录
control.js
// pages/control/control.js
const app = getApp()

Page({

  /**
   * 页面的初始数据
   */
  data: {
    // Car control images
    "forwardBtn": "/res/forward.png",
    "leftBtn": "/res/left.png",
    "rightBtn": "/res/right.png",
    "backLeftBtn": "/res/back-left.png",
    "backRightBtn": "/res/back-right.png",
    "backBtn": "/res/backward.png",

    // Camera control images
    "upBtn": "/res/forward.png",
    "camLeftBtn": "/res/camLeft.png",
    "camRightBtn": "/res/camRight.png",
    "downBtn": "/res/backward.png",
    "resetBtn": "/res/reset.png"
  },

  carMove: function(event) {
    wx.request({
      url: this.data.postURL,
      data: event.currentTarget.dataset.direction,
      method: "POST",
      success: function(res){

      },
      fail: function(res){

      }
    })
  },

  carStop: function(event) {
    wx.request({
      url: this.data.postURL,
      data: "S",
      method: "POST",
      success: function (res) {

      },
      fail: function (res) {

      }
    })
  },

  camMove: function(event) {
    wx.request({
      url: this.data.postURL,
      data: event.currentTarget.dataset.direction,
      method: "POST",
      success: function (res) {

      },
      fail: function (res) {

      }
    })
  },

  /**
   * 生命周期函数--监听页面加载
   */
  onLoad: function (options) {
    //this.data.cameraURL = app.globalData.cameraURL
    this.setData({
      cameraURL: app.globalData.cameraURL,
      postURL: app.globalData.postURL
    })
    console.log(this.data.cameraURL)
    console.log("post url in control page: " + app.globalData.postURL)
  },

  /**
   * 生命周期函数--监听页面初次渲染完成
   */
  onReady: function () {

  },

  /**
   * 生命周期函数--监听页面显示
   */
  onShow: function () {
    //console.log(wx.getSystemInfoSync().windowWidth)
    //console.log(wx.getSystemInfoSync().windowHeight)
  },

  /**
   * 生命周期函数--监听页面隐藏
   */
  onHide: function () {

  },

  /**
   * 生命周期函数--监听页面卸载
   */
  onUnload: function () {

  },

  /**
   * 页面相关事件处理函数--监听用户下拉动作
   */
  onPullDownRefresh: function () {

  },

  /**
   * 页面上拉触底事件的处理函数
   */
  onReachBottom: function () {

  },

  /**
   * 用户点击右上角分享
   */
  onShareAppMessage: function () {

  }
})
control.json
{
  "navigationBarBackgroundColor": "#ffffff",
  "navigationBarTextStyle": "black",
  "navigationBarTitleText": "树莓小车",
  "backgroundColor": "#eeeeee",
  "backgroundTextStyle": "light",
  "enablePullDownRefresh": false,
  "navigationStyle": "custom",
  "disableScroll": true
}
control.wxml
<!--pages/control/control.wxml-->
<view class='control'>
<!-- This image shows the camera view -->
<image class='cameraView' src='http://192.168.1.104:8080/?action=stream' style="z-index:1"></image>
<!-- The following six images control the car move -->
<image class='button' id='forward' src='{{forwardBtn}}' style="position:absolute;z-index:2" bindtouchstart='carMove' data-direction='F' bindtouchend='carStop'></image>
<image class='button' id='left' src='{{leftBtn}}' style="position:absolute;z-index:2" bindtouchstart='carMove' data-direction='L' bindtouchend='carStop'></image>
<image class='button' id='right' src='{{rightBtn}}' style="position:absolute;z-index:2" bindtouchstart='carMove' data-direction='R' bindtouchend='carStop'></image>
<image class='button' id='backLeft' src='{{backLeftBtn}}' style="position:absolute;z-index:2" bindtouchstart='carMove' data-direction='BL' bindtouchend='carStop'></image>
<image class='button' id='backRight' src='{{backRightBtn}}' style="position:absolute;z-index:2" bindtouchstart='carMove' data-direction='BR' bindtouchend='carStop'></image>
<image class='button' id='back' src='{{backBtn}}' style="position:absolute;z-index:2" bindtouchstart='carMove' data-direction='B' bindtouchend='carStop'></image>
<!-- The following images control the camera move -->
<image class='button' id='up' src='{{upBtn}}' style="position:absolute;z-index:2" bindtouchstart='camMove' data-direction='VU'></image>
<image class='button' id='camLeft' src='{{camLeftBtn}}' style="position:absolute;z-index:2" bindtouchstart='camMove' data-direction='HL'></image>
<image class='button' id='camRight' src='{{camRightBtn}}' style="position:absolute;z-index:2" bindtouchstart='camMove' data-direction='HR'></image>
<image class='button' id='down' src='{{downBtn}}' style="position:absolute;z-index:2" bindtouchstart='camMove' data-direction='VD'></image>
<image class='button' id='reset' src='{{resetBtn}}' style="position:absolute;z-index:2" bindtouchstart='camMove' data-direction='RESET'></image>
</view>control.wxss
/* pages/control/control.wxss */

.control {
  width: 100%;
  height: 100%;
  transform: rotate(90deg);
  background-color: #eee;
  justify-content: center;
}

.cameraView {
  margin-left: 0px;
  width: 603px;
  height: 375px;
  background-color: #eee;
  justify-content: center;
}

.button {
  height: 60px;
  width: 60px;
  opacity: 0.3;
}

#forward {
  left: 60px;
  top: 135px;
}

#left {
  left: 0px;
  top: 195px;
}

#right {
  left: 120px;
  top: 195px;
}

#backLeft {
  left: 0px;
  top: 255px;
}

#backRight {
  left: 120px;
  top: 255px;
}

#back {
  left: 60px;
  top: 315px;
}

#up {
  left: 480px;
  top: 195px;
}

#camLeft {
  left: 420px;
  top: 255px;
}

#camRight {
  left: 540px;
  top: 255px;
}

#down {
  left: 480px;
  top: 315px;
}

#reset{
  left: 480px;
  top: 135px
}
5. 工程全局控制
app.js:实际似乎并没有用到,里面都是工程创建时的默认代码
//app.js
App({
  onLaunch: function () {
    // 展示本地存储能力
    var logs = wx.getStorageSync('logs') || []
    logs.unshift(Date.now())
    wx.setStorageSync('logs', logs)

    // 登录
    wx.login({
      success: res => {
        // 发送 res.code 到后台换取 openId, sessionKey, unionId
      }
    })
    // 获取用户信息
    wx.getSetting({
      success: res => {
        if (res.authSetting['scope.userInfo']) {
          // 已经授权,可以直接调用 getUserInfo 获取头像昵称,不会弹框
          wx.getUserInfo({
            success: res => {
              // 可以将 res 发送给后台解码出 unionId
              this.globalData.userInfo = res.userInfo

              // 由于 getUserInfo 是网络请求,可能会在 Page.onLoad 之后才返回
              // 所以此处加入 callback 以防止这种情况
              if (this.userInfoReadyCallback) {
                this.userInfoReadyCallback(res)
              }
            }
          })
        }
      }
    })
  },
  globalData: {
    userInfo: null,
    postURL: null,
    cameraURL: null
  }
})
app.json:
{
  "pages": [
    "pages/index/index",
    "pages/control/control"
  ],
  "window": {
    "backgroundTextStyle": "light",
    "navigationBarBackgroundColor": "#fff",
    "navigationBarTitleText": "树莓小车",
    "navigationBarTextStyle": "black",
    "showStatusBar": false
  }
}
app.wxss:
/**app.wxss**/
.container {
  height: 100%;
  display: flex;
  flex-direction: column;
  align-items: center;
  justify-content: space-between;
  padding: 200rpx 0;
  box-sizing: border-box;
}
project.control.json:
{
	"description": "项目配置文件。",
	"packOptions": {
		"ignore": []
	},
	"setting": {
		"urlCheck": false,
		"es6": true,
		"postcss": true,
		"minified": true,
		"newFeature": true
	},
	"compileType": "miniprogram",
	"libVersion": "2.0.4",
	"appid": "wx18414b9f85bfc895",
	"projectname": "wechat-control",
	"isGameTourist": false,
	"condition": {
		"search": {
			"current": -1,
			"list": []
		},
		"conversation": {
			"current": -1,
			"list": []
		},
		"game": {
			"currentL": -1,
			"list": []
		},
		"miniprogram": {
			"current": -1,
			"list": []
		}
	}
}
相关推荐:
Atas ialah kandungan terperinci 微信小程序--树莓派(raspberry pi)小车控制的代码流程. Untuk maklumat lanjut, sila ikut artikel berkaitan lain di laman web China PHP!

Alat AI Hot

Undresser.AI Undress
Apl berkuasa AI untuk mencipta foto bogel yang realistik

AI Clothes Remover
Alat AI dalam talian untuk mengeluarkan pakaian daripada foto.

Undress AI Tool
Gambar buka pakaian secara percuma

Clothoff.io
Penyingkiran pakaian AI

Video Face Swap
Tukar muka dalam mana-mana video dengan mudah menggunakan alat tukar muka AI percuma kami!

Artikel Panas

Alat panas

VSCode Windows 64-bit Muat Turun
Editor IDE percuma dan berkuasa yang dilancarkan oleh Microsoft

Muat turun versi mac editor Atom
Editor sumber terbuka yang paling popular

EditPlus versi Cina retak
Saiz kecil, penyerlahan sintaks, tidak menyokong fungsi gesaan kod

Dreamweaver CS6
Alat pembangunan web visual

SublimeText3 versi Inggeris
Disyorkan: Versi Win, menyokong gesaan kod!


