本系列文章在实现一个 (x)react 的同时理顺 React 框架的主干内容(JSX/虚拟DOM/组件/生命周期/diff算法/...)
从 0 到 1 实现 React 系列 —— JSX 和 Virtual DOM
从 0 到 1 实现 React 系列 —— 组件和 state|props
生命周期
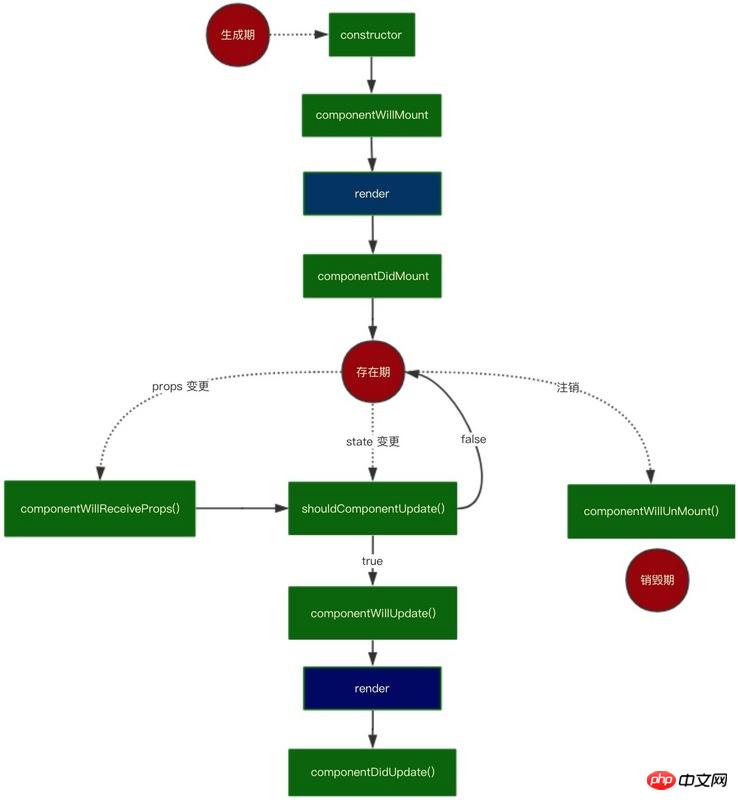
先来回顾 React 的生命周期,用流程图表示如下:

该流程图比较清晰地呈现了 react 的生命周期。其分为 3 个阶段 —— 生成期,存在期,销毁期。
因为生命周期钩子函数存在于自定义组件中,将之前 _render 函数作些调整如下:
// 原来的 _render 函数,为了将职责拆分得更细,将 virtual dom 转为 real dom 的函数单独抽离出来
function vdomToDom(vdom) {
  if (_.isFunction(vdom.nodeName)) {        // 为了更加方便地书写生命周期逻辑,将解析自定义组件逻辑和一般 html 标签的逻辑分离开
    const component = createComponent(vdom) // 构造组件
    setProps(component)                     // 更改组件 props
    renderComponent(component)              // 渲染组件,将 dom 节点赋值到 component
    return component.base                   // 返回真实 dom
  }
  ...
}
我们可以在 setProps 函数内(渲染前)加入 componentWillMount,componentWillReceiveProps 方法,setProps 函数如下:
function setProps(component) {
  if (component && component.componentWillMount) {
    component.componentWillMount()
  } else if (component.base && component.componentWillReceiveProps) {
    component.componentWillReceiveProps(component.props) // 后面待实现
  }
}
而后我们在 renderComponent 函数内加入 componentDidMount、shouldComponentUpdate、componentWillUpdate、componentDidUpdate 方法
function renderComponent(component) {
  if (component.base && component.shouldComponentUpdate) {
    const bool = component.shouldComponentUpdate(component.props, component.state)
    if (!bool && bool !== undefined) {
      return false // shouldComponentUpdate() 返回 false,则生命周期终止
    }
  }
  if (component.base && component.componentWillUpdate) {
    component.componentWillUpdate()
  }

  const rendered = component.render()
  const base = vdomToDom(rendered)

  if (component.base && component.componentDidUpdate) {
    component.componentDidUpdate()
  } else if (component && component.componentDidMount) {
    component.componentDidMount()
  }

  if (component.base && component.base.parentNode) { // setState 进入此逻辑
    component.base.parentNode.replaceChild(base, component.base)
  }

  component.base = base  // 标志符
}
测试生命周期
测试如下用例:
class A extends Component {
componentWillReceiveProps(props) {
console.log('componentWillReceiveProps')
}
render() {
return (
<p>{this.props.count}</p>
)
}
}
class B extends Component {
constructor(props) {
super(props)
this.state = {
count: 1
}
}
componentWillMount() {
console.log('componentWillMount')
}
componentDidMount() {
console.log('componentDidMount')
}
shouldComponentUpdate(nextProps, nextState) {
console.log('shouldComponentUpdate', nextProps, nextState)
return true
}
componentWillUpdate() {
console.log('componentWillUpdate')
}
componentDidUpdate() {
console.log('componentDidUpdate')
}
click() {
this.setState({
count: ++this.state.count
})
}
render() {
console.log('render')
return (
<p>
<button onClick={this.click.bind(this)}>Click Me!</button>
<A count={this.state.count} />
</p>
)
}
}
ReactDOM.render(
<B />,
document.getElementById('root')
)页面加载时输出结果如下:
componentWillMount
render
componentDidMount
点击按钮时输出结果如下:
shouldComponentUpdate
componentWillUpdate
render
componentDidUpdate
diff 的实现
在 react 中,diff 实现的思路是将新老 virtual dom 进行比较,将比较后的 patch(补丁)渲染到页面上,从而实现局部刷新;本文借鉴了 preact 和 simple-react 中的 diff 实现,总体思路是将旧的 dom 节点和新的 virtual dom 节点进行了比较,根据不同的比较类型(文本节点、非文本节点、自定义组件)调用相应的逻辑,从而实现页面的局部渲染。代码总体结构如下:
/**
 * 比较旧的 dom 节点和新的 virtual dom 节点:
 * @param {*} oldDom  旧的 dom 节点
 * @param {*} newVdom 新的 virtual dom 节点
 */
function diff(oldDom, newVdom) {
  ...
  if (_.isString(newVdom)) {
    return diffTextDom(oldDom, newVdom)   // 对比文本 dom 节点
  }

  if (oldDom.nodeName.toLowerCase() !== newVdom.nodeName) {
    diffNotTextDom(oldDom, newVdom)       // 对比非文本 dom 节点
  }

  if (_.isFunction(newVdom.nodeName)) {
    return diffComponent(oldDom, newVdom) // 对比自定义组件
  }

  diffAttribute(oldDom, newVdom)          // 对比属性

  if (newVdom.children.length > 0) {
    diffChild(oldDom, newVdom)            // 遍历对比子节点
  }

  return oldDom
}
下面根据不同比较类型实现相应逻辑。
对比文本节点
首先进行较为简单的文本节点的比较,代码如下:
// 对比文本节点
function diffTextDom(oldDom, newVdom) {
  let dom = oldDom
  if (oldDom && oldDom.nodeType === 3) {  // 如果老节点是文本节点
    if (oldDom.textContent !== newVdom) { // 这里一个细节:textContent/innerHTML/innerText 的区别
      oldDom.textContent = newVdom
    }
  } else {                                // 如果旧 dom 元素不为文本节点
    dom = document.createTextNode(newVdom)
    if (oldDom && oldDom.parentNode) {
      oldDom.parentNode.replaceChild(dom, oldDom)
    }
  }
  return dom
}
对比非文本节点
对比非文本节点,其思路为将同层级的旧节点替换为新节点,代码如下:
// 对比非文本节点
function diffNotTextDom(oldDom, newVdom) {
  const newDom = document.createElement(newVdom.nodeName);
  [...oldDom.childNodes].map(newDom.appendChild) // 将旧节点下的元素添加到新节点下
  if (oldDom && oldDom.parentNode) {
    oldDom.parentNode.replaceChild(oldDom, newDom)
  }
}
对比自定义组件
对比自定义组件的思路为:如果新老组件不同,则直接将新组件替换老组件;如果新老组件相同,则将新组件的 props 赋到老组件上,然后再对获得新 props 前后的老组件做 diff 比较。代码如下:
// 对比自定义组件
function diffComponent(oldDom, newVdom) {
  if (oldDom._component && (oldDom._component.constructor !== newVdom.nodeName)) { // 如果新老组件不同,则直接将新组件替换老组件
    const newDom = vdomToDom(newVdom)
    oldDom._component.parentNode.insertBefore(newDom, oldDom._component)
    oldDom._component.parentNode.removeChild(oldDom._component)
  } else {
    setProps(oldDom._component, newVdom.attributes) // 如果新老组件相同,则将新组件的 props 赋到老组件上
    renderComponent(oldDom._component)              // 对获得新 props 前后的老组件做 diff 比较(renderComponent 中调用了 diff)
  }
}
遍历对比子节点
遍历对比子节点的策略有两个:一是只比较同层级的节点,二是给节点加上 key 属性。它们的目的都是降低空间复杂度。代码如下:
// 对比子节点
function diffChild(oldDom, newVdom) {
  const keyed = {}
  const children = []
  const oldChildNodes = oldDom.childNodes
  for (let i = 0; i < oldChildNodes.length; i++) {
    if (oldChildNodes[i].key) { // 将含有 key 的节点存进对象 keyed
      keyed[oldChildNodes[i].key] = oldChildNodes[i]
    } else {                    // 将不含有 key 的节点存进数组 children
      children.push(oldChildNodes[i])
    }
  }

  const newChildNodes = newVdom.children
  let child
  for (let i = 0; i < newChildNodes.length; i++) {
    if (keyed[newChildNodes[i].key]) {  // 对应上面存在 key 的情形
      child = keyed[newChildNodes[i].key]
      keyed[newChildNodes[i].key] = undefined
    } else {                            // 对应上面不存在 key 的情形
      for (let j = 0; j < children.length; j++) {
        if (isSameNodeType(children[i], newChildNodes[i])) { // 如果不存在 key,则优先找到节点类型相同的元素
          child = children[i]
          children[i] = undefined
          break
        }
      }
    }
    diff(child, newChildNodes[i]) // 递归比较
  }
}
测试
在生命周期的小节中,componentWillReceiveProps 方法还未跑通,稍加修改 setProps 函数即可:
/**
 * 更改属性,componentWillMount 和 componentWillReceiveProps 方法
 */
function setProps(component, attributes) {
  if (attributes) {
    component.props = attributes // 这段逻辑对应上文自定义组件比较中新老组件相同时 setProps 的逻辑
  }

  if (component && component.base && component.componentWillReceiveProps) {
    component.componentWillReceiveProps(component.props)
  } else if (component && component.componentWillMount) {
    component.componentWillMount()
  }
}
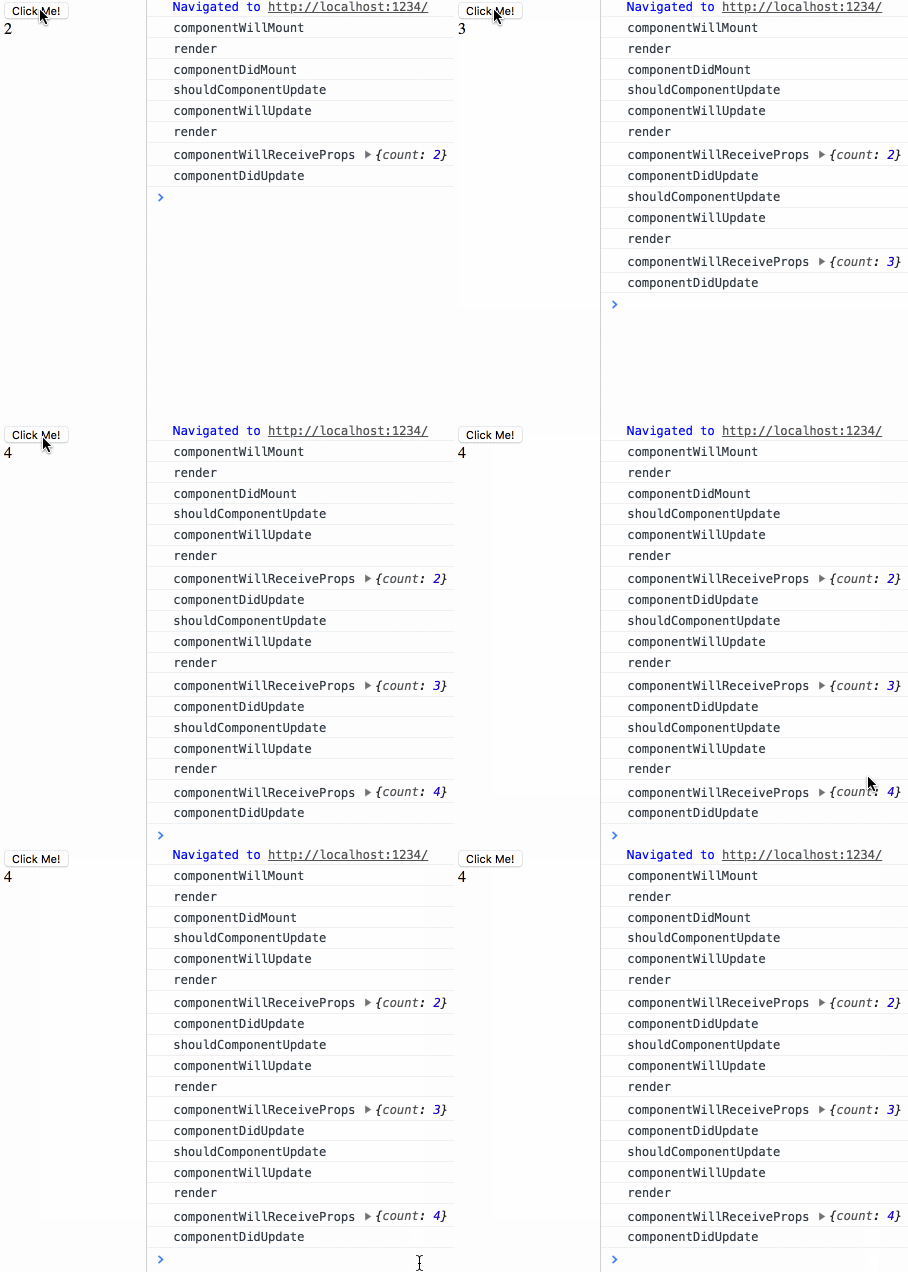
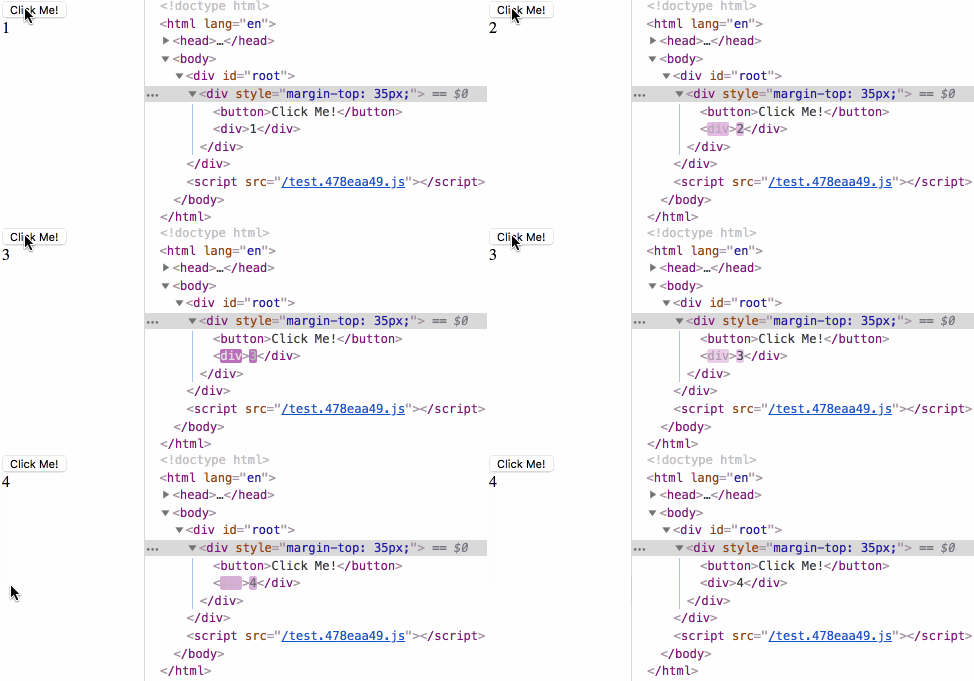
来测试下生命周期小节中最后的测试用例:
生命周期测试

diff 测试

项目地址,关于如何 pr
相关文章:
相关视频:
Atas ialah kandungan terperinci 从 0 到 1 实现 React 系列:生命周期和diff 的实现. Untuk maklumat lanjut, sila ikut artikel berkaitan lain di laman web China PHP!
 C dan JavaScript: Sambungan dijelaskanApr 23, 2025 am 12:07 AM
C dan JavaScript mencapai interoperabilitas melalui webassembly. 1) Kod C disusun ke dalam modul WebAssembly dan diperkenalkan ke dalam persekitaran JavaScript untuk meningkatkan kuasa pengkomputeran. 2) Dalam pembangunan permainan, C mengendalikan enjin fizik dan rendering grafik, dan JavaScript bertanggungjawab untuk logik permainan dan antara muka pengguna.
 Dari laman web ke aplikasi: Aplikasi pelbagai JavaScriptApr 22, 2025 am 12:02 AM
JavaScript digunakan secara meluas di laman web, aplikasi mudah alih, aplikasi desktop dan pengaturcaraan sisi pelayan. 1) Dalam pembangunan laman web, JavaScript mengendalikan DOM bersama -sama dengan HTML dan CSS untuk mencapai kesan dinamik dan menyokong rangka kerja seperti JQuery dan React. 2) Melalui reaktnatif dan ionik, JavaScript digunakan untuk membangunkan aplikasi mudah alih rentas platform. 3) Rangka kerja elektron membolehkan JavaScript membina aplikasi desktop. 4) Node.js membolehkan JavaScript berjalan di sisi pelayan dan menyokong permintaan serentak yang tinggi.
 Python vs JavaScript: Gunakan Kes dan Aplikasi MembandingkanApr 21, 2025 am 12:01 AM
Python lebih sesuai untuk sains data dan automasi, manakala JavaScript lebih sesuai untuk pembangunan front-end dan penuh. 1. Python berfungsi dengan baik dalam sains data dan pembelajaran mesin, menggunakan perpustakaan seperti numpy dan panda untuk pemprosesan data dan pemodelan. 2. Python adalah ringkas dan cekap dalam automasi dan skrip. 3. JavaScript sangat diperlukan dalam pembangunan front-end dan digunakan untuk membina laman web dinamik dan aplikasi satu halaman. 4. JavaScript memainkan peranan dalam pembangunan back-end melalui Node.js dan menyokong pembangunan stack penuh.
 Peranan C/C dalam JavaScript Jurubah dan PenyusunApr 20, 2025 am 12:01 AM
C dan C memainkan peranan penting dalam enjin JavaScript, terutamanya digunakan untuk melaksanakan jurubahasa dan penyusun JIT. 1) C digunakan untuk menghuraikan kod sumber JavaScript dan menghasilkan pokok sintaks abstrak. 2) C bertanggungjawab untuk menjana dan melaksanakan bytecode. 3) C melaksanakan pengkompil JIT, mengoptimumkan dan menyusun kod hot-spot semasa runtime, dan dengan ketara meningkatkan kecekapan pelaksanaan JavaScript.
 JavaScript in Action: Contoh dan projek dunia nyataApr 19, 2025 am 12:13 AM
Aplikasi JavaScript di dunia nyata termasuk pembangunan depan dan back-end. 1) Memaparkan aplikasi front-end dengan membina aplikasi senarai TODO, yang melibatkan operasi DOM dan pemprosesan acara. 2) Membina Restfulapi melalui Node.js dan menyatakan untuk menunjukkan aplikasi back-end.
 JavaScript dan Web: Fungsi teras dan kes penggunaanApr 18, 2025 am 12:19 AM
Penggunaan utama JavaScript dalam pembangunan web termasuk interaksi klien, pengesahan bentuk dan komunikasi tak segerak. 1) kemas kini kandungan dinamik dan interaksi pengguna melalui operasi DOM; 2) pengesahan pelanggan dijalankan sebelum pengguna mengemukakan data untuk meningkatkan pengalaman pengguna; 3) Komunikasi yang tidak bersesuaian dengan pelayan dicapai melalui teknologi Ajax.
 Memahami Enjin JavaScript: Butiran PelaksanaanApr 17, 2025 am 12:05 AM
Memahami bagaimana enjin JavaScript berfungsi secara dalaman adalah penting kepada pemaju kerana ia membantu menulis kod yang lebih cekap dan memahami kesesakan prestasi dan strategi pengoptimuman. 1) aliran kerja enjin termasuk tiga peringkat: parsing, penyusun dan pelaksanaan; 2) Semasa proses pelaksanaan, enjin akan melakukan pengoptimuman dinamik, seperti cache dalam talian dan kelas tersembunyi; 3) Amalan terbaik termasuk mengelakkan pembolehubah global, mengoptimumkan gelung, menggunakan const dan membiarkan, dan mengelakkan penggunaan penutupan yang berlebihan.
 Python vs JavaScript: Keluk Pembelajaran dan Kemudahan PenggunaanApr 16, 2025 am 12:12 AM
Python lebih sesuai untuk pemula, dengan lengkung pembelajaran yang lancar dan sintaks ringkas; JavaScript sesuai untuk pembangunan front-end, dengan lengkung pembelajaran yang curam dan sintaks yang fleksibel. 1. Sintaks Python adalah intuitif dan sesuai untuk sains data dan pembangunan back-end. 2. JavaScript adalah fleksibel dan digunakan secara meluas dalam pengaturcaraan depan dan pelayan.


Alat AI Hot

Undresser.AI Undress
Apl berkuasa AI untuk mencipta foto bogel yang realistik

AI Clothes Remover
Alat AI dalam talian untuk mengeluarkan pakaian daripada foto.

Undress AI Tool
Gambar buka pakaian secara percuma

Clothoff.io
Penyingkiran pakaian AI

Video Face Swap
Tukar muka dalam mana-mana video dengan mudah menggunakan alat tukar muka AI percuma kami!

Artikel Panas

Alat panas

EditPlus versi Cina retak
Saiz kecil, penyerlahan sintaks, tidak menyokong fungsi gesaan kod

ZendStudio 13.5.1 Mac
Persekitaran pembangunan bersepadu PHP yang berkuasa

DVWA
Damn Vulnerable Web App (DVWA) ialah aplikasi web PHP/MySQL yang sangat terdedah. Matlamat utamanya adalah untuk menjadi bantuan bagi profesional keselamatan untuk menguji kemahiran dan alatan mereka dalam persekitaran undang-undang, untuk membantu pembangun web lebih memahami proses mengamankan aplikasi web, dan untuk membantu guru/pelajar mengajar/belajar dalam persekitaran bilik darjah Aplikasi web keselamatan. Matlamat DVWA adalah untuk mempraktikkan beberapa kelemahan web yang paling biasa melalui antara muka yang mudah dan mudah, dengan pelbagai tahap kesukaran. Sila ambil perhatian bahawa perisian ini

MantisBT
Mantis ialah alat pengesan kecacatan berasaskan web yang mudah digunakan yang direka untuk membantu dalam pengesanan kecacatan produk. Ia memerlukan PHP, MySQL dan pelayan web. Lihat perkhidmatan demo dan pengehosan kami.

mPDF
mPDF ialah perpustakaan PHP yang boleh menjana fail PDF daripada HTML yang dikodkan UTF-8. Pengarang asal, Ian Back, menulis mPDF untuk mengeluarkan fail PDF "dengan cepat" dari tapak webnya dan mengendalikan bahasa yang berbeza. Ia lebih perlahan dan menghasilkan fail yang lebih besar apabila menggunakan fon Unicode daripada skrip asal seperti HTML2FPDF, tetapi menyokong gaya CSS dsb. dan mempunyai banyak peningkatan. Menyokong hampir semua bahasa, termasuk RTL (Arab dan Ibrani) dan CJK (Cina, Jepun dan Korea). Menyokong elemen peringkat blok bersarang (seperti P, DIV),


