Rumah >pembangunan bahagian belakang >tutorial php >php+ajax实现带进度条的上传图片功能实例详解
php+ajax实现带进度条的上传图片功能实例详解
- 墨辰丷asal
- 2018-06-01 11:16:531721semak imbas
这篇文章主要介绍了php+ajax实现带进度条的上传图片功能,涉及php文件传输及ajax无刷新提交的相关操作技巧,并附带demo源码供读者下载参考,需要的朋友可以参考下
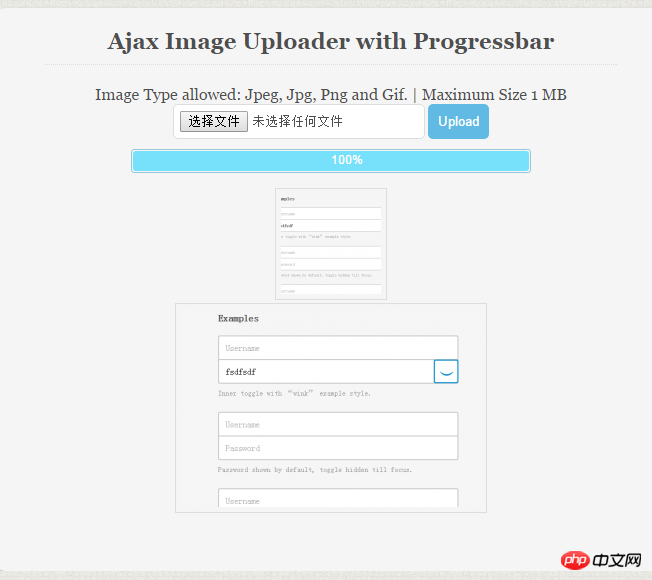
运行效果图如下:

代码如下:
<?php
if(isset($_FILES["FileInput"]) && $_FILES["FileInput"]["error"]== UPLOAD_ERR_OK)
{
############ Edit settings ##############
$UploadDirectory = 'F:/Websites/file_upload/uploads/'; //specify upload directory ends with / (slash)
##########################################
/*
Note : You will run into errors or blank page if "memory_limit" or "upload_max_filesize" is set to low in "php.ini".
Open "php.ini" file, and search for "memory_limit" or "upload_max_filesize" limit
and set them adequately, also check "post_max_size".
*/
//check if this is an ajax request
if (!isset($_SERVER['HTTP_X_REQUESTED_WITH'])){
die();
}
//Is file size is less than allowed size.
if ($_FILES["FileInput"]["size"] > 5242880) {
die("File size is too big!");
}
//allowed file type Server side check
switch(strtolower($_FILES['FileInput']['type']))
{
//allowed file types
case 'image/png':
case 'image/gif':
case 'image/jpeg':
case 'image/pjpeg':
case 'text/plain':
case 'text/html': //html file
case 'application/x-zip-compressed':
case 'application/pdf':
case 'application/msword':
case 'application/vnd.ms-excel':
case 'video/mp4':
break;
default:
die('Unsupported File!'); //output error
}
$File_Name = strtolower($_FILES['FileInput']['name']);
$File_Ext = substr($File_Name, strrpos($File_Name, '.')); //get file extention
$Random_Number = rand(0, 9999999999); //Random number to be added to name.
$NewFileName = $Random_Number.$File_Ext; //new file name
if(move_uploaded_file($_FILES['FileInput']['tmp_name'], $UploadDirectory.$NewFileName ))
{
die('Success! File Uploaded.');
}else{
die('error uploading File!');
}
}
else
{
die('Something wrong with upload! Is "upload_max_filesize" set correctly?');
}
总结:以上就是本篇文的全部内容,希望能对大家的学习有所帮助。
相关推荐:
Atas ialah kandungan terperinci php+ajax实现带进度条的上传图片功能实例详解. Untuk maklumat lanjut, sila ikut artikel berkaitan lain di laman web China PHP!
Kenyataan:
Kandungan artikel ini disumbangkan secara sukarela oleh netizen, dan hak cipta adalah milik pengarang asal. Laman web ini tidak memikul tanggungjawab undang-undang yang sepadan. Jika anda menemui sebarang kandungan yang disyaki plagiarisme atau pelanggaran, sila hubungi admin@php.cn
Artikel sebelumnya:PHP实现二维数组某个键排序的方法Artikel seterusnya:PHP连接MySQL数据库并以json格式输出
Artikel berkaitan
Lihat lagi- Cara menggunakan cURL untuk melaksanakan permintaan Dapatkan dan Hantar dalam PHP
- Cara menggunakan cURL untuk melaksanakan permintaan Dapatkan dan Hantar dalam PHP
- Cara menggunakan cURL untuk melaksanakan permintaan Dapatkan dan Hantar dalam PHP
- Cara menggunakan cURL untuk melaksanakan permintaan Dapatkan dan Hantar dalam PHP
- Semua simbol ungkapan dalam ungkapan biasa (ringkasan)

