Rumah >hujung hadapan web >tutorial js >react-native封装插件swiper的使用方法
react-native封装插件swiper的使用方法
- 亚连asal
- 2018-05-25 16:43:352223semak imbas
这篇文章主要介绍了react-native封装插件swiper的使用方法,现在分享给大家,也给大家做个参考。
首先创建简单的react-native项目,创建一个文件夹。然后用命令符输入
react-native init swiper
创建完成之后开发项目,我用的vs

打开控制台,安装swiper依赖。
安装:npm i react-native-swiper --save
查看:npm view react-native-swiper
删除:npm rm react-native-swiper --save
这里还需要 npm i 下更新下本地的依赖库
启动app项目
ios: react-native run-ios
android: react-native run-android
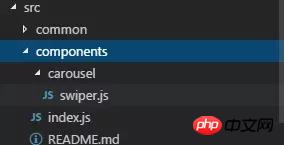
开始上码,在src里面创建个components文件夹下边创建个swiper.js文件,以及index.js,加上说明文档

import PropTypes from 'prop-types';
import React, { Component } from 'react';
import { StyleSheet, TouchableWithoutFeedback, View } from 'react-native';
import RNSwiper from 'react-native-swiper';
const styles = StyleSheet.create({
activeDotWrapperStyle: {
//圆点样式
},
activeDotStyle: {
//圆点样式
},
dotStyle: {
//圆点样式
}
});
const activeDot = (
<View style={styles.activeDotWrapperStyle}>
<View style={styles.activeDotStyle} />
</View>
);
const dot = <View style={styles.dotStyle} />;
export class Carousel extends Component {
// Define component prop list
static propTypes = {
data: PropTypes.array,
height: PropTypes.number,
onPressItem: PropTypes.func,
renderItem: PropTypes.func.isRequired,
autoplay: PropTypes.bool,
autoplayTimeout: PropTypes.number
};
// Define props default value
static defaultProps = {
data: [],
height: 150,
autoplay: true,
autoplayTimeout: 2.5,
onPressItem: () => {},
renderItem: () => {}
};
// Define inner state
state = {
showSwiper: false
};
constructor(props) {
super(props);
this.handleItemPress = this.handleItemPress.bind(this);
}
componentDidMount() {
setTimeout(() => {
this.setState({ showSwiper: true });
});
}
handleItemPress(item) {
this.props.onPressItem(item);
}
_renderSwiperItem(item, index) {
return (
<TouchableWithoutFeedback key={index} onPress={() => this.handleItemPress(item)}>
<View style={[{ flex: 1 }]}>{this.props.renderItem(item)}</View>
</TouchableWithoutFeedback>
);
}
render() {
return this.props.data.length === 0 || !this.state.showSwiper ? null : (
<RNSwiper
height={this.props.height} //图片高度
activeDot={activeDot}
dot={dot}
style={{ backgroundColor: '#fff' }}
autoplay={this.props.autoplay} //是否自动轮播
autoplayTimeout={this.props.autoplayTimeout} //轮播秒数
>
{this.props.data.map((item, idx) => this._renderSwiperItem(item, idx))} //如果数据是个对象里面的数组加一个循环
</RNSwiper>
);
}
}
这是index.js文件
import { Carousel } from './carousel/Carousel';

export { Carousel };
公共组件库
这里用于放置与业务无关的公共组件。组件实现必须考虑灵活性,扩展性,不能包含具体的业务逻辑。
组件必须以 你做的业务命名 为前缀,如 TryCarousel.js 。每个组件必须单独放在目录中,目录必须全小写(中横线分割),如 carousel/TryCarousel.js 。
一个基本的组件结构:
import PropTypes from 'prop-types';
import React, { Component } from 'react';

export class TryCarousel extends Component {
 // Define component prop list
 static propTypes = {};

 // Define props default value
 static defaultProps = {};

 // Define inner state
 state = {};

 constructor(props) {
  super(props);
 }

 // LifeCycle Hooks

 // Prototype Functions

 // Ensure the latest function is render
 render() {}
}
组件列表
carousel(轮播组件)
主要用于通用的图片轮播,能够提供点击事件响应。
Usage:
Props:
| 属性 | 描述 | 类型 | 默认值 |
|---|---|---|---|
| data | Carousel数据源 | Array | - |
| height | Carousel的高度 | number | 150 |
| onPressItem | 点击Carousel Item的时候触发 | fn | - |
| renderItem | 具体的渲染Item的方法,请参考FlatList | fn | - |
| autoplay | 是否自动切换 | bool | true |
| autoplayTimeout | Item自动切换的时间间隔(单位s) | number | 2.5 |
需要导入的地方
import { HigoCarousel } from '../../components';
<Carousel
      data={} //接受的数据
      onPressItem={} //点击事件
      height={} //图片高度
      autoplay={} //是否自动播放
      autoplayTimeout={} //过渡时间
      renderItem={item => {
       return <Image source={{ uri: item.imageSource }} style={{ flex: 1 }} />;
      }} //图片
/>
上面是我整理给大家的,希望今后会对大家有帮助。
相关文章:
Atas ialah kandungan terperinci react-native封装插件swiper的使用方法. Untuk maklumat lanjut, sila ikut artikel berkaitan lain di laman web China PHP!
Artikel berkaitan
Lihat lagi- Analisis mendalam bagi komponen kumpulan senarai Bootstrap
- Penjelasan terperinci tentang fungsi JavaScript kari
- Contoh lengkap penjanaan kata laluan JS dan pengesanan kekuatan (dengan muat turun kod sumber demo)
- Angularjs menyepadukan UI WeChat (weui)
- Cara cepat bertukar antara Cina Tradisional dan Cina Ringkas dengan JavaScript dan helah untuk tapak web menyokong pertukaran antara kemahiran_javascript Cina Ringkas dan Tradisional

