下面我就为大家带来一篇Javascript基础(嵌入图像的简单实现)。现在就分享给大家,也给大家做个参考。
img元素允许我们在HTML文档里嵌入图像。
要嵌入一张图像需要使用src和alt属性,代码如下:
<img src="../img/example/img-map.jpg" alt="Products Image" width="580" height="266" />
显示效果:

1 在超链接里嵌入图像
img元素的一个常见用法是结合a元素创建一个基于图像的超链接,代码如下:
<a href="otherpage.html">
  <img src="../img/example/img-map.jpg" ismap alt="Products Image" width="580" height="266" />
</a>
浏览器显示这张图片的方式没有什么不同。因此,重要的一点事要向用户提供视觉提示,表明特定图像所代表的是超链接。具体的做法可以是利用CSS,能在图像内容里表达则更好。
如果点击这种图片,浏览器会导航至父元素a的href属性所指定的URL上。给 img 元素应用 ismap 属性就创建了一个服务器端分部响应图,意思是在图像上点击的位置会附加到URL上。举个例子,如果点击的位置是距图像顶部8像素,左边缘10像素,浏览器就会导航到下面的地址:
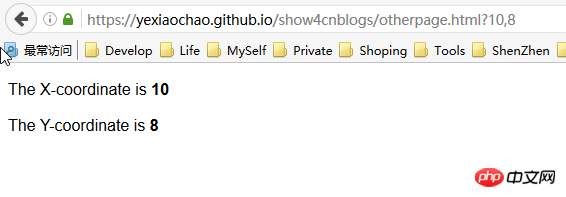
https://yexiaochao.github.io/show4cnblogs/otherpage.html?10,8
下面代码展示了 otherpage.html 中的内容,它包含了一个简单的脚本,用来显示点击位置的坐标:
<body>
<p>The X-coordinate is <b><span id="xco">??</span></b></p>
<p>The Y-coordinate is <b><span id="yco">??</span></b></p>
<script type="application/javascript">
var coords = window.location.href.split('?')[1].split(',');
document.getElementById("xco").innerHTML = coords[0];
document.getElementById("yco").innerHTML = coords[1];
</script>
</body>浏览器显示这张图片的方式没有什么不同。因此,重要的一点事要向用户提供视觉提示,表明特定图像所代表的是超链接。具体的做法可以是利用CSS,能在图像内容里表达则更好。
如果点击这种图片,浏览器会导航至父元素a的href属性所指定的URL上。给 img 元素应用 ismap 属性就创建了一个服务器端分部响应图,意思是在图像上点击的位置会附加到URL上。举个例子,如果点击的位置是距图像顶部8像素,左边缘10像素,浏览器就会导航到下面的地址:
https://yexiaochao.github.io/show4cnblogs/otherpage.html?10,8
下面代码展示了 otherpage.html 中的内容,它包含了一个简单的脚本,用来显示点击位置的坐标:
<body>
<p>The X-coordinate is <b><span id="xco">??</span></b></p>
<p>The Y-coordinate is <b><span id="yco">??</span></b></p>
<script type="application/javascript">
var coords = window.location.href.split('?')[1].split(',');
document.getElementById("xco").innerHTML = coords[0];
document.getElementById("yco").innerHTML = coords[1];
</script>
</body>可以看到鼠标点击产生的效果:

服务器端分区响应图通常意味着服务器会根据用户在图像上点击区域的不同做出有差别的反应,比如返回不同的响应信息。如果省略了img元素上的 ismap 属性,鼠标点击的坐标就不会被包含在请求 URL 中。
2 创建客户端分区响应图
我们可以创建一个客户端分区响应图,通过点击某张图像上的不同区域让浏览器导航到不同的URL上。这一过程不需要通过服务器引导,因此需要使用元素定义图像上的各个区域以及它们所代表的行为。客户端分区响应图的关键元素是 map,map元素包含一个或多个area元素,它们各自代表了图像上可被点击的一块区域 。
area元素的属性可以分为两类,第一类处理的是area所代表的图像区域被用户点击后浏览器会导航到的URL。下图介绍了这一类属性,它们类似于在其他元素上见到过的对应属性。

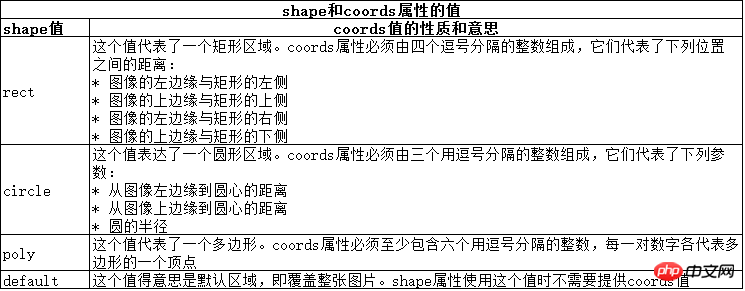
第二类则包含了更有意思的属性:shape 和 coords 属性。可以用这些属性来标明用户可以点击的各个图像区域。 shape 和 coords 属性是共同起作用的。 coords 属性的意思根据 shape 属性的值而定,正如下图所示:

介绍完这些元素后,举个例子,代码如下:
<body>
<img src="../img/example/img-map.jpg" ismap alt="Products Image" usemap="#mymap" width="580" height="266" />
<map name="mymap">
<area href="javascript:show_page(1)" shape="rect" coords="'34,60,196,230" alt="product 1" />
<area href="javascript:show_page(2)" shape="rect" coords="'210,60,370,230" alt="product 2" />
<area href="javascript:show_page(3)" shape="rect" coords="'383,60,545,230" alt="product 3" />
</map>
<script type="application/javascript">
function show_page(num){
//通过对话框显示产品,表示对应的跳转页面
alert("This is product "+num);
}
</script>
</body>显示效果是一样的,只是在点击对应的产品图片,会弹出对应的产品名称,表示跳转的产品页面。
上面是我整理给大家的,希望今后会对大家有帮助。
相关文章:
Atas ialah kandungan terperinci Javascript基础(嵌入图像的简单实现). Untuk maklumat lanjut, sila ikut artikel berkaitan lain di laman web China PHP!
 Python vs JavaScript: Komuniti, Perpustakaan, dan SumberApr 15, 2025 am 12:16 AM
Python dan JavaScript mempunyai kelebihan dan kekurangan mereka sendiri dari segi komuniti, perpustakaan dan sumber. 1) Komuniti Python mesra dan sesuai untuk pemula, tetapi sumber pembangunan depan tidak kaya dengan JavaScript. 2) Python berkuasa dalam bidang sains data dan perpustakaan pembelajaran mesin, sementara JavaScript lebih baik dalam perpustakaan pembangunan dan kerangka pembangunan depan. 3) Kedua -duanya mempunyai sumber pembelajaran yang kaya, tetapi Python sesuai untuk memulakan dengan dokumen rasmi, sementara JavaScript lebih baik dengan MDNWebDocs. Pilihan harus berdasarkan keperluan projek dan kepentingan peribadi.
 Dari C/C ke JavaScript: Bagaimana semuanya berfungsiApr 14, 2025 am 12:05 AM
Peralihan dari C/C ke JavaScript memerlukan menyesuaikan diri dengan menaip dinamik, pengumpulan sampah dan pengaturcaraan asynchronous. 1) C/C adalah bahasa yang ditaip secara statik yang memerlukan pengurusan memori manual, manakala JavaScript ditaip secara dinamik dan pengumpulan sampah diproses secara automatik. 2) C/C perlu dikumpulkan ke dalam kod mesin, manakala JavaScript adalah bahasa yang ditafsirkan. 3) JavaScript memperkenalkan konsep seperti penutupan, rantaian prototaip dan janji, yang meningkatkan keupayaan pengaturcaraan fleksibiliti dan asynchronous.
 Enjin JavaScript: Membandingkan PelaksanaanApr 13, 2025 am 12:05 AM
Enjin JavaScript yang berbeza mempunyai kesan yang berbeza apabila menguraikan dan melaksanakan kod JavaScript, kerana prinsip pelaksanaan dan strategi pengoptimuman setiap enjin berbeza. 1. Analisis leksikal: Menukar kod sumber ke dalam unit leksikal. 2. Analisis Tatabahasa: Menjana pokok sintaks abstrak. 3. Pengoptimuman dan Penyusunan: Menjana kod mesin melalui pengkompil JIT. 4. Jalankan: Jalankan kod mesin. Enjin V8 mengoptimumkan melalui kompilasi segera dan kelas tersembunyi, Spidermonkey menggunakan sistem kesimpulan jenis, menghasilkan prestasi prestasi yang berbeza pada kod yang sama.
 Beyond the Browser: JavaScript di dunia nyataApr 12, 2025 am 12:06 AM
Aplikasi JavaScript di dunia nyata termasuk pengaturcaraan sisi pelayan, pembangunan aplikasi mudah alih dan Internet of Things Control: 1. Pengaturcaraan sisi pelayan direalisasikan melalui node.js, sesuai untuk pemprosesan permintaan serentak yang tinggi. 2. Pembangunan aplikasi mudah alih dijalankan melalui reaktnatif dan menyokong penggunaan silang platform. 3. Digunakan untuk kawalan peranti IoT melalui Perpustakaan Johnny-Five, sesuai untuk interaksi perkakasan.
 Membina aplikasi SaaS Multi-penyewa dengan Next.js (Integrasi Backend)Apr 11, 2025 am 08:23 AM
Saya membina aplikasi SaaS multi-penyewa berfungsi (aplikasi edTech) dengan alat teknologi harian anda dan anda boleh melakukan perkara yang sama. Pertama, apakah aplikasi SaaS multi-penyewa? Aplikasi SaaS Multi-penyewa membolehkan anda melayani beberapa pelanggan dari Sing
 Cara Membina Aplikasi SaaS Multi-Tenant dengan Next.js (Integrasi Frontend)Apr 11, 2025 am 08:22 AM
Artikel ini menunjukkan integrasi frontend dengan backend yang dijamin oleh permit, membina aplikasi edtech SaaS yang berfungsi menggunakan Next.Js. Frontend mengambil kebenaran pengguna untuk mengawal penglihatan UI dan memastikan permintaan API mematuhi dasar peranan
 JavaScript: meneroka serba boleh bahasa webApr 11, 2025 am 12:01 AM
JavaScript adalah bahasa utama pembangunan web moden dan digunakan secara meluas untuk kepelbagaian dan fleksibiliti. 1) Pembangunan front-end: Membina laman web dinamik dan aplikasi satu halaman melalui operasi DOM dan kerangka moden (seperti React, Vue.js, sudut). 2) Pembangunan sisi pelayan: Node.js menggunakan model I/O yang tidak menyekat untuk mengendalikan aplikasi konkurensi tinggi dan masa nyata. 3) Pembangunan aplikasi mudah alih dan desktop: Pembangunan silang platform direalisasikan melalui reaktnatif dan elektron untuk meningkatkan kecekapan pembangunan.
 Evolusi JavaScript: Trend Semasa dan Prospek Masa DepanApr 10, 2025 am 09:33 AM
Trend terkini dalam JavaScript termasuk kebangkitan TypeScript, populariti kerangka dan perpustakaan moden, dan penerapan webassembly. Prospek masa depan meliputi sistem jenis yang lebih berkuasa, pembangunan JavaScript, pengembangan kecerdasan buatan dan pembelajaran mesin, dan potensi pengkomputeran IoT dan kelebihan.


Alat AI Hot

Undresser.AI Undress
Apl berkuasa AI untuk mencipta foto bogel yang realistik

AI Clothes Remover
Alat AI dalam talian untuk mengeluarkan pakaian daripada foto.

Undress AI Tool
Gambar buka pakaian secara percuma

Clothoff.io
Penyingkiran pakaian AI

AI Hentai Generator
Menjana ai hentai secara percuma.

Artikel Panas

Alat panas

Pelayar Peperiksaan Selamat
Pelayar Peperiksaan Selamat ialah persekitaran pelayar selamat untuk mengambil peperiksaan dalam talian dengan selamat. Perisian ini menukar mana-mana komputer menjadi stesen kerja yang selamat. Ia mengawal akses kepada mana-mana utiliti dan menghalang pelajar daripada menggunakan sumber yang tidak dibenarkan.

EditPlus versi Cina retak
Saiz kecil, penyerlahan sintaks, tidak menyokong fungsi gesaan kod

DVWA
Damn Vulnerable Web App (DVWA) ialah aplikasi web PHP/MySQL yang sangat terdedah. Matlamat utamanya adalah untuk menjadi bantuan bagi profesional keselamatan untuk menguji kemahiran dan alatan mereka dalam persekitaran undang-undang, untuk membantu pembangun web lebih memahami proses mengamankan aplikasi web, dan untuk membantu guru/pelajar mengajar/belajar dalam persekitaran bilik darjah Aplikasi web keselamatan. Matlamat DVWA adalah untuk mempraktikkan beberapa kelemahan web yang paling biasa melalui antara muka yang mudah dan mudah, dengan pelbagai tahap kesukaran. Sila ambil perhatian bahawa perisian ini

Dreamweaver CS6
Alat pembangunan web visual

Penyesuai Pelayan SAP NetWeaver untuk Eclipse
Integrasikan Eclipse dengan pelayan aplikasi SAP NetWeaver.


