Rumah >hujung hadapan web >tutorial js >jQuery+CSS实现标签分栏切换(附代码)
jQuery+CSS实现标签分栏切换(附代码)
- php中世界最好的语言asal
- 2018-04-26 09:37:122321semak imbas
这次给大家带来jQuery+CSS实现标签分栏切换(附代码),jQuery+CSS实现标签分栏切换的注意事项有哪些,下面就是实战案例,一起来看一下。
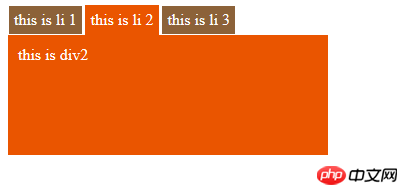
运行代码如下

具体代码如下
<html>
 <head>
 <title>jQuery平滑滚动的标签分栏切换</title>
 <meta charset="gb2312">
 <style>
 ul,li{
 margin:0px;
 padding:0px;
 list-style:none
 }
 li{
 float:left;
 background-color:#8c6239;
 color:white;
 padding:5px;
 margin-right:2px;
 border:1px solid white;
 }
 li.myLi{
 background-color:#ea5500;
 border:1px solid #ea5500;
 }
 p{
 clear:left;
 background-color:#ea5500;
 color:white;
 width:300px;
 height:100px;
 padding:10px;
 display:none;
 }
 p.myp{
 display:block;
 }
 </style>
 <script src="./jquery-1.7.1.min.js"></script>
 <script>
 var timeId;
 $(document).ready(function(){
 $("li").each(function(index){
 //index是li数组的的索引值
 $(this).mouseover(function(){
 var liNode = $(this);
 //延迟是为了减少服务器压力,防止鼠标快速滑动
 timeId = setTimeout(function(){
  //将原来显示的p隐藏掉
  $("p.myp").removeClass("myp");
  //将原来的li的myLi去掉
  $("li.myLi").removeClass("myLi");
  //显示当前鼠标li的对应的p
  $("p").eq(index).addClass("myp");
  //增加当前li的myLi
  liNode.addClass("myLi");
 },300);
 }).mouseout(function(){
 clearTimeout(timeId);
 });
 });
 });
 </script>
 </head>
 <body>
 <ul>
 <li class="myLi">this is li 1</li>
 <li>this is li 2</li>
 <li>this is li 3</li>
 </ul>
 <p class="myp">this is p1</p>
 <p>this is p2</p>
 <p>this is p3</p>
 </body>
</html>
相信看了本文案例你已经掌握了方法,更多精彩请关注php中文网其它相关文章!
推荐阅读:
jquery实现元素拖动排序(附代码)
Atas ialah kandungan terperinci jQuery+CSS实现标签分栏切换(附代码). Untuk maklumat lanjut, sila ikut artikel berkaitan lain di laman web China PHP!
Kenyataan:
Kandungan artikel ini disumbangkan secara sukarela oleh netizen, dan hak cipta adalah milik pengarang asal. Laman web ini tidak memikul tanggungjawab undang-undang yang sepadan. Jika anda menemui sebarang kandungan yang disyaki plagiarisme atau pelanggaran, sila hubungi admin@php.cn
Artikel sebelumnya:jquery实现元素拖动排序(附代码)Artikel seterusnya:jQuery最简洁实现tab选项切换
Artikel berkaitan
Lihat lagi- Analisis mendalam bagi komponen kumpulan senarai Bootstrap
- Penjelasan terperinci tentang fungsi JavaScript kari
- Contoh lengkap penjanaan kata laluan JS dan pengesanan kekuatan (dengan muat turun kod sumber demo)
- Angularjs menyepadukan UI WeChat (weui)
- Cara cepat bertukar antara Cina Tradisional dan Cina Ringkas dengan JavaScript dan helah untuk tapak web menyokong pertukaran antara kemahiran_javascript Cina Ringkas dan Tradisional

