Rumah >pembangunan bahagian belakang >tutorial php >php和html5实现无刷新上传的方法
php和html5实现无刷新上传的方法
- 小云云asal
- 2018-03-31 13:33:421474semak imbas
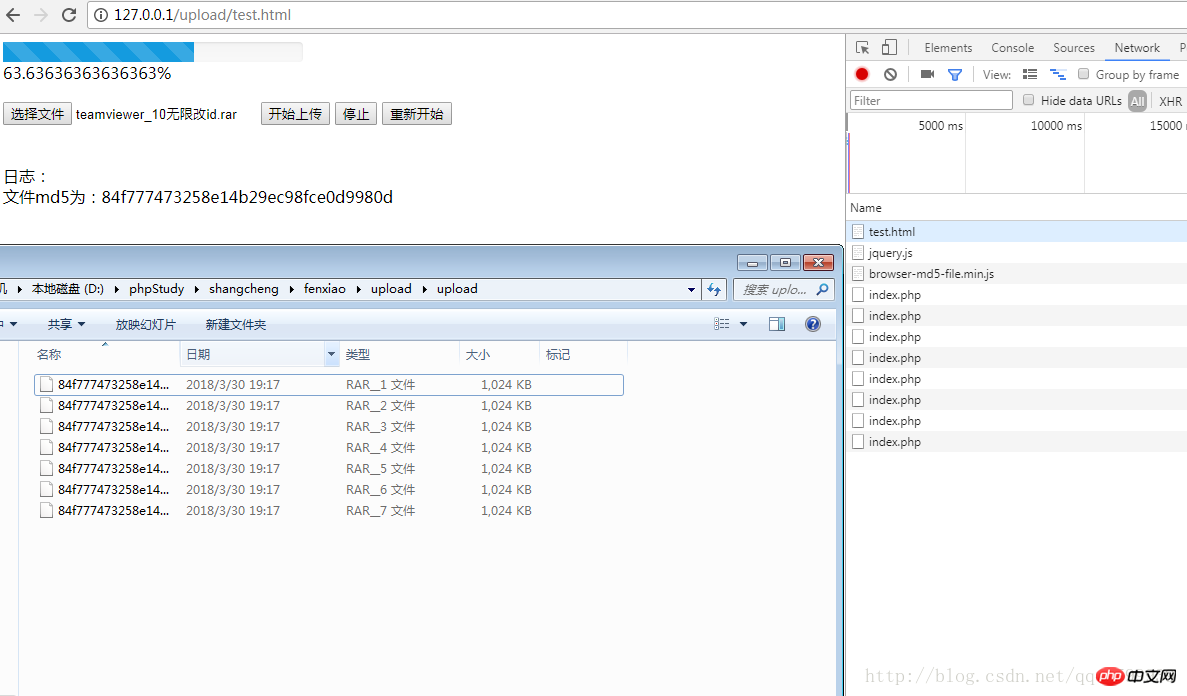
本文主要和大家分享php和html5实现无刷新上传的方法,主要以图文的方法和大家分享,希望能帮助到大家。

根据网上改编----->>>>>>>>>
理清思路:
引入了两个概念:块(block)和片(chunk)。每个块由一到多个片组成,而一个资源则由一到多个块组成
块是服务端的永久数据存储单位,片则只在分片上传过程中作为临时存储的单位。服务端会以约一个月为单位周期性的清除上传后未被合并为块的数据片
创建块(mkblk)、上传片(bput)、创建资源(mkfile)。
前端code:
<!doctype html>
<html lang="en">
<head>
<meta charset="UTF-8">
<meta name="viewport"
content="width=device-width, user-scalable=no, initial-scale=1.0, maximum-scale=1.0, minimum-scale=1.0">
<meta http-equiv="X-UA-Compatible" content="ie=edge">
<script src="http://apps.bdimg.com/libs/jquery/2.1.4/jquery.js" ></script>
<script src="./browser-md5-file.min.js" ></script>
<title>Document</title>
<style>
#progress{
width: 300px;
height: 20px;
background-color:#f7f7f7;
box-shadow:inset 0 1px 2px rgba(0,0,0,0.1);
border-radius:4px;
background-image:linear-gradient(to bottom,#f5f5f5,#f9f9f9);
}
#finish{
background-color: #149bdf;
background-image:linear-gradient(45deg,rgba(255,255,255,0.15) 25%,transparent 25%,transparent 50%,rgba(255,255,255,0.15) 50%,rgba(255,255,255,0.15) 75%,transparent 75%,transparent);
background-size:40px 40px;
height: 100%;
}
.upload{
margin-top: 40px;
}
.log
{
margin-top: 40px;
}
</style>
</head>
<body>
<p id="progress">
<p id="finish" style="width: 0%;" progress="0"></p>
<span id="rate"></span>
</p>
<p class="upload">
<input type="file" name="file" id="file">
<input type="button" value="开始上传" id="upstart">
<input type="button" value="停止" id="stop">
<input type="button" value="重新开始" id="restart">
</p>
<p class="log">
日志:<p id="plog"></p>
</p>
<script>
var fileForm = document.getElementById("file");
var upstartBtn = document.getElementById('upstart');
var stopBtn = document.getElementById('stop');
var startBtn = document.getElementById('restart');
var rate = document.getElementById('rate');
var plog = document.getElementById('plog');
//---------------------------
const LENGTH = 1024 * 1024 * 1;
var start = 0;
var end = start + LENGTH;
var blob;
var blob_num = 1;
var is_stop = 0
var file = null;
var md5filename = '';
//-----------------------------
var upload_instance = new Upload();
fileForm.onchange = function()
{
browserMD5File(fileForm.files[0], function (err, md5) {
md5filename = md5;
plog.innerHTML = '文件md5为:' + md5filename;
});
}
upstartBtn.onclick = function(){
upload_instance.addFileAndSend(fileForm);
}
stopBtn.onclick = function(){
upload_instance.stop();
}
startBtn.onclick = function(){
upload_instance.start();
}
function Upload(){
var xhr = new XMLHttpRequest();
var form_data = new FormData();
//对外方法,传入文件对象
this.addFileAndSend = function(that){
file = that.files[0];
blob = cutFile(file);
sendFile(blob,file);
blob_num += 1;
}
//停止文件上传
this.stop = function(){
xhr.abort();
is_stop = 1;
}
this.start = function(){
sendFile(blob,file);
is_stop = 0;
}
//切割文件
function cutFile(file){
console.log("start========"+start);
console.log("start========"+end);
var file_blob = file.slice(start,end);
start = end;
end = start + LENGTH;
return file_blob;
};
//发送文件
function sendFile(blob,file){
var total_blob_num = Math.ceil(file.size / LENGTH);
form_data.append('file',blob);
form_data.append('blob_num',blob_num);
form_data.append('total_blob_num',total_blob_num);
form_data.append('md5_file_name',md5filename);
form_data.append('file_name',file.name);
xhr.open('POST','./index.php',false);
xhr.onreadystatechange = function () {
console.log(xhr.readyState);
var progress;
var progressObj = document.getElementById('finish');
if(total_blob_num == 1){
progress = '100%';
}else{
progress = Math.min(100,(blob_num/total_blob_num)* 100 ) +'%';
}
console.log('progress-----'+progress);
progressObj.style.width = progress;
rate.innerHTML = progress;
var t = setTimeout(function(){
if(start < file.size && is_stop === 0){
blob = cutFile(file);
sendFile(blob,file);
blob_num += 1;
}else{
//setTimeout(t);
}
},1000);
}
console.log('test');
xhr.send(form_data);
}
}
</script>
</body>
</html>后端code:
<?php
class Upload{
private $filepath = './upload'; //上传目录
private $tmpPath; //PHP文件临时目录
private $blobNum; //第几个文件块
private $totalBlobNum; //文件块总数
private $fileName; //文件名
private $md5FileName;
public function __construct($tmpPath,$blobNum,$totalBlobNum,$fileName, $md5FileName){
$this->tmpPath = $tmpPath;
$this->blobNum = $blobNum;
$this->totalBlobNum = $totalBlobNum;
$this->fileName = $this->createName($fileName, $md5FileName);
$this->moveFile();
$this->fileMerge();
}
//判断是否是最后一块,如果是则进行文件合成并且删除文件块
private function fileMerge(){
if($this->blobNum == $this->totalBlobNum){
$blob = '';
for($i=1; $i<= $this->totalBlobNum; $i++){
$blob .= file_get_contents($this->filepath.'/'. $this->fileName.'__'.$i);
}
file_put_contents($this->filepath.'/'. $this->fileName,$blob);
$this->deleteFileBlob();
}
}
//删除文件块
private function deleteFileBlob(){
for($i=1; $i<= $this->totalBlobNum; $i++){
@unlink($this->filepath.'/'. $this->fileName.'__'.$i);
}
}
//移动文件
private function moveFile(){
$this->touchDir();
$filename = $this->filepath.'/'. $this->fileName.'__'.$this->blobNum;
move_uploaded_file($this->tmpPath,$filename);
}
//API返回数据
public function apiReturn(){
if($this->blobNum == $this->totalBlobNum){
if(file_exists($this->filepath.'/'. $this->fileName)){
$data['code'] = 2;
$data['msg'] = 'success';
$data['file_path'] = 'http://'.$_SERVER['HTTP_HOST'].dirname($_SERVER['DOCUMENT_URI']).str_replace('.','',$this->filepath).'/'. $this->fileName;
}
}else{
if(file_exists($this->filepath.'/'. $this->fileName.'__'.$this->blobNum)){
$data['code'] = 1;
$data['msg'] = 'waiting for all';
$data['file_path'] = '';
}
}
header('Content-type: application/json');
echo json_encode($data);
}
//建立上传文件夹
private function touchDir(){
if(!file_exists($this->filepath)){
return mkdir($this->filepath);
}
}
private function createName($fileName, $md5FileName){
return $md5FileName . '.' . pathinfo($fileName)['extension'];
}
}
//实例化并获取系统变量传参
$upload = new Upload($_FILES['file']['tmp_name'],$_POST['blob_num'],$_POST['total_blob_num'],$_POST['file_name'],$_POST['md5_file_name']);
//调用方法,返回结果
$upload->apiReturn();相关推荐:
Atas ialah kandungan terperinci php和html5实现无刷新上传的方法. Untuk maklumat lanjut, sila ikut artikel berkaitan lain di laman web China PHP!
Kenyataan:
Kandungan artikel ini disumbangkan secara sukarela oleh netizen, dan hak cipta adalah milik pengarang asal. Laman web ini tidak memikul tanggungjawab undang-undang yang sepadan. Jika anda menemui sebarang kandungan yang disyaki plagiarisme atau pelanggaran, sila hubungi admin@php.cn
Artikel sebelumnya:PHP中new self()和new static()有什么区别Artikel seterusnya:Sqlmap命令行参数实例详解
Artikel berkaitan
Lihat lagi- Cara menggunakan cURL untuk melaksanakan permintaan Dapatkan dan Hantar dalam PHP
- Cara menggunakan cURL untuk melaksanakan permintaan Dapatkan dan Hantar dalam PHP
- Cara menggunakan cURL untuk melaksanakan permintaan Dapatkan dan Hantar dalam PHP
- Cara menggunakan cURL untuk melaksanakan permintaan Dapatkan dan Hantar dalam PHP
- Semua simbol ungkapan dalam ungkapan biasa (ringkasan)

