Rumah >hujung hadapan web >tutorial js >使用render方法的图文详解
使用render方法的图文详解
- php中世界最好的语言asal
- 2018-03-23 11:47:3310007semak imbas
这次给大家带来使用render方法的图文详解,使用render方法的注意事项有哪些,下面就是实战案例,一起来看一下。
先说一下对官网上demo的个人理解:
<!DOCTYPE html>
<html>
<head>
  <title>Vue的render方法说明</title>
  <script src="vue.js"></script>
</head>
<body>
<p id="app">
  <child :level="1">
    hello world
  </child>
</p>
<script type="text/x-template" id="anchored-heading-template">
  <p>
    <h1 v-if="level === 1">
      <slot></slot>
    </h1>
    <h2 v-if="level === 2">
      <slot></slot>
    </h2>
    <h3 v-if="level === 3">
      <slot></slot>
    </h3>
    <h4 v-if="level === 4">
      <slot></slot>
    </h4>
    <h5 v-if="level === 5">
      <slot></slot>
    </h5>
    <h6 v-if="level === 6">
      <slot></slot>
    </h6>
  </p>
</script>
<script type="text/javascript">
Vue.component('child', {
  template: '#anchored-heading-template',
  props: {
    level: {
      type: Number,
      required: true
    }
  }
});
  new Vue({
    el: "#app"
  })
</script>
</body>
</html>
虽然使用template定义组件的方法非常的直观,但是这样会造成代码过长。可以使用render的方法
<!DOCTYPE html>
<html>
<head>
  <title>Vue的render方法说明</title>
  <script src="vue.js"></script>
</head>
<body>
<p id="app">
  <child :level="1">
    hello world
  </child>
</p>
<script type="text/javascript">
Vue.component('child', {
  render:function (createElement) {
    var body=this.$slots.default;
    //this.$slots返回了一个组件分发下来的元素和内容
    //this.$slots.default返回了具名的内容
    return createElement(
      'h'+this.level,
      //this.level是利用v-bind注入到组件中的level
      body
    )
  },
  //因为vue中组件父组件无法向子组件注入内容。所以我们需要通过
  //v-bind定义一个key,value向子组件注入内容。所要接收的值也需要在定义组件时的props属性中的定义一下
  props:{
    level:{
    }
  }
});
  new Vue({
    el: "#app"
  })
</script>
</body>
</html>
下面是一个slot具名分发的demo:介绍了creatElement的用法:
<!DOCTYPE html>
<html>
<head>
  <title>Vue的render方法说明</title>
  <script src="vue.js"></script>
</head>
<body>
<p id="app">
  <child>
    <p slot="header">this is header</p>
    <p slot="center">this is center</p>
    <p slot="footer">this is footer</p>
  </child>
</p>
<script type="text/javascript">
  Vue.component('child', {
    render: function (createElement) {
     var header=this.$slots.header;
     var center=this.$slots.center;
     var footer=this.$slots.footer;
//createElement第一个参数是标签名,第二个参数是值
     return createElement('p',[
       createElement('p', header),
       createElement('p', center),
       createElement('p', footer),
     ])
    }
  });
  new Vue({
    el: "#app"
  })
</script>
</body>
</html>
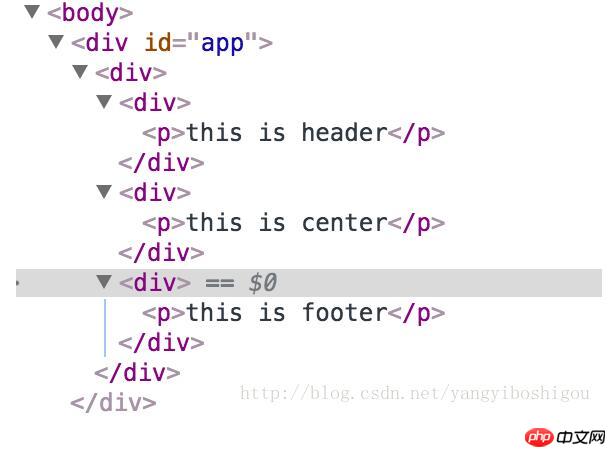
所创建的组件的demo结果如下:

相信看了本文案例你已经掌握了方法,更多精彩请关注php中文网其它相关文章!
推荐阅读:
Atas ialah kandungan terperinci 使用render方法的图文详解. Untuk maklumat lanjut, sila ikut artikel berkaitan lain di laman web China PHP!
Kenyataan:
Kandungan artikel ini disumbangkan secara sukarela oleh netizen, dan hak cipta adalah milik pengarang asal. Laman web ini tidak memikul tanggungjawab undang-undang yang sepadan. Jika anda menemui sebarang kandungan yang disyaki plagiarisme atau pelanggaran, sila hubungi admin@php.cn
Artikel sebelumnya:JS如何实现浏览器通信Artikel seterusnya:JS获取图片的top N色值方法
Artikel berkaitan
Lihat lagi- Analisis mendalam bagi komponen kumpulan senarai Bootstrap
- Penjelasan terperinci tentang fungsi JavaScript kari
- Contoh lengkap penjanaan kata laluan JS dan pengesanan kekuatan (dengan muat turun kod sumber demo)
- Angularjs menyepadukan UI WeChat (weui)
- Cara cepat bertukar antara Cina Tradisional dan Cina Ringkas dengan JavaScript dan helah untuk tapak web menyokong pertukaran antara kemahiran_javascript Cina Ringkas dan Tradisional

