这次给大家带来HTML与CSS中2D转换模块,HTML与CSS中2D转换模块的注意事项有哪些,下面就是实战案例,一起来看一下。
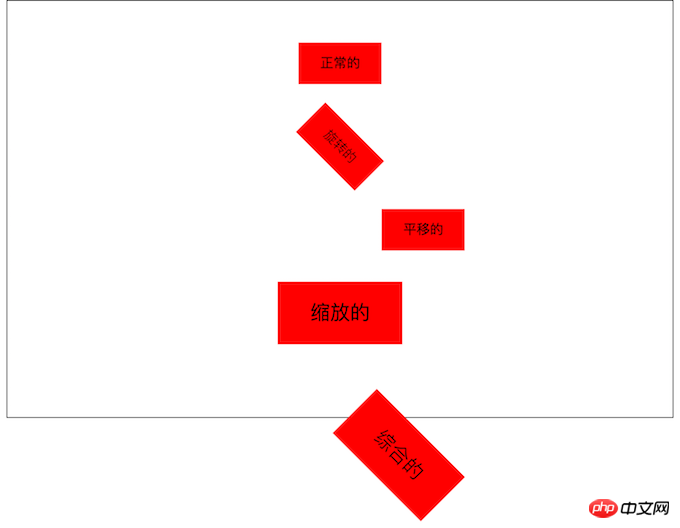
一. 2D转换模块
2D转换模块
/*其中deg是单位, 代表多少度*/
transform: rotate(45deg);/*
第一个参数:水平方向
第二个参数:垂直方向
*/transform: translate(100px, 0px);/*
第一个参数:水平方向
第二个参数:垂直方向
注意点:
如果取值是1, 代表不变
如果取值大于1, 代表需要放大
如果取值小于1, 代表需要缩小
如果水平和垂直缩放都一样, 那么可以简写为一个参数
*//*transform: scale(0.5, 0.5);*/transform: scale(1.5);/*
注意点:
1.如果需要进行多个转换, 那么用空格隔开
2.2D的转换模块会修改元素的坐标系, 所以旋转之后再平移就不是水平平移的
*/transform: rotate(45deg) translate(100px, 0px);
2D转换模块

二. 2D转换模块-形变中心点
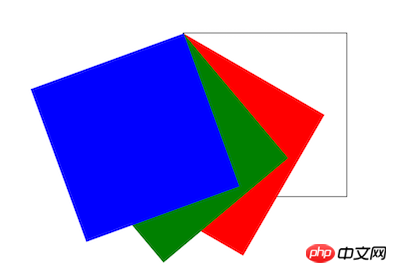
默认情况下所有的元素都是以自己的中心点作为参考来旋转的, 我们可以通过形变中心点属性来修改它的参考点
/*
第一个参数:水平方向
第二个参数:垂直方向
注意点
取值有三种形式
具体像素
百分比
特殊关键字
*/
/*transform-origin: 200px 0px;*/
/*transform-origin: 50% 50%;*/
/*transform-origin: 0% 0%;*/
/*transform-origin: center center;*/
transform-origin: left top;

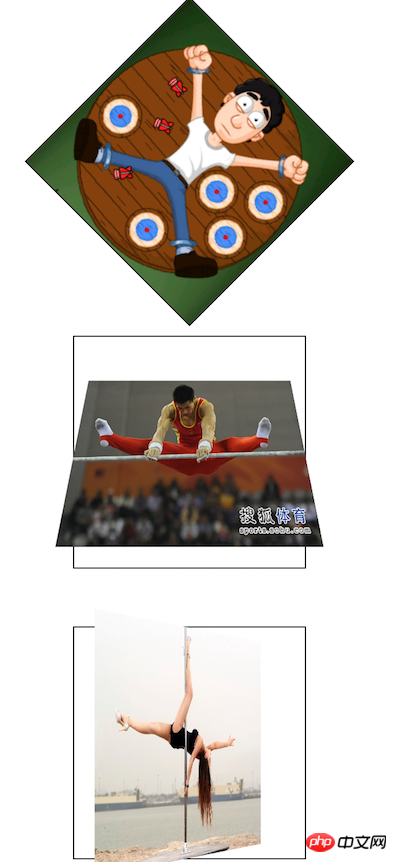
三.透视属性(perspective: 500px;) 和 旋转轴向 (transform: rotateY(45deg);)
1.perspective: 500px;
1.1什么是透视
近大远小
1.2.注意点
一定要注意, 透视属性必须添加到需要呈现近大远小效果的元素的父元素上面
2.transform: rotateY(45deg);
想围绕哪个轴旋转, 那么只需要在rotate后面加上哪个轴即可;
代码示例:
<html lang="en"> <head>
<meta charset="UTF-8">
<title>95-2D转换模块-旋转轴向</title>
<style>
*{ margin: 0; padding: 0; }
ul{ width: 800px; height: 500px; margin: 0 auto; }
ul li{ list-style: none; width: 200px; height: 200px; margin: 0 auto; margin-top: 50px; border: 1px solid #000;
/* 1.什么是透视 近大远小
2.注意点 一定要注意, 透视属性必须添加到需要呈现近大远小效果的元素的父元素上面 */
perspective: 500px; } ul li img{ width: 200px; height: 200px;
/*perspective: 500px;*/
} ul li:nth-child(1){
/*默认情况下所有元素都是围绕Z轴进行旋转*/
transform: rotateZ(45deg); } ul li:nth-child(2) img{ transform: rotateX(45deg); } ul li:nth-child(3) img{ /* 总结: 想围绕哪个轴旋转, 那么只需要在rotate后面加上哪个轴即可 */ transform: rotateY(45deg); } </style> </head> <body> <ul> <li></li> <li></li> <li></li> </ul> </body> </html>
四. 扑克牌练习
<html lang="en">
<head>
<meta charset="UTF-8">
<title>96-2D转换模块-练习</title>
<style>
*{ margin: 0; padding: 0; }
p{ width: 310px; height: 438px; border: 1px solid #000;
background-color: skyblue; margin: 100px auto; perspective: 500px; }
p img{ transform-origin: center bottom; transition: transform 1s; }
p:hover img{ transform: rotateX(80deg); }
</style> </head> <body> <p>  </p>
</body>
</html>
五. 照片墙
<html lang="en">
<head>
<meta charset="UTF-8">
<title>97-2D转换模块-相片墙</title>
<style>
*{ margin: 0; padding: 0; }
ul{ height: 400px; border: 1px solid #000;
background-color: skyblue; margin-top: 100px;
text-align: center; }
ul li{ list-style: none;
width: 150px; height: 200px;
background-color: red; display: inline-block;
//转换成行内块级元素,用于水平排版
margin-top: 100px; transition: all 1s;
position: relative; box-shadow: 0 0 10px; }
ul li:nth-child(1){ transform: rotate(30deg); }
ul li:nth-child(2){ transform: rotate(-40deg); }
ul li:nth-child(3){ transform: rotate(10deg); }
ul li:nth-child(4){ transform: rotate(45deg); }
ul li img{ width: 150px; height: 200px;
border: 5px solid #fff; box-sizing: border-box;
}
ul li:hover{ /*transform: rotate(0deg);*/
/*transform: none;*/ transform: scale(1.5);
//之前的旋转被层叠掉, 只执行放大
z-index: 998;
//显示在最上面
}
</style>
</head>
<body>
<ul>
<li></li>
<li></li>
<li></li>
<li></li>
</ul>
</body>
</html>相信看了本文案例你已经掌握了方法,更多精彩请关注php中文网其它相关文章!
推荐阅读:
Atas ialah kandungan terperinci HTML与CSS中2D转换模块. Untuk maklumat lanjut, sila ikut artikel berkaitan lain di laman web China PHP!
 Masa Depan HTML, CSS, dan JavaScript: Trend Pembangunan WebApr 19, 2025 am 12:02 AM
Trend masa depan HTML adalah semantik dan komponen web, trend masa depan CSS adalah CSS-in-JS dan CSShoudini, dan trend masa depan JavaScript adalah webassembly dan tanpa pelayan. 1. Semantik HTML meningkatkan kebolehcapaian dan kesan SEO, dan komponen web meningkatkan kecekapan pembangunan, tetapi perhatian harus dibayar kepada keserasian penyemak imbas. 2. CSS-in-JS meningkatkan fleksibiliti pengurusan gaya tetapi boleh meningkatkan saiz fail. Csshoudini membolehkan operasi langsung rendering CSS. 3.Webassembly mengoptimumkan prestasi aplikasi penyemak imbas tetapi mempunyai keluk pembelajaran yang curam, dan tanpa pelayan memudahkan pembangunan tetapi memerlukan pengoptimuman masalah permulaan sejuk.
 HTML: Struktur, CSS: Gaya, JavaScript: Tingkah LakuApr 18, 2025 am 12:09 AM
Peranan HTML, CSS dan JavaScript dalam pembangunan web adalah: 1. HTML mentakrifkan struktur laman web, 2. CSS mengawal gaya laman web, dan 3. JavaScript menambah tingkah laku dinamik. Bersama -sama, mereka membina kerangka, estetika dan interaktiviti laman web moden.
 Masa Depan HTML: Evolusi dan Trend dalam Reka Bentuk WebApr 17, 2025 am 12:12 AM
Masa depan HTML penuh dengan kemungkinan yang tidak terhingga. 1) Ciri -ciri dan piawaian baru akan merangkumi lebih banyak tag semantik dan populariti komponen web. 2) Trend reka bentuk web akan terus berkembang ke arah reka bentuk yang responsif dan boleh diakses. 3) Pengoptimuman prestasi akan meningkatkan pengalaman pengguna melalui pemuatan imej yang responsif dan teknologi pemuatan malas.
 HTML vs CSS vs JavaScript: Gambaran Keseluruhan PerbandinganApr 16, 2025 am 12:04 AM
Peranan HTML, CSS dan JavaScript dalam pembangunan web adalah: HTML bertanggungjawab untuk struktur kandungan, CSS bertanggungjawab untuk gaya, dan JavaScript bertanggungjawab untuk tingkah laku dinamik. 1. HTML mentakrifkan struktur laman web dan kandungan melalui tag untuk memastikan semantik. 2. CSS mengawal gaya laman web melalui pemilih dan atribut untuk menjadikannya cantik dan mudah dibaca. 3. JavaScript mengawal tingkah laku laman web melalui skrip untuk mencapai fungsi dinamik dan interaktif.
 HTML: Adakah bahasa pengaturcaraan atau yang lain?Apr 15, 2025 am 12:13 AM
Htmlisnotaprogramminglanguage; itisamarkuplanguage.1) htmlstructuresandformatswebcontentusingtags.2) itworkswithcssforstylingandjavascriptforinteractivity, meningkatkan pembangunan semula.
 HTML: Membina struktur laman webApr 14, 2025 am 12:14 AM
HTML adalah asas struktur laman web bangunan. 1. HTML mentakrifkan struktur kandungan dan semantik, dan penggunaan, dan sebagainya. 2. Menyediakan penanda semantik, seperti, dan sebagainya, untuk meningkatkan kesan SEO. 3. Untuk merealisasikan interaksi pengguna melalui tag, perhatikan pengesahan bentuk. 4. Gunakan elemen lanjutan seperti, digabungkan dengan JavaScript untuk mencapai kesan dinamik. 5. Kesilapan biasa termasuk label yang tidak terkawal dan nilai atribut yang tidak disebutkan, dan alat pengesahan diperlukan. 6. Strategi pengoptimuman termasuk mengurangkan permintaan HTTP, memampatkan HTML, menggunakan tag semantik, dll.
 Dari teks ke laman web: Kekuatan HTMLApr 13, 2025 am 12:07 AM
HTML adalah bahasa yang digunakan untuk membina laman web, menentukan struktur laman web dan kandungan melalui tag dan atribut. 1) HTML menganjurkan struktur dokumen melalui tag, seperti,. 2) Penyemak imbas menghancurkan HTML untuk membina DOM dan menjadikan laman web. 3) Ciri -ciri baru HTML5, seperti, meningkatkan fungsi multimedia. 4) Kesilapan biasa termasuk label yang tidak terkawal dan nilai atribut yang tidak disebutkan. 5) Cadangan pengoptimuman termasuk menggunakan tag semantik dan mengurangkan saiz fail.
 Memahami HTML, CSS, dan JavaScript: Panduan PemulaApr 12, 2025 am 12:02 AM
WebDevelopmentReliesOnhtml, CSS, andjavascript: 1) HtmlStructuresContent, 2) CSSStylesit, dan3) JavaScriptaddsInteractivity, Formingthebasisofmodernwebexperiences.


Alat AI Hot

Undresser.AI Undress
Apl berkuasa AI untuk mencipta foto bogel yang realistik

AI Clothes Remover
Alat AI dalam talian untuk mengeluarkan pakaian daripada foto.

Undress AI Tool
Gambar buka pakaian secara percuma

Clothoff.io
Penyingkiran pakaian AI

AI Hentai Generator
Menjana ai hentai secara percuma.

Artikel Panas

Alat panas

Notepad++7.3.1
Editor kod yang mudah digunakan dan percuma

SecLists
SecLists ialah rakan penguji keselamatan muktamad. Ia ialah koleksi pelbagai jenis senarai yang kerap digunakan semasa penilaian keselamatan, semuanya di satu tempat. SecLists membantu menjadikan ujian keselamatan lebih cekap dan produktif dengan menyediakan semua senarai yang mungkin diperlukan oleh penguji keselamatan dengan mudah. Jenis senarai termasuk nama pengguna, kata laluan, URL, muatan kabur, corak data sensitif, cangkerang web dan banyak lagi. Penguji hanya boleh menarik repositori ini ke mesin ujian baharu dan dia akan mempunyai akses kepada setiap jenis senarai yang dia perlukan.

PhpStorm versi Mac
Alat pembangunan bersepadu PHP profesional terkini (2018.2.1).

Muat turun versi mac editor Atom
Editor sumber terbuka yang paling popular

ZendStudio 13.5.1 Mac
Persekitaran pembangunan bersepadu PHP yang berkuasa


