这次给大家带来SpringMvc+AngularJs应如何使用,SpringMvc+AngularJs使用的注意事项有哪些,下面就是实战案例,一起来看一下。
前端框架分段繁杂,框架本身也是日新月异,但是不免还是有很多好的框架,例如jQuery,但是jQuery本身的很多类库有比较杂乱,AngularJs和jQuery都作为前端框架,都有自己适合的场景,本文主要讲解AngularJs和SpringMvc的整合,代码来自于GitHub,自己下载下来看了一下,写点自己对于整合的理解。
目录
1.为什么使用AngularJs
2.SpringMvc和AngularJs整合使用
3.总结
一、为什么要使用AngulaJs
AngularJS通过为开发者呈现一个更高层次的抽象来简化应用的开发。如同其他的抽象技术一样,这也会损失一部分灵活性。换句话说,并不是所有的应用都适合用AngularJS来做。AngularJS主要考虑的是构建CRUD应用。幸运的是,至少90%的WEB应用都是CRUD应用。
二、SpringMvc和AngularJs整合使用
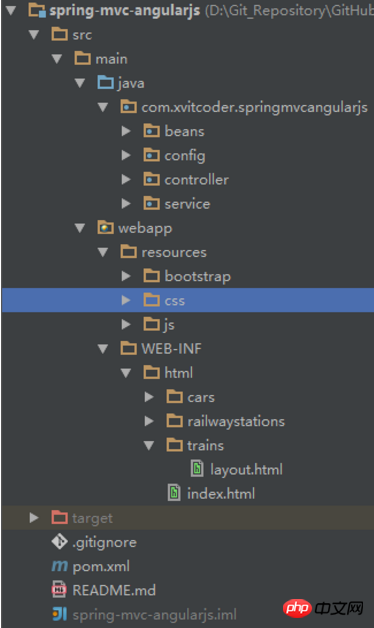
项目结构

使用JavaConfig配置Spring
使用thymeleaf作为模板代替JSP
使用AngularJs
使用JavaConfig配置Spring

public class AppInitializer implements WebApplicationInitializer {
        public void onStartup(ServletContext servletContext) throws ServletException {
        AnnotationConfigWebApplicationContext rootContext = new AnnotationConfigWebApplicationContext();
        rootContext.register(AppConfig.class);
        servletContext.addListener(new ContextLoaderListener(rootContext));
        AnnotationConfigWebApplicationContext dispatcherContext = new AnnotationConfigWebApplicationContext();
        dispatcherContext.register(WebMvcConfig.class);
 ServletRegistration.Dynamic dispatcher = servletContext.addServlet("dispatcher", new DispatcherServlet(dispatcherContext));
        dispatcher.setLoadOnStartup(1);
        dispatcher.addMapping("/");
    }
}
这个配置类是用来代替web.xml文件的,主要是注册监听器,Web的相关配置
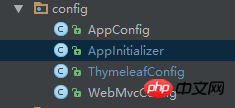
包含了AppConfig和WebMvcConfig两个类
@Configuration@EnableWebMvc@ComponentScan(basePackages = "com.xvitcoder.springmvcangularjs")@Import({ThymeleafConfig.class})public class WebMvcConfig extends WebMvcConfigurerAdapter {    @Override
    public void configureDefaultServletHandling(DefaultServletHandlerConfigurer configurer) {
        configurer.enable();
    }    @Override
    public void addResourceHandlers(final ResourceHandlerRegistry registry) {
        registry.addResourceHandler("/resources/**").addResourceLocations("/resources/");
    }    @Override
    public void configureMessageConverters(List<HttpMessageConverter<?>> converters) {
        converters.add(new MappingJackson2HttpMessageConverter());        super.configureMessageConverters(converters);
    }
}
继承了WebMvcConfigurerAdapter
重写了三个方法,分别配置了Handler,资源拦截和Converter
@Configurationpublic class ThymeleafConfig {    @Bean
    public ServletContextTemplateResolver templateResolver() {
        ServletContextTemplateResolver resolver = new ServletContextTemplateResolver();
        resolver.setPrefix("/WEB-INF/html/");
        resolver.setSuffix(".html");
        resolver.setTemplateMode("HTML5");
        resolver.setCacheable(false);        return resolver;
    }    @Bean
    public SpringTemplateEngine templateEngine() {
        SpringTemplateEngine engine = new SpringTemplateEngine();
        engine.setTemplateResolver(templateResolver());        return engine;
    }    @Bean
    public ThymeleafViewResolver thymeleafViewResolver() {
        ThymeleafViewResolver resolver = new ThymeleafViewResolver();
        resolver.setTemplateEngine(templateEngine());        return resolver;
    }
}
这里配置Thymeleaf模板
AngularJs的使用
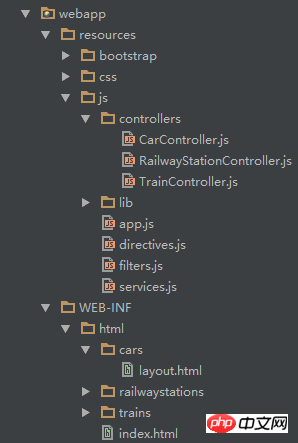
项目结构

重点解释下这里面的东西,在IndexController中默认会将页面跳转到index.html页面,index.html页面时这样的:
<!doctype html><html lang="en" ng-app="AngularSpringApp"><head>
    <meta charset="utf-8"/>
    <title>Service App</title>
    <link rel="stylesheet" href="resources/css/app.css"/>
    <link rel="stylesheet" href="resources/bootstrap/css/bootstrap.min.css" /></head><body><div id="wrapper">
    <ul class="menu">
        <li><a href="#/cars">Cars</a></li>
        <li><a href="#/trains">Trains</a></li>
        <li><a href="#/railwaystations">Railway Station</a></li>
    </ul>
    <hr class="" />
    <div ng-view=""></div></div><script src="resources/js/lib/angular/angular.js"></script><script src="resources/js/app.js"></script><script src="resources/js/services.js"></script><script src="resources/js/controllers/RailwayStationController.js"></script><script src="resources/js/controllers/CarController.js"></script><script src="resources/js/controllers/TrainController.js"></script><script src="resources/js/filters.js"></script><script src="resources/js/directives.js"></script></body>
这里引入了很多js文件
注意cf5f2fd5eb6c8203012bece6f3538ed5
这是AngularJs的执行流程:从index.html开始,找到app.js文件,从app.js文件中根据路径找到相应的controller.js文件,controller.js文件将从后台获得数据返回到相应的html页面进行展示
模块是angularJs很重要的概念
var AngularSpringApp = {};
var App = angular.module('AngularSpringApp', ['AngularSpringApp.filters', 'AngularSpringApp.services', 'AngularSpringApp.directives']);// Declare app level module which depends on filters, and servicesApp.config(['$routeProvider', function ($routeProvider) {
    $routeProvider.when('/cars', {        templateUrl: 'cars/layout',        controller: CarController
    });
    $routeProvider.when('/trains', {        templateUrl: 'trains/layout',        controller: TrainController
    });
    $routeProvider.when('/railwaystations', {        templateUrl: 'railwaystations/layout',        controller: RailwayStationController
    });
    $routeProvider.otherwise({redirectTo: '/cars'});
}]);
根据路径找到相应的controller和template模板
var CarController = function($scope, $http) {
    $scope.fetchCarsList = function() {
        $http.get('cars/carlist.json').success(function(carList){
            $scope.cars = carList;
        });
    };
    $scope.addNewCar = function(newCar) {
        $http.post('cars/addCar/' + newCar).success(function() {
            $scope.fetchCarsList();
        });
        $scope.carName = '';
    };
    $scope.removeCar = function(car) {
        $http.delete('cars/removeCar/' + car).success(function() {
            $scope.fetchCarsList();
        });
    };
    $scope.removeAllCars = function() {
        $http.delete('cars/removeAllCars').success(function() {
            $scope.fetchCarsList();
        });
    };
    $scope.fetchCarsList();
};
使用$http服务向后台发送ajax请求,获取数据
<div class="input-append">
    <input style="width:358px; margin-left: 100px;" class="span2" type="text" ng-model="carName" required="required" min="1" />
    <button class="btn btn-primary" ng-disabled="!carName" ng-click="addNewCar(carName)">Add Car</button></div><h3 style="margin-left:100px;">Car List</h3><div class="alert alert-info" style="width:400px;margin-left:100px;" ng-show="cars.length == 0">
    No cars found</div><table class="table table-bordered table-striped" style="width:450px; margin-left: 100px;" ng-show="cars.length > 0">
    <thead>
        <tr>
            <th style="text-align: center; width: 25px;">Action</th>
            <th style="text-align: center;">Car Name</th>
        </tr>
    </thead>
    <tbody>
        <tr ng-repeat="car in cars">
            <td  style="width:70px;text-align:center;"><button class="btn btn-mini btn-danger" ng-click="removeCar(car)">Remove</button></td>
            <td>{{car}}</td>
        </tr>
    </tbody></table><button style="margin-left:100px;" class="btn btn-danger"  ng-show="cars.length > 1" ng-click="removeAllCars()">Remove All Cars</button>
使用相应的标签接收数据和控制显示等操作

三、 总结
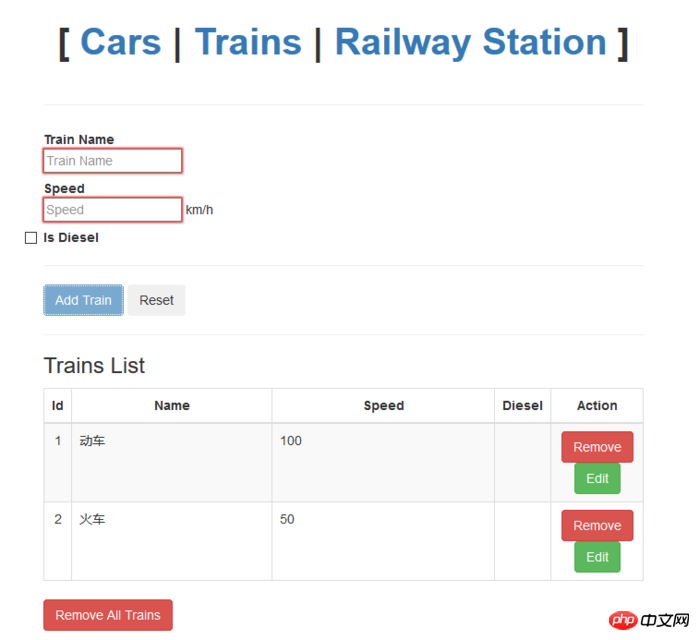
界面有点朴素,但是无法掩饰AngularJs带来的这种方便快捷的操作,我们不需要在过度关注DOM操作,这种从前端引入后端的思想也是一次创新,目前我也只是懂点皮毛,很多理念和用法也不会使用,这篇文章算是给AngularJs开个头。
相信看了这些案例你已经掌握了方法,更多精彩请关注php中文网其它相关文章!
相关阅读:
Atas ialah kandungan terperinci SpringMvc+AngularJs应如何使用. Untuk maklumat lanjut, sila ikut artikel berkaitan lain di laman web China PHP!
 JavaScript dan Web: Fungsi teras dan kes penggunaanApr 18, 2025 am 12:19 AM
Penggunaan utama JavaScript dalam pembangunan web termasuk interaksi klien, pengesahan bentuk dan komunikasi tak segerak. 1) kemas kini kandungan dinamik dan interaksi pengguna melalui operasi DOM; 2) pengesahan pelanggan dijalankan sebelum pengguna mengemukakan data untuk meningkatkan pengalaman pengguna; 3) Komunikasi yang tidak bersesuaian dengan pelayan dicapai melalui teknologi Ajax.
 Memahami Enjin JavaScript: Butiran PelaksanaanApr 17, 2025 am 12:05 AM
Memahami bagaimana enjin JavaScript berfungsi secara dalaman adalah penting kepada pemaju kerana ia membantu menulis kod yang lebih cekap dan memahami kesesakan prestasi dan strategi pengoptimuman. 1) aliran kerja enjin termasuk tiga peringkat: parsing, penyusun dan pelaksanaan; 2) Semasa proses pelaksanaan, enjin akan melakukan pengoptimuman dinamik, seperti cache dalam talian dan kelas tersembunyi; 3) Amalan terbaik termasuk mengelakkan pembolehubah global, mengoptimumkan gelung, menggunakan const dan membiarkan, dan mengelakkan penggunaan penutupan yang berlebihan.
 Python vs JavaScript: Keluk Pembelajaran dan Kemudahan PenggunaanApr 16, 2025 am 12:12 AM
Python lebih sesuai untuk pemula, dengan lengkung pembelajaran yang lancar dan sintaks ringkas; JavaScript sesuai untuk pembangunan front-end, dengan lengkung pembelajaran yang curam dan sintaks yang fleksibel. 1. Sintaks Python adalah intuitif dan sesuai untuk sains data dan pembangunan back-end. 2. JavaScript adalah fleksibel dan digunakan secara meluas dalam pengaturcaraan depan dan pelayan.
 Python vs JavaScript: Komuniti, Perpustakaan, dan SumberApr 15, 2025 am 12:16 AM
Python dan JavaScript mempunyai kelebihan dan kekurangan mereka sendiri dari segi komuniti, perpustakaan dan sumber. 1) Komuniti Python mesra dan sesuai untuk pemula, tetapi sumber pembangunan depan tidak kaya dengan JavaScript. 2) Python berkuasa dalam bidang sains data dan perpustakaan pembelajaran mesin, sementara JavaScript lebih baik dalam perpustakaan pembangunan dan kerangka pembangunan depan. 3) Kedua -duanya mempunyai sumber pembelajaran yang kaya, tetapi Python sesuai untuk memulakan dengan dokumen rasmi, sementara JavaScript lebih baik dengan MDNWebDocs. Pilihan harus berdasarkan keperluan projek dan kepentingan peribadi.
 Dari C/C ke JavaScript: Bagaimana semuanya berfungsiApr 14, 2025 am 12:05 AM
Peralihan dari C/C ke JavaScript memerlukan menyesuaikan diri dengan menaip dinamik, pengumpulan sampah dan pengaturcaraan asynchronous. 1) C/C adalah bahasa yang ditaip secara statik yang memerlukan pengurusan memori manual, manakala JavaScript ditaip secara dinamik dan pengumpulan sampah diproses secara automatik. 2) C/C perlu dikumpulkan ke dalam kod mesin, manakala JavaScript adalah bahasa yang ditafsirkan. 3) JavaScript memperkenalkan konsep seperti penutupan, rantaian prototaip dan janji, yang meningkatkan keupayaan pengaturcaraan fleksibiliti dan asynchronous.
 Enjin JavaScript: Membandingkan PelaksanaanApr 13, 2025 am 12:05 AM
Enjin JavaScript yang berbeza mempunyai kesan yang berbeza apabila menguraikan dan melaksanakan kod JavaScript, kerana prinsip pelaksanaan dan strategi pengoptimuman setiap enjin berbeza. 1. Analisis leksikal: Menukar kod sumber ke dalam unit leksikal. 2. Analisis Tatabahasa: Menjana pokok sintaks abstrak. 3. Pengoptimuman dan Penyusunan: Menjana kod mesin melalui pengkompil JIT. 4. Jalankan: Jalankan kod mesin. Enjin V8 mengoptimumkan melalui kompilasi segera dan kelas tersembunyi, Spidermonkey menggunakan sistem kesimpulan jenis, menghasilkan prestasi prestasi yang berbeza pada kod yang sama.
 Beyond the Browser: JavaScript di dunia nyataApr 12, 2025 am 12:06 AM
Aplikasi JavaScript di dunia nyata termasuk pengaturcaraan sisi pelayan, pembangunan aplikasi mudah alih dan Internet of Things Control: 1. Pengaturcaraan sisi pelayan direalisasikan melalui node.js, sesuai untuk pemprosesan permintaan serentak yang tinggi. 2. Pembangunan aplikasi mudah alih dijalankan melalui reaktnatif dan menyokong penggunaan silang platform. 3. Digunakan untuk kawalan peranti IoT melalui Perpustakaan Johnny-Five, sesuai untuk interaksi perkakasan.
 Membina aplikasi SaaS Multi-penyewa dengan Next.js (Integrasi Backend)Apr 11, 2025 am 08:23 AM
Saya membina aplikasi SaaS multi-penyewa berfungsi (aplikasi edTech) dengan alat teknologi harian anda dan anda boleh melakukan perkara yang sama. Pertama, apakah aplikasi SaaS multi-penyewa? Aplikasi SaaS Multi-penyewa membolehkan anda melayani beberapa pelanggan dari Sing


Alat AI Hot

Undresser.AI Undress
Apl berkuasa AI untuk mencipta foto bogel yang realistik

AI Clothes Remover
Alat AI dalam talian untuk mengeluarkan pakaian daripada foto.

Undress AI Tool
Gambar buka pakaian secara percuma

Clothoff.io
Penyingkiran pakaian AI

AI Hentai Generator
Menjana ai hentai secara percuma.

Artikel Panas

Alat panas

Versi Mac WebStorm
Alat pembangunan JavaScript yang berguna

SublimeText3 Linux versi baharu
SublimeText3 Linux versi terkini

Muat turun versi mac editor Atom
Editor sumber terbuka yang paling popular

SublimeText3 versi Inggeris
Disyorkan: Versi Win, menyokong gesaan kod!

Penyesuai Pelayan SAP NetWeaver untuk Eclipse
Integrasikan Eclipse dengan pelayan aplikasi SAP NetWeaver.


