Rumah >hujung hadapan web >tutorial js >学会简单的vuex与模块化
学会简单的vuex与模块化
- 小云云asal
- 2018-01-16 09:18:251741semak imbas
Vuex 强调使用单一状态树,即在一个项目里只有一个 store,这个 store 集中管理了项目中所有的数据以及对数据的操作行为。但是这样带来的问题是 store 可能会非常臃肿庞大不易维护,所以就需要对状态树进行模块化的拆分。
示例教程
例子是在vue-cli基础上构建的,以下是src文件下的内容目录。
├── App.vue
├── components // 组件文件夹
│ ├── tab1.vue
│ ├── tab2.vue
│ ├── tab3.vue
│ └── tab4.vue
├── main.js // vue的主文件入口
├── router // vue-router文件
│ └── index.js
└── store // vuex文件
 ├── action.js // action
 ├── getter.js // getter
 ├── index.js // vuex的主文件
 ├── module // 模块文件
 │ ├── tab2.js
 │ └── tab3.js
 ├── mutation-type.js // mutation常量名文件
 └── mutation.js // mutation
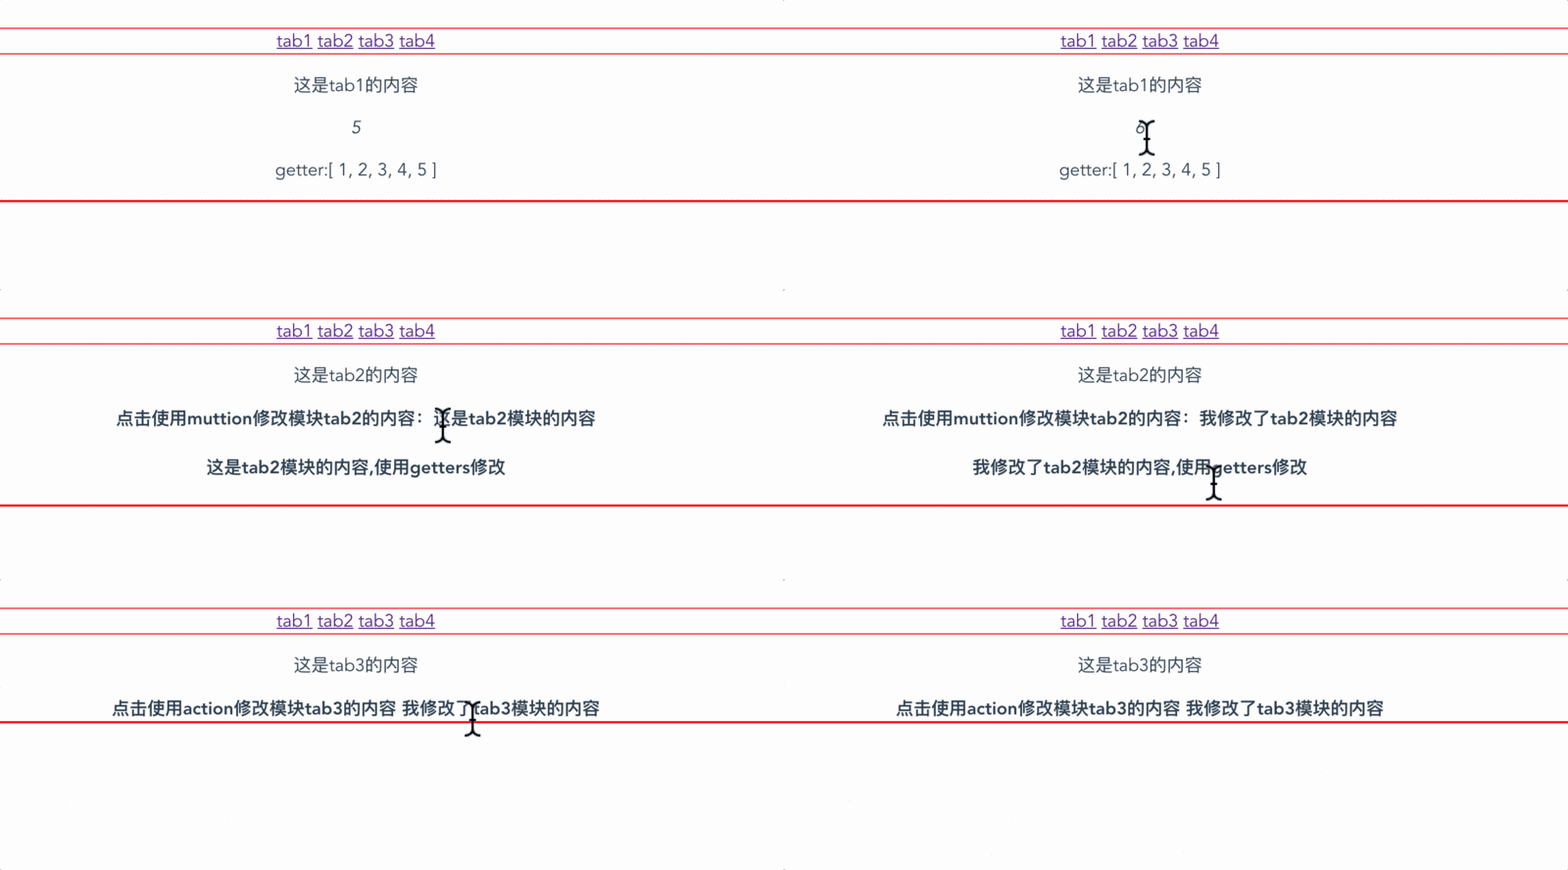
效果是这样的(不要嫌弃简陋啊啊啊)

在这个例子里,把文档里提到的vuex的相关知识都使用了一遍,包括模块相关的知识,基本把一般的使用场景都覆盖了吧。
那不废话了,开始吧。
首先app.vue和router两部分是和路由相关,就是很简单的东西,看看文档就能了解。
vuex的模块化
在写这个例子之前看了很多的开源项目的代码,一开始蛮新鲜的,毕竟之前项目中并没有深度使用过vuex,基本就是一个store.js里把vuex的功能就都完成了,但是项目复杂肯定不能这么写,正好现在有这个需求,我就想写个例子理一理这方面的思路。结果还是蛮简单的。
store文件里的内容就是按照vuex五个核心概念建立的,这么做的好处对于梳理业务逻辑和后期维护都是极大的方便,比如mutation.js和mutation-type.js这两个文件:
// mutation-type.js

const CHANGE_COUNT = 'CHANGE_COUNT';


export default {
 CHANGE_COUNT
}
// mutation.js

import type from './mutation-type'

let mutations = {
 [type.CHANGE_COUNT](state) {
 state.count++
 }
}

export default mutations
将mutation中的方法名单独作为常量提取出来,放在单独的文件中,用的时候引用相关的内容,这样非常便于管理和了解有哪些方法存在,很直观。另一方面,有时候可能需要用到action,可以使用相同的方法名,只要再引入常量的文件就行。
// action.js
import type from './mutation-type'

let actions = {
 [type.CHANGE_COUNT]({ commit }) {

 commit(type.CHANGE_COUNT)

 }
}

export default actions
怎么样,这样是不是看起来就没有写在一个文件里那么乱了。
...mapGetters和...mapActions
tab1.vue里:
// tab1.vue
<template>
 <p>
 <p>这是tab1的内容</p>
 <em @click="add">{{count}}</em>
 <p>getter:{{NewArr}}</p>
 </p>
</template>


<script>
import { mapActions, mapGetters } from "vuex";
import type from "../store/mutation-type";
export default {
 computed: {
 ...mapGetters([
 'NewArr'
 ]),
 count: function() {
 return this.$store.state.count;
 },
 },
 methods: {
 ...mapActions({
 CHANGE_COUNT: type.CHANGE_COUNT
 }),
 add: function() {
 this.CHANGE_COUNT(type.CHANGE_COUNT);
 }
 }
};
</script>

<style lang="" scoped>

</style>
index.js文件里:
import Vuex from 'vuex'
import Vue from 'vue'
import actions from './action'
import mutations from './mutation'
import getters from './getter'
import tab2 from './module/tab2'
import tab3 from './module/tab3'

Vue.use(Vuex)

let state = {
 count: 1,
 arr:[]
}


let store = new Vuex.Store({
 state,
 getters,
 mutations,
 actions,
 modules:{
 tab2,tab3
 }

})

export default store
vuex提供了一种叫做辅助函数的东西,他的好处能让你在一个页面集中展示一些需要用到的东西,并且在使用的时候也可以少写一些内容,不过这个不是必须,根据自己需要取用。
需要说明的是,他们两个生效的地方可不一样。
...mapGetters写在本页面的计算属性中,之后就可以像使用计算属性一样使用getters里的内容了。
...mapActions写在本页面的methods里面,既可以在其他方法里调用,甚至可以直接写在@click里面,像这样:
<em @click="CHANGE_COUNT">{{count}}</em>
酱紫,tab1里面的数字每次点击都会自增1。
mudule
vuex的文档里对于模块这部分写的比较模糊,还是得自己实际使用才能行。
在本例子中,我设置了两个模块:tab2和tab3,分别对应着同名的两个组件,当然,我这样只是为了测试,实际看tab2就可以。
// module/tab2.js
const tab2 = {
 state: {
 name:`这是tab2模块的内容`
 },
 mutations:{
 change2(state){
  state.name = `我修改了tab2模块的内容`
 }
 },
 getters:{
 name(state,getters,rootState){
  console.log(rootState)
  return state.name + ',使用getters修改'
 }
 }
}

export default tab2;
// tab2.vue
<template>
 <p>
 <p>这是tab2的内容</p>
 <strong @click="change">点击使用muttion修改模块tab2的内容:{{info}}</strong>
 <h4>{{newInfo}}</h4>
 </p>
</template>


<script>
export default {
 mounted() {
 // console.log(this.$store.commit('change2'))
 },
 computed: {
 info: function() {
 return this.$store.state.tab2.name;
 },
 newInfo(){
 return this.$store.getters.name;
 }
 },
 methods: {
 change() {
 this.$store.commit('change2')
 }
 }
};
</script>

<style lang="" scoped>

</style>
这个例子里主要是看怎么在页面中调用模块中的stated等。
首先说state,这个很简单,在页面中这样写就行:
this.$store.steta.tab2(模块名).name
在本页面的mounted中console一下$store,可以看到模块中,stete加了一层嵌套在state中的。
至于action,mutation,getter,和一般的使用方法一样,没有任何区别。
还有就是,在getter和action中,可以通过rootState获得根结构的state,mutation中没有此方法。
相关推荐:
Atas ialah kandungan terperinci 学会简单的vuex与模块化. Untuk maklumat lanjut, sila ikut artikel berkaitan lain di laman web China PHP!
Artikel berkaitan
Lihat lagi- Analisis mendalam bagi komponen kumpulan senarai Bootstrap
- Penjelasan terperinci tentang fungsi JavaScript kari
- Contoh lengkap penjanaan kata laluan JS dan pengesanan kekuatan (dengan muat turun kod sumber demo)
- Angularjs menyepadukan UI WeChat (weui)
- Cara cepat bertukar antara Cina Tradisional dan Cina Ringkas dengan JavaScript dan helah untuk tapak web menyokong pertukaran antara kemahiran_javascript Cina Ringkas dan Tradisional

