Rumah >pembangunan bahagian belakang >tutorial php >用html5和css3写出登录页面教程
用html5和css3写出登录页面教程
- 小云云asal
- 2017-11-09 14:09:382930semak imbas
现在很多网站都有注册页面和登录页面,像淘宝京东微信等这些都需要注册登录的,那么我们如何用html5和css3写出这些页呢?现在就一步一步教大家如何用html和css3写登录页面。
login.html代码如下:
<form id="login">
    <h1>Log In</h1>
    <fieldset id="inputs">
        <input id="username" type="text" placeholder="Username" autofocus required>
        <input id="password" type="password" placeholder="Password" required>
    </fieldset>
    <fieldset id="actions">
        <input type="submit" id="submit" value="Log in">
        <a href="">Forgot your password?</a><a href="">Register</a>
    </fieldset>
</form>
所用到的HTML 5的特性:
placeholder – 输入框的简短提示,当该输入框获得输入焦点时,该提示信息自动消失
required – 指定该输入元素是否必须提供
autofocus – 指定输入框是否在页面加载完毕自动获取输入焦点
type=”password” – 指定密码输入(非HTML5专有)
CSS
在这里我们用到了 CSS3 的一些专有属性,包括:
Box-shadow 可以帮我们制作效果很好的边框阴影
#login
{
    box-shadow:
          0 0 2px rgba(0, 0, 0, 0.2),
          0 1px 1px rgba(0, 0, 0, .2),
          0 3px 0 #fff,
          0 4px 0 rgba(0, 0, 0, .2),
          0 6px 0 #fff,
          0 7px 0 rgba(0, 0, 0, .2);
}
Stitch effect (缝效果)
#login
{
    position: absolute;
    z-index: 0;
}

#login:before
{
    content: '';
    position: absolute;
    z-index: -1;
    border: 1px dashed #ccc;
    top: 5px;
    bottom: 5px;
    left: 5px;
    right: 5px;
    -moz-box-shadow: 0 0 0 1px #fff;
    -webkit-box-shadow: 0 0 0 1px #fff;
    box-shadow: 0 0 0 1px #fff;
}
Subtle gradient lines (微妙的渐变线)
h1
{
    text-shadow: 0 1px 0 rgba(255, 255, 255, .7), 0px 2px 0 rgba(0, 0, 0, .5);
    text-transform: uppercase;
    text-align: center;
    color: #666;
    margin: 0 0 30px 0;
    letter-spacing: 4px;
    font: normal 26px/1 Verdana, Helvetica;
    position: relative;
}

h1:after, h1:before
{
    background-color: #777;
    content: "";
    height: 1px;
    position: absolute;
    top: 15px;
    width: 120px;
}

h1:after
{
    background-image: -webkit-gradient(linear, left top, right top, from(#777), to(#fff));
    background-image: -webkit-linear-gradient(left, #777, #fff);
    background-image: -moz-linear-gradient(left, #777, #fff);
    background-image: -ms-linear-gradient(left, #777, #fff);
    background-image: -o-linear-gradient(left, #777, #fff);
    background-image: linear-gradient(left, #777, #fff);
    right: 0;
}

h1:before
{
    background-image: -webkit-gradient(linear, right top, left top, from(#777), to(#fff));
    background-image: -webkit-linear-gradient(right, #777, #fff);
    background-image: -moz-linear-gradient(right, #777, #fff);
    background-image: -ms-linear-gradient(right, #777, #fff);
    background-image: -o-linear-gradient(right, #777, #fff);
    background-image: linear-gradient(right, #777, #fff);
    left: 0;
}
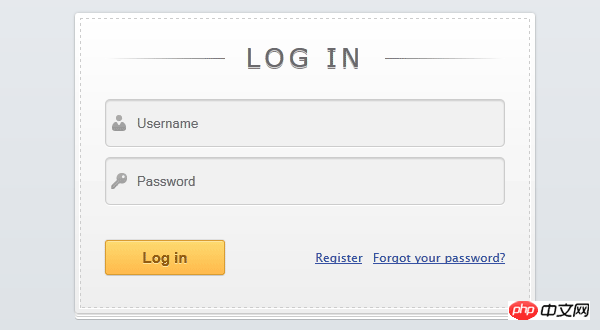
最终结果

以上就是用html5和css3写出的登录页面,怎么样大家学会了吗?
Atas ialah kandungan terperinci 用html5和css3写出登录页面教程. Untuk maklumat lanjut, sila ikut artikel berkaitan lain di laman web China PHP!
Kenyataan:
Kandungan artikel ini disumbangkan secara sukarela oleh netizen, dan hak cipta adalah milik pengarang asal. Laman web ini tidak memikul tanggungjawab undang-undang yang sepadan. Jika anda menemui sebarang kandungan yang disyaki plagiarisme atau pelanggaran, sila hubungi admin@php.cn
Artikel sebelumnya:PHP支付宝接口实例精讲Artikel seterusnya:php二次开发难吗?二次开发的四个基本要求
Artikel berkaitan
Lihat lagi- Cara menggunakan cURL untuk melaksanakan permintaan Dapatkan dan Hantar dalam PHP
- Cara menggunakan cURL untuk melaksanakan permintaan Dapatkan dan Hantar dalam PHP
- Cara menggunakan cURL untuk melaksanakan permintaan Dapatkan dan Hantar dalam PHP
- Cara menggunakan cURL untuk melaksanakan permintaan Dapatkan dan Hantar dalam PHP
- Semua simbol ungkapan dalam ungkapan biasa (ringkasan)

