Rumah >pembangunan bahagian belakang >Tutorial Python >Python中关于自动获取公网IP的实例讲解
Python中关于自动获取公网IP的实例讲解
- 黄舟asal
- 2017-10-09 10:40:141735semak imbas
下面小编就为大家带来一篇Python之自动获取公网IP的实例讲解。小编觉得挺不错的,现在就分享给大家,也给大家做个参考。一起跟随小编过来看看吧
0.预备知识
0.1 SQL基础
ubuntu、Debian系列安装:
root@raspberrypi:~/python-script# apt-get install mysql-server
Redhat、Centos 系列安装:
[root@localhost ~]# yum install mysql-server
登录数据库
pi@raspberrypi:~ $ mysql -uroot -p -hlocalhost
Enter password:
Welcome to the MariaDB monitor. Commands end with ; or \g.
Your MariaDB connection id is 36
Server version: 10.0.30-MariaDB-0+deb8u2 (Raspbian)

Copyright (c) 2000, 2016, Oracle, MariaDB Corporation Ab and others.

Type 'help;' or '\h' for help. Type '\c' to clear the current input statement.

MariaDB [(none)]>
其中,mysql是客户端命令 -u是指定用户 -p是密码 -h是主机
创建数据库、创建数据表
创建数据库语法如下
MariaDB [(none)]> help create database
Name: 'CREATE DATABASE'
Description:
Syntax:
CREATE {DATABASE | SCHEMA} [IF NOT EXISTS] db_name
 [create_specification] ...

create_specification:
 [DEFAULT] CHARACTER SET [=] charset_name
 | [DEFAULT] COLLATE [=] collation_name

CREATE DATABASE creates a database with the given name. To use this
statement, you need the CREATE privilege for the database. CREATE
SCHEMA is a synonym for CREATE DATABASE.

URL: https://mariadb.com/kb/en/create-database/


MariaDB [(none)]>
创建数据表语法如下
MariaDB [(none)]> help create table
Name: 'CREATE TABLE'
Description:
Syntax:
CREATE [TEMPORARY] TABLE [IF NOT EXISTS] tbl_name
 (create_definition,...)
 [table_options]
 [partition_options]

Or:

CREATE [TEMPORARY] TABLE [IF NOT EXISTS] tbl_name
 [(create_definition,...)]
 [table_options]
 [partition_options]
 select_statement
创建数据库ServiceLogs
MariaDB [(none)]> CREATE DATABASE `ServiceLogs`
创建数据表
MariaDB [(none)]> CREATE TABLE `python_ip_logs` (
 `serial_number` bigint(20) NOT NULL AUTO_INCREMENT,
 `time` datetime DEFAULT NULL,
 `old_data` varchar(50) DEFAULT NULL,
 `new_data` varchar(50) DEFAULT NULL,
 PRIMARY KEY (`serial_number`)
) ENGINE=InnoDB AUTO_INCREMENT=3 DEFAULT CHARSET=latin1
表内容的查询
 MariaDB [ServiceLogs]> select * from python_ip_logs;
 Empty set (0.00 sec)
0.2 python连接操作MySQL
模块下载安装
下载路径: https://pypi.python.org/pypi/MySQL-python
安装:
安装:
解压
unzip MySQL-python-1.2.5.zip
进入解压后目录
cd MySQL-python-1.2.5/
安装依赖
apt-get install libmysqlclient-dev
安装
python setup.py install
如果为0则安装OK
echo $?
连接Mysql
root@raspberrypi:~/python-script# cat p_mysql_3.py
#!/usr/bin/env python

import MySQLdb

try :
  conn = MySQLdb.connect("主机","用户名","密码","ServiceLogs")
  print ("Connect Mysql successful")
except:
  print ("Connect MySQL Fail")
root@raspberrypi:~/python-script#
如果输出Connect Mysql successful则说明连接OK
Python MySQL insert语句
root@raspberrypi:~/python-script# cat p_mysql1.py
#!/usr/bin/env python

import MySQLdb

db = MySQLdb.connect("localhost","root","root","ServiceLogs")

cursor = db.cursor()

sql = "insert INTO python_ip_logs VALUES (DEFAULT,'2017-09-29 22:46:00','123','456')"

cursor.execute(sql)
db.commit()

db.close()
root@raspberrypi:~/python-script#
执行完成后可以mysql客户端SELECT语句查看结果
1.需求
1.1 需求
由于宽带每次重启都会重新获得一个新的IP,那么在这种状态下,在进行ssh连接的时候会出现诸多的不便,好在之前还有花生壳软件,它能够通过域名来找到你的IP地址,进行访问,这样是最好的,不过最近花生壳也要进行实名认证才能够使用,于是乎,这就催发了我写一个python脚本来获取公网IP的冲动。
实现效果:当IP变更时,能够通过邮件进行通知,且在数据库中写入数据
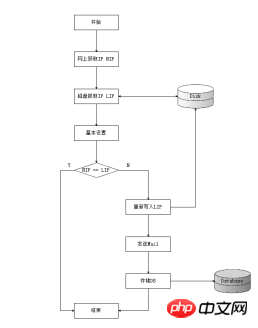
1.2 大致思路

1.3 流程图


其他代码均没有什么好画的
2.代码编写
2.1.1 编写python代码
getnetworkip.py
root@raspberrypi:~/python-script# cat getnetworkip.py
#!/usr/bin/env python
# coding:UTF-8

import requests
import send_mail
import savedb

def get_out_ip() :
  url = r'http://www.trackip.net/'
  r = requests.get(url)
  txt = r.text
  ip = txt[txt.find('title')+6:txt.find('/title')-1]
  return (ip)

def main() :
  try:
    savedb.general_files()

    tip = get_out_ip()
    cip = savedb.read_files()


    if savedb.write_files(cip,tip) :
      send_mail.SamMail(get_out_ip())
  except :
    return False

if __name__=="__main__" :
  main()
root@raspberrypi:~/python-script#
savedb.py
root@raspberrypi:~/python-script# cat savedb.py
#!/usr/bin/env python

import MySQLdb
import os
import time

dirname = "logs"
filename = "logs/.ip_tmp"

def general_files(Default_String="Null") :

  var1 = Default_String

  if not os.path.exists(dirname) :
    os.makedirs(dirname)

  if not os.path.exists(filename) :
    f = open(filename,'w')
    f.write(var1)
    f.close()

def read_files() :
  f = open(filename,'r')
  txt = f.readline()
  return (txt)

def write_files(txt,new_ip) :
  if not txt == new_ip :
    NowTime = time.strftime("%Y-%m-%d %H:%M:%S", time.localtime())
    old_ip = read_files()
    os.remove(filename)
    general_files(new_ip)
    write_db(NowTime,old_ip,new_ip)
    return True
  else:
    return False


def write_db(NowTime,Old_ip,New_ip) :
  db = MySQLdb.connect("主机","用户名","密码","库名")

  cursor = db.cursor()

  sql = """
    INSERT INTO python_ip_logs
    VALUES
    (DEFAULT,"%s","%s","%s")
  """ %(NowTime,Old_ip,New_ip)

  try:
    cursor.execute(sql)
    db.commit()
  except:
    db.rollback()

  db.close()
root@raspberrypi:~/python-script#
send_mail.py
root@raspberrypi:~/python-script# cat send_mail.py
#!/usr/bin/env python
import smtplib
import email.mime.text
def SamMail(HtmlString) :
HOST = "smtp.163.com"
SUBJECT = "主题"
TO = "对方的邮箱地址"
FROM = "来自于哪里"
Remask = "The IP address has been changed"
msg = email.mime.text.MIMEText("""
<html>
<head>
<meta charset="utf-8" />
</head>
<body>
<em><h1>ip:%s</h1></em>
</body>
</html>
""" %(HtmlString),"html","utf-8")
msg['Subject'] = SUBJECT
msg['From'] = FROM
msg['TO'] = TO
try:
server = smtplib.SMTP()
server.connect(HOST,'25')
server.starttls()
server.login("用户名","密码")
server.sendmail(FROM,TO,msg.as_string())
server.quit()
except:
print ("Send mail Error")
root@raspberrypi:~/python-script#
print ("%s" %(line),end='')3.效果
收到的邮件如下:

利用SELECT查看表,效果如下:

把脚本放入crontab中,让它执行定时任务即可
Atas ialah kandungan terperinci Python中关于自动获取公网IP的实例讲解. Untuk maklumat lanjut, sila ikut artikel berkaitan lain di laman web China PHP!

