准备工作:
1、Intellij IDEA (ULTIMATE版):官网下载地址
2、JDK
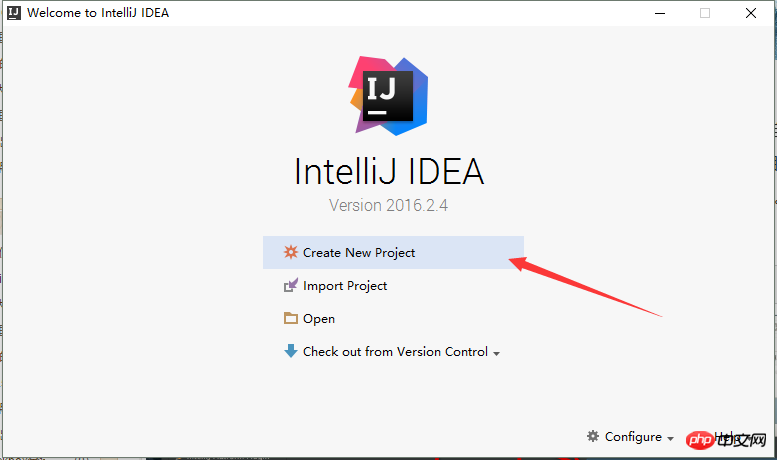
一、创建新项目

二、左侧面板选择Spring Initializr

输入项目名称,项目组名称和项目ID,点击进入下一步

下面的页面是用于添加依赖的,可以根据需求,添加依赖。或者在pom.xml文件进行添加也可以。主要包括:Core(核心依赖)、SQL、NOSQL
当前测试只需勾选 Web。

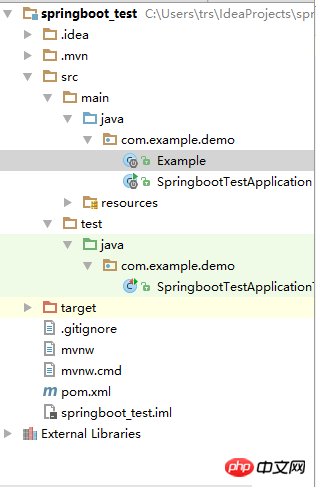
点击Next,项目创建结束。项目架构如下所示:(注:Example.java是我添加的)

二、在相应目录下创建 Example.java。代码如下:
package com.example.demo;

import org.slf4j.Logger;
import org.slf4j.LoggerFactory;
import org.springframework.boot.autoconfigure.EnableAutoConfiguration;
import org.springframework.web.bind.annotation.PathVariable;
import org.springframework.web.bind.annotation.RequestMapping;
import org.springframework.web.bind.annotation.RestController;

@RestController
@EnableAutoConfiguration
public class Example {
    @RequestMapping("/")
    String home() {
        return "Hello World!";
    }

    @RequestMapping("/hello/{myName}")
    String index(@PathVariable String myName) {
        return "Hello "+myName+"!!!";
    }
}
三、运行项目,选中 SpringbootTestApplication.java,右击--Run 'SpringbootTestApplication' ,或者点击如图所示按钮:

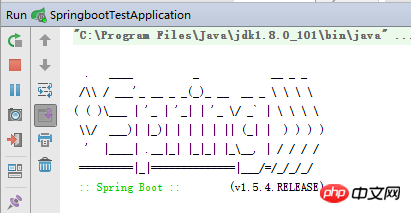
四、程序成功启动,控制台如下所示(部分):


五、最后我们来测试一下:输入 http://localhost:8080/ 和 http://localhost:8080/hello/王大陆


测试成功!!!
最后,另外附上pom.xml代码,仅供参考。
930406f08da8ee4a2ff134b688d29d1d
261ccf601aed9e706bad7e14d745ea63
   f88eb0eb1aecac9ee9b4f14c6ec6df3b4.0.064e738e3986bec0362927b9ad33d6f1a

   05a8acc5c31084a4f61ade01873802cacom.example192ca2f7b8c770b01c8f81e6bdd5b947
   9bc4cbb67f66e148869423c0d27e5f90springboot_testb68fb17cb904a46b73e6272850323873
   3d689bd3819ead35ed794427bd12f4590.0.1-SNAPSHOT83a577b3f930c490b31329be5e672d0b
   0d5281799fde01379a2f5b5ea0c57ee5jarb381c39f05d1340a5f54760f38fa259d

   8a11bc632ea32a57b3e3693c7987c420springboot_testdf406f776eecbaf16b62325323196f14
   8b55addfb40ddf4a384b1010d729e503Demo project for Spring Boota11945cc7b2902590ebb81ca9fd0b283

   58652436a08d62d32b90566dafe0913c
      05a8acc5c31084a4f61ade01873802caorg.springframework.boot192ca2f7b8c770b01c8f81e6bdd5b947
      9bc4cbb67f66e148869423c0d27e5f90spring-boot-starter-parentb68fb17cb904a46b73e6272850323873
      3d689bd3819ead35ed794427bd12f4591.5.4.RELEASE83a577b3f930c490b31329be5e672d0b
      9d08dd43193b87e544f7f9753dac4bce 8d2d71f76b067132be80f6f649e0b044
   db7b8d074c72824ed121864240fe4c81

   a01741acb88936e4cea4237317380dd9
      1c7a7393b6227ec4d47c36077ff090b8UTF-8e1707586e242e616eb540a7accd7b351
      d2d8c130ea6225f24b1c2ce2131af998UTF-837d0ee9d6f821be650562ff4d5ce07f8
      cba97bffed69576781755455c6f1e4131.837fea447ce86e32369605f68ca6046c0
   86cd8b5c0fbd401fb69261955cf13796

   fce2022be5e87c17c94245fd7ccbf1d9
      8a6cc4527fc0e71b0dfbcd757b4f1373
      b4b38e33757a6497aa8690936b905cc1
         05a8acc5c31084a4f61ade01873802caorg.springframework.boot192ca2f7b8c770b01c8f81e6bdd5b947
         9bc4cbb67f66e148869423c0d27e5f90spring-boot-starter-webb68fb17cb904a46b73e6272850323873
      09a0e22e5aaafd848ae04665be625b91

      b4b38e33757a6497aa8690936b905cc1
         05a8acc5c31084a4f61ade01873802caorg.springframework.boot192ca2f7b8c770b01c8f81e6bdd5b947
         9bc4cbb67f66e148869423c0d27e5f90spring-boot-starter-testb68fb17cb904a46b73e6272850323873
         06db57cb000bdd2564c5b32a302b10e2test03b1008234ba0cf6ad3c873aea327e8a
      09a0e22e5aaafd848ae04665be625b91
   d233ceef72c18d2307de4871b5eff5ad

   5ac54a929980b32fdd2e48b6a8da067c
      c4222ff3007372f15ec728b963e717b6
         33ca7039399a4759a8764ea38765dd46
            05a8acc5c31084a4f61ade01873802caorg.springframework.boot192ca2f7b8c770b01c8f81e6bdd5b947
            9bc4cbb67f66e148869423c0d27e5f90spring-boot-maven-pluginb68fb17cb904a46b73e6272850323873
         9424ec9162a9b85f34067d0c54f34b32
      f3567a435ac6132b26525998d793443b
   f82c24fb6fac67972f6e79c18ccef56a
1755c7176d4002e2a322de4f48c796fa
这是第一次接触 SpringBoot架构,恩,先记下来,免得以后忘记了
Atas ialah kandungan terperinci SpringBoot入门第一章:Hello World. Untuk maklumat lanjut, sila ikut artikel berkaitan lain di laman web China PHP!
 Bagaimanakah JVM mengendalikan perbezaan dalam sistem operasi API?Apr 27, 2025 am 12:18 AM
JVM Mengendalikan Perbezaan API Sistem Operasi melalui JavanativeInterface (JNI) dan Perpustakaan Standard Java: 1. JNI membenarkan kod Java untuk memanggil kod tempatan dan terus berinteraksi dengan API Sistem Operasi. 2. Perpustakaan Standard Java menyediakan API bersatu, yang dipetakan secara dalaman kepada API sistem operasi yang berbeza untuk memastikan kod tersebut berjalan di seluruh platform.
 Bagaimanakah modulariti yang diperkenalkan dalam kemerdekaan platform kesan Java 9?Apr 27, 2025 am 12:15 AM
modularitydoesnotdirectlyaffectjava'splatformindected.java'splatformindectenceismaintybythejvm, butmodularityinfluencesapplicationstructureandManagement, indirectlyimpactingplatformindect.1) DeploymentandmentandmentweMbecombecombecombecombecombecombecombecombecombecombecombecombecombecombecombecombecombecombecombecombecombecombecombecombecombecombecombecombecombecombecombecombecombecombecombecombecombecombecombecombecombecombecombecombecombecombecombecombecombecombecombecombecom
 Apakah bytecode, dan bagaimanakah ia berkaitan dengan kemerdekaan platform Java?Apr 27, 2025 am 12:06 AM
BytecodeinjavaistheintermediaterepresentationThateNableSplatformindant.1) javacodeiscompiledintobytecodestoredin.classfiles.2)
 Mengapa Java dianggap sebagai bahasa bebas platform?Apr 27, 2025 am 12:03 AM
JavaachievesplatformindependencethroughavavaVirtualMachine (JVM), yang mana -yexeCuteSbytecodeonanydeviceWIjvm.1)
 Bagaimanakah antara muka pengguna grafik (GUI) menyajikan cabaran untuk kemerdekaan platform di Java?Apr 27, 2025 am 12:02 AM
Kemerdekaan platform dalam pembangunan Javagui menghadapi cabaran, tetapi boleh ditangani dengan menggunakan swing, javafx, penampilan penyatuan, pengoptimuman prestasi, perpustakaan pihak ketiga dan ujian silang platform. Pembangunan Javagui bergantung pada AWT dan Swing, yang bertujuan untuk menyediakan konsistensi rentas platform, tetapi kesan sebenar berbeza dari sistem operasi ke sistem operasi. Penyelesaian termasuk: 1) Menggunakan Swing dan Javafx sebagai Toolkit GUI; 2) menyatukan penampilan melalui uimanager.setlookandfeel (); 3) mengoptimumkan prestasi untuk memenuhi platform yang berbeza; 4) menggunakan perpustakaan pihak ketiga seperti Apachepivot atau SWT; 5) Melaksanakan ujian silang platform untuk memastikan konsistensi.
 Apakah aspek pembangunan Java yang bergantung kepada platform?Apr 26, 2025 am 12:19 AM
Javadevelopmentisnotentirelyplatform-independentduetoseveralfactors.1) jvmvariationsaffecperformanceandbehavioracrossdifferentos.2) nativelibrariesviajniintroduceplatform-specificiSsues.3)
 Adakah terdapat perbezaan prestasi semasa menjalankan kod Java pada platform yang berbeza? Kenapa?Apr 26, 2025 am 12:15 AM
Kod Java akan mempunyai perbezaan prestasi apabila berjalan pada platform yang berbeza. 1) Strategi pelaksanaan dan pengoptimuman JVM adalah berbeza, seperti OracleJDK dan OpenJDK. 2) Ciri -ciri sistem operasi, seperti pengurusan memori dan penjadualan thread, juga akan menjejaskan prestasi. 3) Prestasi boleh ditingkatkan dengan memilih JVM yang sesuai, menyesuaikan parameter JVM dan pengoptimuman kod.
 Apakah beberapa batasan kemerdekaan platform Java?Apr 26, 2025 am 12:10 AM
Java'splatformindecthaslimitationscludingperformanceOverhead, VersionCompateIssues, cabaranwithnativelibraryintegration, platform-specificfeatures, danjvminstallation/penyelenggaraan.


Alat AI Hot

Undresser.AI Undress
Apl berkuasa AI untuk mencipta foto bogel yang realistik

AI Clothes Remover
Alat AI dalam talian untuk mengeluarkan pakaian daripada foto.

Undress AI Tool
Gambar buka pakaian secara percuma

Clothoff.io
Penyingkiran pakaian AI

Video Face Swap
Tukar muka dalam mana-mana video dengan mudah menggunakan alat tukar muka AI percuma kami!

Artikel Panas

Alat panas

Pelayar Peperiksaan Selamat
Pelayar Peperiksaan Selamat ialah persekitaran pelayar selamat untuk mengambil peperiksaan dalam talian dengan selamat. Perisian ini menukar mana-mana komputer menjadi stesen kerja yang selamat. Ia mengawal akses kepada mana-mana utiliti dan menghalang pelajar daripada menggunakan sumber yang tidak dibenarkan.

Notepad++7.3.1
Editor kod yang mudah digunakan dan percuma

Penyesuai Pelayan SAP NetWeaver untuk Eclipse
Integrasikan Eclipse dengan pelayan aplikasi SAP NetWeaver.

SublimeText3 versi Cina
Versi Cina, sangat mudah digunakan

EditPlus versi Cina retak
Saiz kecil, penyerlahan sintaks, tidak menyokong fungsi gesaan kod


