


本篇文章主要介绍了一些常用的Spring Bean扩展接口以及它们的简单用法,具有很好的参考价值。下面跟着小编一起来看下吧
前言
Spring是一款非常强大的框架,可以说是几乎所有的企业级Java项目使用了Spring,而Bean又是Spring框架的核心。
Spring框架运用了非常多的设计模式,从整体上看,它的设计严格遵循了OCP----开闭原则,即:
1、保证对修改关闭,即外部无法修改Spring整个运作的流程
2、提供对扩展开放,即可以通过继承、实现Spring提供的众多抽象类与接口来改变类加载的行为
开卷有益,阅读Spring源码(无需每个类都看得很细,大体流程能梳理出来即可)对于个人水平的提升是帮助非常大的,同时也能在工作中即使发现和解决一些不常见的Spring问题。
不过,本文的目的不是整理Spring的流程,而是通过介绍一些常用的Spring Bean工具类,来让我们可以更好地使用Spring提供给开发者的多种特性,下面让我们开始吧。
InitialingBean和DisposableBean
InitialingBean是一个接口,提供了一个唯一的方法afterPropertiesSet()。
DisposableBean也是一个接口,提供了一个唯一的方法destory()。
这两个接口是一组的,功能类似,因此放在一起:前者顾名思义在Bean属性都设置完毕后调用afterPropertiesSet()方法做一些初始化的工作,后者在Bean生命周期结束前调用destory()方法做一些收尾工作。下面看一下例子,为了能明确地知道afterPropertiesSet()方法的调用时机,加上一个属性,给属性set方法,在set方法中打印一些内容:
/**
 * @author 五月的仓颉 http://www.cnblogs.com/xrq730/p/5721366.html
 */
public class LifecycleBean implements InitializingBean, DisposableBean
{
  @SuppressWarnings("unused")
  private String  lifeCycleBeanName;

  public void setLifeCycleBeanName(String lifeCycleBeanName)
  {
    System.out.println("Enter LifecycleBean.setLifeCycleBeanName(), lifeCycleBeanName = " + lifeCycleBeanName);
    this.lifeCycleBeanName = lifeCycleBeanName;
  }

  public void destroy() throws Exception
  {
    System.out.println("Enter LifecycleBean.destroy()");
  }

  public void afterPropertiesSet() throws Exception
  {
    System.out.println("Enter LifecycleBean.afterPropertiesSet()");
  }

  public void beanStart()
  {
    System.out.println("Enter LifecycleBean.beanStart()");
  }
  public void beanEnd()
  {
    System.out.println("Enter LifecycleBean.beanEnd()");
  }
}
配置一个spring.xml:
<?xml version="1.0" encoding="UTF-8"?>
<beans xmlns="http://www.springframework.org/schema/beans"
  xmlns:xsi="http://www.w3.org/2001/XMLSchema-instance"
  xsi:schemaLocation="http://www.springframework.org/schema/beans
  http://www.springframework.org/schema/beans/spring-beans-4.1.xsd">

  <bean id="lifeCycleBean" class="org.xrq.bean.lifecycle.LifecycleBean">
    <property name="lifeCycleBeanName" value="lifeCycleBean" />
  </bean>
</beans>
启动Spring容器,LifecycleBean执行的结果为:
Enter LifecycleBean.setLifeCycleBeanName(), lifeCycleBeanName = lifeCycleBean
Enter LifecycleBean.afterPropertiesSet()
Enter LifecycleBean.beanStart()
Enter LifecycleBean.destroy()
Enter LifecycleBean.beanEnd()
执行结果和我们想的一样,afterPropertiesSet()方法就如同它的名字所表示的那样,是在Bean的属性都被设置完毕之后,才会调用。
关于这两个接口,我总结几点:
1、InitializingBean接口、Disposable接口可以和init-method、destory-method配合使用,接口执行顺序优先于配置
2、InitializingBean接口、Disposable接口底层使用类型强转.方法名()进行直接方法调用,init-method、destory-method底层使用反射,前者和Spring耦合程度更高但效率高,后者解除了和Spring之间的耦合但是效率低,使用哪个看个人喜好
3、afterPropertiesSet()方法是在Bean的属性设置之后才会进行调用,某个Bean的afterPropertiesSet()方法执行完毕才会执行下一个Bean的afterPropertiesSet()方法,因此不建议在afterPropertiesSet()方法中写处理时间太长的方法
BeanNameAware、ApplicationContextAware和BeanFactoryAware
这三个接口放在一起写,是因为它们是一组的,作用相似。
"Aware"的意思是"感知到的",那么这三个接口的意思也不难理解:
1、实现BeanNameAware接口的Bean,在Bean加载的过程中可以获取到该Bean的id
2、实现ApplicationContextAware接口的Bean,在Bean加载的过程中可以获取到Spring的ApplicationContext,这个尤其重要,ApplicationContext是Spring应用上下文,从ApplicationContext中可以获取包括任意的Bean在内的大量Spring容器内容和信息
3、实现BeanFactoryAware接口的Bean,在Bean加载的过程中可以获取到加载该Bean的BeanFactory
看一下例子:
/**
 * @author 五月的仓颉 http://www.cnblogs.com/xrq730/p/5721366.html
 */
public class AwareBean implements BeanNameAware, BeanFactoryAware, ApplicationContextAware
{
  private String           beanName;

  private ApplicationContext    applicationContext;

  private BeanFactory        beanFactory;

  public void setBeanName(String beanName)
  {
    System.out.println("Enter AwareBean.setBeanName(), beanName = " + beanName + "\n");
    this.beanName = beanName;
  }

  public void setApplicationContext(ApplicationContext applicationContext) throws BeansException
  {
    System.out.println("Enter AwareBean.setApplicationContext(), applicationContext = " + applicationContext + "\n");
    this.applicationContext = applicationContext;
  }

  public void setBeanFactory(BeanFactory beanFactory) throws BeansException
  {
    System.out.println("Enter AwareBean.setBeanFactory(), beanfactory = " + beanFactory + "\n");
    this.beanFactory = beanFactory;
  }
}
配置一个Spring.xml:
<?xml version="1.0" encoding="UTF-8"?>
<beans xmlns="http://www.springframework.org/schema/beans"
  xmlns:xsi="http://www.w3.org/2001/XMLSchema-instance"
xsi:schemaLocation="http://www.springframework.org/schema/beans
http://www.springframework.org/schema/beans/spring-beans-4.1.xsd">
<bean id="AwareBean" class="org.xrq.bean.aware.AwareBean" />
</beans>
启动Spring容器后的执行结果为:
Enter AwareBean.setBeanName(), beanName = AwareBean

Enter AwareBean.setBeanFactory(), beanfactory = org.springframework.beans.factory.support.DefaultListableBeanFactory@2747fda0: defining beans [AwareBean,org.springframework.context.annotation.internalConfigurationAnnotationProcessor,org.springframework.context.annotation.internalAutowiredAnnotationProcessor,org.springframework.context.annotation.internalRequiredAnnotationProcessor,org.springframework.context.annotation.internalCommonAnnotationProcessor,org.springframework.context.annotation.ConfigurationClassPostProcessor.importAwareProcessor,org.springframework.context.annotation.ConfigurationClassPostProcessor.enhancedConfigurationProcessor]; root of factory hierarchy

Enter AwareBean.setApplicationContext(), applicationContext = org.springframework.context.support.GenericApplicationContext@5514cd80: startup date [Mon Aug 08 19:23:30 CST 2016]; root of context hierarchy
关于这三个接口以及上面的打印信息,总结几点:
1、如果你的BeanName、ApplicationContext、BeanFactory有用,那么就自己定义一个变量将它们保存下来,如果没用,那么只需要实现setXXX()方法,用一下Spring注入进来的参数即可
2、如果Bean同时还实现了InitializingBean,容器会保证BeanName、ApplicationContext和BeanFactory在调用afterPropertiesSet()方法被注入
FactoryBean
FactoryBean在Spring中是非常有用的,使用Eclipse/MyEclipse的朋友可以对FactoryBean使用ctrl+t查看一下,FactoryBean这个接口在Spring容器中有大量的子实现。
传统的Spring容器加载一个Bean的整个过程,都是由Spring控制的,换句话说,开发者除了设置Bean相关属性之外,是没有太多的自主权的。FactoryBean改变了这一点,开发者可以个性化地定制自己想要实例化出来的Bean,方法就是实现FactoryBean接口。
看一下代码例子,为了讲清楚FactoryBean,内容相对多一些,首先定义一个接口Animal:
public interface Animal
{
  public void move();
}
定义两个实现类Monkey和Tiger:
public class Monkey implements Animal
{
  public void move()
  {
    System.out.println("Monkey move!");
  }
}
public class Tiger implements Animal
{
public void move()
{
System.out.println("Tiger move!");
}
}写一个实现类,实现FactoryBean接口:
/**
 * @author 五月的仓颉 http://www.cnblogs.com/xrq730/p/5721366.html
 */
public class AnimalFactoryBean implements FactoryBean<Animal>
{
  private String  animal;

  public Animal getObject() throws Exception
  {
    if ("Monkey".equals(animal))
    {
      return new Monkey();
    }
    else if ("Tiger".equals(animal))
    {
      return new Tiger();
    }
    else
    {
      return null;
    }
  }

  public Class<?> getObjectType()
  {
    return Animal.class;
  }

  public boolean isSingleton()
  {
    return true;
  }
  public void setAnimal(String animal)
  {
    this.animal = animal;
  }
}
配置一个spring.xml,注入属性Tiger:
<?xml version="1.0" encoding="UTF-8"?>
<beans xmlns="http://www.springframework.org/schema/beans"
  xmlns:xsi="http://www.w3.org/2001/XMLSchema-instance"
  xsi:schemaLocation="http://www.springframework.org/schema/beans
  http://www.springframework.org/schema/beans/spring-beans-4.1.xsd">

  <bean id="animal" class="org.xrq.bean.factory.AnimalFactoryBean">
    <property name="animal" value="Tiger"/>
  </bean>
</beans>
写一个JUnit的测试类:
@RunWith(SpringJUnit4ClassRunner.class)
@ContextConfiguration(locations = {
    "classpath*:spring.xml",
})
public class BaseTest
{
  @Resource
  private Animal  animal;

  @Test
  public void aa()
  {
    animal.move();
  }
}
查看一下运行结果:
Tiger move!
看到最后得到的并不是FactoryBean本身,而是FactoryBean的泛型对象,这就是FactoryBean的作用。FactoryBean的几个方法:
1、getObject()方法是最重要的,控制Bean的实例化过程
2、getObjectType()方法获取接口返回的实例的class
3、isSingleton()方法获取该Bean是否为一个单例的Bean
像我这段代码的功能就是传入一个String类型的参数,可以动态控制生成出来的是接口的哪种子类。有了FactoryBean,同样的我们也可以灵活地操控Bean的生成。
BeanPostProcessor
之前的InitializingBean、DisposableBean、FactoryBean包括init-method和destory-method,针对的都是某个Bean控制其初始化的操作,而似乎没有一种办法可以针对每个Bean的生成前后做一些逻辑操作,PostProcessor则帮助我们做到了这一点,先看一个简单的BeanPostProcessor。
网上有一张图画了Bean生命周期的过程,画得挺好,原图出处:
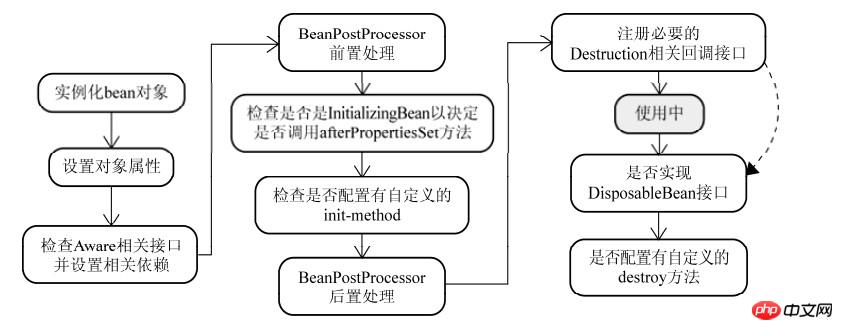
BeanPostProcess接口有两个方法,都可以见名知意:
1、postProcessBeforeInitialization:在初始化Bean之前
2、postProcessAfterInitialization:在初始化Bean之后
值得注意的是,这两个方法是有返回值的,不要返回null,否则getBean的时候拿不到对象。
写一段测试代码,首先定义一个普通的Bean,为了后面能区分,给Bean加一个属性:
public class CommonBean
{
  private String commonName;
  public void setCommonName(String commonName)
  {
    this.commonName = commonName;
  }
  public void initMethod()
  {
    System.out.println("Enter CommonBean.initMethod(), commonName = " + commonName);
  }
}
定义一个PostProcess,实现BeanPostProcess接口:
/**
 * @author 五月的仓颉 http://www.cnblogs.com/xrq730/p/5721366.html
 */
public class PostProcessorBean implements BeanPostProcessor
{
  public Object postProcessAfterInitialization(Object bean, String beanName) throws BeansException
  {
    System.out.println("Enter ProcessorBean.postProcessAfterInitialization()\n");
    return bean;
  }
  public Object postProcessBeforeInitialization(Object bean, String beanName) throws BeansException
  {
    System.out.println("Enter ProcessorBean.postProcessBeforeInitialization()");
    return bean;
  }
}
配置一个spring.xml,给CommonBean的commonName赋予不同的值以区分:
<?xml version="1.0" encoding="UTF-8"?>
<beans xmlns="http://www.springframework.org/schema/beans"
  xmlns:xsi="http://www.w3.org/2001/XMLSchema-instance"
  xsi:schemaLocation="http://www.springframework.org/schema/beans
  http://www.springframework.org/schema/beans/spring-beans-4.1.xsd">

  <bean id="common0" class="org.xrq.bean.common.CommonBean" init-method="initMethod">
    <property name="commonName" value="common0"/>
  </bean>

  <bean id="common1" class="org.xrq.bean.common.CommonBean" init-method="initMethod">
    <property name="commonName" value="common1"/>
  </bean>
  <bean id="postProcessorBean" class="org.xrq.bean.processor.PostProcessorBean" />
</beans>
运行一个Spring容器, 初始化结果为:
Enter ProcessorBean.postProcessBeforeInitialization()
Enter CommonBean.initMethod(), commonName = common0
Enter ProcessorBean.postProcessAfterInitialization()

Enter ProcessorBean.postProcessBeforeInitialization()
Enter CommonBean.initMethod(), commonName = common1
Enter ProcessorBean.postProcessAfterInitialization()
Enter ProcessorBean.postProcessBeforeInitialization()
Enter ProcessorBean.postProcessAfterInitialization()
看到每个Bean初始化前后都会分别执行postProcessorBeforeInitiallization()方法与postProcessorAfterInitialization()方法,最后两行出现原因是,PostProcessorBean本身也是一个Bean。
BeanFactoryPostProcessor
接下来看另外一个PostProcessor----BeanFactoryPostProcessor。
Spring允许在Bean创建之前,读取Bean的元属性,并根据自己的需求对元属性进行改变,比如将Bean的scope从singleton改变为prototype,最典型的应用应当是PropertyPlaceholderConfigurer,替换xml文件中的占位符,替换为properties文件中相应的key对应的value,这将会在下篇文章中专门讲解PropertyPlaceholderConfigurer的作用及其原理。
BeanFactoryPostProcessor就可以帮助我们实现上述的功能,下面来看一下BeanFactoryPostProcessor的使用,定义一个BeanFactoryPostProcessor的实现类:
/**
 * @author 五月的仓颉 http://www.cnblogs.com/xrq730/p/5721366.html
 */
public class FactoryPostProcessorBean implements BeanFactoryPostProcessor
{
  public void postProcessBeanFactory(ConfigurableListableBeanFactory configurablelistablebeanfactory)
      throws BeansException
  {
    System.out.println("Enter FactoryPostProcessorBean.postProcessBeanFactory()\n");
  }
}
spring.xml里面配置一下这个Bean,就不写了,运行一下Spring容器,结果为:
Enter FactoryPostProcessorBean.postProcessBeanFactory()

Enter ProcessorBean.postProcessBeforeInitialization()
Enter CommonBean.initMethod(), commonName = common0
Enter ProcessorBean.postProcessAfterInitialization()

Enter ProcessorBean.postProcessBeforeInitialization()
Enter CommonBean.initMethod(), commonName = common1
Enter ProcessorBean.postProcessAfterInitialization()
Enter ProcessorBean.postProcessBeforeInitialization()
Enter ProcessorBean.postProcessAfterInitialization()
从执行结果中可以看出两点:
1、BeanFactoryPostProcessor的执行优先级高于BeanPostProcessor
2、BeanFactoryPostProcessor的postProcessBeanFactory()方法只会执行一次
注意到postProcessBeanFactory方法是带了参数ConfigurableListableBeanFactory的,这就和我之前说的可以使用BeanFactoryPostProcessor来改变Bean的属性相对应起来了。ConfigurableListableBeanFactory功能非常丰富,最基本的,它携带了每个Bean的基本信息,比如我简单写一段代码:
/**
 * @author 五月的仓颉 http://www.cnblogs.com/xrq730/p/5721366.html
 */
public void postProcessBeanFactory(ConfigurableListableBeanFactory configurablelistablebeanfactory)
      throws BeansException
{
  BeanDefinition beanDefinition = configurablelistablebeanfactory.getBeanDefinition("common0");
  MutablePropertyValues beanProperty = beanDefinition.getPropertyValues();
  System.out.println("scope before change:" + beanDefinition.getScope());
  beanDefinition.setScope("singleton");
  System.out.println("scope after change:" + beanDefinition.getScope());
  System.out.println("beanProperty:" + beanProperty);
}
看一下执行结果:
scope before change:
scope after change:singleton
beanProperty:PropertyValues: length=1; bean property 'commonName'
这样就获取了Bean的生命周期以及重新设置了Bean的生命周期。ConfigurableListableBeanFactory还有很多的功能,比如添加BeanPostProcessor,可以自己去查看。
InstantiationAwareBeanPostProcessor
最后写一个叫做InstantiationAwareBeanPostProcessor的PostProcessor。
InstantiationAwareBeanPostProcessor又代表了Spring的另外一段生命周期:实例化。先区别一下Spring Bean的实例化和初始化两个阶段的主要作用:
1、实例化----实例化的过程是一个创建Bean的过程,即调用Bean的构造函数,单例的Bean放入单例池中
2、初始化----初始化的过程是一个赋值的过程,即调用Bean的setter,设置Bean的属性
之前的BeanPostProcessor作用于过程(2)前后,现在的InstantiationAwareBeanPostProcessor则作用于过程(1)前后,看一下代码,给前面的CommonBean加上构造函数:
public class CommonBean
{
  public CommonBean()
  {
    System.out.println("Enter CommonBean's constructor");
  }

  private String commonName;

  public void setCommonName(String commonName)
  {
    System.out.println("Enter CommonBean.setCommonName(), commonName = " + commonName);
    this.commonName = commonName;
  }
  public void initMethod()
  {
    System.out.println("Enter CommonBean.initMethod(), commonName = " + commonName);
  }
}
实现InstantiationAwareBeanPostProcessor接口:
/**
 * @author 五月的仓颉 http://www.cnblogs.com/xrq730/p/5721366.html
 */
public class InstantiationAwareBeanPostProcessorBean implements InstantiationAwareBeanPostProcessor
{
  public Object postProcessAfterInitialization(Object bean, String beanName) throws BeansException
  {
    System.out.println("Enter InstantiationAwareBeanPostProcessorBean.postProcessAfterInitialization()");
    return bean;
  }

  public Object postProcessBeforeInitialization(Object bean, String beanName) throws BeansException
  {
    System.out.println("Enter InstantiationAwareBeanPostProcessorBean.postProcessBeforeInitialization()");
    return bean;
  }

  public boolean postProcessAfterInstantiation(Object bean, String beanName) throws BeansException
  {
    System.out.println("Enter InstantiationAwareBeanPostProcessorBean.postProcessAfterInstantiation()");
    return true;
  }

  public Object postProcessBeforeInstantiation(Class<?> bean, String beanName) throws BeansException
  {
    System.out.println("Enter InstantiationAwareBeanPostProcessorBean.postProcessBeforeInstantiation()");
    return null;
  }
  public PropertyValues postProcessPropertyValues(PropertyValues pvs, PropertyDescriptor[] pd, Object bean,
      String beanName) throws BeansException
  {
    return pvs;
  }
}
配置一下spring.xml:
<?xml version="1.0" encoding="UTF-8"?>
<beans xmlns="http://www.springframework.org/schema/beans"
  xmlns:xsi="http://www.w3.org/2001/XMLSchema-instance"
  xsi:schemaLocation="http://www.springframework.org/schema/beans
  http://www.springframework.org/schema/beans/spring-beans-4.1.xsd">

  <bean id="common" class="org.xrq.bean.common.CommonBean">
    <property name="commonName" value="common"/>
  </bean>

  <bean class="org.xrq.bean.processor.InstantiationAwareBeanPostProcessorBean" />
</beans>
启动容器,观察一下运行结果为:
Enter InstantiationAwareBeanPostProcessorBean.postProcessBeforeInstantiation()
Enter CommonBean's constructor
Enter InstantiationAwareBeanPostProcessorBean.postProcessAfterInstantiation()
Enter CommonBean.setCommonName(), commonName = common
Enter InstantiationAwareBeanPostProcessorBean.postProcessBeforeInitialization()
Enter InstantiationAwareBeanPostProcessorBean.postProcessAfterInitialization()
Enter InstantiationAwareBeanPostProcessorBean.postProcessAfterInstantiation()
Enter InstantiationAwareBeanPostProcessorBean.postProcessBeforeInitialization()
Enter InstantiationAwareBeanPostProcessorBean.postProcessAfterInitialization()
最后三行的运行结果不去关注,看到很明显的,InstantiationAwareBeanPostProcessor作用的是Bean实例化前后,即:
1、Bean构造出来之前调用postProcessBeforeInstantiation()方法
2、Bean构造出来之后调用postProcessAfterInstantiation()方法
不过通常来讲,我们不会直接实现InstantiationAwareBeanPostProcessor接口,而是会采用继承InstantiationAwareBeanPostProcessorAdapter这个抽象类的方式来使用。
后记
如果只会写个Bean,配置在xml文件里面,注入一下,那是最最基础的Spring开发者。一个中级、高级的Spring开发者,必然会对Spring中的多个扩展点有所了解,并利用这些扩展点更好地为项目服务,使得整个代码结构更加地优雅,并且可读性、可维护性更好。
【相关推荐】
1. Java免费视频教程
2. JAVA教程手册
3. 全面解析Java注解
Atas ialah kandungan terperinci 关于Spring Bean扩展接口的方法介绍. Untuk maklumat lanjut, sila ikut artikel berkaitan lain di laman web China PHP!

 Java Spring怎么实现定时任务May 24, 2023 pm 01:28 PM
java实现定时任务Jdk自带的库中,有两种方式可以实现定时任务,一种是Timer,另一种是ScheduledThreadPoolExecutor。Timer+TimerTask创建一个Timer就创建了一个线程,可以用来调度TimerTask任务Timer有四个构造方法,可以指定Timer线程的名字以及是否设置为为守护线程。默认名字Timer-编号,默认不是守护线程。主要有三个比较重要的方法:cancel():终止任务调度,取消当前调度的所有任务,正在运行的任务不受影响purge():从任务队
 Java axios与spring前后端分离传参规范是什么May 03, 2023 pm 09:55 PM
一、@RequestParam注解对应的axios传参方法以下面的这段Springjava代码为例,接口使用POST协议,需要接受的参数分别是tsCode、indexCols、table。针对这个Spring的HTTP接口,axios该如何传参?有几种方法?我们来一一介绍。@PostMapping("/line")publicList
 Spring Boot与Spring Cloud的区别与联系Jun 22, 2023 pm 06:25 PM
SpringBoot和SpringCloud都是SpringFramework的扩展,它们可以帮助开发人员更快地构建和部署微服务应用程序,但它们各自有不同的用途和功能。SpringBoot是一个快速构建Java应用的框架,使得开发人员可以更快地创建和部署基于Spring的应用程序。它提供了一个简单、易于理解的方式来构建独立的、可执行的Spring应用
 Spring 最常用的 7 大类注解,史上最强整理!Jul 26, 2023 pm 04:38 PM
随着技术的更新迭代,Java5.0开始支持注解。而作为java中的领军框架spring,自从更新了2.5版本之后也开始慢慢舍弃xml配置,更多使用注解来控制spring框架。
 从零开始学Spring CloudJun 22, 2023 am 08:11 AM
作为一名Java开发者,学习和使用Spring框架已经是一项必不可少的技能。而随着云计算和微服务的盛行,学习和使用SpringCloud成为了另一个必须要掌握的技能。SpringCloud是一个基于SpringBoot的用于快速构建分布式系统的开发工具集。它为开发者提供了一系列的组件,包括服务注册与发现、配置中心、负载均衡和断路器等,使得开发者在构建微
 Java Spring框架创建项目与Bean的存储与读取实例分析May 12, 2023 am 08:40 AM
1.Spring项目的创建1.1创建Maven项目第一步,创建Maven项目,Spring也是基于Maven的。1.2添加spring依赖第二步,在Maven项目中添加Spring的支持(spring-context,spring-beans)在pom.xml文件添加依赖项。org.springframeworkspring-context5.2.3.RELEASEorg.springframeworkspring-beans5.2.3.RELEASE刷新等待加载完成。1.3创建启动类第三步,创
 Java Spring Bean生命周期管理的示例分析Apr 18, 2023 am 09:13 AM
SpringBean的生命周期管理一、SpringBean的生命周期通过以下方式来指定Bean的初始化和销毁方法,当Bean为单例时,Bean归Spring容器管理,Spring容器关闭,就会调用Bean的销毁方法当Bean为多例时,Bean不归Spring容器管理,Spring容器关闭,不会调用Bean的销毁方法二、通过@Bean的参数(initMethod,destroyMethod)指定Bean的初始化和销毁方法1、项目结构2、PersonpublicclassPerson{publicP
 spring设计模式有哪些Dec 29, 2023 pm 03:42 PM
spring设计模式有:1、依赖注入和控制反转;2、工厂模式;3、模板模式;4、观察者模式;5、装饰者模式;6、单例模式;7、策略模式和适配器模式等。详细介绍:1、依赖注入和控制反转: 这两个设计模式是Spring框架的核心。通过依赖注入,Spring负责管理和注入组件之间的依赖关系,降低了组件之间的耦合度。控制反转则是指将对象的创建和依赖关系的管理交给Spring容器等等。


Alat AI Hot

Undresser.AI Undress
Apl berkuasa AI untuk mencipta foto bogel yang realistik

AI Clothes Remover
Alat AI dalam talian untuk mengeluarkan pakaian daripada foto.

Undress AI Tool
Gambar buka pakaian secara percuma

Clothoff.io
Penyingkiran pakaian AI

AI Hentai Generator
Menjana ai hentai secara percuma.

Artikel Panas
Alat panas

DVWA
Damn Vulnerable Web App (DVWA) ialah aplikasi web PHP/MySQL yang sangat terdedah. Matlamat utamanya adalah untuk menjadi bantuan bagi profesional keselamatan untuk menguji kemahiran dan alatan mereka dalam persekitaran undang-undang, untuk membantu pembangun web lebih memahami proses mengamankan aplikasi web, dan untuk membantu guru/pelajar mengajar/belajar dalam persekitaran bilik darjah Aplikasi web keselamatan. Matlamat DVWA adalah untuk mempraktikkan beberapa kelemahan web yang paling biasa melalui antara muka yang mudah dan mudah, dengan pelbagai tahap kesukaran. Sila ambil perhatian bahawa perisian ini

PhpStorm versi Mac
Alat pembangunan bersepadu PHP profesional terkini (2018.2.1).

SublimeText3 versi Mac
Perisian penyuntingan kod peringkat Tuhan (SublimeText3)

MinGW - GNU Minimalis untuk Windows
Projek ini dalam proses untuk dipindahkan ke osdn.net/projects/mingw, anda boleh terus mengikuti kami di sana. MinGW: Port Windows asli bagi GNU Compiler Collection (GCC), perpustakaan import yang boleh diedarkan secara bebas dan fail pengepala untuk membina aplikasi Windows asli termasuk sambungan kepada masa jalan MSVC untuk menyokong fungsi C99. Semua perisian MinGW boleh dijalankan pada platform Windows 64-bit.

ZendStudio 13.5.1 Mac
Persekitaran pembangunan bersepadu PHP yang berkuasa

