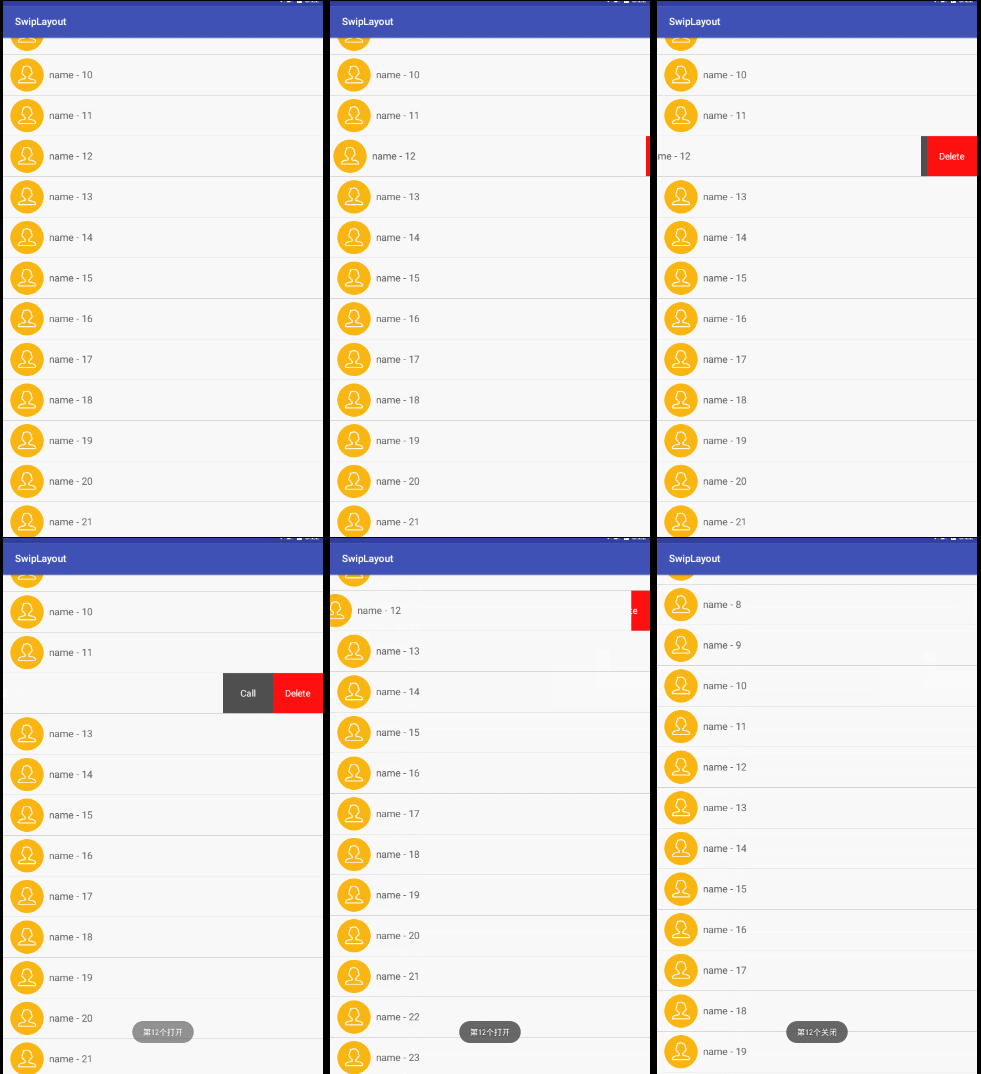
效果图:

看网上的都是两个view拼接,默认右侧的不显示,水平移动的时候把右侧的view显示出来。但是看最新版QQ上的效果不是这样的,但给人的感觉却很好,所以献丑来一发比较高仿的。
知识点:
1、ViewDragHelper 的用法;
2、滑动冲突的解决;
3、自定义viewgroup。
ViewDragHelper 出来已经比较久了 相信大家都比较熟悉,不熟悉的话google一大把这里主要简单用一下它的几个方法
1、tryCaptureView(View child, int pointerId) :确定那个子view可以滑动
2、 getViewHorizontalDragRange(View child):用我蹩脚的英语翻译一下是‘返回的是子view在水平方向上可移动的大小,以像素为单位,返回0的时候表示水平方向上不能拖动'
3、clampViewPositionHorizontal(View child, int left, int dx):在这里可以对边界进行检查,left和dx分别代表即将移动到的位置
4、onViewPositionChanged(View changedView, int left, int top,
int dx, int dy):当要捕获view,由于拖曳或者设定而发生位置变更时回调
它的基本用法是:
public SwipeLayout(Context context, AttributeSet attrs, int defStyle) {
    super(context, attrs, defStyle);
    init();
  }
  private void init() {
    viewDragHelper = ViewDragHelper.create(this, callback);
  }
   public boolean onInterceptTouchEvent(MotionEvent ev) {
    boolean result = viewDragHelper.shouldInterceptTouchEvent(ev);
   }
   public boolean onTouchEvent(MotionEvent event) {
    viewDragHelper.processTouchEvent(event);
    return true;
  }
1)、在构造方法中创建
2)、在onInterceptTouchEvent 中判断是否拦截
3 )、 在 onTouchEvent出来事件
好了 最不好理解的已经搞定了。接下来看看具体实现:
首先看布局:
<LinearLayout xmlns:android="http://schemas.android.com/apk/res/android"
  android:layout_width="match_parent"
  android:layout_height="wrap_content"
  android:orientation="vertical" >
  <scrollviewgroup.lly.com.swiplayout.SwipeLayout
    android:id="@+id/swipeLayout"
    android:layout_width="match_parent"
    android:layout_height="wrap_content" >
    <!-- delete区域的布局 -->
    <include layout="@layout/layout_delete" />
    <!-- item内容的布局 -->
    <include layout="@layout/layout_content" />
  </scrollviewgroup.lly.com.swiplayout.SwipeLayout>
</LinearLayout>
这个没什么好说的,一个自定义viewgroup包含两个子控件。
接着看看SwipeLayout是怎么实现的:
@Override
  protected void onFinishInflate() {
    super.onFinishInflate();
    deleteView = getChildAt(0);
    contentView = getChildAt(1);
  }
  @Override
  protected void onSizeChanged(int w, int h, int oldw, int oldh) {
    super.onSizeChanged(w, h, oldw, oldh);
    deleteHeight = deleteView.getMeasuredHeight();
    deleteWidth = deleteView.getMeasuredWidth();
    contentWidth = contentView.getMeasuredWidth();
    screenWidth = getWidth();
  }
  @Override
  protected void onLayout(boolean changed, int left, int top, int right,
              int bottom) {
    // super.onLayout(changed, left, top, right, bottom);
    deleteView.layout(screenWidth - deleteWidth, 0, (screenWidth - deleteWidth)
        + deleteWidth, deleteHeight);
    contentView.layout(0, 0, contentWidth, deleteHeight);
  }
上面代码进行了一些初始化的操作,重点看看onlayout里面的,我们继承的是framelayout 这里先画出来 deleteView并让他在右边,然后在上面改了一层contentView,这样显示的时候只会显示contentView。
接下来看ontouch方法
public boolean onTouchEvent(MotionEvent event) {
    //如果当前有打开的,则下面的逻辑不能执行
    if(!SwipeLayoutManager.getInstance().isShouldSwipe(this)){
      requestDisallowInterceptTouchEvent(true);
      return true;
    }
    switch (event.getAction()) {
      case MotionEvent.ACTION_DOWN:
        downX = event.getX();
        downY = event.getY();
        break;
      case MotionEvent.ACTION_MOVE:
        //1.获取x和y方向移动的距离
        float moveX = event.getX();
        float moveY = event.getY();
        float delatX = moveX - downX;//x方向移动的距离
        float delatY = moveY - downY;//y方向移动的距离
        if(Math.abs(delatX)>Math.abs(delatY)){
          //表示移动是偏向于水平方向,那么应该SwipeLayout应该处理,请求父view不要拦截
          requestDisallowInterceptTouchEvent(true);
        }
        //更新downX,downY
        downX = moveX;
        downY = moveY;
        break;
      case MotionEvent.ACTION_UP:
        break;
    }
    viewDragHelper.processTouchEvent(event);
    return true;
  }
上面主要就是对事件冲突的处理,当是水平移动的时候就请求父视图不要拦截。
接下来来重点就来了
private ViewDragHelper.Callback callback = new ViewDragHelper.Callback() {
    @Override
    public boolean tryCaptureView(View child, int pointerId) {
      return child==contentView;
    }
    @Override
    public int getViewHorizontalDragRange(View child) {
      return deleteWidth;
    }
    @Override
    public int clampViewPositionHorizontal(View child, int left, int dx) {
      if(child==contentView){
        if(left>0)left = 0;
        if(left<-deleteWidth)left = -deleteWidth;
      }
      return left;
    }
    @Override
    public void onViewPositionChanged(View changedView, int left, int top,
                     int dx, int dy) {
      super.onViewPositionChanged(changedView, left, top, dx, dy);
      //判断开和关闭的逻辑
      if(contentView.getLeft()==0 && currentState!=SwipeState.Close){
        //说明应该将state更改为关闭
        currentState = SwipeState.Close;
        //回调接口关闭的方法
        if(listener!=null){
          listener.onClose(getTag());
        }
        //说明当前的SwipeLayout已经关闭,需要让Manager清空一下
        SwipeLayoutManager.getInstance().clearCurrentLayout();
      }else if (contentView.getLeft()==-deleteWidth && currentState!=SwipeState.Open) {
        //说明应该将state更改为开
        currentState = SwipeState.Open;
        //回调接口打开的方法
        if(listener!=null){
          listener.onOpen(getTag());
        }
        //当前的Swipelayout已经打开,需要让Manager记录一下下
        SwipeLayoutManager.getInstance().setSwipeLayout(SwipeLayout.this);
      }
    }
    @Override
    public void onViewReleased(View releasedChild, float xvel, float yvel) {
      super.onViewReleased(releasedChild, xvel, yvel);
      if(contentView.getLeft()<-deleteWidth/2){
        //应该打开
        open();
      }else {
        //应该关闭
        close();
      }
    }
  };
上面这段代码里面的方法一开始我们都说过了,在来看下在tryCaptureView中我们让 contentView可以滑动,在getViewHorizontalDragRange中却东滑动范围是deleteWidth,在clampViewPositionHorizontal中对边界进行了下限制,在onViewPositionChanged中进行状态的更新, 最后在手指抬起的时候让view自动回滚,
/**
  * 打开的方法
  */
 public void open() {
   viewDragHelper.smoothSlideViewTo(contentView,-deleteWidth,contentView.getTop());
   ViewCompat.postInvalidateOnAnimation(SwipeLayout.this);
 }
 /**
  * 关闭的方法
  */
 public void close() {
   viewDragHelper.smoothSlideViewTo(contentView,0,contentView.getTop());
   ViewCompat.postInvalidateOnAnimation(SwipeLayout.this);
 };
 public void computeScroll() {
   if(viewDragHelper.continueSettling(true)){
     ViewCompat.postInvalidateOnAnimation(this);
   }
 }
这里注意一定要重写computeScroll方法,不然滑动效果动一下就不动了。
至此这个自定义framelayout就完成了
但是发现一个问题,我们在已经滑动出来的view中上下滑动时,这个view的deleteView还是显示状态,所以还要在activity中处理一下:
recyView.setOnScrollListener(new RecyclerView.OnScrollListener() {
     @Override
     public void onScrollStateChanged(RecyclerView recyclerView, int newState) {
       super.onScrollStateChanged(recyclerView, newState);
     }
     @Override
     public void onScrolled(RecyclerView recyclerView, int dx, int dy) {
       super.onScrolled(recyclerView, dx, dy);
       if(dy>0 || dy<0){
         SwipeLayoutManager.getInstance().closeCurrentLayout();
       }
     }
   });
当这个RecyclerView是上下滑动时,让子view复位。
收工。
ps:本来是在eclipse中listview中实现的,但是想想google都已经不支持eclipse了,而listview也快被RecyclerView代替了,所以最后还是切换到Android studio,用RecyclerView实现了一套。
以上所述是小编给大家介绍的Android中自定义view实现侧滑效果,希望对大家有所帮助,如果大家有任何疑问请给我留言,小编会及时回复大家的。在此也非常感谢大家对PHP中文网的支持!
更多Android中自定义view实现侧滑效果相关文章请关注PHP中文网!

Alat AI Hot

Undresser.AI Undress
Apl berkuasa AI untuk mencipta foto bogel yang realistik

AI Clothes Remover
Alat AI dalam talian untuk mengeluarkan pakaian daripada foto.

Undress AI Tool
Gambar buka pakaian secara percuma

Clothoff.io
Penyingkiran pakaian AI

AI Hentai Generator
Menjana ai hentai secara percuma.

Artikel Panas

Alat panas

SecLists
SecLists ialah rakan penguji keselamatan muktamad. Ia ialah koleksi pelbagai jenis senarai yang kerap digunakan semasa penilaian keselamatan, semuanya di satu tempat. SecLists membantu menjadikan ujian keselamatan lebih cekap dan produktif dengan menyediakan semua senarai yang mungkin diperlukan oleh penguji keselamatan dengan mudah. Jenis senarai termasuk nama pengguna, kata laluan, URL, muatan kabur, corak data sensitif, cangkerang web dan banyak lagi. Penguji hanya boleh menarik repositori ini ke mesin ujian baharu dan dia akan mempunyai akses kepada setiap jenis senarai yang dia perlukan.

SublimeText3 versi Cina
Versi Cina, sangat mudah digunakan

Hantar Studio 13.0.1
Persekitaran pembangunan bersepadu PHP yang berkuasa

Muat turun versi mac editor Atom
Editor sumber terbuka yang paling popular

MinGW - GNU Minimalis untuk Windows
Projek ini dalam proses untuk dipindahkan ke osdn.net/projects/mingw, anda boleh terus mengikuti kami di sana. MinGW: Port Windows asli bagi GNU Compiler Collection (GCC), perpustakaan import yang boleh diedarkan secara bebas dan fail pengepala untuk membina aplikasi Windows asli termasuk sambungan kepada masa jalan MSVC untuk menyokong fungsi C99. Semua perisian MinGW boleh dijalankan pada platform Windows 64-bit.


