Rumah >applet WeChat >Pembangunan program mini >PHP:微信小程序 微信支付服务端集成实例详解
PHP:微信小程序 微信支付服务端集成实例详解
- 高洛峰asal
- 2017-01-10 09:49:412578semak imbas
微信小程序 微信支付服务端集
理论上集成微信支付的全部工作可以在小程序端完成,因为小程序js有访问网络的能力,但是为了安全,不暴露敏感key,而且可以使用官方提供的现成php demo更省力,于是在服务端完成签名与发起请求,小程序端只做一个wx.requestPayment(OBJECT)接口的对接。
整体集成过程与JSAPI、APP类似,先统一下单,然后拿返回的结果来请求支付。
一共三步:
1.小程序端通过wx.login的返回的code换取openid 2.服务端向微信统一下单 3.小程序端发起支付
事先准备好这几样东西:
APPID = 'wx426b3015555a46be';
MCHID = '1900009851';
KEY = '8934e7d15453e97507ef794cf7b0519d';
APPSECRET = '7813490da6f1265e4901ffb80afaa36f';
PHP SDK,下载链接见文尾
第1、4样是申请小程序时获得的,第2、3样是申请开通微信支付时获得的,注意第3、4样长得比较像,其实是2个东西,两者混淆将导致签名通不过。
向微信端下单,得到prepay_id
1. 创建一个Controller,引并WxPay.Api.php类
<?php
require_once __DIR__ . '/BaseController.php';
require_once __DIR__ . '/../third_party/wxpay/WxPay.Api.php';
class WXPay extends BaseController {
function index() {
}
}
之后可以通过index.php/wxpay来作访问请求
2. 修改配置文件WxPay.Config.php
改成自己申请得到相应key
3. 实现index方法
function index() {
//     初始化值对象
    $input = new WxPayUnifiedOrder();
//     文档提及的参数规范:商家名称-销售商品类目
    $input->SetBody("灵动商城-手机");
//     订单号应该是由小程序端传给服务端的,在用户下单时即生成,demo中取值是一个生成的时间戳
    $input->SetOut_trade_no('123123123');
//     费用应该是由小程序端传给服务端的,在用户下单时告知服务端应付金额,demo中取值是1,即1分钱
    $input->SetTotal_fee("1");
    $input->SetNotify_url("http://paysdk.weixin.qq.com/example/notify.php");
    $input->SetTrade_type("JSAPI");
//     由小程序端传给服务端
    $input->SetOpenid($this->input->post('openId'));
//     向微信统一下单,并返回order,它是一个array数组
    $order = WxPayApi::unifiedOrder($input);
//     json化返回给小程序端
    header("Content-Type: application/json");
    echo json_encode($order);
  }
说明1:文档上提到的nonce_str不是没提交,而是sdk帮我们填上的
出处在WxPay.Api.php第55行
$inputObj->SetNonce_str(self::getNonceStr());//随机字符串
说明2:sign也已经好心地给setSign了,出处在WxPay.Data.php第111行,MakeSign()中
/**
  * 生成签名
  * @return 签名,本函数不覆盖sign成员变量,如要设置签名需要调用SetSign方法赋值
  */
 public function MakeSign()
 {
   //签名步骤一:按字典序排序参数
   ksort($this->values);
   $string = $this->ToUrlParams();
   //签名步骤二:在string后加入KEY
   $string = $string . "&key=".WxPayConfig::KEY;
   //签名步骤三:MD5加密
   $string = md5($string);
   //签名步骤四:所有字符转为大写
   $result = strtoupper($string);
   return $result;
 }
4. 小程序内调用登录接口,获取openid
向微信登录请求,拿到code,再将code提交换取openId
wx.login({
     success: function(res) {
      if (res.code) {
       //发起网络请求
       wx.request({
        url: 'https://api.weixin.qq.com/sns/jscode2session?appid=wx9114b997bd86f***&secret=d27551c7803cf16015e536b192******&js_code='+res.code+'&grant_type=authorization_code',
        data: {
         code: res.code
        },
        success: function (response) {
          console.log(response);
        }
       })
      } else {
       console.log('获取用户登录态失败!' + res.errMsg)
      }
     }
    });
从控制台看到已经成功拿到openid,剩下的事情就是将它传到服务端就好了,服务端那边$this->input->post('openId')等着收呢。
5. 小程序端向https://lendoo.leanapp.cn/index.php/WXPay发起请求,作统一下单
//统一下单接口对接
      wx.request({
        url: 'https://lendoo.leanapp.cn/index.php/WXPay',
        data: {
          openId: openId
        },
        success: function (response) {
          console.log(response);

        },
            header: {
        'content-type': 'application/x-www-form-urlencoded'
    },
      });
得到如下结果
{
 "appid": "wx9114b997bd86f8ed",
 "mch_id": "1414142302",
 "nonce_str": "eEICgYFuGqxFRK6f",
 "prepay_id": "wx201701022235141fc713b8f80137935406",
 "result_code": "SUCCESS",
 "return_code": "SUCCESS",
 "return_msg": "OK",
 "sign": "63E60C8CD90394FB50E612D085F5362C",
 "trade_type": "JSAPI"
}
前提是https://lendoo.leanapp.cn已经在白名单:
6. 小程序端调起支付API
// 发起支付
var appId = response.data.appid;
var timeStamp = (Date.parse(new Date()) / 1000).toString();
var pkg = 'prepay_id=' + response.data.prepay_id;
var nonceStr = response.data.nonce_str;
var paySign = md5.hex_md5('appId='+appId+'&nonceStr='+nonceStr+'&package='+pkg+'&signType=MD5&timeStamp='+timeStamp+"&key=d27551c7803cf16***e536b192d5d03b").toUpperCase();
console.log(paySign);
console.log(appId);
wx.requestPayment({
  'timeStamp': timeStamp,
  'nonceStr': nonceStr,
  'package': pkg,
  'signType': 'MD5',
  'paySign': paySign,
  'success':function(res){
    console.log('success');
    console.log(res);
  }
});
模拟器测试,将弹出一个二维码供扫描
结果报了一个错误:
errMsg:"requestPayment:fail"
err_code:2
err_desc:"支付验证签名失败"
key需要加入到签名中!!!'appId='+appId+'&nonceStr='+nonceStr+'&package='+pkg+'&signType=MD5&timeStamp='+timeStamp+"&key=d27551c7803cf16*e536b192d5d03b"这才是完整的。
可是文档里明明没提到key啊
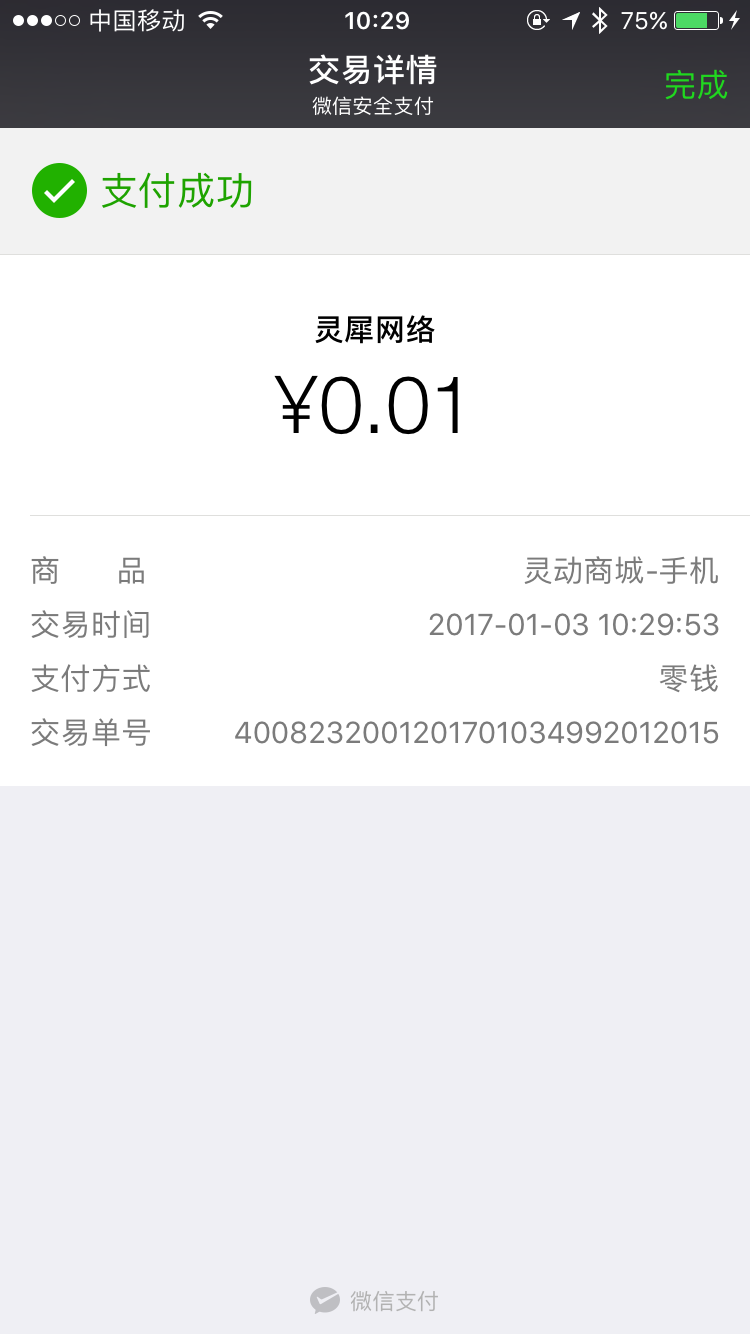
支付成功截图

更多PHP:微信小程序 微信支付服务端集成实例详解及源码下载相关文章请关注PHP中文网!

