Rumah >pembangunan bahagian belakang >tutorial php >Yii2.0 整合elfinder图片管理器调用方法
Yii2.0 整合elfinder图片管理器调用方法
- 伊谢尔伦asal
- 2016-12-02 10:26:232522semak imbas
Yii2扩展:https://github.com/MihailDev/yii2-elfinder
教程虽然是俄语,不用怕,按代码来就行
步骤:
1、使用composer安装扩展
composer require --prefer-dist mihaildev/yii2-elfinder "*"
2、加入配置信息,我是Yii2高级模版,在后台中使用,所以打开backend/config/main.php配置文件
与'components'同级添加
'controllerMap' => [ 'elfinder' => [ 'class' => 'mihaildev\elfinder\PathController', 'access' => ['@'], 'root' => [ 'path' => 'uploads', //主目录路径 'name' => 'Files' ],/*
        'watermark' => [
            'source'         => __DIR__.'/logo.png', // Path to Water mark image
            'marginRight'    => 5,          // Margin right pixel
            'marginBottom'   => 5,          // Margin bottom pixel
            'quality'        => 95,         // JPEG image save quality
            'transparency'   => 70,         // Water mark image transparency ( other than PNG )
            'targetType'     => IMG_GIF|IMG_JPG|IMG_PNG|IMG_WBMP, // Target image formats ( bit-field )
            'targetMinPixel' => 200         // Target image minimum pixel size
        ]*/ ]
],
3、添加默认参数
打开commmon(backend)/config/params.php
// elfinder默认配置 'elfinderDefaultConfig' => [ 'language' => 'zh_CN', 'controller' => 'elfinder', // 默认控制名 'filter' => 'image',
// 只管理图片 https://github.com/Studio-42/elFinder/wiki/Client-configuration-options#wiki-onlyMimes 'template' => '<div class="input-group">{input}
<span class="input-group-btn">{button}</span></div>', 'options' => ['class' => 'form-control'], 'buttonOptions' =>
['class' => 'btn btn-default'], 'buttonName' => '浏览' ],4、最后一步,引入调用
打开要用到的form视图文件,添加如下代码
use mihaildev\elfinder\InputFile; <?php $path = 'carLogo'; // 存放目录,改为实际的,elfinder会自动创建 $elfinderConfig = array_merge(Yii::$app->params['elfinderDefaultConfig'],['path' => $dir]); echo $form->field($model, 'carLogo')->widget(InputFile::className(),$elfinderConfig); ?>
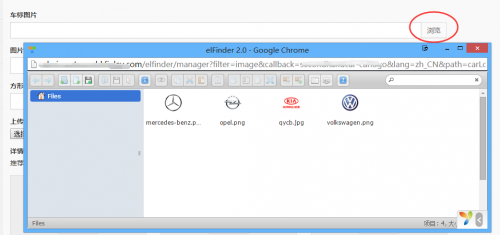
最终效果:

Kenyataan:
Kandungan artikel ini disumbangkan secara sukarela oleh netizen, dan hak cipta adalah milik pengarang asal. Laman web ini tidak memikul tanggungjawab undang-undang yang sepadan. Jika anda menemui sebarang kandungan yang disyaki plagiarisme atau pelanggaran, sila hubungi admin@php.cn
Artikel sebelumnya:缩略图生成的php程序Artikel seterusnya:php 进阶:活用数组来完成强大的功能
Artikel berkaitan
Lihat lagi- Cara menggunakan cURL untuk melaksanakan permintaan Dapatkan dan Hantar dalam PHP
- Cara menggunakan cURL untuk melaksanakan permintaan Dapatkan dan Hantar dalam PHP
- Cara menggunakan cURL untuk melaksanakan permintaan Dapatkan dan Hantar dalam PHP
- Cara menggunakan cURL untuk melaksanakan permintaan Dapatkan dan Hantar dalam PHP
- Semua simbol ungkapan dalam ungkapan biasa (ringkasan)

