


Wouldn't it be convenient if you could compose an email now and have it sent at a later, more opportune time? With Outlook's scheduling feature, you can do just that!
Imagine that you are working late at night, inspired by a brilliant idea, and you write the perfect email. But hold on, it's already past midnight, and sending it now might get lost in the morning rush. What if you could make sure the message lands in the recipient's inbox exactly when they are most receptive? This is the power of scheduled email sending - a feature that lets you craft messages at your convenience while ensuring they deliver at just the right moment. With this capability, you are not just sending emails; you're arranging a communication strategy, enhancing every message for optimal effect.
Note. This article targets the new Outlook for Windows and Outlook 365 online. If you use classic Outlook, please refer to How to delay delivery and schedule sending in Outlook.
How to schedule send in Outlook
To automatically send an email at a certain time in the new Outlook and on the web, follow these simple steps:
- Compose email. Begin by crafting your message as you normally would. Address it to the desired recipients, write the subject line, and compose your message.
-
Schedule email. Once your email is ready, open the dropdown next to the Send button and choose Schedule send.

-
Choose sending date and time. In the dropdown menu, you'll find a couple of predefined options. Select one that suits your needs, and then click Send.
Alternatively, choose Custom time and select the desired date and time from the calendar.


That's it! Your email is now scheduled to be sent at the specified date and time, allowing you to plan ahead and ensure your message reaches the recipients at the most appropriate moment.
Where do scheduled emails go in Outlook?
Scheduled emails are stored in the Drafts folder within the new Outlook app. They remain in this folder until the scheduled sending time arrives. You'll find the scheduled date and time displayed at the top of the message:

This gives you the chance to review and make any final changes before the message goes out. You can also reschedule the email for another time directly from the Drafts folder.
How to re-schedule or send email immediately
If you find yourself needing to adjust the timing of a scheduled message or send it right away, follow these steps:
- Navigate to the Draft folder in Outlook.
- Locate the scheduled message you wish to modify and either select or open it.
- Click the Edit pencil icon in the upper-right corner.
- Depending on your preference, select either:
- Modify Email to reschedule or change the message content.
- Send Now to send the message immediately.
With these straightforward options, you can easily manage the timing of your emails to make certain they're sent at the most suitable moments, whether it's immediately or rescheduled for a later time.

Viva Insights schedule send in Outlook
When you're working late at night or early in the morning, you might notice schedule send suggestions popping up at the top of your messages, provided you have the Viva Insights add-in added to your Outlook.
These prompts typically show up when:
- You're working outside your regular hours.
- Everyone in the To field is outside their working hours.
- You are sending an email to one person who has an out-of-office auto reply set up in Outlook.

How to schedule sending email with Viva Insights
Here's how to schedule sending your email using these suggestions:
- Click the Schedule send link.
- In the Viva Insights pane that appears on the right, confirm the date and time for your message to be sent:
- If the suggested date and time work for you, hit Send within the email.
- To tweak the timing, adjust the date and time settings in the corresponding boxes, then click Send.
- To send the message immediately without any delay, click Cancel scheduled prompt, and then hit the Send button in the email as usual.

Once you click the Send button, your scheduled message will head to the Drafts folder in the new Outlook and on the web. In Outlook for Windows, it's routed to the Sent items folder.
How to turn Viva schedule send suggestions on and off
Now, if you're wondering how to toggle this handy feature on or off, the steps are:
- While composing a message in Outlook, click the Viva Insights button on the Message tab.
- In the Viva pane that opens, select Settings.
- Under Schedule send suggestions, toggle the switch as per your preference.

Advantages of Viva schedule send
Viva schedule send doesn't require Outlook to be open – your emails will be sent as planned even if Outlook is closed, your computer is offline or turned off.
Limitations of Viva schedule send
- Doesn't pop up during your regular working hours.
- Won't show if there are more than 15 recipients in the To field.
- Doesn't appear when you're emailing yourself.
Will a scheduled email send if Outlook is closed?
Yes. Even if you close Outlook, a scheduled email will still be sent at the designated time. This sets the Schedule send feature in the new Outlook apart from the delay delivery feature in classic Outlook, which only operates when Outlook is open.
Can I schedule or delay delivery of all emails in new Outlook?
Unfortunately, scheduling or delaying delivery for all messages isn't an option in the new Outlook. Unlike classic Outlook, where you can set rules to delay delivery of all emails by a specified number of minutes or schedule automatic send/receive intervals, these features aren't available in the new version. However, there's a workaround to mitigate hasty sends - maximizing the Undo send interval. While it's not the same as delayed delivery, it does provide a brief window for last-minute corrections before your message goes out.
So, that's how you schedule messages in the new Outlook and web app. With this handy feature, you can write emails whenever you want and send them later, at the perfect time for your recipient. Take control of when your messages fly out of your inbox!
Atas ialah kandungan terperinci Cara menjadualkan menghantar Outlook. Untuk maklumat lanjut, sila ikut artikel berkaitan lain di laman web China PHP!

 Formula Median di Excel - Contoh PraktikalApr 11, 2025 pm 12:08 PM
Tutorial ini menerangkan cara mengira median data berangka dalam Excel menggunakan fungsi median. Median, ukuran utama kecenderungan pusat, mengenal pasti nilai pertengahan dalam dataset, yang menawarkan perwakilan yang lebih mantap dari Tenden Central
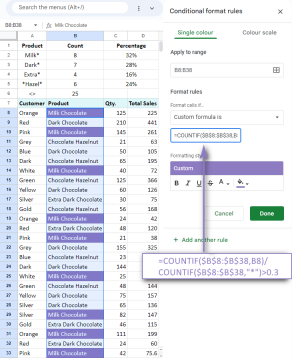 COUNTIF SPREWEET COUNTIF Google dengan contoh formulaApr 11, 2025 pm 12:03 PM
Menguasai sheet google countif: panduan komprehensif Panduan ini meneroka fungsi countif serba boleh di Helaian Google, menunjukkan aplikasinya di luar pengiraan sel mudah. Kami akan merangkumi pelbagai senario, dari perlawanan tepat dan separa ke Han
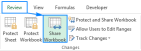 Buku Kerja Dikongsi Excel: Cara berkongsi fail Excel untuk beberapa penggunaApr 11, 2025 am 11:58 AM
Tutorial ini menyediakan panduan komprehensif untuk berkongsi buku kerja Excel, meliputi pelbagai kaedah, kawalan akses, dan resolusi konflik. Versi Excel Moden (2010, 2013, 2016, dan kemudian) Memudahkan pengeditan kolaboratif, menghapuskan keperluan untuk m
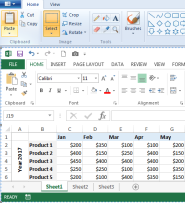 Cara Menukar Excel ke JPG - Simpan .xls atau .xlsx Sebagai Fail ImejApr 11, 2025 am 11:31 AM
Tutorial ini meneroka pelbagai kaedah untuk menukar fail .xls ke imej .jpg, merangkumi kedua-dua alat Windows terbina dalam dan penukar dalam talian percuma. Perlu membuat persembahan, berkongsi data spreadsheet dengan selamat, atau merancang dokumen? Menukar yo
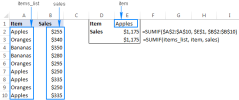 Nama Excel dan Rentang Dinamakan: Cara Menentukan dan Menggunakan dalam FormulaApr 11, 2025 am 11:13 AM
Tutorial ini menjelaskan fungsi nama -nama Excel dan menunjukkan bagaimana untuk menentukan nama untuk sel, julat, pemalar, atau formula. Ia juga meliputi penyuntingan, penapisan, dan memadam nama yang ditetapkan. Nama Excel, sementara sangat berguna, sering melampaui
 Sisihan piawai Excel: Contoh fungsi dan formulaApr 11, 2025 am 11:01 AM
Tutorial ini menjelaskan perbezaan antara sisihan piawai dan kesilapan piawai min, membimbing anda pada fungsi Excel yang optimum untuk pengiraan sisihan piawai. Dalam statistik deskriptif, sisihan min dan piawai adalah intrinsi
 Akar persegi dalam excel: fungsi sqrt dan cara lainApr 11, 2025 am 10:34 AM
Tutorial Excel ini menunjukkan cara mengira akar persegi dan akar n. Mencari akar persegi adalah operasi matematik yang biasa, dan Excel menawarkan beberapa kaedah. Kaedah untuk mengira akar persegi di Excel: Menggunakan fungsi SQRT: The
 Asas Helaian Google: Ketahui cara bekerja dengan hamparan GoogleApr 11, 2025 am 10:23 AM
Buka kunci kekuatan lembaran Google: Panduan Pemula Tutorial ini memperkenalkan asas -asas Google Sheets, alternatif yang kuat dan serba boleh kepada MS Excel. Ketahui cara untuk menguruskan spreadsheet dengan mudah, memanfaatkan ciri -ciri utama, dan bekerjasama


Alat AI Hot

Undresser.AI Undress
Apl berkuasa AI untuk mencipta foto bogel yang realistik

AI Clothes Remover
Alat AI dalam talian untuk mengeluarkan pakaian daripada foto.

Undress AI Tool
Gambar buka pakaian secara percuma

Clothoff.io
Penyingkiran pakaian AI

Video Face Swap
Tukar muka dalam mana-mana video dengan mudah menggunakan alat tukar muka AI percuma kami!

Artikel Panas
Alat panas

VSCode Windows 64-bit Muat Turun
Editor IDE percuma dan berkuasa yang dilancarkan oleh Microsoft

DVWA
Damn Vulnerable Web App (DVWA) ialah aplikasi web PHP/MySQL yang sangat terdedah. Matlamat utamanya adalah untuk menjadi bantuan bagi profesional keselamatan untuk menguji kemahiran dan alatan mereka dalam persekitaran undang-undang, untuk membantu pembangun web lebih memahami proses mengamankan aplikasi web, dan untuk membantu guru/pelajar mengajar/belajar dalam persekitaran bilik darjah Aplikasi web keselamatan. Matlamat DVWA adalah untuk mempraktikkan beberapa kelemahan web yang paling biasa melalui antara muka yang mudah dan mudah, dengan pelbagai tahap kesukaran. Sila ambil perhatian bahawa perisian ini

PhpStorm versi Mac
Alat pembangunan bersepadu PHP profesional terkini (2018.2.1).

SublimeText3 versi Inggeris
Disyorkan: Versi Win, menyokong gesaan kod!

Muat turun versi mac editor Atom
Editor sumber terbuka yang paling popular

