


Object detection is pivotal in artificial intelligence, serving as the backbone for numerous cutting-edge applications. From autonomous vehicles and surveillance systems to medical imaging and augmented reality, the ability to identify and locate objects in images and videos is transforming industries worldwide. TensorFlow’s Object Detection API, a powerful and versatile tool, simplifies building robust object detection models. By leveraging this API, developers can train custom models tailored to specific needs, significantly reducing development time and complexity.
In this guide, we will explore the step-by-step process of training an object detection model using TensorFlow,focusing on integrating datasets fromRoboflow Universe,a rich repository of annotated datasets designed to accelerate AI development.
Learning Objectives
- Learn to set up and configure TensorFlow‘s Object Detection API environment for efficient model training.
- Understand how to prepare and preprocess datasets for training, using the TFRecord format.
- Gain expertise in selecting and customizing a pre-trained object detection model for specific needs.
- Learn to adjust pipeline configuration files and fine-tune model parameters to optimize performance.
- Master the training process, including handling checkpoints and evaluating model performance during training.
- Understand how to export the trained model for inference and deployment in real-world applications.
This article was published as a part of theData Science Blogathon.
Table of contents
- Step-By-Step Implementation of Object Detection with TensorFlow
- Step1: Setting Up the Environment
- Step2: Verify Environment and Installations
- Step3: Prepare the Training Data
- Step4: Set Up the Training Configuration
- Step5: Modify the Pipeline Configuration File
- Step6: Train the Model
- Step7: Save the Trained Model
- Conclusion
- Frequently Asked Questions
Step-By-Step Implementation of Object Detection with TensorFlow
In this section, we’ll walk you through a step-by-step implementation of object detection using TensorFlow, guiding you from setup to deployment.
Step1: Setting Up the Environment
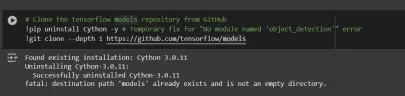
The TensorFlow Object Detection API requires various dependencies. Begin by cloning the TensorFlow models repository:
# Clone the tensorflow models repository from GitHub
!pip uninstall Cython -y # Temporary fix for "No module named 'object_detection'" error
!git clone --depth 1 https://github.com/tensorflow/models
- Uninstall Cython: This step ensures there are no conflicts with the Cython library during setup.
- Clone TensorFlow Models Repository: This repository contains TensorFlow’s official models, including the Object Detection API.
Copy the Setup Files andModify the setup.py File
# Copy setup files into models/research folder
%%bash
cd models/research/
protoc object_detection/protos/*.proto --python_out=.
#cp object_detection/packages/tf2/setup.py .

# Modify setup.py file to install the tf-models-official repository targeted at TF v2.8.0
import re
with open('/content/models/research/object_detection/packages/tf2/setup.py') as f:
    s = f.read()

with open('/content/models/research/setup.py', 'w') as f:
    # Set fine_tune_checkpoint path
    s = re.sub('tf-models-official>=2.5.1',
               'tf-models-official==2.8.0', s)
    f.write(s)
Why is This Necessary?
- Protocol Buffers Compilation: The Object Detection API uses .proto files to define model configurations and data structures. These need to be compiled into Python code to function.
- Dependency Version Compatibility: TensorFlow and its dependencies evolve. Using tf-models-official>=2.5.1 may inadvertently install an incompatible version for TensorFlow v2.8.0.
- Explicitly setting tf-models-official==2.8.0 avoids potential version conflicts and ensures stability.
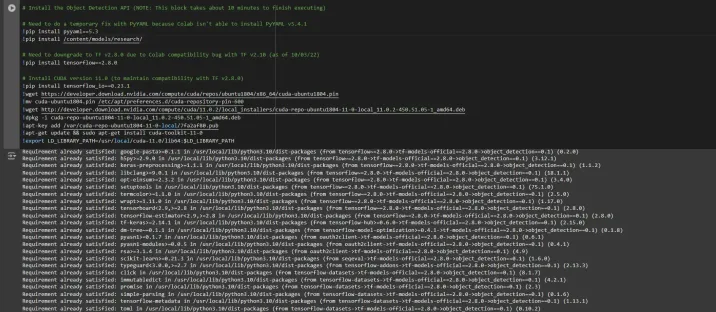
Installing dependency libraries
TensorFlow models often rely on specific library versions. Fixing the TensorFlow version ensures smooth integration.
# Install the Object Detection API

# Need to do a temporary fix with PyYAML because Colab isn't able to install PyYAML v5.4.1
!pip install pyyaml==5.3
!pip install /content/models/research/

# Need to downgrade to TF v2.8.0 due to Colab compatibility bug with TF v2.10 (as of 10/03/22)
!pip install tensorflow==2.8.0

# Install CUDA version 11.0 (to maintain compatibility with TF v2.8.0)
!pip install tensorflow_io==0.23.1
!wget https://developer.download.nvidia.com/compute/cuda/repos/ubuntu1804/x86_64/cuda-ubuntu1804.pin
!mv cuda-ubuntu1804.pin /etc/apt/preferences.d/cuda-repository-pin-600
!wget http://developer.download.nvidia.com/compute/cuda/11.0.2/local_installers/cuda-repo-ubuntu1804-11-0-local_11.0.2-450.51.05-1_amd64.deb
!dpkg -i cuda-repo-ubuntu1804-11-0-local_11.0.2-450.51.05-1_amd64.deb
!apt-key add /var/cuda-repo-ubuntu1804-11-0-local/7fa2af80.pub
!apt-get update && sudo apt-get install cuda-toolkit-11-0
!export LD_LIBRARY_PATH=/usr/local/cuda-11.0/lib64:$LD_LIBRARY_PATH
While running this block you need to restart the sessions again and run this block of code again to successfully install all dependencies. This will install all the dependencies successfully.
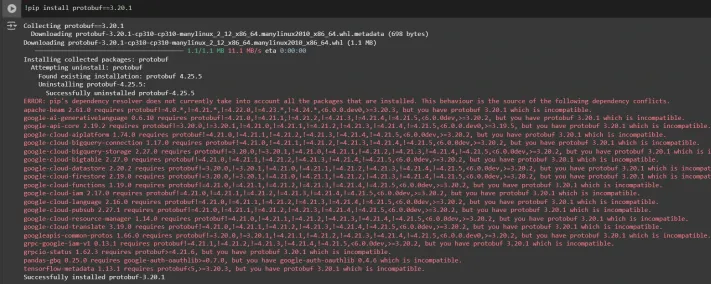
Installing an appropriate version of protobuf library for resolving dependency issues
!pip install protobuf==3.20.1
Step2: Verify Environment and Installations
To confirm the installation works, run the following test:
# Run Model Bulider Test file, just to verify everything's working properly
!python /content/models/research/object_detection/builders/model_builder_tf2_test.py
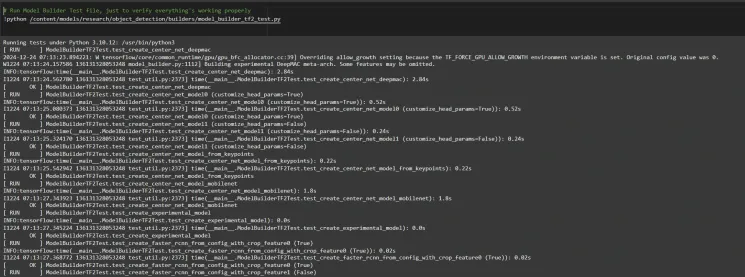
If no errors appear, your setup is complete. So now we have completed the setup successfully.
Step3: Prepare the Training Data
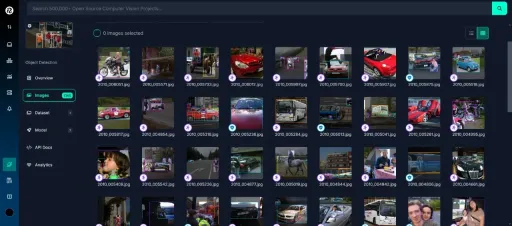
For this tutorial, we’ll use the “People Detection” dataset from Roboflow Universe. Follow these steps to prepare it:
Visit the dataset page:
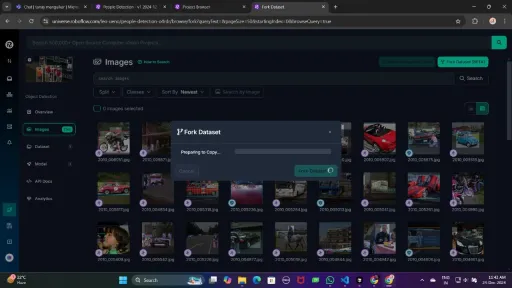
Fork the dataset into your workspace to make it accessible for customization.
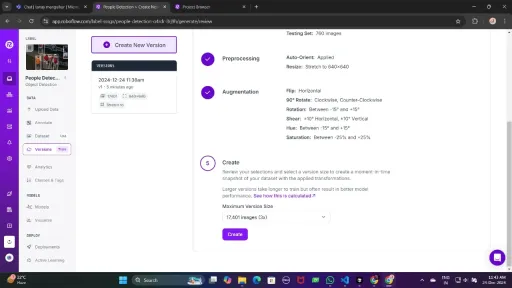
Generate a version of the dataset to finalize its preprocessing configurations such as augmentation and resizing.
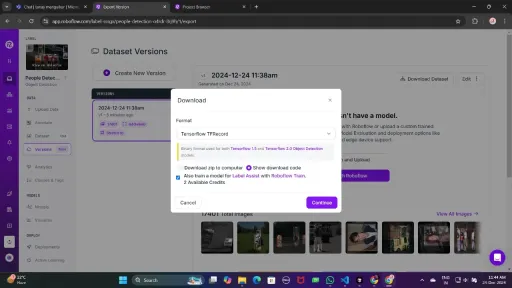
Now , Download it in TFRecord format, which is a binary format optimized for TensorFlow workflows. TFRecord stores data efficiently and allows TensorFlow to read large datasets during training with minimal overhead.
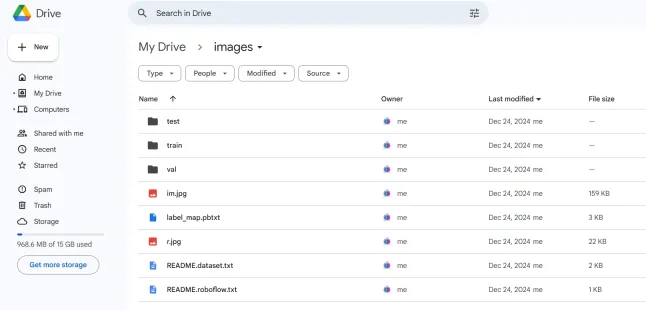
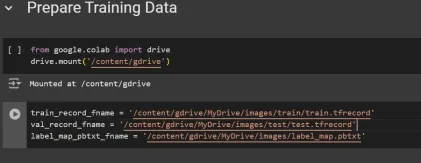
Once downloaded, place the dataset files in your Google Drive mount your code to your drive, and load those files in the code to use it.
from google.colab import drive
drive.mount('/content/gdrive')


train_record_fname = '/content/gdrive/MyDrive/images/train/train.tfrecord'
val_record_fname = '/content/gdrive/MyDrive/images/test/test.tfrecord'
label_map_pbtxt_fname = '/content/gdrive/MyDrive/images/label_map.pbtxt'
Step4: Set Up the Training Configuration
Now, it’s time to set up the configuration for the object detection model. For this example, we’ll use the efficientdet-d0 model. You can choose from other models like ssd-mobilenet-v2 or ssd-mobilenet-v2-fpnlite-320, but for this guide, we’ll focus on efficientdet-d0.
# Change the chosen_model variable to deploy different models available in the TF2 object detection zoo
chosen_model = 'efficientdet-d0'

MODELS_CONFIG = {
    'ssd-mobilenet-v2': {
        'model_name': 'ssd_mobilenet_v2_320x320_coco17_tpu-8',
        'base_pipeline_file': 'ssd_mobilenet_v2_320x320_coco17_tpu-8.config',
        'pretrained_checkpoint': 'ssd_mobilenet_v2_320x320_coco17_tpu-8.tar.gz',
    },
    'efficientdet-d0': {
        'model_name': 'efficientdet_d0_coco17_tpu-32',
        'base_pipeline_file': 'ssd_efficientdet_d0_512x512_coco17_tpu-8.config',
        'pretrained_checkpoint': 'efficientdet_d0_coco17_tpu-32.tar.gz',
    },
    'ssd-mobilenet-v2-fpnlite-320': {
        'model_name': 'ssd_mobilenet_v2_fpnlite_320x320_coco17_tpu-8',
        'base_pipeline_file': 'ssd_mobilenet_v2_fpnlite_320x320_coco17_tpu-8.config',
        'pretrained_checkpoint': 'ssd_mobilenet_v2_fpnlite_320x320_coco17_tpu-8.tar.gz',
    },
}

model_name = MODELS_CONFIG[chosen_model]['model_name']
pretrained_checkpoint = MODELS_CONFIG[chosen_model]['pretrained_checkpoint']
base_pipeline_file = MODELS_CONFIG[chosen_model]['base_pipeline_file']
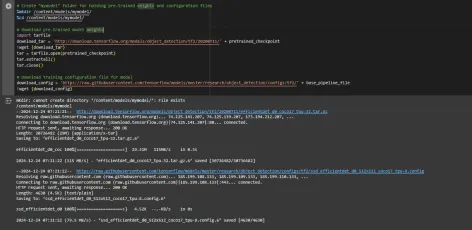
We then download the pre-trained weights and the corresponding configuration file for the chosen model:
# Create "mymodel" folder for holding pre-trained weights and configuration files
%mkdir /content/models/mymodel/
%cd /content/models/mymodel/

# Download pre-trained model weights
import tarfile
download_tar = 'http://download.tensorflow.org/models/object_detection/tf2/20200711/' + pretrained_checkpoint
!wget {download_tar}
tar = tarfile.open(pretrained_checkpoint)
tar.extractall()
tar.close()

# Download training configuration file for model
download_config = 'https://raw.githubusercontent.com/tensorflow/models/master/research/object_detection/configs/tf2/' + base_pipeline_file
!wget {download_config}
After this, we set up the number of steps for training and batch size based on the model selected:
# Set training parameters for the model
num_steps = 4000

if chosen_model == 'efficientdet-d0':
  batch_size = 8
else:
  batch_size = 8

You can increase and decrease num_steps and batch_size according to your requirements.
Step5: Modify the Pipeline Configuration File
We need to customize the pipeline.config file with the paths to our dataset and model parameters. The pipeline.config file contains various configurations such as the batch size, number of classes, and fine-tuning checkpoints. We make these modifications by reading the template and replacing the relevant fields:
# Set file locations and get number of classes for config file
pipeline_fname = '/content/models/mymodel/' + base_pipeline_file
fine_tune_checkpoint = '/content/models/mymodel/' + model_name + '/checkpoint/ckpt-0'

def get_num_classes(pbtxt_fname):
    from object_detection.utils import label_map_util
    label_map = label_map_util.load_labelmap(pbtxt_fname)
    categories = label_map_util.convert_label_map_to_categories(
        label_map, max_num_classes=90, use_display_name=True)
    category_index = label_map_util.create_category_index(categories)
    return len(category_index.keys())
num_classes = get_num_classes(label_map_pbtxt_fname)
print('Total classes:', num_classes)
# Create custom configuration file by writing the dataset, model checkpoint, and training parameters into the base pipeline file
import re
%cd /content/models/mymodel
print('writing custom configuration file')
with open(pipeline_fname) as f:
s = f.read()
with open('pipeline_file.config', 'w') as f:
# Set fine_tune_checkpoint path
s = re.sub('fine_tune_checkpoint: ".*?"',
'fine_tune_checkpoint: "{}"'.format(fine_tune_checkpoint), s)
# Set tfrecord files for train and test datasets
s = re.sub(
'(input_path: ".*?)(PATH_TO_BE_CONFIGURED/train)(.*?")', 'input_path: "{}"'.format(train_record_fname), s)
s = re.sub(
'(input_path: ".*?)(PATH_TO_BE_CONFIGURED/val)(.*?")', 'input_path: "{}"'.format(val_record_fname), s)
# Set label_map_path
s = re.sub(
'label_map_path: ".*?"', 'label_map_path: "{}"'.format(label_map_pbtxt_fname), s)
# Set batch_size
s = re.sub('batch_size: [0-9]+',
'batch_size: {}'.format(batch_size), s)
# Set training steps, num_steps
s = re.sub('num_steps: [0-9]+',
'num_steps: {}'.format(num_steps), s)
# Set number of classes num_classes
s = re.sub('num_classes: [0-9]+',
'num_classes: {}'.format(num_classes), s)
# Change fine-tune checkpoint type from "classification" to "detection"
s = re.sub(
'fine_tune_checkpoint_type: "classification"', 'fine_tune_checkpoint_type: "{}"'.format('detection'), s)
# If using ssd-mobilenet-v2, reduce learning rate (because it's too high in the default config file)
if chosen_model == 'ssd-mobilenet-v2':
s = re.sub('learning_rate_base: .8',
'learning_rate_base: .08', s)
s = re.sub('warmup_learning_rate: 0.13333',
'warmup_learning_rate: .026666', s)
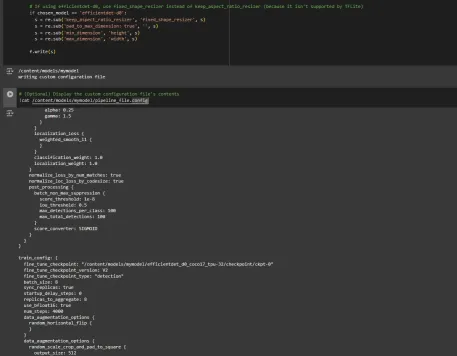
# If using efficientdet-d0, use fixed_shape_resizer instead of keep_aspect_ratio_resizer (because it isn't supported by TFLite)
if chosen_model == 'efficientdet-d0':
s = re.sub('keep_aspect_ratio_resizer', 'fixed_shape_resizer', s)
s = re.sub('pad_to_max_dimension: true', '', s)
s = re.sub('min_dimension', 'height', s)
s = re.sub('max_dimension', 'width', s)
f.write(s)
# (Optional) Display the custom configuration file's contents
!cat /content/models/mymodel/pipeline_file.config
# Set the path to the custom config file and the directory to store training checkpoints in
pipeline_file = '/content/models/mymodel/pipeline_file.config'
model_dir = '/content/training/'
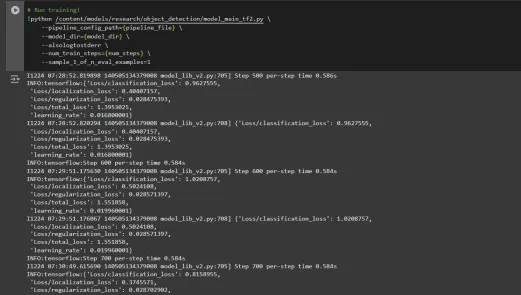
Step6: Train the Model
Now we can train the model using the custom pipeline configuration file. The training script will save checkpoints, which you can use to evaluate the performance of your model:
# Run training!
!python /content/models/research/object_detection/model_main_tf2.py \
    --pipeline_config_path={pipeline_file} \
    --model_dir={model_dir} \
    --alsologtostderr \
    --num_train_steps={num_steps} \
    --sample_1_of_n_eval_examples=1
Step7: Save the Trained Model
After training is complete, we export the trained model so it can be used for inference. We use the exporter_main_v2.py script to export the model:
!python /content/models/research/object_detection/exporter_main_v2.py \
    --input_type image_tensor \
    --pipeline_config_path {pipeline_file} \
    --trained_checkpoint_dir {model_dir} \
    --output_directory /content/exported_model

Finally, we compress the exported model into a zip file for easy downloading and then you can download the zip file containing your trained model:
import shutil
# Path to the exported model folder
exported_model_path = '/content/exported_model'

# Path where the zip file will be saved
zip_file_path = '/content/exported_model.zip'

# Create a zip file of the exported model folder
shutil.make_archive(zip_file_path.replace('.zip', ''), 'zip', exported_model_path)

# Download the zip file using Google Colab's file download utility
from google.colab import files
files.download(zip_file_path)
You can use these downloaded model files for testing it on unseen images or in your applications according to your needs.
You can refer to this:collab notebook for detailed code
Conclusion
In conclusion, this guide equips you with the knowledge and tools necessary to train an object detection model using TensorFlow’s Object Detection API, leveraging datasets from Roboflow Universe for rapid customization. By following the steps outlined, you can effectively prepare your data, configure the training pipeline, select the right model, and fine-tune it to meet your specific needs. Moreover, the ability to export and deploy your trained model opens up vast possibilities for real-world applications, whether in autonomous vehicles, medical imaging, or surveillance systems. This workflow enables you to create powerful, scalable object detection systems with reduced complexity and faster time to deployment.
Key Takeaways
- TensorFlow Object Detection API offers a flexible framework for building custom object detection models with pre-trained options, reducing development time and complexity.
- TFRecord format is essential for efficient data handling, especially with large datasets in TensorFlow, allowing fast training and minimal overhead.
- Pipeline configuration files are crucial for fine-tuning and adjusting the model to work with your specific dataset and desired performance characteristics.
- Pretrained models like efficientdet-d0 and ssd-mobilenet-v2 provide solid starting points for training custom models, with each having specific strengths depending on use case and resource constraints.
- The training process involves managing parameters like batch size, number of steps, and model checkpointing to ensure the model learns optimally.
- Exporting the model is essential for using the trained object detection model in a real-world model that is being packaged and ready for deployment.
Frequently Asked Questions
Q1: What is the TensorFlow Object Detection API?A: The TensorFlow Object Detection API is a flexible and open-source framework for creating, training, and deploying custom object detection models. It provides tools for fine-tuning pre-trained models and building solutions tailored to specific use cases.
Q2: What is the purpose of the TFRecord format in object detection workflows?A: TFRecord is a binary file format optimized for TensorFlow pipelines. It allows efficient data handling, ensuring faster loading, minimal I/O overhead, and smoother training, especially with large datasets.
Q3: What are pipeline configuration files, and why are they critical?A: These files enable seamless model customization by defining parameters like dataset paths, learning rate, model architecture, and training steps to meet specific datasets and performance goals.
Q4: How do I select the best pre-trained model for my use case?A: Select EfficientDet-D0 for a balance of accuracy and efficiency, ideal for edge devices, and SSD-MobileNet-V2 for lightweight, fast real-time applications like mobile apps.
The media shown in this article is not owned by Analytics Vidhya and is used at the Author’s discretion.
Atas ialah kandungan terperinci Pengesanan Objek dengan Tensorflow. Untuk maklumat lanjut, sila ikut artikel berkaitan lain di laman web China PHP!

 Anda mesti membina tempat kerja ai di belakang tudung kejahilanApr 29, 2025 am 11:15 AM
Dalam buku seminal John Rawls pada tahun 1971 The Theory of Justice, beliau mencadangkan percubaan pemikiran yang harus kita ambil sebagai inti reka bentuk AI hari ini dan menggunakan keputusan: tudung kejahilan. Falsafah ini menyediakan alat yang mudah untuk memahami ekuiti dan juga menyediakan pelan tindakan untuk pemimpin untuk menggunakan pemahaman ini untuk mereka bentuk dan melaksanakan AI dengan cara yang saksama. Bayangkan anda membuat peraturan untuk masyarakat baru. Tetapi ada premis: anda tidak tahu terlebih dahulu apa peranan yang akan anda mainkan dalam masyarakat ini. Anda mungkin menjadi kaya atau miskin, sihat atau kurang upaya, milik majoriti atau minoriti marginal. Beroperasi di bawah "VEIL OF KETIGA" ini menghalang pembuat peraturan daripada membuat keputusan yang memberi manfaat kepada diri mereka sendiri. Sebaliknya, orang akan lebih bermotivasi untuk merumuskan orang ramai
 Keputusan, Keputusan ... Langkah seterusnya untuk Praktikal Gunaan AIApr 29, 2025 am 11:14 AM
Banyak syarikat yang mengkhususkan diri dalam Automasi Proses Robot (RPA), menawarkan bot untuk mengautomasikan tugas berulang -UIPATH, Automasi di mana sahaja, Prism Blue, dan lain -lain. Sementara itu, proses perlombongan, orkestrasi, dan pemprosesan dokumen pintar Special
 Ejen akan datang - lebih banyak mengenai apa yang akan kita lakukan di sebelah rakan kongsi AIApr 29, 2025 am 11:13 AM
Masa depan AI bergerak melampaui ramalan kata mudah dan simulasi perbualan; Ejen AI muncul, mampu tindakan bebas dan penyelesaian tugas. Peralihan ini sudah jelas dalam alat seperti Claude Anthropic. Ejen AI: Penyelidikan a
 Mengapa empati lebih penting daripada mengawal pemimpin dalam masa depan yang didorong oleh AIApr 29, 2025 am 11:12 AM
Kemajuan teknologi yang pesat memerlukan perspektif yang berpandangan ke hadapan pada masa depan kerja. Apa yang berlaku apabila AI melampaui peningkatan produktiviti semata -mata dan mula membentuk struktur masyarakat kita? Buku yang akan datang Topher McDougal, Gaia Wakes:
 AI untuk Klasifikasi Produk: Bolehkah Mesin Undang -undang Cukai Master?Apr 29, 2025 am 11:11 AM
Klasifikasi produk, sering melibatkan kod kompleks seperti "HS 8471.30" dari sistem seperti sistem harmoni (HS), adalah penting untuk perdagangan antarabangsa dan jualan domestik. Kod ini memastikan permohonan cukai yang betul, memberi kesan kepada setiap inv
 Bolehkah Pusat Data menuntut mencetuskan pemulihan teknologi iklim?Apr 29, 2025 am 11:10 AM
Masa Depan Penggunaan Tenaga di Pusat Data dan Pelaburan Teknologi Iklim Artikel ini menerangkan lonjakan penggunaan tenaga di pusat data yang didorong oleh AI dan kesannya terhadap perubahan iklim, dan menganalisis penyelesaian inovatif dan cadangan dasar untuk menangani cabaran ini. Cabaran Permintaan Tenaga: Pusat data besar-besaran dan ultra-besar menggunakan kuasa besar, setanding dengan jumlah beratus-ratus ribu keluarga Amerika Utara yang biasa, dan pusat-pusat skala ultra-besar AI yang muncul menggunakan puluhan kali lebih banyak kuasa daripada ini. Dalam lapan bulan pertama 2024, Microsoft, Meta, Google dan Amazon telah melabur kira -kira AS $ 125 bilion dalam pembinaan dan operasi pusat data AI (JP Morgan, 2024) (Jadual 1). Permintaan tenaga yang semakin meningkat adalah satu cabaran dan peluang. Menurut Canary Media, elektrik yang menjulang
 Ai dan Hollywood's Next Golden AgeApr 29, 2025 am 11:09 AM
AI Generatif merevolusi pengeluaran filem dan televisyen. Model Ray 2 Luma, serta Runway's Gen-4, Openai's Sora, Veo Google dan model-model baru yang lain, meningkatkan kualiti video yang dihasilkan pada kelajuan yang belum pernah terjadi sebelumnya. Model-model ini dengan mudah boleh mewujudkan kesan khas yang kompleks dan adegan yang realistik, walaupun klip video pendek dan kesan gerakan yang diperolehi oleh kamera telah dicapai. Walaupun manipulasi dan konsistensi alat -alat ini masih perlu diperbaiki, kelajuan kemajuan adalah menakjubkan. Video generatif menjadi medium bebas. Sesetengah model baik pada pengeluaran animasi, sementara yang lain baik pada imej aksi langsung. Perlu diingat bahawa Firefly Adobe dan Moonvalley's Ma
 Adakah Chatgpt perlahan-lahan menjadi Yes-Man terbesar AI?Apr 29, 2025 am 11:08 AM
Pengalaman Pengguna CHATGPT Menolak: Adakah Degradasi Model atau Harapan Pengguna? Baru -baru ini, sebilangan besar pengguna berbayar ChatGPT telah mengadu tentang kemerosotan prestasi mereka, yang telah menarik perhatian yang meluas. Pengguna melaporkan tindak balas yang lebih perlahan terhadap model, jawapan yang lebih pendek, kekurangan bantuan, dan lebih banyak halusinasi. Sesetengah pengguna menyatakan rasa tidak puas hati di media sosial, menunjukkan bahawa ChatGPT telah menjadi "terlalu menyanjung" dan cenderung untuk mengesahkan pandangan pengguna dan bukannya memberikan maklum balas kritikal. Ini bukan sahaja memberi kesan kepada pengalaman pengguna, tetapi juga membawa kerugian sebenar kepada pelanggan korporat, seperti mengurangkan produktiviti dan pembaziran sumber pengkomputeran. Bukti kemerosotan prestasi Ramai pengguna telah melaporkan kemerosotan yang ketara dalam prestasi CHATGPT, terutamanya dalam model yang lebih lama seperti GPT-4 (yang tidak lama lagi akan dihentikan dari perkhidmatan pada akhir bulan ini). ini


Alat AI Hot

Undresser.AI Undress
Apl berkuasa AI untuk mencipta foto bogel yang realistik

AI Clothes Remover
Alat AI dalam talian untuk mengeluarkan pakaian daripada foto.

Undress AI Tool
Gambar buka pakaian secara percuma

Clothoff.io
Penyingkiran pakaian AI

Video Face Swap
Tukar muka dalam mana-mana video dengan mudah menggunakan alat tukar muka AI percuma kami!

Artikel Panas
Alat panas

SublimeText3 Linux versi baharu
SublimeText3 Linux versi terkini

SecLists
SecLists ialah rakan penguji keselamatan muktamad. Ia ialah koleksi pelbagai jenis senarai yang kerap digunakan semasa penilaian keselamatan, semuanya di satu tempat. SecLists membantu menjadikan ujian keselamatan lebih cekap dan produktif dengan menyediakan semua senarai yang mungkin diperlukan oleh penguji keselamatan dengan mudah. Jenis senarai termasuk nama pengguna, kata laluan, URL, muatan kabur, corak data sensitif, cangkerang web dan banyak lagi. Penguji hanya boleh menarik repositori ini ke mesin ujian baharu dan dia akan mempunyai akses kepada setiap jenis senarai yang dia perlukan.

SublimeText3 versi Cina
Versi Cina, sangat mudah digunakan

VSCode Windows 64-bit Muat Turun
Editor IDE percuma dan berkuasa yang dilancarkan oleh Microsoft

PhpStorm versi Mac
Alat pembangunan bersepadu PHP profesional terkini (2018.2.1).

