Rumah >hujung hadapan web >tutorial js >Membina Copilot GitHub Anda Sendiri: Panduan Langkah demi Langkah untuk Alat Penyiapan Kod
Membina Copilot GitHub Anda Sendiri: Panduan Langkah demi Langkah untuk Alat Penyiapan Kod
- DDDasal
- 2024-09-14 12:15:371306semak imbas
Pernahkah terfikir membina alat penyiapan kod seperti GitHub Copilot adalah rumit? Anehnya, ia tidak sesukar yang disangka!
Sebagai seorang jurutera, saya sentiasa terpesona dengan cara alat pelengkap kod berfungsi di bawah hud. Jadi, saya merekayasa balik proses untuk melihat sama ada saya boleh membinanya sendiri.
Ini adalah satu yang saya bina sendiri dan menerbitkannya - LLM-Autocompleter
Dengan alat berbantukan AI menjadi kebiasaan dalam pembangunan perisian, mencipta alat pelengkap kod anda sendiri ialah cara terbaik untuk mempelajari tentang Protokol Pelayan Bahasa (LSP), API dan penyepaduan dengan model lanjutan seperti GPT OpenAI. Selain itu, ia merupakan projek yang sangat bermanfaat.
Alat pelengkap kod pada asasnya menggabungkan pelayan Protokol Pelayan Bahasa (LSP) dengan mekanisme pelengkapan kod sebaris daripada platform seperti Kod VS. Dalam tutorial ini, kami akan memanfaatkan API penyiapan sebaris Kod VS dan membina pelayan LSP kami sendiri.
Sebelum kita menyelami, mari kita fahami apa itu Pelayan LSP.
Protokol Pelayan Bahasa (LSP)
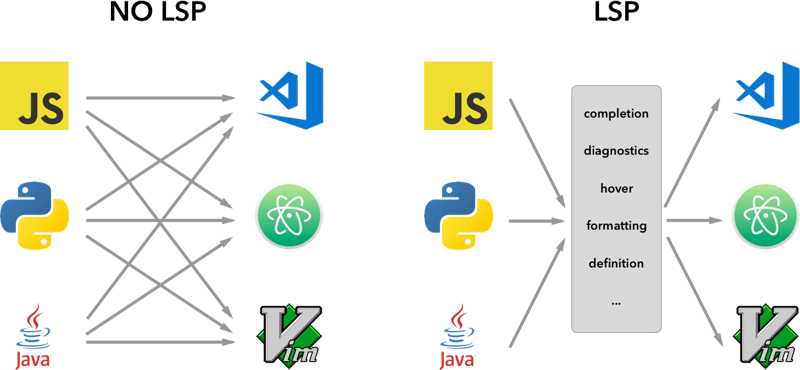
Pelayan LSP ialah perkhidmatan hujung belakang yang menyediakan ciri khusus bahasa kepada penyunting teks atau Persekitaran Pembangunan Bersepadu (IDE). Ia bertindak sebagai jambatan antara editor (pelanggan) dan alat khusus bahasa, menyampaikan ciri seperti:
Pelengkapan kod (mencadangkan coretan kod semasa anda menaip),
Definisi pergi ke (menavigasi ke bahagian kod di mana simbol ditakrifkan),
Menyemak ralat (menyerlahkan ralat sintaks dalam masa nyata).
Idea di sebalik Protokol Pelayan Bahasa (LSP) adalah untuk menyeragamkan protokol untuk cara pelayan dan alatan pembangunan tersebut berkomunikasi. Dengan cara ini, satu Pelayan Bahasa boleh digunakan semula dalam berbilang alatan pembangunan dan LSP hanyalah protokol.
Dengan menyeragamkan cara pelayan ini berkomunikasi dengan editor melalui LSP, pembangun boleh mencipta ciri khusus bahasa yang berfungsi dengan lancar merentas pelbagai platform, seperti Kod VS, Teks Sublime dan juga Vim.

Sekarang anda memahami asas LSP, mari kita selami membina alat penyiapan kod kita sendiri, langkah demi langkah.
Kami akan bermula dengan menggunakan sampel sambungan penyiapan sebaris yang disediakan oleh Kod VS. Anda boleh mengklonkannya terus daripada GitHub:
vscode-sample-inlinecompletion
sekarang mari kita sediakan pelayan lsp, anda boleh ikut struktur di bawah
.
├── client // Language Client
│   ├── src
│   │   ├── test // End to End tests for Language Client / Server
│   │   └── extension.ts // Language Client entry point
├── package.json // The extension manifest.
└── server // Language Server
    └── src
        └── server.ts // Language Server entry point
untuk mendapatkan maklumat lanjut, anda lihat juga lsp-sample
Kod
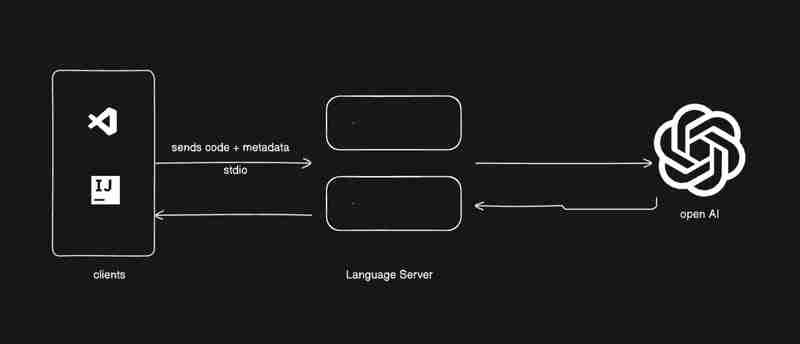
Saya akan memberi anda sedikit kod, Anda perlu mencantumkan perkara bersama saya mahu anda semua belajar. Imej di bawah menunjukkan apa yang akan kami bina.

Mari pergi ke klien/src/extension.ts dan alih keluar semua daripada fungsi aktifkan
export function activate(context: ExtensionContext) {
}
mari mulakan persediaan
- Mencipta klien lsp dan mulakannya.
- serverModule: Menuding ke laluan skrip utama pelayan bahasa.
- Pilihan nyahpepijat: Berguna untuk menjalankan pelayan dalam mod nyahpepijat.
sambungan.ts
export function activate(context: ExtensionContext) {
    const serverModule = context.asAbsolutePath(
        path.join("server", "out", "server.js")
    );

    const debugOptions = { execArgv: ['--nolazy', '--
 inspect=6009'] };

  // communication with the server using Stdio
    const serverOptions: ServerOptions = {
        run: {
            module: serverModule,
            transport: TransportKind.stdio,
        },
        debug: {
            module: serverModule,
            transport: TransportKind.stdio,
            options: debugOptions
        }
    };

        const clientOptions: LanguageClientOptions = {
        documentSelector: [{ scheme: 'file' }],
        initializationOptions: serverConfiguration
    };


     client = new LanguageClient(
        'LSP Server Name',
        serverOptions,
        clientOptions
    );

  client.start();
}
- Terima data pada pelayan lsp pergi ke pelayan/src/server.ts
Sedikit untuk maklumat
kami mempunyai pelbagai jenis protokol yang boleh kami ikuti untuk berkomunikasi antara pelayan dan pelanggan.
untuk maklumat lanjut anda boleh pergi ke microsoft-lsp-docs
Kenapa stdio? Stdio ialah salah satu protokol komunikasi yang paling banyak disokong antara pelanggan dan pelayan. Ia membolehkan pelayan LSP yang kami bina berfungsi bukan sahaja dalam Kod VS tetapi juga dalam editor lain seperti Vim dan Teks Sublime.
server.ts
const methodStore: Record<string, any> = {
  exit,
  initialize,
  shutdown,
};

process.stdin.on("data", async (bufferChuck) => {
    buffer += bufferChuck;

    while (true) {
        try {
            // Check for the Content-Length line
            const lengthMatch = buffer.match(/Content-Length: (\d+)\r\n/);
            if (!lengthMatch) break;

            const contentLength = parseInt(lengthMatch[1], 10);
            const messageStart = buffer.indexOf("\r\n\r\n") + 4;

            // Continue unless the full message is in the buffer
            if (buffer.length < messageStart + contentLength) break;

            const rawMessage = buffer.slice(messageStart, messageStart + contentLength);
            const message = JSON.parse(rawMessage);


            const method = methodStore[message.method];

            if (method) {
                const result = await method(message);

                if (result !== undefined) {
                    respond(message.id, result);
                }
            }
            buffer = buffer.slice(messageStart + contentLength);
        } catch (error: any) {

            const errorMessage = {
                jsonrpc: "2.0",
                method: "window/showMessage",
                params: {
                    type: 1, // Error type
                    message: `Error processing request: ${error.message}`
                }
            };

            const errorNotification = JSON.stringify(errorMessage);
            const errorNotificationLength = Buffer.byteLength(errorNotification, "utf-8");
            const errorHeader = `Content-Length: ${errorNotificationLength}\r\n\r\n`;

            process.stdout.write(errorHeader + errorNotification);
        }
    }
});
mulakan.ts
export const initialize = (message: RequestMessage): InitializeResult => {

    return {
        capabilities: {
            completionProvider: {
                resolveProvider: true
            },
            textDocumentSync: TextDocumentSyncKind.Incremental,
            codeActionProvider: {
                resolveProvider: true
            }
        },
        serverInfo: {
            name: "LSP-Server",
            version: "1.0.0",
        },
    };
};
keluar.ts
export const exit = () => {
    process.exit(0);
  };
tutup.ts
export const shutdown = () => {
    return null;
  };
Setelah selesai dengan fungsi asas, anda kini boleh menjalankan vscode dalam mod nyahpepijat menggunakan kekunci F5 pada papan kekunci atau ikuti panduan penyahpepijatan
Sekarang mari kita mulakan dengan menambah penyedia dalam talian dan dapatkan permintaan dan respons mengikut
Jom tambah kaedah baharu ke dalam methodStore
server.ts
const methodStore: Record<string, any> = {
  exit,
  initialize,
  shutdown,
  "textDocument/generation": generation
};
generasi.ts
export const generation = async (message: any) => {
    if(!message && message !== undefined) return {};

    const text = message.params.textDocument.text as string;

    if(!text) return {};

        const cursorText = getNewCursorText(text, message.params.position.line, message.params.position.character);

  const response = await getResponseFromOpenAI(cursorText, message.params.fsPath);

 return {
    generatedText: response,
  }

}

function getNewCursorText(text: string, line: number, character: number): string {
    const lines = text.split('\n');
    if (line < 0 || line >= lines.length) return text;

    const targetLine = lines[line];
    if (character < 0 || character > targetLine.length) return text;

    lines[line] = targetLine.slice(0, character) + '<CURSOR>' + targetLine.slice(character);
    return lines.join('\n');
}


const getResponseFromOpenAI = async (text: string, fsPath: stiring): Promise<string> => {
     const message = {
          "role": "user",
          "content": text
    };

   const systemMetaData: Paramaters = {
    max_token: 128,
    max_context: 1024,
    messages: [],
    fsPath: fsPath
   }

   const messages = [systemPrompt(systemMetaData), message]

   const chatCompletion: OpenAI.Chat.ChatCompletion | undefined = await this.open_ai_client?.chat.completions.create({
            messages: messages,
            model: "gpt-3.5-turbo",
            max_tokens: systemMetaData?.max_tokens ?? 128,
        });


        if (!chatCompletion) return "";

        const generatedResponse = chatCompletion.choices[0].message.content;

        if (!generatedResponse) return "";

        return generatedResponse;
}
template.ts
interface Parameters {
    max_tokens: number;
    max_context: number;
    messages: any[];
    fsPath: string;
}

 export const systemPrompt = (paramaters: Parameters | null) => {
    return {
        "role": "system",
        "content": `
        Instructions:
            - You are an AI programming assistant.
            - Given a piece of code with the cursor location marked by <CURSOR>, replace <CURSOR> with the correct code.
            - First, think step-by-step.
            - Describe your plan for what to build in pseudocode, written out in great detail.
            - Then output the code replacing the <CURSOR>.
            - Ensure that your completion fits within the language context of the provided code snippet.
            - Ensure, completion is what ever is needed, dont write beyond 1 or 2 line, unless the <CURSOR> is on start of a function, class or any control statment(if, switch, for, while).

            Rules:
            - Only respond with code.
            - Only replace <CURSOR>; do not include any previously written code.
            - Never include <CURSOR> in your response.
            - Handle ambiguous cases by providing the most contextually appropriate completion.
            - Be consistent with your responses.
            - You should only generate code in the language specified in the META_DATA.
            - Never mix text with code.
            - your code should have appropriate spacing.

            META_DATA:
            ${paramaters?.fsPath}`
    };
};
Mari kita daftarkan penyedia sebaris
sambungan.ts
import {languages} from "vscode";


function getConfiguration(configName: string) {
    if(Object.keys(workspace.getConfiguration(EXTENSION_ID).get(configName)).length > 0){
        return workspace.getConfiguration(EXTENSION_ID).get(configName);
    }
    return null;
}

const inLineCompletionConfig = getConfiguration("inlineCompletionConfiguration");

export function activate(context: ExtensionContext) {
 // OTHER CODE

  languages.registerInlineCompletionItemProvider(
        { pattern: "**" },
        {
            provideInlineCompletionItems: (document: TextDocument, position: Position) => {
                const mode = inLineCompletionConfig["mode"] || 'slow';
                return provideInlineCompletionItems(document, position, mode);
            },
        }

    );

}


let lastInlineCompletion = Date.now();
let lastPosition: Position | null = null;
let inlineCompletionRequestCounter = 0;

const provideInlineCompletionItems = async (document: TextDocument, position: Position, mode: 'fast' | 'slow') => {
    const params = {
        textDocument: {
            uri: document.uri.toString(),
            text: document.getText(),
        },
        position: position,
        fsPath: document.uri.fsPath.toString()
    };

    inlineCompletionRequestCounter += 1;
    const localInCompletionRequestCounter = inlineCompletionRequestCounter;
    const timeSinceLastCompletion = (Date.now() - lastInlineCompletion) / 1000;
    const minInterval = mode === 'fast' ? 0 : 1 / inLineCompletionConfig["maxCompletionsPerSecond"];

    if (timeSinceLastCompletion < minInterval) {
        await new Promise(r => setTimeout(r, (minInterval - timeSinceLastCompletion) * 1000));
    }

    if (inlineCompletionRequestCounter === localInCompletionRequestCounter) {
        lastInlineCompletion = Date.now();

        let cancelRequest = CancellationToken.None;
        if (lastPosition && position.isAfter(lastPosition)) {
            cancelRequest = CancellationToken.Cancelled;
        }
        lastPosition = position;

        try {
            const result = await client.sendRequest("textDocument/generation", params, cancelRequest);


            const snippetCode = new SnippetString(result["generatedText"]);
            return [new InlineCompletionItem(snippetCode)];
        } catch (error) {
            console.error("Error during inline completion request", error);
            client.sendNotification("window/showMessage", {
                type: 1, // Error type
                message: "An error occurred during inline completion: " + error.message
            });
            return [];
        }
    } else {
        return [];
    }
};
Blog ini menyediakan asas yang anda perlukan untuk membina alat penyiapan kod anda sendiri, tetapi perjalanan tidak berakhir di sini. Saya menggalakkan anda untuk mencuba, menyelidik dan menambah baik kod ini, meneroka pelbagai ciri LSP dan AI untuk menyesuaikan alat dengan keperluan anda.
Sesiapa yang cuba melaksanakan ini saya mahu mereka belajar, menyelidik dan mencantumkan perkara bersama-sama.
Apa yang Anda Pelajari
Memahami Pelayan LSP: Anda telah mempelajari apa itu pelayan LSP, cara ia menggerakkan alatan khusus bahasa dan sebab ia penting untuk sokongan rentas editor.
Membina Sambungan Kod VS: Anda telah meneroka cara untuk menyepadukan penyiapan kod ke dalam Kod VS menggunakan API.
Penyelesaian Kod Dipacu AI: Dengan menyambung kepada model GPT OpenAI, anda telah melihat cara pembelajaran mesin boleh meningkatkan produktiviti pembangun dengan cadangan pintar.
Jika anda sampai di sini, saya suka mengetahui apa yang telah anda pelajari.
Sila Tekan suka jika anda mempelajari sesuatu yang baharu hari ini daripada blog saya.
Hubungi saya- terpaut-Masuk
Atas ialah kandungan terperinci Membina Copilot GitHub Anda Sendiri: Panduan Langkah demi Langkah untuk Alat Penyiapan Kod. Untuk maklumat lanjut, sila ikut artikel berkaitan lain di laman web China PHP!
Artikel berkaitan
Lihat lagi- Analisis mendalam bagi komponen kumpulan senarai Bootstrap
- Penjelasan terperinci tentang fungsi JavaScript kari
- Contoh lengkap penjanaan kata laluan JS dan pengesanan kekuatan (dengan muat turun kod sumber demo)
- Angularjs menyepadukan UI WeChat (weui)
- Cara cepat bertukar antara Cina Tradisional dan Cina Ringkas dengan JavaScript dan helah untuk tapak web menyokong pertukaran antara kemahiran_javascript Cina Ringkas dan Tradisional

