
Rumah >pembangunan bahagian belakang >Golang >Mencipta Bot untuk Bluesky Social
Mencipta Bot untuk Bluesky Social

- DDDasal
- 2024-09-14 06:29:321155semak imbas
Bagaimana bot akan berfungsi
Kami akan membangunkan bot untuk rangkaian sosial Bluesky, kami akan menggunakan Golang untuk ini, bot ini akan memantau beberapa hashtag melalui websocket,
jika ia menjumpai salah satu hashteg ini, ia akan membuat siaran semula dan menyukai siaran asal.
Kami akan membincangkan beberapa perkara yang sangat menarik seperti, websocket, AT (protokol yang digunakan oleh bluesky), CAR (Content Addressable a Archive) dan CBOR (Concise Binary Object Representation) ialah dua format yang digunakan untuk menyimpan dan menghantar data dengan cekap.
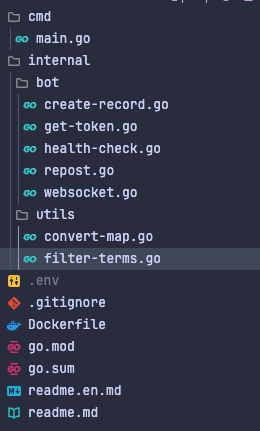
Struktur projek
Projek ini akan mempunyai struktur yang mudah, dalam dalaman kita akan mempunyai pakej yang dipanggil bot dengan semua kod untuk menjalankan bot,
dalam utils kami akan mempunyai beberapa fungsi untuk membantu kami.
Dalam fail .env kita akan mempunyai bukti kelayakan bluesky untuk mengakses api.
Menyediakan kelayakan
Untuk mengesahkan API bluesky, kami perlu menyediakan pengecam dan kata laluan, tetapi kami tidak boleh menggunakan kata laluan untuk mengakses akaun kami,
untuk melakukan ini, kami akan mencipta Kata Laluan Apl, cuma akses akaun anda dalam bluesky, akses tetapan dan kemudian Kata Laluan Apl.
Dengan kata laluan yang dijana ini, letakkannya di dalam fail .env, seperti ini:
BLUESKY_IDENTIFIER=<seu_identificador>
BLUESKY_PASSWORD=<seu_app_password>
Menjana token API
Apabila bot kami mengenal pasti hashtag baharu yang kami pantau, balasan akan dibuat, tetapi kami memerlukan token Pembawa untuk dapat membuat siaran semula,
kami akan mencipta fungsi yang menjana token, kami akan melakukan ini dalam fail get-token.go.
Mula-mula kami mentakrifkan pembolehubah global untuk url API.
var (
  API_URL = "https://bsky.social/xrpc"
)
Kini kami mentakrifkan struct kami dengan data yang akan dikembalikan oleh API.
type DIDDoc struct {
  Context            []string `json:"@context"`
  ID                 string   `json:"id"`
  AlsoKnownAs        []string `json:"alsoKnownAs"`
  VerificationMethod []struct {
    ID                 string `json:"id"`
    Type               string `json:"type"`
    Controller         string `json:"controller"`
    PublicKeyMultibase string `json:"publicKeyMultibase"`
  } `json:"verificationMethod"`
  Service []struct {
    ID              string `json:"id"`
    Type            string `json:"type"`
    ServiceEndpoint string `json:"serviceEndpoint"`
  } `json:"service"`
}

type DIDResponse struct {
  DID             string `json:"did"`
  DIDDoc          DIDDoc `json:"didDoc"`
  Handle          string `json:"handle"`
  Email           string `json:"email"`
  EmailConfirmed  bool   `json:"emailConfirmed"`
  EmailAuthFactor bool   `json:"emailAuthFactor"`
  AccessJwt       string `json:"accessJwt"`
  RefreshJwt      string `json:"refreshJwt"`
  Active          bool   `json:"active"`
}
Sekarang kami akan mencipta fungsi getToken yang mengembalikan DIDResponse (anda boleh memberikan nama apa sahaja yang anda mahu).
func getToken() (*DIDResponse, error) {
  requestBody, err := json.Marshal(map[string]string{
    "identifier": os.Getenv("BLUESKY_IDENTIFIER"),
    "password":   os.Getenv("BLUESKY_PASSWORD"),
  })
  if err != nil {
    return nil, fmt.Errorf("failed to marshal request body: %w", err)
  }

  url := fmt.Sprintf("%s/com.atproto.server.createSession", API_URL)

  resp, err := http.Post(url, "application/json", bytes.NewBuffer(requestBody))
  if err != nil {
    return nil, fmt.Errorf("failed to send request: %w", err)
  }
  defer resp.Body.Close()

  if resp.StatusCode != http.StatusOK {
    return nil, fmt.Errorf("unexpected status code: %d", resp.StatusCode)
  }

  var tokenResponse DIDResponse
  if err := json.NewDecoder(resp.Body).Decode(&tokenResponse); err != nil {
    return nil, fmt.Errorf("failed to decode response: %w", err)
  }

  return &tokenResponse, nil
}
Fungsi ini memanggil titik akhir bluesky com.atproto.server.createSession, kami akan menerima beberapa data, tetapi apa yang penting buat masa ini ialah accessJwt iaitu apa yang kami perlukan untuk membenarkan bot kami melalui Bearer, dengan itu fungsi untuk menjana token sudah siap.
Mencipta Websocket
Ini akan menjadi fungsi bot yang paling kompleks, kita perlu menggunakan titik akhir bluesky.
Mula-mula, mari buat pembolehubah untuk menyimpan titik akhir, lihat lebih banyak dalam dokumen
var (
  wsURL = "wss://bsky.network/xrpc/com.atproto.sync.subscribeRepos"
)
Sekarang mari buat struct:
type RepoCommitEvent struct {
  Repo   string      `cbor:"repo"`
  Rev    string      `cbor:"rev"`
  Seq    int64       `cbor:"seq"`
  Since  string      `cbor:"since"`
  Time   string      `cbor:"time"`
  TooBig bool        `cbor:"tooBig"`
  Prev   interface{} `cbor:"prev"`
  Rebase bool        `cbor:"rebase"`
  Blocks []byte      `cbor:"blocks"`

  Ops []RepoOperation `cbor:"ops"`
}

type RepoOperation struct {
  Action string      `cbor:"action"`
  Path   string      `cbor:"path"`
  Reply  *Reply      `cbor:"reply"`
  Text   []byte      `cbor:"text"`
  CID    interface{} `cbor:"cid"`
}

type Reply struct {
  Parent Parent `json:"parent"`
  Root   Root   `json:"root"`
}

type Parent struct {
  Cid string `json:"cid"`
  Uri string `json:"uri"`
}

type Root struct {
  Cid string `json:"cid"`
  Uri string `json:"uri"`
}

type Post struct {
  Type  string `json:"$type"`
  Text  string `json:"text"`
  Reply *Reply `json:"reply"`
}
Kami juga akan menggunakan pakej Gorilla Websocket, muat turun pakej dengan:
go get github.com/gorilla/websocket
fungsi Websocket pada mulanya kelihatan seperti ini:
func Websocket() error {
  conn, _, err := websocket.DefaultDialer.Dial(wsURL, nil)
  if err != nil {
    slog.Error("Failed to connect to WebSocket", "error", err)
    return err
  }
  defer conn.Close()

  for {
    _, message, err := conn.ReadMessage()
    if err != nil {
      slog.Error("Error reading message from WebSocket", "error", err)
      continue
    }
  }
}
Dengan ini kita kini boleh membaca mesej yang diterima melalui soket web dengan infiniti untuk, tetapi mesej dikodkan dalam CBOR.
Apakah CBOR?
CBOR (Concise Binary Object Representation) ialah format data binari yang digunakan untuk mewakili data dengan cara yang padat dan cekap.
Ia serupa dengan JSON, tetapi bukannya menggunakan teks yang boleh dibaca manusia, ia menggunakan bait binari, yang menjadikannya lebih kecil dan lebih pantas untuk dihantar dan diproses.
Untuk menyahkodnya, kami perlu menggunakan pakej ini.
decoder := cbor.NewDecoder(bytes.NewReader(message))
Hanya tukar mesej kepada pembaca, seperti ini:
func Websocket() error {
  conn, _, err := websocket.DefaultDialer.Dial(wsURL, nil)
  if err != nil {
    slog.Error("Failed to connect to WebSocket", "error", err)
    return err
  }
  defer conn.Close()

  slog.Info("Connected to WebSocket", "url", wsURL)

  for {
     _, message, err := conn.ReadMessage()
    if err != nil {
      slog.Error("Error reading message from WebSocket", "error", err)
      continue
    }

    decoder := cbor.NewDecoder(bytes.NewReader(message))

    for {
      var evt RepoCommitEvent
      err := decoder.Decode(&evt)
      if err == io.EOF {
        break
      }
      if err != nil {
        slog.Error("Error decoding CBOR message", "error", err)
        break
      }
    }
  }
}
decoder.Decode(&evt): Penyahkod bertanggungjawab untuk membaca data yang diterima dan menyahkodnya daripada format CBOR kepada jenis RepoCommitEvent. Evt menyimpan data yang dinyahkod.
jika tersilap == io.EOF { break }: Jika penyahkod mencapai penghujung data (tiada lagi mesej), ia mengembalikan io.EOF (akhir fail). Apabila ini berlaku, gelung terganggu dengan putus, kerana tiada lagi data untuk diproses.
Mencipta handleEvent
Mari kita cipta fungsi untuk memproses acara:
func handleEvent(evt RepoCommitEvent) error {
  for _, op := range evt.Ops {
    if op.Action == "create" {
      if len(evt.Blocks) > 0 {
        err := handleCARBlocks(evt.Blocks, op)
        if err != nil {
          slog.Error("Error handling CAR blocks", "error", err)
          return err
        }
      }
    }
  }

  return nil
}
parameter evt: Fungsi menerima parameter evt, iaitu peristiwa jenis RepoCommitEvent. Acara ini mengandungi senarai operasi Ops dan mungkin Menyekat blok data yang berkaitan dengan operasi ini.
Gelung atas Ops: Acara evt boleh mengandungi berbilang operasi. Kod ini berulang melalui setiap operasi ini menggunakan gelung untuk _, op := julat evt.Ops.
Menyemak op.Action == "buat" tindakan: Untuk setiap operasi, kod menyemak sama ada tindakan yang berkaitan dicipta, iaitu, jika operasi mencipta sesuatu yang baharu dalam bluesky, seperti siaran atau jenis kandungan lain.
Jika terdapat Blok len(evt.Blok) > 0: Jika operasi cipta dikesan, kod menyemak sama ada acara itu mengandungi blok data Sekat. Blok ini mengandungi maklumat tambahan yang mungkin berkaitan dengan operasi.
Memproses blok pemegangCARBlocks: Jika ada blok, fungsi pemegangCARBlocks dipanggil untuk memproses blok ini. Fungsi ini bertanggungjawab untuk mentafsir data dalam blok (Kami akan meliputi CAR di bawah).
What is CAR?
CAR (Content Addressable Archive) is an archive format that stores data efficiently and securely using content addressing. This means that each piece of data is identified by its content rather than a specific location.
Here is a simple explanation:
Content Identified by Hash: Each block of data in a CAR file is identified by a hash (a unique identifier generated from the content of the data). This ensures that the same piece of data always has the same identifier.
Used in IPFS and IPLD: CAR is widely used in systems such as IPFS (InterPlanetary File System) and IPLD (InterPlanetary Linked Data), where data is distributed and retrieved over the network based on content rather than location like bluesky.
Data Blocks: A CAR file can store multiple blocks of data, and each block can be retrieved individually using its content identifier (CID).
Efficient and Safe: Since a block's identifier depends on its content, it is easy to verify that the data is correct and has not been altered.
This is a very simple explanation, if you want to go deeper, I recommend accessing this.
Creating the handleCARBlocks
This will be the most complex function of the bot:
func handleCARBlocks(blocks []byte, op RepoOperation) error {
  if len(blocks) == 0 {
    return errors.New("no blocks to process")
  }

  reader, err := carv2.NewBlockReader(bytes.NewReader(blocks))
  if err != nil {
    slog.Error("Error creating CAR block reader", "error", err)
    return err
  }

  for {
    block, err := reader.Next()
    if err == io.EOF {
        break
    }
    if err != nil {
      slog.Error("Error reading CAR block", "error", err)
      break
    }

    if opTag, ok := op.CID.(cbor.Tag); ok {
      if cidBytes, ok := opTag.Content.([]byte); ok {
        c, err := decodeCID(cidBytes)
        if err != nil {
          slog.Error("Error decoding CID from bytes", "error", err)
          continue
        }

        if block.Cid().Equals(c) {
          var post Post
          err := cbor.Unmarshal(block.RawData(), &post)
          if err != nil {
            slog.Error("Error decoding CBOR block", "error", err)
            continue
          }

          if post.Text == "" || post.Reply == nil {
            continue
          }

          if utils.FilterTerms(post.Text) {
            repost(&post) // we will still create
          }
        }
      }
    }
  }

  return nil
}
We will still create the repost() function, we will pass a pointer to *Post as a parameter.
Remember that our bot only monitors post comments, if a post is created and the hashtag we are monitoring is inserted, the repost will not be made, this
validation if post.Text == "" || post.Reply == nil will prevent it, it is necessary to have a reply and this only happens if it is a comment on a post.
The handleCARBlocks function processes data blocks in CAR format. Let's understand step by step what the function does in a simple way:
- Initial Block Verification:
if len(blocks) == 0 {
  return errors.New("no blocks to process")
}
If the blocks are empty, the function returns an error saying that there are no blocks to process.
- Creating a CAR Block Reader:
reader, err := carv2.NewBlockReader(bytes.NewReader(blocks))
The function creates a block reader to interpret the data contained in the CAR file, we are using the packages carV2 and go-cid
To install, run:
go install github.com/ipld/go-car/cmd/car@latest
go get github.com/ipfs/go-cid
- Reading the Blocks:
for {
  block, err := reader.Next()
    if err == io.EOF {
      break
    }
}
The function enters a loop to read all data blocks one by one. When all blocks are read (i.e. the end is reached), the loop stops.
- Checking the CID:
if opTag, ok := op.CID.(cbor.Tag); ok {
  if cidBytes, ok := opTag.Content.([]byte); ok {
    c, err := decodeCID(cidBytes)
The function checks whether the operation contains a CID (Content Identifier) that can be decoded. This CID identifies the specific content of the block.
- Comparing and Decoding the Block:
if block.Cid().Equals(c) {
  var post Post
  err := cbor.Unmarshal(block.RawData(), &post)
If the block read has the same CID as the operation, the block content is decoded into a format that the function understands, such as a "Post".
- Filtering the Post:
if post.Text == "" || post.Reply == nil {
  continue
}
if utils.FilterTerms(post.Text) {
  repost(&post)
}
If the post has text and a reply, it is filtered with a function called FilterTerms. If it passes the filter, it is reposted.
Creating decodeCID
The decodeCID function is responsible for decoding a content identifier (CID) from a set of bytes. It takes these bytes and tries to transform them into a CID that can be used to identify blocks of data.
func decodeCID(cidBytes []byte) (cid.Cid, error) {
  var c cid.Cid
  c, err := cid.Decode(string(cidBytes))
  if err != nil {
    return c, fmt.Errorf("error decoding CID: %w", err)
  }

  return c, nil
}
With that, we have the Websocket ready.
Creating the Hashtag Filter
Let's create the following within utils in filter-terms.go:
var (
  terms = []string{"#hashtag2", "#hashtag1"}
)

func FilterTerms(text string) bool {
  for _, term := range terms {
    if strings.Contains(strings.ToLower(text), strings.ToLower(term)) {
      return true
    }
  }
  return false
}
It is in this function that we define the hashtags to be monitored, in a simple way we receive a text that comes from the websocket and filter it based on the terms.
Creating createRecord
Let's create a function called createRecord in the create-record.go file, which will be responsible for creating a repost or a like, depending on the $type that is sent via parameter.
First, let's create a struct with the parameters we will need:
type CreateRecordProps struct {
  DIDResponse *DIDResponse
  Resource    string
  URI         string
  CID         string
}
- DIDResponse: We will use it to extract the authorization token.
- Resource: It will be used to inform whether we are going to do a like or repost.
- URI: It will be used to inform the uri of the original post.
- CID: This is what we extracted from the CAR, used as an identifier.
The final function will look like this:
func createRecord(r *CreateRecordProps) error {
  body := map[string]interface{}{
    "$type":      r.Resource,
    "collection": r.Resource,
    "repo":       r.DIDResponse.DID,
    "record": map[string]interface{}{
      "subject": map[string]interface{}{
        "uri": r.URI,
        "cid": r.CID,
      },
      "createdAt": time.Now(),
    },
  }

  jsonBody, err := json.Marshal(body)
  if err != nil {
    slog.Error("Error marshalling request", "error", err, "resource", r.Resource)
    return err
  }

  url := fmt.Sprintf("%s/com.atproto.repo.createRecord", API_URL)
  req, err := http.NewRequest("POST", url, bytes.NewBuffer(jsonBody))
  if err != nil {
    slog.Error("Error creating request", "error", err, "r.Resource", r.Resource)
    return nil
    }
  req.Header.Set("Authorization", fmt.Sprintf("Bearer %s", r.DIDResponse.AccessJwt))
  req.Header.Set("Content-Type", "application/json")

  client := &http.Client{}
  resp, err := client.Do(req)
  if err != nil {
    slog.Error("Error sending request", "error", err, "r.Resource", r.Resource)
    return nil
  }
  if resp.StatusCode != http.StatusOK {
    slog.Error("Unexpected status code", "status", resp, "r.Resource", r.Resource)
    return nil
  }

  slog.Info("Published successfully", "resource", r.Resource)

  return nil
}
It's simple to understand, we make a POST to the API_URL/com.atproto.repo.createRecord endpoint, informing that we are going to create a record, in the body we inform the $type, which informs the bluesky API the type of record we are going to create, then we assemble the request, inserting the bearer token and we do some error handling, simple, isn't it?
This way we can use the createRecord function to create several records, changing only the $type.
Sending the repost and like to Bluesky
With createRecord ready, it's simple to create the repost, let's do this in the repost.go file:
func repost(p *Post) error {
  token, err := getToken()
  if err != nil {
    slog.Error("Error getting token", "error", err)
    return err
  }

  resource := &CreateRecordProps{
    DIDResponse: token,
    Resource:    "app.bsky.feed.repost",
    URI:         p.Reply.Root.Uri,
    CID:         p.Reply.Root.Cid,
  }

  err = createRecord(resource)
  if err != nil {
    slog.Error("Error creating record", "error", err, "resource", resource.Resource)
    return err
  }

  resource.Resource = "app.bsky.feed.like"
  err = createRecord(resource)
  if err != nil {
    slog.Error("Error creating record", "error", err, "resource", resource.Resource)
    return err
  }

  return nil
}
We receive a pointer to the *Post from the Websocket() function, we set up the CreateRecordProps informing that we are going to make a repost through the app.bsky.feed.repost resource, and finally we call createRecord.
After creating the post, we will give it a like (optional), just call createRecord again, but now with the app.bsky.feed.like resource, since we created the resource in a variable, just set a new value, which is what we do resource.Resource = "app.bsky.feed.like".
With that, we can now make the repost and the like.
Creating a health check
This part is optional, it will be used only for deployment, it will be used by the hosting service to check if our bot is still working, it is a very simple endpoint that only returns a status code 200.
Let's do it in the health-check.go file:
func HealthCheck(w http.ResponseWriter, r *http.Request) {
  w.WriteHeader(http.StatusOK)
}
The HealthCheck function returns only a w.WriteHeader(http.StatusOK), this could be done directly in the main.go file, which is where we will start our web server, but I chose to separate it.
Getting the bot up and running
Well, now we just need to get everything running, let's do that in main.go:
func main() {
  slog.Info("Starting bot")
  err := godotenv.Load()
  if err != nil {
    slog.Error("Error loading .env file")
  }

  go func() {
    http.HandleFunc("/health", bot.HealthCheck)
    slog.Info("Starting health check server on :8080")

    if err := http.ListenAndServe(":8080", nil); err != nil {
      log.Fatal("Failed to start health check server:", err)
    }
  }()

  err = bot.Websocket()
  if err != nil {
    log.Fatal(err)
  }
}
Very simple too:
- err := godotenv.Load(): We use the godotenv package to be able to access the variables of the .env locally.
- go func(): We start our webserver for the HealthCheck in a goroutine.
- err = bot.Websocket(): Finally we start the Websocket.
Now, let's run:
go run cdm/main.go
We will have the bot running:
2024/09/13 09:11:31 INFO Starting bot
2024/09/13 09:11:31 INFO Starting health check server on :8080
2024/09/13 09:11:32 INFO Connected to WebSocket url=wss://bsky.network/xrpc/com.atproto.sync.subscribeRepos
We can test it on Bluesky, I used the hashtag #bot-teste for testing purposes, let's create a post and comment on it:
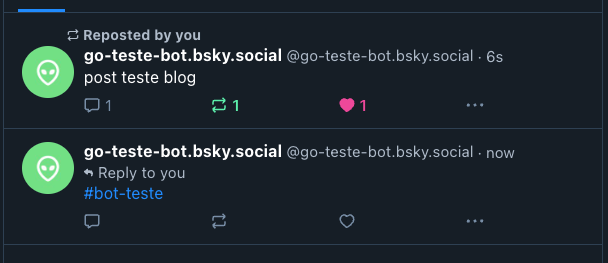
See that the repost was made and now it has the like, and in the terminal we have the logs:
2024/09/13 09:14:16 INFO Published successfully resource=app.bsky.feed.repost
2024/09/13 09:14:16 INFO Published successfully resource=app.bsky.feed.like
Final considerations
We have covered how to create a bot for the Bluesky social network, using Golang and various technologies such as Websockets, AT Protocol, CAR and CBOR.
The bot is responsible for monitoring specific hashtags and, when it finds one of them, it reposts and likes the original post.
This is just one of the features we can do with the bot, the Bluesky API is very complete and allows for several possibilities, you can use this bot and add new features ?.
Links
See the post on my blog here
Subscribe and receive notification of new posts, participate
repository of the project
bot profile on Bluesky
Bluesky documentation
Gopher credits
Atas ialah kandungan terperinci Mencipta Bot untuk Bluesky Social. Untuk maklumat lanjut, sila ikut artikel berkaitan lain di laman web China PHP!
Artikel berkaitan
Lihat lagi- Gunakan go clean untuk menyelenggara projek Go dengan mudah
- Nilai pulangan fungsi golang
- Bagaimanakah Anda Boleh Menukar Senarai Rentetan Laluan dengan Cekap kepada Struktur Seperti Pokok?
- Mengapa Saya Tidak Boleh Mengimport Pakej Tempatan dari dalam $GOPATH/src/projek?
- Bagaimana untuk Mengawal Akses Fail dalam Windows dengan Go?