Rumah  >  Artikel  >  hujung hadapan web  >  Cipta Jadual dalam HTML

Cipta Jadual dalam HTML

王林
王林asal
2024-09-04 16:37:511188semak imbas

Jadual HTML mempunyai beberapa baris dan lajur yang boleh kita masukkan, susun dan paparkan data. Data ini kemudiannya ditunjukkan pada halaman web dalam format jadual. Jadual ini membantu kami mempersembahkan data dalam cara yang teratur, seperti memaparkan senarai item, menunjukkan data jadual seperti laporan jualan, membuat reka letak untuk bahagian halaman web, dll.

Dalam artikel ini, kita akan belajar cara mencipta jenis jadual HTML berikut:

  • Meja Mudah
  • Meja dengan sempadan dan pelapik
  • Meja dengan penggayaan
  • Jadual dengan kapsyen
  • Meja dengan jadual bersarang
  • Jadual dengan rentang kol dan rentang baris
  • Meja dengan colgroup

Keperluan untuk Mencipta Jadual dalam HTML

  1. Editor teks atau editor HTML: Buka editor teks atau editor HTML seperti Notepad++, Teks Sublime atau Kod Visual Studio untuk menulis dan menyimpan kod HTML anda. Kami telah menggunakan Notepad++ sebagai editor lalai kami, tetapi anda boleh menggunakan mana-mana editor yang anda suka.
  2. Fail HTML: Cipta fail baharu dalam Notepad++. Mari namakannya "table.html" atau mana-mana nama lain yang anda suka, tetapi ingat untuk menamatkan nama fail dengan ".html". Fail ini ialah tempat anda akan menulis kod anda untuk halaman web anda. Jika anda memerlukan bantuan untuk mencipta fail ini, anda boleh menyemak tutorial kami, "Reka Bentuk Halaman Web dalam HTML."
  3. Kod HTML: Kami telah menyediakan semua kod penting dalam artikel ini untuk mencipta pelbagai jenis jadual. Hanya salin dan tampal kod ke dalam fail “table.html” anda.
  4. Pelayar web: Selepas anda selesai menulis kod HTML anda dalam fail “table.html”, anda perlu melihat dan menguji halaman web anda. Anda boleh menggunakan penyemak imbas web seperti Google Chrome, Mozilla Firefox atau Microsoft Edge. Kami telah menggunakan Google Chrome untuk melihat halaman web untuk semua contoh dalam artikel ini, tetapi anda boleh memilih mana-mana penyemak imbas yang anda suka.

Teg Digunakan dalam HTML

Sebelum mencipta jadual dalam HTML, adalah penting untuk memahami teg yang digunakan untuk mencipta dan menyusunnya. Berikut ialah teg utama yang digunakan untuk membuat jadual HTML:

Tag Description
Defines a table and its content.
Defines a title or caption for a table.
Groups the header content in a table.
Groups the body content in a table.
Groups the footer content in a table.
Defines a table row.
Defines a table header cell.
Defines a table data/cell.
Specifies a set of one or more columns in a table for the purpose of formatting.
Defines the attributes for a group of columns in a table.
Teg
Penerangan

Examples of Tables in HTML

Example 1: Simple Table

Let’s create a basic HTML table that showcases product information. We will include two columns labeled “Product” and “Price.” The table will contain a single row displaying data for the product “Apple” with a price of $20.

To create a simple HTML table:

  1. Open an HTML file in a text or HTML editor.
  2. Add the
Mentakrifkan jadual dan kandungannya.
Mentakrifkan tajuk atau kapsyen untuk jadual.
Kumpulkan kandungan pengepala dalam jadual.
Kumpulkan kandungan kandungan dalam jadual.
Kumpulkan kandungan pengaki dalam jadual.
Mentakrifkan baris jadual.
Mentakrifkan sel pengepala jadual.
Mentakrifkan data/sel jadual.
Menentukan set satu atau lebih lajur dalam jadual untuk tujuan pemformatan.
Mentakrifkan atribut untuk sekumpulan lajur dalam jadual.
element to define the table.
  • Use the
  • element to create table rows.
  • The
  • tag. For instance, you can use style=”background-color: #33cccc;” to set the background color to a nice shade of teal.

    Code:

    <table>
    <tr>
    <th style="background-color: #33cccc;">Country</th>
    <th style="background-color: #33cccc;">Population</th>
    <th style="background-color: #33cccc;">Capital</th>
    </tr>
    <tr>
    <td>Spain</td>
    <td>47 Million</td>
    <td>Madrid</td>
    </tr>
    <tr>
    <td>Finland</td>
    <td>5.5 Million</td>
    <td>Helsinki</td>
    </tr>
    </table>

    Output:
    Cipta Jadual dalam HTML

    Example 4: Table with Caption

    Using an HTML table with a caption is a great way to present information on a webpage in a tidy and organized manner. It’s like giving your table a title or a brief description to help people grasp its content easily. To include a caption, all you have to do is use the

    element defines table headers (column labels).
  • Use the
  • element to create table cells (data).
  • Insert the desired data within the table cells.
  • Save the file with the .html extension, and then open it in a web browser to view the table.
  • Code:

    <!DOCTYPE html>
    <html>
    <head>
    <title>Simple Table</title>
    </head>
    <body>
    <table>
    <tr>
    <th>Product</th>
    <th>Price</th>
    </tr>
    <tr>
    <td>Apple</td>
    <td>$20</td>
    </tr>
    </table>
    </body>
    </html>

    Output:
    The resultant table for product and price will be displayed as seen below:
    Cipta Jadual dalam HTML

    To add an additional column to the table in the example, you can use the

    element within your table’s column. This element is used to define header cells for the column.

    And if you want to add a new row to the table, you can use the

    element. This element is used to define regular cells within the table row.

    Code:

    <table>
    <tr>
    <th>Product</th>
    <th>Price</th>
    <th>Quantity</th>
    </tr>
    <tr>
    <td>Apple</td>
    <td>$20</td>
    <td>10</td>
    </tr>
    <tr>
    <td>Orange</td>
    <td>$10</td>
    <td>15</td>
    </tr>
    </table>

    Output:
    Cipta Jadual dalam HTML

    Let’s see how to add borders to an HTML table. This is a way to visually separate the different sections of the table and make it easier to read and understand.

    Example 2: Table with Borders and Padding

    In this example, we will add a table element and set the border and cellpadding attribute. We will use the border attribute and set the width of the table’s border to 1 pixel. For the cellpadding attribute, we will use 5 pixels of padding for the content inside each cell.

    Code:

    <table border="1" cellpadding="5">
    <tr>
    <th>Name</th>
    <th>Age</th>
    <th>Country</th>
    </tr>
    <tr>
    <td>Michael</td>
    <td>27</td>
    <td>Alaska</td>
    </tr>
    <tr>
    <td>Evelyn</td>
    <td>32</td>
    <td>Ohio</td>
    </tr>
    </table>

    Output:
    Cipta Jadual dalam HTML

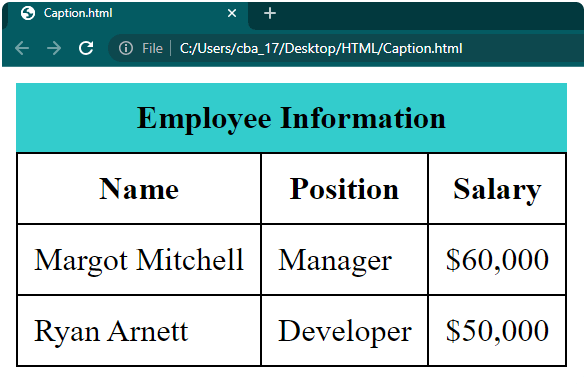
    Example 3: Table with Styling

    If you want to improve the appearance of your table, you can use CSS (Cascading Style Sheets) to add various styles and formatting.

    One way to enhance the table is by giving different cells a background color. To do this, you can simply add the style attribute with the background-color property inside the opening

    tag and place it right below the tag.

    Code:

    <style>
    table {
    border-collapse: collapse;
    }
    th, td {
    border: 1px solid black;
    padding: 8px;
    }
    caption {
    background-color: #33cccc;
    padding: 8px;
    font-weight: bold;
    }
    </style>
    <table>
    <caption>Employee Information</caption>
    <tr>
    <th>Name</th>
    <th>Position</th>
    <th>Salary</th>
    </tr>
    <tr>
    <td>Margot Mitchell</td>
    <td>Manager</td>
    <td>$60,000</td>
    </tr>
    <tr>
    <td>Ryan Arnett</td>
    <td>Developer</td>
    <td>$50,000</td>
    </tr>
    </table>

    Output:
    Cipta Jadual dalam HTML

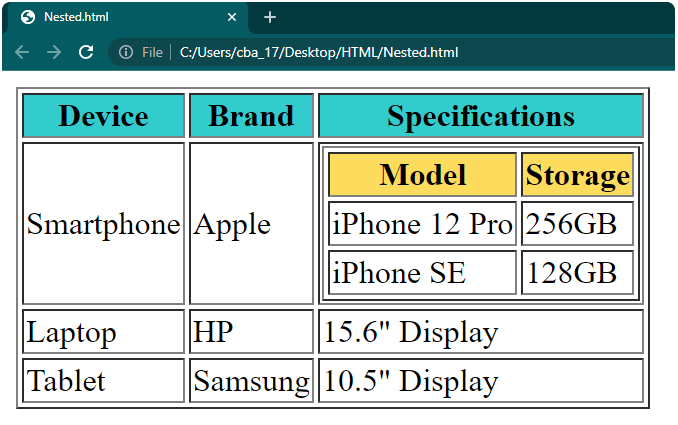
    Example 5: Table with Nested Tables

    In HTML, when we talk about a nested table, it means we have a table placed inside another table. So, basically, some cells in the outer table contain a whole new table structure within them. If you want to include a nested table, you just need to insert another table inside any cell of your main table. To understand better, here is an example:

    Code:

    <table border="1">
    <tr>
    <th style="background-color: #33cccc;">Device</th>
    <th style="background-color: #33cccc;">Brand</th>
    <th style="background-color: #33cccc;">Specifications</th>
    </tr>
    <tr>
    <td>Smartphone</td>
    <td>Apple</td>
    <td>
    <table border="1">
    <tr>
    <th style="background-color: #fddb5d;">Model</th>
    <th style="background-color: #fddb5d;">Storage</th>
    </tr>
    <tr>
    <td>iPhone 12 Pro</td>
    <td>256GB</td>
    </tr>
    <tr>
    <td>iPhone SE</td>
    <td>128GB</td>
    </tr>
    </table>
    </td>
    </tr>
    <tr>
    <td>Laptop</td>
    <td>HP</td>
    <td>15.6" Display</td>
    </tr>
    <tr>
    <td>Tablet</td>
    <td>Samsung</td>
    <td>10.5" Display</td>
    </tr>
    </table>

    Output:
    Cipta Jadual dalam HTML

    Example 6: Table with Col Span and Row Span

    In HTML, the “colspan” and “rowspan” give you the power to merge or split cells horizontally (colspan) and vertically (rowspan) to create more advanced table structures.

    If you want to merge cells horizontally, simply use “colspan” followed by the number of cells you want to merge. And if you want to merge cells vertically, you can use “rowspan” along with the number of cells you want to merge.

    To use the colspan and rowspan attributes, you can add them directly within the

    element to group columns in an HTML table. We can also use the tag within the tag to set a background color for specific columns. To implement this, you can simply add a right after the opening
    or elements that you want to merge.

    Code:

    <!DOCTYPE html>
    <html>
    <head>
    <style>
    table {
    border-collapse: collapse;
    width: 100%;
    }
    th, td {
    border: 1px solid black;
    padding: 8px;
    text-align: left;
    }
    .football {
    background-color: #33cccc;
    }
    .tennis {
    background-color: #33cccc;
    }
    .lebron {
    background-color: #fddb5d;
    }
    .heading {
    background-color: #808080; /* Grey */
    color: #fff; /* White */
    }
    </style>
    </head>
    <body>
    <table>
    <tr>
    <th class="heading">Sport</th>
    <th colspan="2" class="heading">Player</th>
    </tr>
    <tr>
    <td rowspan="2" class="football">Football</td>
    <td>Lionel Messi</td>
    <td>Cristiano Ronaldo</td>
    </tr>
    <tr>
    <td>Neymar</td>
    <td>Harry Kane</td>
    </tr>
    <tr>
    <td class="tennis" rowspan="2">Tennis</td>
    <td>Novak Djokovic</td>
    <td>Rafael Nadal</td>
    </tr>
    <tr>
    <td>Serena Williams</td>
    <td>Naomi Osaka</td>
    </tr>
    <tr>
    <td>Basketball</td>
    <td colspan="2" class="lebron">LeBron James</td>
    </tr>
    </table>
    </body>
    </html>

    Output: 
    Cipta Jadual dalam HTML

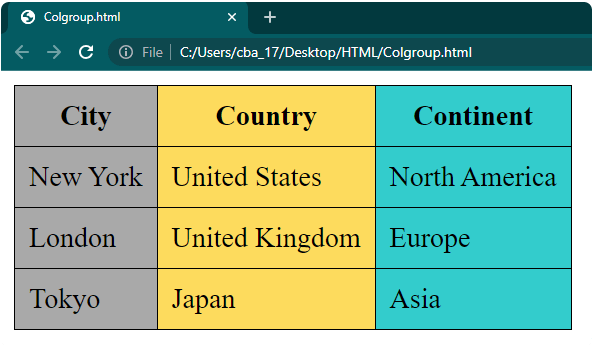
    Example 7: Table with Colgroup

    In HTML, we use the

    tag.

    Code:

    <!DOCTYPE html>
    <html>
    <head>
    <style>
    table {
    border-collapse: collapse;
    }
    th, td {
    border: 1px solid black;
    padding: 8px;
    }
    </style>
    </head>
    <body>
    <table>
    <colgroup>
    <col style="background-color: #a9a9a9;">
    <col style="background-color: #fddb5d;">
    <col style="background-color: #33cccc;">
    </colgroup>
    <tr>
    <th>City</th>
    <th>Country</th>
    <th>Continent</th>
    </tr>
    <tr>
    <td>New York</td>
    <td>United States</td>
    <td>North America</td>
    </tr>
    <tr>
    <td>London</td>
    <td>United Kingdom</td>
    <td>Europe</td>
    </tr>
    <tr>
    <td>Tokyo</td>
    <td>Japan</td>
    <td>Asia</td>
    </tr>
    </table>
    </body>
    </html>

    Output: 
    Cipta Jadual dalam HTML

    Atas ialah kandungan terperinci Cipta Jadual dalam HTML. Untuk maklumat lanjut, sila ikut artikel berkaitan lain di laman web China PHP!

    Kenyataan:
    Kandungan artikel ini disumbangkan secara sukarela oleh netizen, dan hak cipta adalah milik pengarang asal. Laman web ini tidak memikul tanggungjawab undang-undang yang sepadan. Jika anda menemui sebarang kandungan yang disyaki plagiarisme atau pelanggaran, sila hubungi admin@php.cn
    Artikel sebelumnya:Elemen Semantik HTML5Artikel seterusnya:Elemen Semantik HTML5